Einleitung

Nur Grundständige Anleitung: Trenne den Akku eines iPhone 6s

  1. UCFVo6ViPYHOBoSr
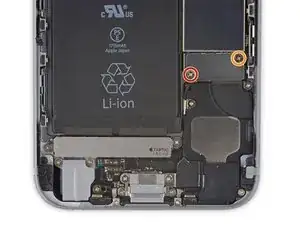
    • Entferne die beiden Kreuzschlitzschrauben von der Kabelabdeckung des Akkuanschlusses. Sie haben folgende Längen:

    • Eine 2,9 mm Schraube

    • Eine 2,2 mm Schraube

    • Achte bei der gesamten Reparatur darauf, dass deine Schrauben geordnet bleiben und sorge dafür, dass sie wieder genau an ihren ursprünglichen Platz zurück kommen, damit dein Smartphone nicht beschädigt wird

    In order to put the correct screw back where you took it out mark the head surface and a small dot beside the hole with a pen. Use coloured pens if you want the exact location for each screw/hole. This goes for steps 17, (23) and 29 too.

    lionno1 -

    Please! Please! Please! Invest in a Magnetic Project Mat or its equivalent from fixit. It will assist you with completing your repair.

    Ian Baldwin -

    I just taped down a 8.5 x 11 white piece of paper on my desk and drew a rough image of it, then ‘taped’ the screw I removed to the “image” on paper. It worked just fine. (My first time ever opening an iphone, so give it a shot!)

    italianchick99 -

    If you missed it from the beginning (like I did) it’s the #000 Philips for all screws except the Pentalobes.

    Max Cox -

    if you get a plastic ice cube tray, and a fine marker pen, text the sizes on each cube compartment as you follow the guide, also stops the screws getting lost

    Brendan Cranny -

    used sheet of A4 paper and bluetak - stick screw in bluetak, write location & size on paper

    Kev Salmon -

    mine is missing a screw!!! this is bs! this was mynmithers ohone nonone ooened it….one screw only…im liesed offf

    makinfilms -

    For some odd reason the screw “One 2.2 mm screw “ orange circled seems to be stuck and can not be unscrewed.

    Ahitagni Mandal -

    that could be because of the threaded part might have been broken (i've run into that a few times) never fun but pretty easy to work around it if needed

    Andre G. Bashore -

    Take a picture of the opened phone. Print it out. Put double sided clear tape over the picture of each screw. Stick the screws to the tape on the picture where they belong.

    Jeffrey Smith -

    Rounded corner, both here and Display cover, takes the Longest screw.

    David.

    David -

    For removing screws, I used a piece of paper and sketched the screw locations and screw sizes in the appropriate pattern for each step I was working on removing screws. I folded clear packing tape in a loop so some sticky area was on top for each screw so they did not fly away when the hair dryer was on or in case I knocked the paper while working beside it. This kept all the screws in an easy pattern with descriptions for later install. Worked slick.

    Keith Paget -

    Ordered a replacement kit, opened my Iphone 6S, got to this step... surprise, my OEM battery connector is at the TOP ! I am stuck, what now?

    Michel Lavallee -

  2. Tkg3BNWC4uLteBVu
    Tkg3BNWC4uLteBVu
    OCYCpUjUcUb4fpD5
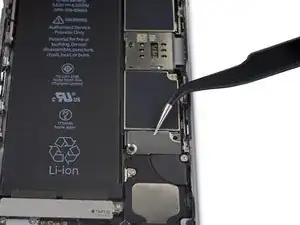
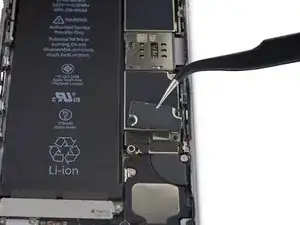
    • Entferne die Kabelabdeckung des Akkuanschlusses.

    Little bit of adhesive holds this down- you do have to use the tiniest bit of force.

    Edward Coe -

    Pay careful attention to the orientation of this plate so that when it comes to re-installation you put it back the correct way. Sounds obvious but I’ve found it inverted in one customer’s phone, which led symptoms of charging failures and repeated spontaneous restarts.

    Jonathan Bradley -

    that's something i've never heard happening before wow

    Andre G. Bashore -

    The replacement battery’s connector is just slightly thicker vs the original. When I put the screen back on (also a replacement part from Ifixit) I get a blue shadow because the battery connector is putting pressure on the screen.

    steven pruchniewski -

  3. aFOebibjGPDG3kKj
    aFOebibjGPDG3kKj
    bmSuTNCd2VYuDBgj
    JUQVpTsWOMexRdXU
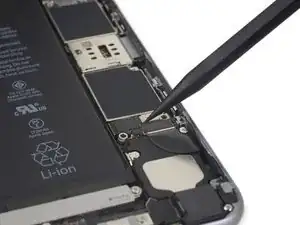
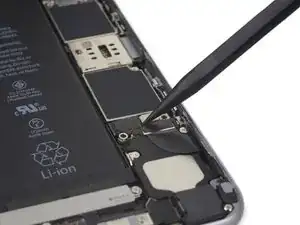
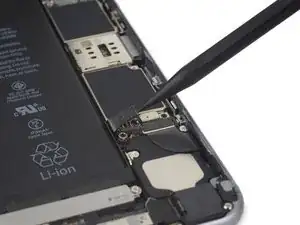
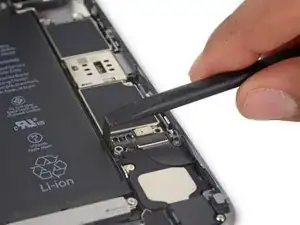
    • Heble den Akkustecker mit dem spitzen Ende eines Spudgers vorsichtig von seinem Anschluss auf dem Logic Board.

    Be sure not to skip this step. It is crucial. I have had many repairs where the screen will not light up after the repair if the battery had not been disconnected and reconnected.

    Andrew spoelstra -

    Thanks for the tip, Andrew.

    William Turner -

    It should also be mentioned, DO NOT USE A METAL SPUDGER. You could short the battery to other nearby metal parts. I've done that, the battery clip arced to the metal cover on some of the logic board chips, and my phone wouldn't power back on for 3 days. They should put a caution caption on this step. I've had this happen on a 5S as well.

    Frank -

    Thanks for the tip, Frank.

    William Turner -

    SERIOUS WARNING!: During *reassembly*, you should NOT reconnect the battery connector until the VERY LAST step (upon reassembly!), as many people, including myself, apparently have smoked (burned, destroyed) the main Logic board. This happens when you reconnect the LCD/digitizer assembly FPC cable. ifixit should modify this instruction to be very explicit about this!

    enoughstatic -

    It sounds like several people, including myself, had trouble charging the new replacement battery past about 10%. This ended up being due to the new battery not having a non-conductive insulator. The way to solve this is by adding a small piece of electrical tape to cover the battery connector before screwing in the battery connector bracket over it. You may want to do this on the first go-around.

    If you do experience that problem, I found the answer here and it worked perfectly: iPhone battery not charging after DIY battery replacement. Why?

    Heather Pastushok -

    Thanks to Heather Pastushok (and Behrang Mohajer at “iPhone battery not charging . . .) for this important detail. My iFixit battery came with a thin layer of black foam insulation on the top surface of the battery connector, but even gentle pressure from a blunt plastic tool (pushing the connector in place) scraped an exposed spot. A carefully trimmed piece of black electrician's tape provided peace of mind. The iPhone 6s is good as new with the battery now at 100%!

    Robert Dering -

    To reduce risk of battery arcing , as soon as the old battery connector was detached, I wrapped it with insulation from connection all the way to the battery body. Did the same with the new battery to eliminate concerns about shorts while checking fit position to assure the connector would match up with the receiver. Only removed the insulation after all other connections had been restored, so plugging in the battery was the last step before closing the case.

    Robert Dering -

  4. EmMxeVeeFdYTQXiE
    EmMxeVeeFdYTQXiE
    URwJFPnPqkwAgWJ3
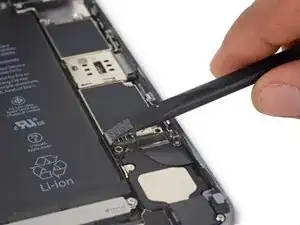
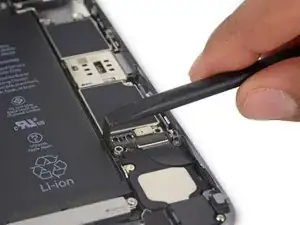
    • Drücke den Akkustecker vom Logic Board weg, so dass es während der Reparatur nicht zu einer unbeabsichtigten Verbindung mit dem Anschluss kommt.

    If you remove the grey bar with the word “TAPTIC” next, removal of the battery adhesive is much easier. It can be pulled straighter back with less chance of tearing. Here’s an image with the securing screws identified.

    If you securely anchor the screen to a can of soup, it is not necessary complete step 16 Front Panel Assembly. I was able to remove the two bottom (1.2 mm) screws and the 2.8 mm screw, but could not get the upper (1.2 mm) screw. I was able to remove the old battery with the Front Panel Assembly left in place.

    Edward Dziuk -

    Amazing tip Edward, I followed your tip exactly and agree to definitely remove the “TAPTIC”

    italianchick99 -

    Hi what it is called black cover between battery connector and sim card tray? Thanks

    Rajendra -

    How in the world does one reapply the edge adhesive without making a mess?

    gary -

    I misread the directions and pulled off the whole large sheet first. I was able to align the bottom of the smaller sheet into the edge of the phone and get the adhesive into the right area. It was a little tricky but once it dropped down it was in the right place. I would have liked an indication of which was top and which was the bottom of the adhesive. The corners seemed slightly different and I aligned the bottom ones carefully.

    Diana Riddle -

    the new battery from ifixit came with a dented connector and wont connect to the logic board. What do I do?

    Adam Frederick -

    are you suuuuuure you didn’t dent the connector? i know if i had received a battery with a dented connector, i’d immediately contact the seller so you probably dented it yourself and now you’re trying to trick all us but we’re on to you.

    unibody deluxe -

Abschluss

Arbeite die Schritte in umgekehrter Reihenfolge ab, um dein Gerät wieder zusammenzubauen.
Evan Noronha

Mitglied seit: 06/02/15

219164 Reputation

0 Kommentare