Einleitung

Ein häufiges Problem bei den Mighty Mouse ist, dass sich Schmutz in der Scrollball-Baugruppe festsetzt und das Scrollen extrem erschwert. Es gibt andere Lösungen wie das Waschen der Kugel in Reinigungsalkohol und das Reinigen der Rollen, aber ich fand es viel effektiver, das Problem an der Wurzel zu packen. Ich nehme an, dass diese Anleitung auch für die USB-Version gilt, obwohl ich es nicht ausprobiert habe.

  1. X2MSkBZHKZX2PR36
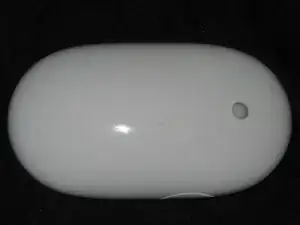
    • Schalte zuerst die Maus mit dem Schiebeschalter auf der Unterseite aus.

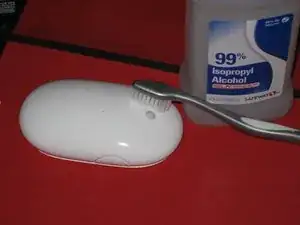
    • Bevor du versuchst die Maus für eine Reparatur zu zerlegen solltest du zuerst versuchen, den Scroll Ball mit einer Zahnbürste und Isopropylalkohol ordentlich zu reinigen. Die Borsten müssen gut in den Zwischenraum zwischen Kugel und Gehäuse eindringen, da sitzt oft der Schmutz, der die Rollen innendrin verstopft.

    • Du kannst auch versuchen, mit Druckluft, z.B. aus einer Sprühdose, das "Ballloch" freizublasen.

  2. WQqp35VbY4vQrPcP
    WQqp35VbY4vQrPcP
    lExGS3YZseUVDh4H
    a5DE5OsgGwnnHL5H
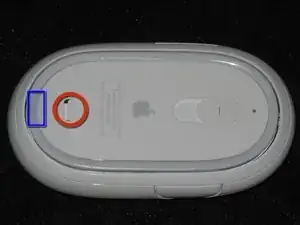
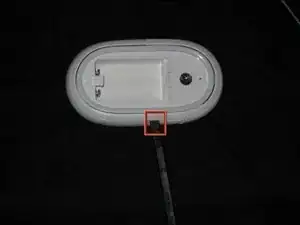
    • Beginne damit, die maus umzudrehen, wie in der Abbildung gezeigt.

    • Entferne die Bodenplatte, indem du die Entriegelungslasche nach unten und links drückst.

    • Möglicherweise musst die Kante der Bodenplatte in dem angegebenen Bereich aufheben.

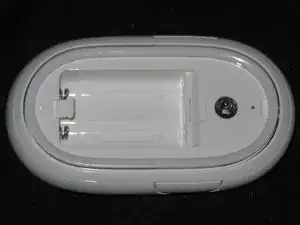
    • Entferne die Batterien.

  3. vE5VEEPFXEEMMMkV
    vE5VEEPFXEEMMMkV
    xNDQHwEpPbLKKnVi
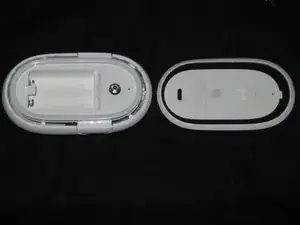
    • Spudger zwischen Knopf und äußerem weißen Ring einsetzen

    • Drehe den Spudger, um den Ring vom Rest der Maus zu trennen. Arbeite mit dem Spudger um die ganze Maus herum, bis der Ring vollständig abgetrennt ist.

    • Es erfordert etwas Kraft, um den Klebstoff, der den Ring an seinem Platz hält, aufzubrechen, aber versuche, den Kunststoffring nicht zu beschädigen.

    • Wenn du die Maus wieder zusammensetzt, musst du diesen Ring wieder an das Gehäuse kleben. Cyanacrylat-Klebstoff funktioniert gut.

    I found this step to be easier when starting at the side buttons as pictured, working around the back of the mouse to loosen the back half of the ring, and then carefully prying the front portions of the ring, which seem to have the most adhesive that you need to loosen. If you get stuck or the rings starts to bend from one direction, resume on the other side.

    Rog -

    While a little bit dangerous, I used an Exacto knife to cut through the adhesive. A slight rocking motion does the trick. Just be sure you don’t have a body parts between the knife edge and the hard surface you’re using to steady the mouse.

    Dennis Johnston -

  4. 1QVvqtEIO1xrmxLH
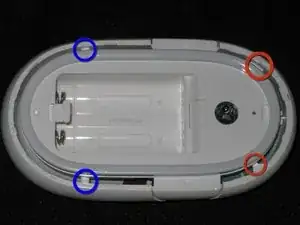
    • Löse zwei Klammern mit einem Spudger.

    • Verwende den Spudger, um zwei Drehpunkte auszuhaken.

  5. g4sAIj1nuPlLLea3
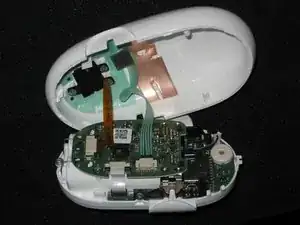
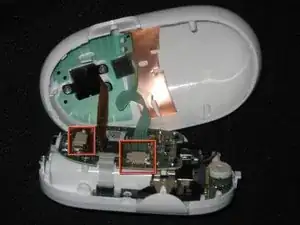
    • Trenne die beiden Hälften vorsichtig voneinander. Ziehe nicht an den Flachbandkabeln.

  6. QSTsPrawxJsVJXmB
    QSTsPrawxJsVJXmB
    MUMa6LHTTueQBbhN
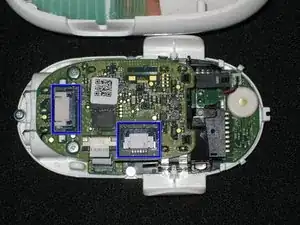
    • Entriegele die Verschlüsse vorsichtig mit einem Fingernagel oder einem Spudger. Belaste die Verriegelung nicht, da sie sonst brechen könnte.

    • Trenne beide Flexkabel ab.

    • Das zweite Foto zeigt, wie weit die Riegel gezogen werden müssen.

    • Wenn du die Maus wieder zusammenbaust, solltest du beide Kabel mit der Kontaktseite nach oben in die Anschlüsse stecken.

    The latches referred to are on the able connection block. The blocks are white, the latches are grey. Push the sides of the grey latches with any small flat screw driver or spudger.

    Dennis Johnston -

  7. yEVnYwpmHlsuxXr6
    yEVnYwpmHlsuxXr6
    TKWoUKam2gIXwCAf
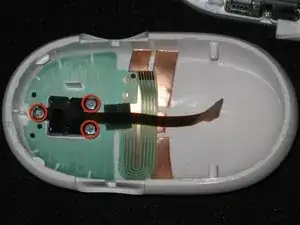
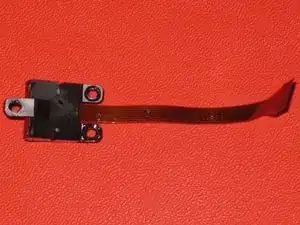
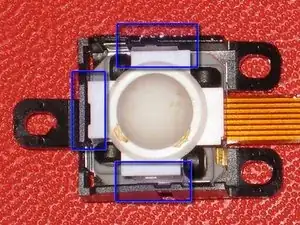
    • Entferne die drei Kreuzschlitzschrauben #00, mit denen die Scrollball-Baugruppe an der Oberschale befestigt ist.

  8. xNZhfYhVZGGcJb31
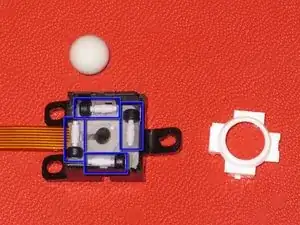
    • Heble die weiße Kugelabdeckung mit einem kleinen Schlitzschraubendreher aus dem schwarzen Gehäuse.

    • In der Baugruppe befinden sich kleine lose Teile, sei vorsichtig, wenn du die Abdeckung entfernst. Die kleinen Magneträder sind besonders leicht zu verlieren.

  9. neXFWM1CeB6cqmCa
    • Nimm die vier Rollen mit einer Pinzette aus dem schwarzen Gehäuse. Sie werden magnetisch gehalten.

    • Reinige alle Teile mit Isopropylalkohol, lasse sie trocknen und baue das Gerät wieder zusammen.

    • Beim Zusammenbau der Baugruppe werden die Rollen wieder so eingesetzt, dass das hintere Radende die Metallzungen berührt.

    Abou 2 years ago I have followed these instructions to clean my mouse and everything was perfect. But now I tried this procedure again, but the mouse ball isn't working anymore. I thought I had the flat cables in the wrong position, and then I checked it, and I think they are in the correct position. The photos are small and I cannot be sure the position of the flat cables are correct. I would like to know how can I check this. What is the correct side to insert these flat cables? I'm sure I close the ball box correctly and it's running smooth inside it.

    sergio barrozo -

    Be careful : the little black wheels don’t touch the metal tabs.

    Henri Guillemot -

Abschluss

Um dein Gerät wieder zusammenzubauen, befolge diese Anweisungen in umgekehrter Reihenfolge.

Alex Jansen

Mitglied seit: 22/04/10

9134 Reputation

48 Kommentare

Confirmed: these instructions work just fine for the usb version. The ribbon cable connectors are positioned slightly differently, but otherwise, exactly the same process. My usb mighty mouse is now like brand new. Thanks.

manwithfire -

Very good guide, worked very well for USB version as well, cable connector sitting in different positions but it's not a problem. Fixed my mouse in about 15 minutes, I would say it was easy.

Thanks!

Tobias -

thanks, it worked perfectly.
olivierfrein -

Great guide. I followed it and re-assembled my wireless mighty mouse, only problem though, now the ball only scrolls up. When I scroll up, down, left, or right, the page scrolls upwards in all cases. Any tips?

Omar ElHagin -

I guess I screwed it. Something went wrong with one of the flex cables, so that the scrollball works fine, but the pointer doesn't move any more. F**k.

lomez -

Great guide! My usb mighty mouse is now clean and 100% functional! At first, i was a little scared about step 3 (i thought i could break it) but everything went ok. All i needed was Just a little patience. This plastic piece turned out to be of much more quality and rigidity than i expected!

Thanks a lot to the member who made this guide! You've saved me $49! =)

Fokka85 -

Excellent instructions: clear explanations and photographs. My mouse, despite Apple's faulty design, is now working as it should. BTW, it's a USB mouse and the instructions work just fine.

I added an additional step for my USB mouse: after disconnecting the flex cables in Step 6, it was no trouble to carefully remove the circuit board in order to get at the accumulated dust and gunk that had collected underneath.

Peri -

take a clean piece of paper, or a pad of paper, and turn the mouse with the trackball down. apply the slightest pressure, and draw figure 8's or the infinity sign for 30seconds.. repeat with another piece of paper.

turn over and use scrollball again.

pritishjacob -

This trick is so easy! Thank you for the idea!

Bekah -

This method works for me, no need to take anything apart.

Tim Meehan -

You can do the same thing with a non-linty cloth dampened with high-test isopropyl. It'll work great the first couple of times, and you may get most of a year more out of it, but eventually you WILL need to disassemble the mouse to remove the crud.

The roller shafts should be brushed lengthwise with a soft toothbrush dipped in isopropyl; this is where the crud settles that disables the ball motion.

macsrwe -

Excellent guide, thank you. This was a pretty simple operation. I skipped the step of disconnecting the cables as I didn't want to risk breaking a connector on my 8 year old MM. It was a bit awkward at times but I was careful and it worked out fine. Like a new mouse!

Dan O'Connor -

Just dug up the mouse to replace the broken one temporarily, and found the ball not working in two out of four directions.

When I disassembled the whole thing, each wad of dirt was nearly as big as the black magnetic wheels inside the assembly. Ended up just soaking them in a small vial of alcohol. Works perfectly.

And after all these years and all that dirt, I only just realised that the "click" sounds of the scrollball is actually generated by the buzzer inside the mouse. I feel deceived in a weird way. At least iPod clickwheels were stationary (except the very first one, I guess).

Jaewoo Chung -

Mine has a little piece broken inside the tracking ball system (the white square), avoiding to track up movement. I've been looking for a replacement, with no luck. help?

Frozen Sea -

Great - thanks OP for publishing. I have a USB A1152 Mouse - followed this - I'm back in business! Works 100%, great response from the mouse scrollball now... ;]

BobaFettuccine -

Great phank you so much it worked great with the USB. It helped a lot!! Just with the alcohol and the tootbrhuch

buda9 -

My 15 years old wireless mighty mice is still the mighty! gr8! :)

Done some clean up and fix the loosen flex cable.

sahaini -

It works perfect now! Many thanks for the detailed descrbtion for de- and reassembling!

adi -

10 second fix with the toothbrush. I used nail polish remover as we had this at home. 10/10 to ifixit, 0/10 to Apple for designing a mouse that gets dirty inside so quickly (compared with other mice), and is so hard to disassemble when needed (compared with other mice).

pduncanj -

Hi there,

Excellent tutorial thanks for posting it. Does anyone know where I could buy a replacement scroll ball? My kids tried to "fix" it with sand paper... all scratched now and very jumpy.

Thanks!

Matteo Petitti -

has anyone changed the shell of the mouse to a clear and black "2000: Apple Pro Mouse (Model M5769)" ?

Francisco Javier Perez -

Perfect, thank you. I used your guide for a USB version and it was very similar. Works like new!

Thomas Resimont -

Try this first - it may save you the hassle:

Turn the mouse upside down and, while pushing down, run the mouse on its scroll ball over a mouse mat. You are vigorously exercising the ball.

Voila - works for me!

Note: I see this technique has been posted above also; never mind - this tip is probably useful enough to bear repeating :)

Wytze Hoekstra -

I fall in love with iFixIt.. I had repaired my macbook always with help you and this time mouse scroll button is working charm… I never gone to any service centre for any types of repair.. hats off!! keep it up!!

Naurej Alam -

I've never taken anything apart to fix it before, but this tutorial worked great! I also didn't totally unplug everything, which made it a little awkward but it still worked. I didn't soak anything in alcohol either, I just wiped all the grime off and put it back together and it's working great! Thanks for the help.

Lisa Humason -

One clarification, when you pull out the two wires, the housing on top is white, the housing on the bottom is black, the wires go between. It is the lower (black) housing that moves to release and then lock in the wires. When putting the wires back, make sure the bottom (black) housing is still out, as it is really easy to knock it back in when you put the wires back. Otherwise, perfect fix. Thanks much.

Paul Mohlman -

Great tutorial, thank you. My 9 year old mighty mouse is as new…

Bart Kramer -

For anyone having trouble with the scrolling not working in certain directions after re-assembly. Take it apart again and make sure the little black rings on the rollers are in line with the metal plates. The metal plates are the sensors and are reading the rolling from the little black magnetic rings. One of mine was slightly out of line, very easy to miss at a glance, I nudged it back in place and scrolling was restored in all directions.

Johnny Luu -

Hi! Very good guide indeed. I am interested to find out why the middle click is not working anymore and if there is a good / easy way to fixit. Thanks!

Florin Lupașcu -

I have a corded Mighty Mouse, so no batteries. I was able to disassemble it and cleaned up the ball rollers. The side buttons are attached to the main housing and I am having trouble getting them to engage the bottom cover (figures 5 & 6.). I have not found a way to insert them from the outside in main housing. They don’t seem to be able to back out of the housing enough to allow the base to properly set in place. Suggestions?

ken -

Appears much better now.

Couple notes:

File the rough edges off after you take the retaining ring off. Make the mouse body and ring surface flat again. And breaking isn’t a big deal. Just use super glue in the BREAK ONLY. For putting the ring back on, which really just keeps dust from getting in, use white school glue or rubber cement etc. It will hold it on and let you get back in later. There’s no stress here and it’s just a dust cover.

Don’t dump a bunch of low percentage isopropyl alcohol into the ball while it’s all assembled. You’ll get condensate and have to dry it on a fan. I ended up disassembling it anyway.

One of my magnetic wheels touches the metal tab. It still works but I considered using a sharp toothpick and putting the TINIEST bit of lithium grease on it, so little that it won’t end up elsewhere to lower the resistance to turning. The white retaining part appears defective/broke but it still works ok.

beachfitrob -

Brilliant guide, my mouse now scrolls both up AND down!

Took a couple of minutes to get apart, and an hour to get back together.

One of the little rollers decided to make a break for it and I spent 30 minutes searching the carpet for it.

They are so fiddly, next time I will buy a new mouse to preserve my sanity :)

d.watson -

Thank you, mouse is like new now! Got ten years of crud out of the ball, a lump nearly as big as the ball itself. Mouse should be good for another ten years now.

oliver -

Isopropyl alcohol melted the plastic on the mouse. Really bad advise.

Tout Bient -

Update for this article - my mouse was all cleaned out but still not working. So I readjusted the metal tabs to the right place so that they sensed the rollers correctly and this sorted it all out :)

I bent the tabs towards the rollers. At first they were touching when I reassembled, but then I poked a small screwdriver between the roller and the tab and this seems to have set the distance right.

lewismccallumorchestra -

Worked great for old USB mouse. For USB, Steps 7-9 are the same, key steps fro the fix.

For USB disassembly:

Step 3: This works best starting at the side buttons working around the rear of the unit (opposite the cord), then carefully prying up the front.

Step 4: There are only 3 pivot points on the USB mouse: 2 rear/side, one just under the cord entry point. If you can see it, you can push the front pivot in a bit to release the unit. I had no issues working from the back, though, before I knew this was the case.

Step 6: Flex cables are a differently located, as others have noted. I found I could remove the assembly (Step 7) without disconnecting the cables. I did disconnect the one attached to the assembly prior to cleaning.

Scrolling along happily now…

Rog -

Had a bit of a problem with the final stage, and had to airfix the retainer ring with superglue, but even so, all goo.

thanks

Richard Holmes -

Thanks, worked perfectly!

Daniele -

Great Guide. I repaired the USB version. Like mentioned before the cable connectors are upright instead of lying flat. For the rest same procedure.

Coen Scheen -

Many thanks, that works.

diego fernando franco perez -

Finger schmutz, BEGONE!

saru kun -

I just disassembled my mouse then cleaned it. This guide was perfect.

enrique bengaura -

If you hear a buzzing noise like the scrolling click a thousand times in a second and the page goes insane scrolling then disassemble it again. The touch flex cable (green cable) somehow interferences with the scroll flex (orange cable) so move it around till the buzzing sound goes off. Your mouse must be on, so be careful. You can do it while powered off, but it would take forever. BTW I wouldn't say it is a 3/3 difficulty procedure.

David Akafadam -

New life to my mouse ! Easy to do with the instructions, thank you.

lili gouniche -

Perfect, just cleaning fixxed it :-)

Henrik Erlandsson -

Works fine! If you are feeling craftsy you don't need to remove the cables. You have enough room when you rotate the bottom half (now upside down) one quarter and then unscrew the black scroll ball housing.

Lauri -

Do not use acetone on plastic (ie including fingernail polish remover). It can very easily dissolve, or cause it to fragment. I suspect that is what may have caused a commenter to say that is what alcohol did to the mouse.

Henri Steenaart -

If anyone has problems with small parts breaking, there is now Bondic glue. Instead of having to hold pieces for a while, while the glue dries, a UV light is used and the glue is hard immediately, after a few seconds. Since the glue does not dry without that, there is also no period, when vapors, like from superglue, are condensing and drying on other parts. I once glued in a replacement watch lens, with superglue, and it badly fogged the inside surface of it, ie with a white film.

Henri Steenaart -