Einleitung

Ersetze ein defektes oder gebrochenes Display an deiner Apple Watch.

Als Vorsichtsmaßnahme, um dein Gerät nicht zu beschädigen, beginnt diese Anleitung damit, den Akku zu trennen, und das geht nur auf eine Art und Weise: den kompletten Ausbau des Akkus.

  1. PFpjwVSYrnq3JQap
    PFpjwVSYrnq3JQap
    RFsyoneYVYQDPSht
    • Wir empfehlen die Mikrowelle vor dem Gebrauch zu reinigen, da sonst Essensreste oder Ähnliches am iOpener hängenbleiben können.

    • Lege den iOpener in die Mitte der Mikrowelle.

    • Für sich drehende Mikrowellen: Stelle sicher, dass der Teller sich drehen kann. Wenn der iOpener hängenbleibt kann er überhitzen und sogar Feuer fangen.

    I didn't find this to be as hard as I had built it up in my mind to be; HOWEVER, saying that I need to say years ago I was the local Nokia service center in my town. But many years ago right after they got rid of analog times. Yeah. A classic installer/repairer mistake when starting something they haven't fixed or installed before is picking up the instructions, flipping through them; maybe even reading a section that is new-then tossing the instructions over the shoulder. "I got this." This usually comes right before something major gets broke. And I can tell you when you try to do it yourself and then mess it up horribly then take it to the repair shop. Well we called that "I can do it myself" syndrome and charged extra to put back together what they brought in in the box. Now knowing all this - I can't stress this enough because I am stupid, stupid, stupid. COVER YOUR SCREEN IN CLEAR BOXING TAPE AND READ ALL THE INSTRUCTION BELOW THROUGH TO THE END BEFORE EVEN ATTEMPTING THIS FIX. Take my advise.

    windizy -

    I didn't have an iOpener, so I used a wheat type heat bag. If you do this though, make sure you put a layer of plastic between your Mac and the bag, or you'll get condensation in places you don't want it.

    Martin Gray -

    I started out using the iOpener but switched to my wife's hairdryer. A heat gun or hair dryer proved to be much more convenient and is a time saviour. You can heat more and the glue becomes more fluid make the next steps with the opening picks much easier

    Jan Van Puymbroeck -

    I know this is obvious, but backup your iPad with iTunes before you start. I'd also turn off your passcode if you have one.

    Laurie Higgins -

    Ther first time you heat up the iOpener for this repair when its room temperature I had to heat it up for more than 30 seconds. I remember I had to heat it up for around 45 seconds. However, after that when you need to reheat it again during the repair 30 seconds will be enough.

    Yousef Ghalib -

    I used the wheat bag in a sensor microwave heating up to 65-70 deg C (155 def F).

    ian cheong -

    Get yourself a cherry pit bean bag the size of your iPad. Heat it, put the iPad on it for 3 to 5 minutes or so, reheat the cherry pit bean bag, again put your iPad on it. Then heat the iOpener and start working. The cherry pit bean bag will have to be reheated several times, but it will soften the adhesive so you have less problems with the iOpener

    Tim Feyaerts -

    The heating can be done very effectively (and quickly) with 3d printer heated bed. Make sure the bed is clean. Set the temperature to 60c, (130f ) and put the ipad face down for +/- 10 minutes. Repeat as needed throughout the “gentle prying” stages.

    polleyphony -

    The iOpener did not work at all for me.

    I had to use a heat gun and bring the edges of the case up to ~200 degrees (used an infrared thermometer to measure) before the glue would weaken. This obviously superheated the metal frame, so I also had to wear gloves to handle the phone while prying the back off with the included picks.

    Mike Jeanette -

    Repair instructions worked like a charm. Had to be patient with the iOpener and getting the screen off. I tried repeatedly without success until shifting the suction cup a bit to the left side where perhaps the glue had loosened up a bit more.

    Kyle -

    The iOpener, in my opinion, is of no help. Many warnings to say “don’t warm it too much”, but the glue doesn’t melt if not warm enough. As a result, a complete waste of time and energy. In addition, too much liquid in it, so it doesn’t lay on the device on a sufficient surface. I took a hairdryer and it worked much much better.

    laurentvidu -

    I used an immersion bath to heat this to 180F and applied it to the device until the outside temperature of the opener read 150F with an IR thermometer. Removing the screen took very little force with this method.

    breadandbits -

    My experience. I was replacing the screen which had been cracked and a little shattered in some places. The iopener is pretty much useless, so was the suction cup. The suction cup would probably be more useful if I was doing something besides the screen. Also you probably want the clean the screen before using it so it can get good suction. I used a hair dryer on high for a couple of minutes at a time (someone on this tread suggested that). I used my exacto knife and a razor blade to get into the adhesive. First the exacto to get the initial cut, then the razor blade to go a little deeper. Could have probably just used the razor blade, but the exacto has a little more finesse. I got the razor blade in and a little under the glass then I used the picks to wedge in. I didn’t want to risk anything using the razor blade too much. Used tape to keep the shattered glass together.

    trebor65 -

    My experience pt2

    Fortunately the shattering was mostly on the edges and most of it had adhesive on the back so it stuck together. Just take your time and work your way around following the guide to get the screen off. Have some goof off or goo be gone to clean the frame when putting the new glass on or putting the existing one back. (someone suggested that also, very good idea). Be careful of the LCD (you should know that). The cable on my LCD was pretty tight, so I propped it up while taking the cable cover off and when I put it back on I did the same thing. I just put a bottle on the battery and leaned the back of the LCD on that while attaching the cables and putting the screws back on the cover. Also be careful with the home button and the bracket on the back of it. I had enough old adhesive on left on the bracket that it stuck back to the new glass fine. So far only 12 hours in, so we will see how that holds up when the kids get at it.

    trebor65 -

    Another alternative if you do not have the iopener is to use a bed time hotwater bottle. Do not over fill it though. Just put enough hot water in to support the phone while you work around the adhesive.

    I use both the hot water bottle and iopener together on Samsung's. It makes life easier

    gazza667 -

    I followed the directions and heated my iOpener for 30 seconds in a 1000 watt microwave, and it came out at 160 degrees F, as verified by a infrared thermometer. This allowed me to separate the last bit of the back of my Samsung S8, which was already coming off due to a swollen battery (hence the reason for the repair).

    Dennis -

    Hallo,habe den Akku erfolgreich getauscht.Doch seitdem gibt es bei Telefonaten eine Rückkopplung für den anrufenden.Bei mir ist alles normal.Woran liegt das?Mfg

    Manu R -

    If you follow these instructions, you will crack your screen like I did. Heating the iOpener for 30 seconds, using it to melt glue, then waiting 10 minutes to reheat is useless. The iOpener can be used to maybe warm the glue on whatever side you aren’t working on. You need a hairdryer and/or a heat gun to melt the glue and separate the glass from the iPad.

    Anyone want to buy an old iPad with broken glass and a dead battery?

    mpulliam -

    Not everybody has a microwave. You should provide a target temperature for the iOpener and instructions for a conventional oven, or pot of warm water, or whatever. Although I will probably use a heat gun …

    Esmond Pitt -

    Three times heating opener and no luck. Tried pressing down gently on opener with a towel, and the opener broke. Wondering if I now replace table mats, fancy table cloth, etc. or will this stuff wash out.

    Not impressed so far. Maybe the hair dryer next.

    doug -

    I support the comments about the iOpener. Everyone has a hair drier, FHS, so get a cheap IR thermometer (£18) and blow heat until the area is 60+ deg C. Still takes w while, and getting the screen off is v scary, but just add more heat if you feel resistance.

    The rest of the kit is good, esp the magnetic screwdrivers.

    Richard O'Brien -

    No, everyone does not have a hairdryer. Some of us don’t even have hair. Thank goodness I already had an IR thermometer, though.

    nin10doh -

    #### WARNUNG WENN MINIMALSTER SPRUNG IM DISPLAY IST FUNKTIONERT DAS NICHT!!! ######

    Hatte einen winzigen, minimalen Sprung im Display. Ich dachte es könnte gehen, weil der Sprung “abgeschlossen” war. Er hat in einer Ecke ein winzige Glasteil rausgeschnitten. NEIN! Geht nicht. Habe alles mit viel Geduld dem iOpener und einem Föhn erhitzt. Es ist trotzdem sofort über das komplette Display zersprungen…

    T z -

    I’ve started with iOpener but changed very quickly to a heatgun. That was more efficient.

    Mizzoo, s.r.o. -

    I could not get the iOpener hot enough to melt the glue on my ipad 6. I heated for 45 seconds once and it was boiling and it still never worked. Thank goodness contributors mentioned using a hair dryer. Using an 1700w hair dryer on high did the trick to get the screen off. Still took some time and the case got pretty hot but be patient. It took twice as long and a lot more patience to get the battery out.

    Randal Haufler -

    I have an Ipad with touch screen issue, if i replace this part it should be Ok?

    janderson martin -

    WARNING - DO NOT MICROWAVE ON A METAL MICROWAVE RACK

    The metal microwave rack can heat up and melt through the iOpener cover letting the contents leak out.

    Not a big issue for me as I have a heat gun and used that instead.

    Run Up A Tree -

    I opened my iPad with the iOpener. Be patient! It may take quite a bit longer to it the iOpener in the microwave than it says in the guide. My microwave can only do 800W and I had to put the iOpener in several times (maybe a total of 90-120 seconds). I recommend that you have the transparent side up an watch the bag carefully. As long a the bag doesn't bloat up and the liquid doesn't start bubbling you should be fine. But I recommend to take the iO out from time to time to check it. (More comments in Step 6.)

    marcelflueeler -

    I gave upon the I opener and used a hairdryer. (Fixed an iPad 6)

    Tom Weber -

    iPad mini gen5. I used the iOpener. My microwave is 1200w with carousel. 30 sec got the iOpener to 155ºF. For the 2nd heating, after 10 minutes sitting, the temp was still around 125º so I only cooked it for 15 sec. Not enough increase so +5 sec more which me to 165-170ºF. This should be considered ballpark info because who knows the real output of the various microwaves and the quality of the IR tool used to determine temp.

    To successfully open my iPad mini I applied the iOpener twice to the left edge and twice to bottom. & once to R edge. Using the suction cup was difficult for me (I'm in my 70's so my hands don't work too well anymore). I had trouble holding the guitar pick and slipping them in (at an downward angle). In the end, sliding my thumbnail along the edge opened it very slightly and allowed the pick to get into the gap. I marked the ends of all my picks with a sharpie pen for the recommended 2mm insertion to avoid going in too deep. To get the screen open it took me approx 1 hour.

    jharrison -

  2. ylYXoFMbBeXNAIyj
    • Erhitze den iOpener für dreißig Sekunden.

    • Im Verlauf der Reparatur kühlt sich der iOpener wieder ab. Erhitze ihn dann noch einmal für dreißig Sekunden.

    • Achte darauf, den iOpener während der Reparatur nicht zu überhitzen. Eine Überhitzung bringt den iOpener möglicherweise zum Platzen.

    • Berühre niemals den iOpener, falls er aufgeschwollen aussieht.

    • Falls der iOpener in der Mitte immer noch zu heiß ist, um ihn anzufassen, dann benutze ihn weiter, bis er ein wenig herunter gekühlt ist, bevor du ihn erneut erhitzt. Ein ordnungsgemäß erhitzter iOpener sollte für bis zu 10 Minuten warm bleiben.

    I had to heat mine up for more than 30 seconds. After 30 seconds on high it was only warm. It had to keep trying different times and checking it until it got hot. I think the initial time that I put it in for was over a minute.

    whale13 -

    DO NOT USE IN NON ROTATING MICROWAVE! It will pop a hole. I had it in for 45 seconds the first time. It wasn't very hot inside and I saw it started to leak on the paper towel I put under it. Just a fair bit of advice. I think I will just stick with the heat gun. Loud but useful.

    Alex Jackson -

    I heated mine up for 30 seconds, tested, then again for 30 seconds. It felt adequately hot. Leaving it on the left side, per the instruction, for a minute did not loosen the adhesive. I ended up pulling the suction cup hard enough to shadder the old screen. Moral of the story, I don't think it gets hot enough safely to have an affect.

    Travis Dixon -

    There is a clear problem here with the heating part using the iopener things....no details are given. Whoever is testing them needs to make it clear - What temperature does it need to be? And for which phone models, because they differ in what's needed. It's only £10-15 for a laser guided temp sensor unit, and the designers/repairers should have one of those already for doing these kinds of repairs. Explaining half a repair, is worse than not explaining at all :-(

    assortedrubbish -

    All phones/devices differ it’s unrealistic and unsafe to put a exact time/temperature needed to soften the adhesive. It’s really quite simple you warm the device evenly and in a controlled manner just enough to enable pry tools and picks to begin separating. Best tool in my opinion but again this is because I have experience is a hot plate and heat gun both of which are used at nearly the lowest settings and I can handle flat palming the plate for almost 10 seconds I leave the device to conduct heat until approx it’s about 110 at most 120 ish this will be plenty to soften all the adhesive if any problem areas I use heat gun while prying. Again you need go slowly and learn with a throw away phone

    Greg Latta -

    I used a hot water bottle, works well as it covers the whole screen and stays hot for longer.

    dave -

    If I may suggest include your microwave wattage so people can get an idea on time for there own

    Patrick Storey -

    I agree with this.

    Jarl Friis -

    I ended up using a hair dryer. That iOpener thing took forever.

    mark fitzgerald -

    30 seconds sure isn’t cutting it… 45 didn’t get the screen of my iPad air 2 to budge either… even after resting on the ipad for 4 minutes.

    60 seconds in the microwave, the iOpener burst.

    I’ll get a new one and try once more with heating it 45 seconds and repeat that for 30 minutes like others have said here. If that doesn’t work it’ll have to be the heat gun.

    K

    Karl Marble -

    I can’t recommend the microwave. If the the iOpener becomes too hot, it bursts. Better put the opener in cooking water. Dry it and use it. Instead of an iOpener you can use hot/cool packs as well.

    Bernhard Keim -

    Great idea with using the heat packs. I will try that next time. Thank you

    Collins -

    Trust the directions! I forgot and left it in the Microwave too long and after 1 minute I had Mt Vesuvius - the iOpener burst and spewed the goodies out. The problem is, the Digitizer can be damaged by a hot air gun, so I had to tough out and remove the glue the hard way. I made it … with lots of patience! Tough lesson.

    Larry Bennett -

    I also used a hairdryer. I used it on the low setting and I cut a piece of carboard to protect the rest of the screen. The iFixit tool and method is vert tedious and very time consuming in comparison. With the hairdryer method you can literally have the display apart in a few minutes. Using your other hand nearby the area you are heating it should be very hot but not enough to burn your hand. You only have to heat metal part of case near glass edge. If you have a cellular model then you need to be very careful because the black antenna area is plastic. So less heat and work your way up in adding heat just enough to separate around the area but not so much you melt the plastic!

    Fixrights -

    iOpener was the worst part of the kit. Followed directions for :30 in microwave and took 4 trips to the microwave to loosen adhesive on left side of home button. I thought I was figuring it out and it was working well… even set a timer to wait 10 minutes between heating it up. Was on the right side and was on my 12th heat up when it exploded in the microwave. My only tip is that if you set it clear side up, as soon as you see any bubbles or boiling in the liquid, STOP! If you put a pot holder over the iOpener and press slightly to make good surface contact, that seemed to help. I finished heating with a “Corn Sack” that held heat better than the provided iOpener.

    digital_only -

    Mon iopener n'a pas tenu une réparation. Je ne vous conseille pas ce produit

    Berard Romain -

    Bonjour,

    Nous sommes désolés que votre réparation ne se soit pas déroulée comme prévu. Il se peut que le produit était défectueux. Veuillez contacter notre service client support@ifixit.com (boutique américaine) ou eustore@ifixit.com (boutique européenne) en décrivant ce qui s’est passé.

    Claire Miesch -

    Readers looking for temperature advice might check the comments of the previous instruction, as there are more there. I used an immersion bath to heat this to 180F and applied it to the device until the outside temperature of the opener read 150F with an IR thermometer. Removing the screen took very little force with this method.

    breadandbits -

    Thank you for posting some actual temperatures. I have a heat gun with a very fine self-temperature regulation setting capability.

    I will set it for 150-180 F, and use that to soften the adhesive.

    G Trieste -

    Get a heat gun.

    alesha adamson -

    I followed the directions and heated my iOpener for 30 seconds in a 1000 watt microwave, and it came out at 160 degrees F, as verified by a infrared thermometer. A second heating about 15 minutes later in the micro and it came out at 190 degrees F. Plenty hot enough to soften the adhesive for removing the back on my S8. Based on the comments above I think people just need to use more patience.

    Dennis -

    I used various time settings. It got very hot. It would soften the glue but not a whole lot. If my screen had been intact and I was replacing something that was not a digitizer, it may have worked. A broken screen makes the process significantly more difficult. I ended up breaking the home button cable. Good bye TouchID…

    cvela90 -

    After reading previous comments I didn't even use the i-opener. Used the heatgun ( hairdryer ) which works great for me. Maybe I was lucky as this is my first attempt at replacing a cellphone battery. Motoz 3

    Collins -

    It appeared 30 seconds were not enough, so I heated it more, by 5 seconds at a time until I got the right temperature about 70 degrees Celsius (measured with infrared pistol) to get the screen heated up to 60 C, the best for softening the glue. But the heat was quickly dissipating by the big aluminum back cover, so the best I got in 2 minutes of applying iOpener was around 45 C, which made the procedure difficult and having risk of breaking the screen. So I eventually abandoned iOpener and user a hot air gun with precise temperature setup. I set it to 90 C, which allowed me to open my iPad quickly and safely.

    Sergey Kofanov -

    I, too, ended up using a hot air gun. I’ve done earlier versions of iPad before but the adhesive used on this IPad 5 A1822 was particularly difficult to remove.

    Also, while the suction cup worked great when the glass is in tact, any cracks in the glass make the suction cup useless.

    manningrl -

    You need to remember here are different sizes of microwaves. I had the same issue.

    Heating on a smaller unit I used 45-60 seconds. That worked but was time comsuming

    William Draheim -

  3. Q3OPkaQyxV6cdnx3
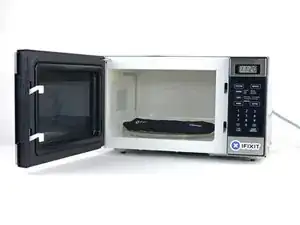
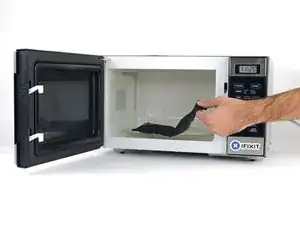
    • Halte den iOpener an einem der flachen Enden und vermeide die heiße Mitte, während du ihn aus der Mikrowelle nimmst.

    • Der Beutel wird sehr heiß, sei vorsichtig beim Gebrauch. Lege dir am besten einen Topflappen bereit.

    I did this repair. I used a hair dryer, I think it works better: gets very hot fast.

    Cobus de Beer -

    I did too, you get far more control and no expense on fancy equipment.

    Billinski -

    Readers looking for temperature advice might check the comments of the previous instruction, as there are more there. I used an immersion bath to heat this to 180F and applied it to the device until the outside temperature of the opener read 150F with an IR thermometer. Removing the screen took very little force with this method. I don’t know how much microwaves vary in heating consistency with these pads, but knowing how inconsistent the temperature of a bowl of plain rice gets in my microwave, I wasn’t interested in even trying to use it for this.

    breadandbits -

    I used an electric griddle set to the lowest setting. It seemed to work very well.

    John -

    I vote for the hair dryer. The other methods work too but if you aren’t having any luck, switch to the hair dryer. While holding the iPad in my hand, I found that I am aiming the dryer at my finger at the same time and it gauges how hot it is. I stop when my finger can’t take it - maybe five seconds up close. Repeat as needed like I did.

    Robin -

    This thing melts when placed up side down in the microwave…

    Mark -

    If the maximum temperature for this iOpener is lower than the gadget glue minimum temperature, this device does not make sense.
    I think the maximum temperature for this iOpener is below 100⁰C and most gadget glue minimum temperature is higher than 100⁰C. So the iOpener is useless for many opening steps in repair guides. But who knows because temperature range is not specified for this iOpener.

    Jarl Friis -

  4. 2Nj3CEcEUHn2EtLQ
    2Nj3CEcEUHn2EtLQ
    lgRIBJjmHo2vTdda
    • Solltest du keine Mikrowelle haben oder benutzen wollen, folge diesem Schritt, um den iOpener in kochendem Wasser zu erhitzen.

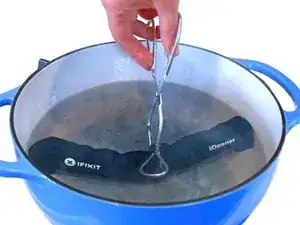
    • Fülle einen Topf oder eine tiefe Pfanne mit ausreichend Wasser, um den iOpener komplett damit bedecken zu können.

    • Erhitze das Wasser (ohne den iOpener) bis es kocht. Schalte die Wärmezufuhr (Platte) aus.

    • Lege den iOpener für etwa 2-3 Minuten in das heiße Wasser. Stelle sicher, dass der iOpener komplett mit Wasser bedeckt ist.

    • Nimm den iOpener mit einer Küchenzange aus dem Wasser heraus.

    • Trockne den iOpener gründlich mit einem Küchen- oder Handtuch ab.

    • Der iOpener speichert die Hitze, und ist daher sehr heiß. Sei vorsichtig, und halte den iOpener nur an den Endlaschen, nicht in der Mitte.

    • Der iOpener kann jetzt verwendet werden. Solltest du den iOpener erneut erwärmen müssen, erhitze das Wasser nochmal bis zum Siedepunkt, schalte die Wärmezufuhr aus, und lege den iOpener wieder für 2-3 Minuten vollständig in das Wasser.

    What do I do if I don’t have a iopener?

    alexdelarge103@gmail.com -

    Use a hair dryer

    Edited To the max -

    2 or 3 cups Rice in a sock, heat for about 2 minutes. But, I recommend the iopener.

    Robert Garcia -

    When boiling in water you can put the iopener in a ziplock to keep it dry.

    Robert Garcia -

  5. eiWiVJXlJDYFbYyB
    eiWiVJXlJDYFbYyB
    jeRpbOWM11MtPxSb
  6. h1JNiKVJeMl2pIVk
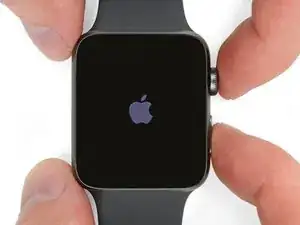
    • Bereite einen iOpener vor (oder benutze einen Haartrockner oder ein Heißluftgebläse) und erwärme die Vorderseite der Uhr, bis du sie kaum noch anfassen kannst.

    • Lasse den iOpener für mindestens eine Minute auf der Uhr liegen, so dass das Display komplett erhitzt wird. Dadurch wird der Kleber weich, mit dem das Display am Gehäuse befestigt ist.

    • Möglicherweise musst du den iOpener mehrfach erhitzen oder auf dem Bildschirm bewegen, wenn Stellen wieder abkühlen, bevor der Kleber weich genug ist, damit der Bildschirm entfernt werden kann.

    Save yourself some time—use a hair dryer. After multiple efforts with the iOpener, I could not get the screen to pop enough to pry it up. That’s when I grabbed a hair dryer and had it off within minutes.

    Patrick -

    I heated it up with hair dryer for less then 2min and stick the blade in that was supplied with infix kit and popped right off.

    MIke C -

    Does heating the screen not run the risk of damaging it like you can with a phone?

    Wade -

  7. HdVOMcSvytVW6vMV
    HdVOMcSvytVW6vMV
    UdwVjIBCXLMjms4q
    • Da der Spalt zwischen Display und Gehäuse so schmal ist, benötigst du eine scharfe Klinge, um die beiden voneinander zu trennen. Lies die folgenden Warnhinweise aufmerksam durch, bevor du weitermachst.

    • Schütze deine Finger und berühre die Klinge niemals mit deinen Fingern. Im Zweifelsfall benutze lieber einen schweren Arbeitshandschuh oder Gartenhandschuh aus Leder.

    • Verwende nicht zu viel Kraft, da du sonst mit dem Messer abrutschen und das Gerät beschädigen oder dich schneiden könntest.

    • Trage eine Schutzbrille. Das Messer oder der Bildschirm können brechen, sodass Splitter umherfliegen können.

    In my instance, the problem started with the face/screen popping off because the battery swelled. So I didn’t need to heat the face and pry it off. I did heat it a bit in order to warm the residue adhesive on the edge of the face and the case frame and found it easier to scrap it off gently with the craft blade that came with the $39.21 battery replacement kit. If this is your issue, you can skip the prying up steps.

    jeb605 -

    Same situation as jeb605 - my watch battery swelled and popped the screen off. Fortunately the force touch sensor did not debond from the watch. Thinking about just cleaning the back side of the screen and applying new adhesive. I used an alternate kit that did not come with the force touch sensor.

    Tom Karches -

  8. ystRiIlDZtDahdiq
    ystRiIlDZtDahdiq
    Y5lK11RJpXjYMMlT
    ptyFoBJMLVs13JqQ
    • Die Verwendung einer gebogenen Klinge verringert das Risiko von Kratzern oder Beschädigungen. Heble nur mit der gebogenen Seite der Klinge und nicht mit der flachen Seite oder der Spitze.

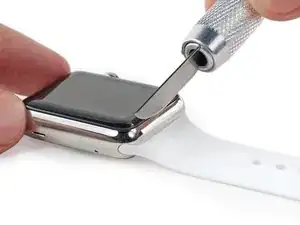
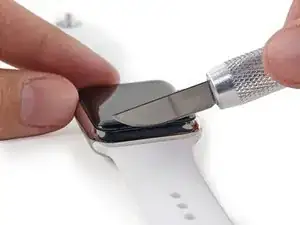
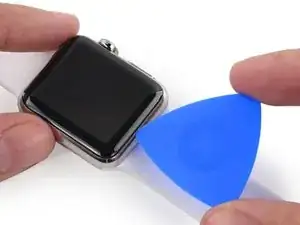
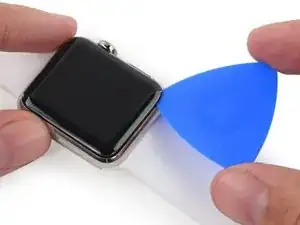
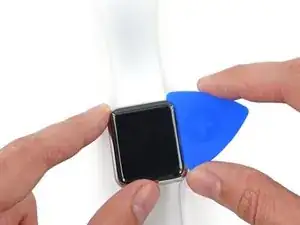
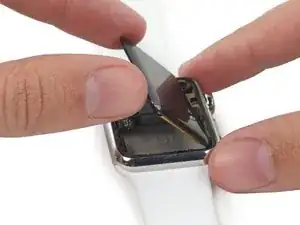
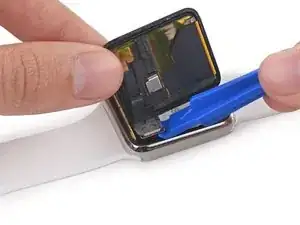
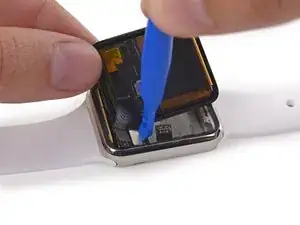
    • Platziere die gebogene Seite der Klinge auf der Lücke zwischen Bildschirm und Gehäuse an der unteren Kante der Uhr, und drücke die Klinge senkrecht nach unten fest in die Lücke.

    • Sei sehr vorsichtig und und arbeite behutsam – sobald die Lücke offen ist, könnte das Messer in das Gehäuse eindringen und den Akku beschädigen.

    • Mit dieser Technik solltest du eine kleine Lücke schaffen und das Display leicht anheben können.

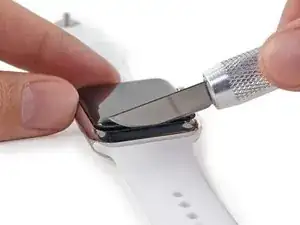
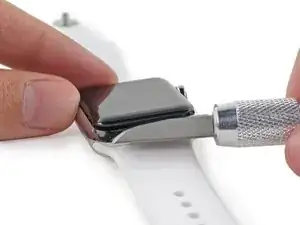
    • Drehe das Messer nach unten, sobald das Glas etwas angehoben ist, um die Lücke zu vergrößern.

    It is not possible to separate the screen from the casing? I have heated this thing numerous times and the opening is way too small to get any type of blade, knife or other tool in between. Any suggestions???

    Paul -

    Using a curved blade like the guide recommends, angle the blade straight down between the glass and the edge of the frame, mid-way along the bottom edge of the case. The metal of the case will flex *just a little bit*, allowing you to slowly rotate the blade so the cutting edge is now pointing towards the center of the watch instead of down towards your work surface. You may need to rock the blade back and forth, sort of massaging the curve into the seam between the glass and the metal before it works. And like they mention above, lots of heat. I used the heatpack they sell, put it in my toaster oven on 200. I started at 130, and went up in 20 degree increments until it worked.

    Pete -

    I've tried everything, heating it up until it's too hot to touch, pressing the knife in the gap straight down, at an angle, nothing seems to work. I've tried using all my arm strength and it still doesn't even enter the gap. Is the iFixit Jimmy not thin enough for the job?

    Kenneth -

    It’s not. The Jimmy’s a great pry tool, but not a cutting blade and not sharp enough for this particular job. You want a curved razor like the guide suggests.

    Jeff Suovanen -

    Just to emphasise after quite a struggle - the blade absolutely matters!! I tried about 5 and almost gave up before the last one lifted the glass quite easily. Obviously, you want a thin blade! No, thinner than that!

    Mark Moore -

    Plenty of heat helps this part. Also PLEASE PLEASE wear a glove. Nearly lost a finger thinking I was careful enough…

    jake -

    Apple Watch Ceramic Series 3… Unable to crack open even with curved razor. The tolerances are extremely tight. Does anyone have any tips? Being ceramic, there is no flex at all.

    kurt -

    I got hung up on this step for over an hour. The key for me was to keep the watch straps on! I initially took them off thinking it would be easier to work with the watch, but I guess just the little pressure I placed on the glass while trying to hold the watch and use the blade was enough to keep it in place. At first I thought I didn’t use enough heat and ended up reheating the iOpener a few times and applying it to the watch over the course of an hour. I put the top strap on, put it back flat on the table and held the watch secure with just the strap. I gave it another go with the blade and the screen instantly popped off. Also, be careful with the force you use on the blade… it seems with adequate heat, you don’t need to use that much (I ended up cutting through the Force Touch sensor and punctured the battery).

    phchang -

    I would never use a knife like this to remove the screen. It’s way to wide to get in between the glass and body, without potentially breaking the glass. I use the Ultra Thin iFlex Opening Tool, sold by IFIXIT. Seriously. You won’t wanna use a fat blade like that after you take the iFlex for a test drive.

    Donald Fournier -

    I used the rounded blade provided by iFixIt themselves as part of the Series 1 battery replacement kit and even that was wide enough that it scratched my case while trying to pry the screen up. Also I had to heat the iOpener like 3 or 4 times consecutively at 30s each and leave it on the screen for 5+ minutes before the screen would even budge. Heating for 30 sec and leaving on the screen for 1 minute was not even close to enough.

    Happily After Ever -

    The display came off nicely after heating the iOpener a couple of times and wiggling the blade a bit. Now i have replaced the battery and the force touch sensor an thought I was ready for a dry run. So I did not peel off the final layer of film so that I can still remove the display. What I see is not good, the display is full of stipes and pixles in many colors. So, did I break the display (e.g. by heat) or does it have to be completely glued to the sensor in order to work?

    Jörg -

    I got the answer. Unfortunately, I broke the display. A magifying glass revealed that I have scratched the cable where I inserted the blade. Replacing the display and I fixed it!

    Jörg -

  9. RVcUMJVRNsNC26Vx
    RVcUMJVRNsNC26Vx
    sGgXNZxKH5qEBimm
    ZSBJpAtHrRFtwMEH
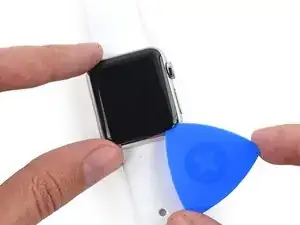
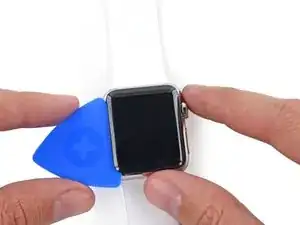
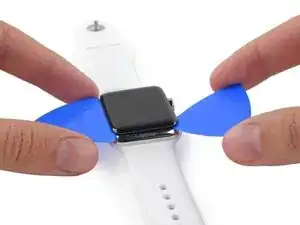
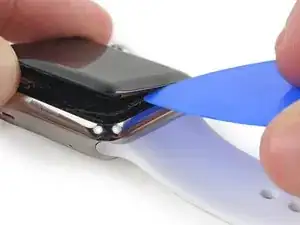
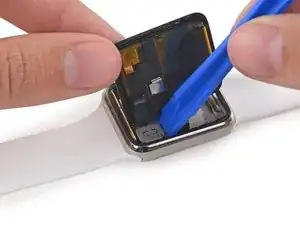
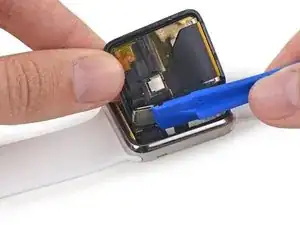
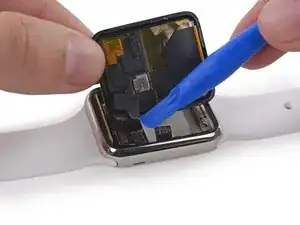
    • Sobald die Lücke groß genug ist, setze ein Plektrum in der Lücke unter den Bildschirm.

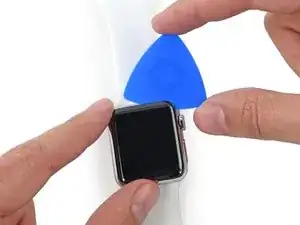
    • Schiebe das Plektrum an der unteren Kante entlang, um den restlichen Kleber zwischen dem Gehäuse und dem Bildschirm zu lösen.

    • Achte darauf, das Plektrum nicht zu weit einzuführen – 3 mm sind bereits genug, sonst könntest du unter Umständen Kabel beschädigen.

  10. Qa6uhnAYV3StVKTw
    Qa6uhnAYV3StVKTw
    WchAQpOXKBn4HX2Q
    SKoePtUAHiQ6F1ks
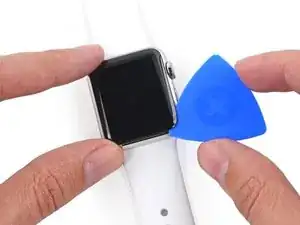
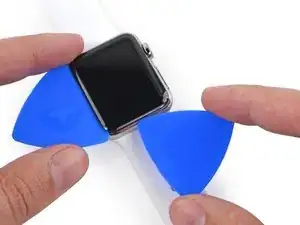
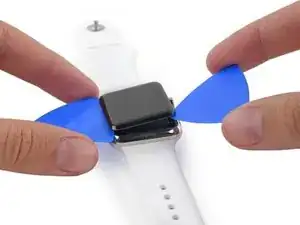
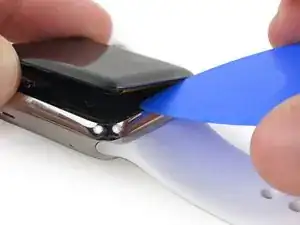
    • Bewege das Plektrum um die Ecke Richtung Krone und löse so weiter den Kleber und trenne den Bildschirm vom Gehäuse.

    • Denke weiterhin daran, das Plektrum nicht zu weit in das Gehäuse zu schieben – am besten drehst du es um seine Ecken, anstatt nur mit einer Spitze zu schieben.

  11. VwdDfxoNsUhcaDdp
    VwdDfxoNsUhcaDdp
    Wyaa1FMJwQ4Jygfj
    bgMlvXTfJvxdfQHN
    • Bewege das Plektrum um die obere rechte Ecke und an der Oberkante der Uhr entlang.

  12. db6gwEhQ3OuikS5i
    db6gwEhQ3OuikS5i
    KO5QIDJnw2CxxVAA
    AxyAnNhpsppiHwvu
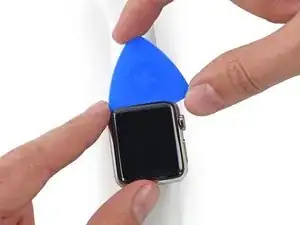
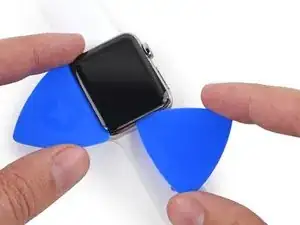
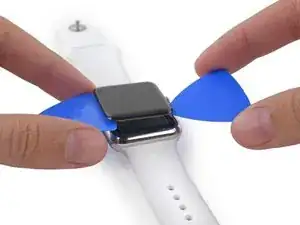
    • Arbeite dich um den restlichen Bildschirm herum die linke Seite herunter und durchtrenne den letzten Kleber.

    • Lasse das Plektrum zwischen Bildschirm und Gehäuse stecken, um ein erneutes Verkleben zu verhindern.

  13. IMPTRaFVYqytUDUL
    IMPTRaFVYqytUDUL
    WHX5HCBgDFYhC4HE
    DnCXkTSYUfT6SSgj
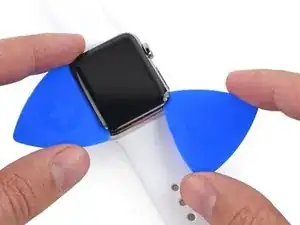
    • Halte das erste Plektrum an seinem Platz fest, und fahre mit einem zweiten Plektrum erneut um alle Kanten herum, um sicherzustellen, dass jeglicher Kleber gelöst ist.

  14. kKhK5IOPfLplDHMI
    kKhK5IOPfLplDHMI
    IdrnKSp1iexsiD1m
    B6slLO2txYsJcXI4
    • Der Bildschirm ist mit zwei Kabeln im Inneren der Uhr in der linken oberen Ecke angeschlossen. Sei vorsichtig beim Hebeln, um diese nicht zu beschädigen.

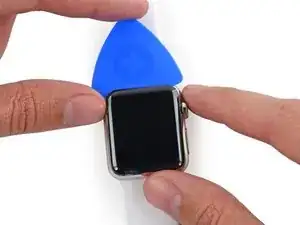
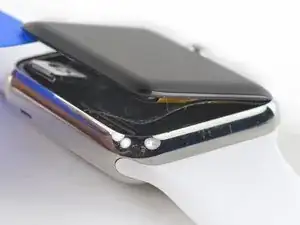
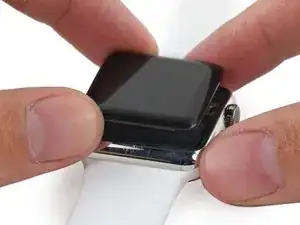
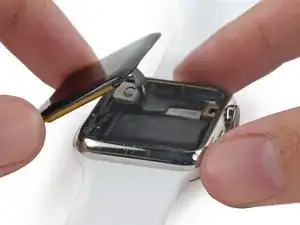
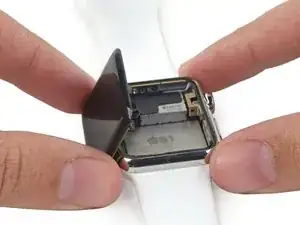
    • Heble vorsichtig an der rechten Kante des Bildschirms, um ihn vom Kleber zu lösen, mit dem er befestigt ist.

    • Heble auch an der linken Kante – aber versuche nicht den Bildschirm zu entfernen, da er noch mit den beiden Kabeln befestigt ist.

    My iwatch screen came lose. There are two strips loose I don’t know how or where they connect to. The watch still powers on and screen is not cracked. Can you advise how to get it back on again?

    dawnnstojkovic -

  15. mOtFZtA1kYZrSojX
    mOtFZtA1kYZrSojX
    ppb3ar5oiOUKgi2t
    mpMEmsMqYeEQxKuF
    • Wenn du die obere Schicht des Force Touch Sensors unter dem Displaykleber siehst, haben sich die beiden Schichten des Sensors voneinander gelöst und du musst sie reparieren oder ersetzen.

    • Keine Sorge - wenn du ein Display- oder Akkukit von iFixit hast, dann wurde dir automatisch auch ein neuer Force Touch Sensor mitgeliefert.

    • Die obere Schicht des Sensors kann an der Rückseite des Displays festgeklebt sein – wenn das der Fall ist, dann drücke ihn wieder herunter und löse sie dann.

    Hi, thanks for the guide, nice work. I miss a picture of the natural opening of the screen, as the mentioned “Force Touch sensor slides” gets connected from the screen to the main body of the watch by a pair of very thin wires. None of these wires are seen in any of the pictures among this guide, which may lead novices to not pay enough attention to them, broke them accidentally, or not knowing what are them for. Picture on step 13 is absolutely impossible without removing the slides / thin wires of the force touch sensor in advance.

    Cheers

    Javier Enrique Díaz -

    "If you can see the top layer of your Force Touch sensor" - How are we supposed to know whether we can see this or not? If one of your images shows us this then can you please point this out. Also, an image of what it should look like, without the problem would be good.

    Just discovered this article you have posted about replacing the Force Touch Sensor. After looking at the article I can now see your first image, above, is showing the separated Force Touch Sensor. Perhaps you should link to it in this article, so people can get a better idea of what it is and what it looks like:

    Apple Watch Force Touch Sensor austauschen

    djones -

    Same issue as djones I think. My watch was forced apart by an expanding battery and it came apart in such a way that the force touch sensor was still intact, connected to the watch back and still glued to the face. If I had an image showing the two connectors to the force touch sensor along the same side as the cables, I would have better understood and released the force touch sensor from the face before pulling the sensor away from it's connection in the base. Would have saved $20+ on buying a replacement sensor. Thank you for the documented process.

    Jeff Overbey -

  16. AQFTkMwkxGf2ppkk
    AQFTkMwkxGf2ppkk
    EaPcZPdZUwA36Ket
    W6wfFXjuUVRe5WeB
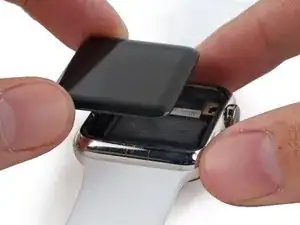
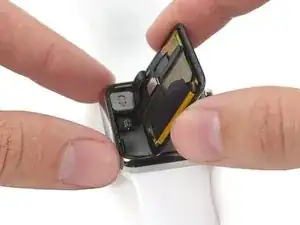
    • Hebe das Display an und bewege es vorsichtig nach links – achte dabei auf die Displaydaten- und Touchscreen-Kabel.

    I have 2 other small cables which are missing in your photos. Can you also explain what to do with them? https://drive.google.com/file/d/1_6ngMn9...

    Pavel Guzenko -

    Looks like you forced touch sensor is still attached to the screen and not the body. I’ve got the same issues. I’m going to try to use the plastic tool and heat to gently remove it from the screen and return it down to the body. You can see it in their fix of it… Apple Watch Force Touch Sensor austauschen . Hope this helps.

    Andrew Marjamaa -

    Be VERY careful when moving the display and attached 2 cables. While they are reasonably protected it is easy to over stress these cables, resulting in tearing of the mini ribbon cable attached at the base. Move the screen the absolute minimum required to get to the battery.

    Joe Smith -

  17. k3Xt2voVkG4tRUjA
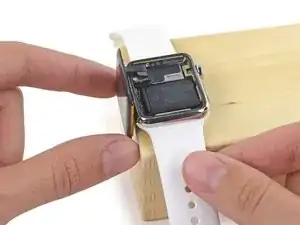
    • Platziere die Uhr auf einer kleinen Erhöhung, mindestens 1 cm hoch – eine kleine Box oder die Kante eines Buches funktionieren super. So kann das Display vertikal hängen und du hast besseren Zugang zum Akku.

    • Achte darauf, nicht gegen das Display zu stoßen oder die Kabel zu stark zu belasten, während du arbeitest.

    Your iFixit shipping box is a great size for this

    Joe Smith -

    I would taped the watch to the elevated surface and rotated the surface around as I needed to

    Andy Campbell -

    I could not get the face to swing out of the way as shown for fear of tearing the tab connectors. I let it “hang” as much as it would and had to work with it partly in the way through the entire process

    jeb605 -

  18. DG3oDZKCyUAOPByA
    DG3oDZKCyUAOPByA
    YdJOmTVd2vrKTxGJ
    KtjCAL1LM6laAOy6
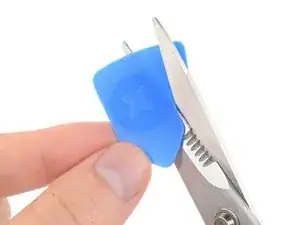
    • Zerschneide ein Plektrum mit der Schere so, dass es etwa so breit ist wie der Akku. Achte darauf, dass keine scharfen Kanten entstehen.

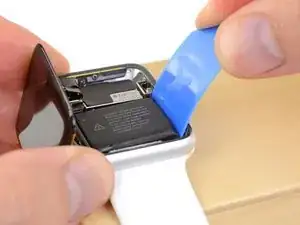
    • Setze das zugeschnittene Plektrum zwischen der rechten Kante des Akkus und dem Gehäuse ein.

    • Drücke fest und gleichmäßig, so dass der sich der Akku langsam aus der Klebeverbindung zur Hauptplatine löst und herauskommt.

    • Pass auf, dass du den Akku nicht versehentlich anstichst oder verformst.

    • Bei den größeren Modellen (42 mm) sitzt die Hauptplatine direkt unter dem Akku. Daher musst du hier besonders aufpassen, dass du nicht versehentlich an der Hauptplatine hebelst. Setze das Plektrum nur so tief ein, dass du unter den Akku gelangst, nicht unter die Hauptplatine.

    • Tröpfle, falls nötig, etwas hochkonzentrierten Isopropylalkohol (mindestens 90%ig) um und unter den Akku, so dass der Kleber aufgeweicht wird.

    • Versuche noch nicht den Akku zu entfernen, er ist immer noch durch ein Kabel verbunden.

    I tried removing the battery with the prying tool as instructed, but I think it may have slightly damaged the outer black plastic wrapping of the battery. Does this mean the battery is now damaged and needs to be replaced? Or is that just a cover around the battery and it doesn’t matter? I just don’t want any battery chemicals leaking out. Asking before I stick the screen back on the watch, I’ve done all the rest and it seems fine otherwise.

    Danae -

    Hi Danae, the black plastic is technically just protective, but I would highly recommend replacing the battery. It’s possible there is additional unseen damage, and that plastic helps protect against swelling and normal wear of the battery inside the device.

    Sam Goldheart -

    I had to use the pry tool instead of the pick as the pick was not moving it. Was careful not to damage the battery but found it much easier to get movement and know exactly where I was prying with the pry tool.

    Joey Totherow -

    Great tutorial but I’ve run into a problem changing the battery on my 42mm Original Series watch .

    Getting the battery off with the pick has proven impossible and I’m about to try using the isopropyl alcohol.

    • Can you provide any tips on how best to apply it, how long to give it to take effect, how often to apply etc. ?

    • Given how narrow the gap is, also how to ensure nothing gets damaged by the alcohol?

    • Is there any inherent risk in using the pry tool as Joey ended up doing?

    Thanks for any advice

    Allan Davidson -

    Hey so I’m about to do a repair on one and noticed that it’s drains of battery making it pretty much safe to work with but do I really need to remove the battery? Like can’t I just remove the screen right there and now?

    Christopher Renteria -

  19. fBTbWdH1ByEefgFV
    fBTbWdH1ByEefgFV
    xwONTowBS2eUaENh
    • Drehe den Akku gegen den Uhrzeigersinn, um seinen Stecker freizulegen.

  20. RBXUINvbWcNnY3Di
    RBXUINvbWcNnY3Di
    AVbQ4cQ6WxvNBrPy
    hQ2OKcEmLkIxPDwk
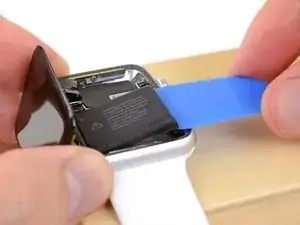
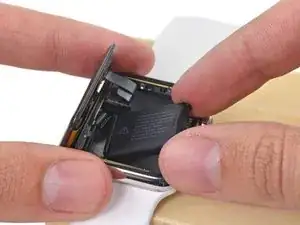
    • Hebe den Akku an und drehe ihn leicht aus dem Weg, um an den Kabelstecker zu kommen.

    • Heble mit einem Plastiköffnungswerkzeug gegen die Unterseite des Gehäuses, um den Akku-Kabelstecker vom Akkukabel der Uhr zu trennen.

    • Entferne den Akku aus der Uhr.

    • Wenn der Akku sichtbar verformt oder verbeult ist, sollte er ausgetauscht werden. Beste Ergebnisse erzielst du, wenn du jedesmal den Akku austauschst, wenn du ihn ausgebaut hast.

    Why should you remove the battery if you only need to replace the screen?...?

    Douglas Richey -

    Douglas - this iFixit is for Apple Watch Battery Replacement - looks like you need to remove the screen to replace the battery...

    jimvaughn6 -

    You will find that it is a good precautionary measure to disconnect the battery anytime you are repairing or replacing a screen as a short can occur when reconnecting the screen rendering it useless even if you have the unit turned off.

    Bryan Solo -

    Great repair guide! You iFixit guys are awesome. Took me about 2 hours but then I am very careful and I replaced the touch sensor at the same time since I had it open anyway. Make sure you have at least 2, and better 3 adhesive gaskets. You need 2 and, well, it’s easy to mess one up while trying to place it.

    rbolling -

    Will removing the battery reset my icloud info? I have a guy who says he can do this, but i dont want him to run off with my watch after he replaces the battery…

    dreadmusicreview -

    I did not disconnect the battery first. After replacing the screen, it didn’t work. I have to assume I created a short. The watch will still turn on and haptics are evident, but the display doesn’t work. Are there any further repairs to save my watch at this point?

    Scotty Beauchamp -

    Yeah, sounds like you shorted part of the board. If it’s a Series 0 you’re working with, just go get a new one. Not worth fixing.

    Thomas Gehman -

    How do I insert the new battery???

    WebPoppy8 -

    After replacing the battery I tried to turn it on and was presented with the red snake, I let it go for about an hour. When I checked it the red snake was gone, when I tried to turn it on it showed the Apple logo for about 4 seconds then went away. Is this normal, and if not what should I do?

    Donald Goodman -

    I'm having a similar issue, did you manage to resolve it?

    Craig Lyon -

    Did you calibrate the battery? You need to fill it up completely and let it continue to charge for a few hours first.

    Grant Glass -

    Is it possible to place a battery in and charge/start the watch without the screen plugged in? I want to check integrity of the battery. I was thinking to put it on charge in a closed clear plastic container without the new screen on to see if the battery is good. I ‘really’ do not want to wait another 20 days for a battery replacement and the battery has no visual punctures, front looks good and the back where the adhesive is (or were, rather) is deflated and slightly ‘knobby’. I do not know if it is damage or just how it generally looks like or maybe it looks like so because of the old adhesive. It is not inflated or abnormally expanded. Anyone who knows about this? I used a hair dryer directly on the watch opened to loosen up the adhesive, is that a no-no?

    Philip Bromander -

    The battery swelled up and popped off the screen, so went directly to Step 12. Luckily the adhesive below the Force Touch sensor was intact. Was able to complete the fix using the Adhesive Strip after replacing the battery. Works again! Thanks!

    Alex Danci -

    Hi Alex, I’m having the same problem with my series one with the screen has popped off due to the battery swelling. Did you have any issues starting from step 12?

    Glenn -

    The apple logo keeps flashing on my series 1 watch, tried force restart with crown and side button but it still just keeps on flashing the apple logo, does anyone have any advise? Is the issue with the battery? Do I need to get a new battery? I change the screen as the screen was broken and used the existing battery.

    shafeeqrahaman -

    yes the issue was with battery, swapped with a new battery and booted up fine.

    shafeeqrahaman -

    Having the same issue.good to hear it’s the battery and not me.

    Grant Glass -

    my watch was completely unloaded and stays in power saver mode when I charge. When I load in power saver mode the red light turns green for a few moments then switch back to red and no longer charge. When I remove the battery and put it back on the charger the charge starts again for a while and then stops. Do I need to change the battery? (apple watch serie 4 nike)

    IXO bf -

    Where should I dispose of my old I watch battery?

    oconnor84 -

    I replaced the screen and battery on mine. Now, it will not charge. Everything works fine, except charging. Any ideas why this may be?

    Donald Fournier -

    My series one has two other cables/strings in the bottom left corner. Why do none of the pictures address this?

    thatgreatdeal -

    My watch hasn’t recalibrated with the new battery. Even a couple of weeks later I still get premature low battery - it can take hours for the final 10% to run out after the first 90% only took 9 hours. I left it off the charger for multiple days after installation and yet I could still quickly wake it up by pressing the crown to see the time reported with red numbers, so I don’t think it fully ran out.

    Is there a way to force calibration? A Google search didn’t yield anything useful in the first several pages of results.

    Chris B -

    Hy Chris,

    Same problem as you. Have you found a solution ?

    luc poli -

    If you’re lucky (?) the swollen battery will pop the screen right off for you. Anyone know where to get a replacement battery for a Series 0 watch?

    rmann -

    Watching various videos and instructions from others, I found that there’s no need to remove the screen if your goal is to only swap out the battery.

    It’s meant to make it easier to clean off the old glue and install some double-sided adhesive tape but it was far more simpler to loop the tape around the screen with a pair of tweezers than to try to wrangle with the metal bracket securing the display and digitiser cable connectors.

    T-7000 glue can presumably be used in lieu of double-sided adhesive tape but it’s definitely more messier.

    Anyway, I was initially quite annoyed about my battery expanding and popping the screen off but very quickly got over it when I realised it was a simple $20 DIY fix. Guess I got lucky this time..

    osienna -

    I’m just replacing the battery. The screen and eveything is fine. While i’ve done just that and the new battery seems secure and eveything, i don’t know which is the adhesive strip that i’d use to re-secure the watch face back onto the watch itself. I don’t need a sensor because the watch face is fine, i just need the adhesive strip and i’m not seeing anything labelled as such in the kit. Ive got 2 tesa stickers (?) and one 3M sensor thing with a little compotent thingy attached to it. Which is the double sided adhesive that goes around the base of the watch to secure the face to the watch?? I was lucky in that my old swollen battery pushed the face off so replacing the battery was fairly easy. Now i just need to secure the face to the body. Any advice?

    Anthony Rezendes -

    Have followed the guide as best I could but when everything is reconnected the watch will not power up. Have disconnected and reconnected several times but still the same. Fear that is only going to do damage. Watch was working before removing swollen battery which had caused screen to detach.

    johnriding -

    How do you put in the battery and close the Watch

    Liam Cassidy -

    DOESN'T WORK FOR ME : Have followed the guide in every point but i have now the red snake.

    Just after repairing i put the watch on the charger, let it some hours to charge.

    when I took it, the watch was hot. It started up and was working. I let it discharge then put it back on the charger. After a few hours, it was not charged and showed the green snake. When I took it out, it showed the red snake.

    Has anyone had this problem and found a solution?

    luc poli -

    Replaced my Series 1 battery/force sensor. The swelled original battery popped the watch open, so no prying necessary. However, the watch wouldn't work normally afterward, only displaying the "put me on my charger!" image of the charge cord with the disc on the end.

    iFixIt was great about sending a replacement... battery, tools, force touch sensor, the whole kit, no charge. Replacement #2 required prying it open, but the force touch sensor stayed put, so I didn't have to replace that the second time. Watch is charging and behaving normally as I calibrate the battery. Can unlock etc.

    Be very gentle/careful with the tiny force touch sensor screw. A great comment above says if you lose it, you can put in bit of a pick to press the sensor snug where the screw would hold it. I strongly recommend using a cheap hands-free, head-mounted magnifier w/light for this job. A loop of tape to stick the watch to a surface to hold it still while fiddling with the tiny cable connections was a HUGE help. Take your time!

    Geneius -

  21. oXmnKwq3m2dvtE4h
    oXmnKwq3m2dvtE4h
    GfvBEfMIEbhldLRk
    1qeFwESjXDZqFVyh
    • Klappe das Display nach oben und rechts, um die darunter liegenden Kabel freizulegen.

  22. G1JXXDpMZYVJNuAm
    G1JXXDpMZYVJNuAm
    3xVnrstUTAKMlwcH
    QIeIdFb2sjGtnJw6
    • Die Anschlüsse vom Display und vom Front Panel liegen unter einer kleinen Metallklammer, die mit dem Lautsprecher verbunden ist.

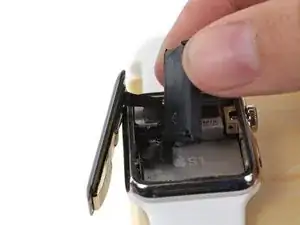
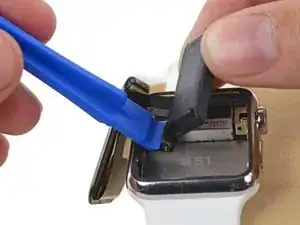
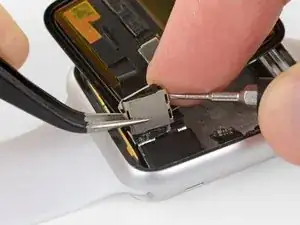
    • Drehe die Klammer mit einem Plastic Opening Tool weg vom Lautsprecher und Richtung Display.

    • Wenn du die Klammer Richtung Armband drehst, riskierst du die Kabel zu beschädigen.

    I managed to replace the force touch sensor without removing the screen

    Andy Campbell -

    Thanks, Andy. After reading your comment, and as I only needed to replace the battery since nothing was wrong with the screen, I too was able to remove the sensor without detaching the screen.

    jeb605 -

  23. HfecGHI1JGh5Mswb
    HfecGHI1JGh5Mswb
    EGM2SKBMglNyB2qB
    XBPWe5BPGtkJBgnt
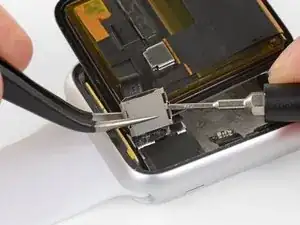
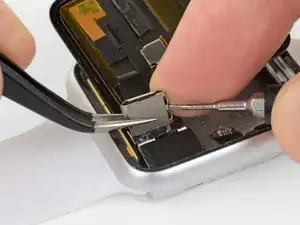
    • Stütze die Klammer auf der linken Seite mit den Fingern oder einer Pinzette.

    • Setze gleichzeitig einen kleinen Flachschraubendreher (1 mm) unter die kleine Lasche an der rechten Seite.

    • Setze zum Schluss einen Finger hinter die Lasche und drücke die Klammer kräftig zwischen deinem Finger und dem Schraubendreher, bis sich die Abdeckung löst.

    • Dadurch werden zwei geschlitzte Laschen frei, mit denen die Abdeckung an der Klammern befestigt ist, so dass die Abdeckung frei kommt.

    • Das Ablösen der Abdeckung ist eine Herausforderung, du brauchst dazu wahrscheinlich mehr als einen Versuch. Sei geduldig und achte darauf, dass du nicht an der Klammer ziehst oder die angeschlossenen Kabel zerreißt.

    Also agree: a little too much pressure and the ribbon cable tears at the point it enters the bracket. Take it SLOW and make sure you have really good light and vision. Orient yourself.

    Dave Varon -

    And this is where things went south for me too. Ended up disconnecting from the rest of the watch and the Taptic Engine. I read through this and watched this portion of Ifixit’s YouTube video no less than 15 times, so confusing they way it’s worded and the pictures didn’t help. Now I’m out of luck and out of $190.

    Timothy Hipps -

    Pas de problèmes me particulier à cette étape. Le fait de pousser très légèrement sur la petite languette qui dépasse a suffit, il n’y a vraiment pas besoin de forcer.

    Raphaël WOLFF -

    If you lift out carefull the whole lit / coverbox of the screen connector between your thumb and your pointing finger.

    Then you can peel the cover easy up with your other pointing finger Nail.

    You can feel the smal clip with your nail and lift easy up.

    It works fine by me without any metal of plastic tool.

    Evert -

    And if you do tear your cable? Do you have a video for replacing this?

    aalao -

    I also tore the cable, I assume that once that happens I’m screwed? I have a battery and force touch sensor if anyone needs one for free let me know!

    Connor Bourque -

    Evert is correct - this can be done with a fingernail and does not need to be hard. Seems much safer.

    sambrightman -

    Evert is correct, using fingernail works.

    Thomas Rossano -

    It is possible to replace the force touch sensor without removing the screen

    Andy Campbell -

    There isn’t really a latch that goes with this. Just use the screwdriver to create a bit of space and it comes right off. I assume where most people go wrong is by pinching the case together as they try to separate it. Also, to reduce your chance of breaking it, There is no need to bring it to the nearly 90 degree angle as depicted and 50-60 degree angle allows it to pop back a bit without damaging anything.

    Jerrod Anderson -

    WATCH OUT! It is possible to slip with the screwdriver and completely bungle the connector that the screen plugs into. This is impossible to recover from unless you have the time and microsoldering skills to replace the cable that the screen plugs into.

    Adam Roach -

    I skipped this part as I found it difficult to do and almost made me damaged the entire cover when I tried inserting the screw driver head to the holes beside side it and prying the side part too. So I stopped trying. Ended up looping the adhesive around the screen careful not to touch the adhesive’s sticky side. (I replaced the adhesive along with the swollen battery. ) It was a success.

    Note: I should have zoomed in the photo and now it makes more sense.

    Edward Cruz -

  24. ckLuPPgU2Cgimn55
    ckLuPPgU2Cgimn55
    aI3ZSF2hbAgqPh15
    kWx4B5S6mPEHYaTA
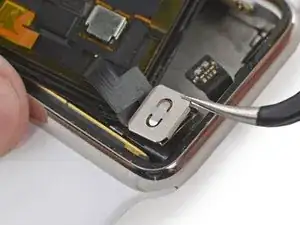
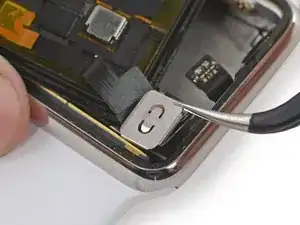
    • Fasse die Abdeckung mit der Pinzette und schiebe sie in Richtung Oberkante der Uhr, so dass auch die letzte geschlitzte Lasche frei kommt. Entferne dann die Abdeckung.

    • Richte beim Zusammenbau die Abdeckung aus und schiebe sie in entgegengesetzter Richtung, so dass die große geschlitzte Lasche gesichert wird. Drücke dann einfach nach unten, bis die anderen beiden kleinen Laschen einrasten.

  25. WICLDVKY26oGgrOW
    WICLDVKY26oGgrOW
    jcUZ21diUIy3fW3j
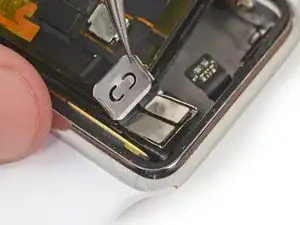
    • Heble die Kabel vom Display und vom Front Panel vorsichtig hoch und trenne sie von ihren Anschlüssen.

    • Achte darauf offenliegende Kontakte nicht zu berühren, da das Fett an deinen Fingern die Leitfähigkeit beeinträchtigen kann.

    • Entferne das Display.

    So how do you get the display off the screen or did I already mess it up cause I just did it

    Jamie Groff -

    Hello guys , appreciate the effort that u guys are doing , have one question though , I own a series 2 watch and I was thinking about changing my screen caz is cracked but I can't find that many lcd for 2 series , and now my question Would a 1 series lcd match my 2series watch? Keep on searching but no answers!!! Many thanks

    cris cri -

    Great repair guide! You iFixit guys are awesome. Took me about 2 hours but then I am very careful and I replaced the touch sensor and the battery at the same time since I had it open anyway. Make sure you have at least 2, and better 3 adhesive gaskets. You need 2 and, well, it’s easy to mess one up while trying to place it.

    rbolling -

    I followed the above instructions and successfully replaced the broken screen, however the new screen won’t pair to my iphone or fully boot up, only goes to a certain point (Pairing stage) and then starts over; any suggestions on what the problem could be?

    Gregg Hardy -

    The display bracket that holds the 2 display connections is the most difficult part of this procedure. (Once you get the display off). A bit clearer explanation would be helpful (or a diagram of where you are actually putting the 1mm flathead and then twisting.

    jeff53 -

    I agree with Jeff53, by far the retention clip bracket was the most nerve racking part on my first attempt. I found that inserting a sharp pointed exacto knife blade between the bracket and metal tops of the screen connectors along the edge that has the smaller clip (closest side to the battery connector) while it was still in a glued down position actually works easier than prying the entire connector up first as done in this guide and then trying to hold it with tweezer while inserting a flat tip screwdriver into that very tiny slit between the bracket and the top of the connectors. Once the excto blade is inserted, just a little twist of the blade pops the retention clip off easily.

    Chad McCollister -

    One other suggestion is to plan on replacing the force touch pressure sensor gasket any time you pry a screen off one of these watches. They are very inexpensive now ($5 range) and easily damaged when prying up the screen or when trying to remove glass shards embedded along the edge of the screen. Replacing the gasket also assures new, fresh adhesive to hold the new screen onto the watch body properly and keeping water resistance intact. If you skip the gasket replacement, plan on a high likelihood of the new screen coming loose and having to take it all back apart again just to replace that $5 adhesive gasket down the road.

    Chad McCollister -

    how do you put the screen back on

    Kristen Meggs -

    hi, after some advice. After replacing the battery and force touch pressure sensor i have no touch control of the screen. i’ve redone the procedure several times and everything looks perfect. but no touch. touch was working before the battery repplacement. i see no tears in the cables and i havent forced anything.

    Kevin Rook -

    Hi Kevin

    I have the same issue. Did you manage to find a solution or reason?

    Thanks

    Begoña Montánchez -

    It is possible to replace the force touch sensor without removing the screen

    Andy Campbell -

    Great guide! I followed each of the steps, took my time and I’m actually successful. I replaced the new adhesive and reversed the steps. Took a little over an hour but I read more than once and really, really took my time. It took patience and the right tools. Thank you!

    Jan Truzinski -

    Did I miss how to make sure the face is secured once again after repairs are made?

    Angela Smitherman -

    Those steps are part of the Force Touch Sensor replacement guide as is indicated on the last step of this guide.

    Nekoniaow -

Abschluss

Um deine Uhr wieder zu verkleben und die Reparatur abzuschließen, folge unserer Force Touch Sensor Anleitung ab Schritt 22.

Tobias Isakeit

Mitglied seit: 31/03/14

108055 Reputation

5 Kommentare

I followed all the instructions but needed to look repair videos on YouTube. Everything worked perfectly. The bracket is a bit of a challenge, I just took my time.

Thomas Rossano -

I did replace my display and it works super-fine (thanks to iFixit) but the issue am facing right now is glueing the Display+Force Touch Ring+Body. Am unable to keep hold of display to the body and it keeps removing even after sevseral days of rubber banding and heat treatment.

Suraj Jorwekar -

It wasn’t easy but the guide really helped a lot.

THANK YOU

Dennis Bailey -

Super Anleitung. Die Uhr ist zwischendurch angegangen… Obwohl ich mit den Steckern nicht zimperlich war, funktioniert die Uhr nun wieder perfekt. ⭐⭐⭐⭐⭐

Christian Schickentanz -

The screen does not respond to any touch. Does that mean the screen is broken? Do I need to replace the full screen with a Force Touch sensor? Thank you.

Ian Chan -