Einleitung

Make sure you are properly grounded to protect your device from static discharge before you begin.

If you need more help getting the back cover off, the removal process is extremely similar to what's seen in this video for a 2021 VivoBook: https://youtu.be/Rv_-KFoPTJc?t=166

All of the laptops in this model range should take DDR4 SODIMM RAM. You can find details on getting technical specs for you laptops further in this guide.

  1. tDeTGGLT5BNEQqPv
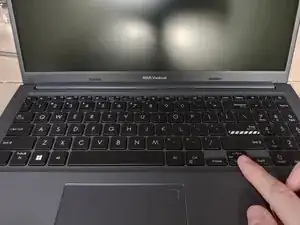
    • Make sure the laptop is off. This model runs very quietly. Don't get fooled by sleep mode! Press a couple of keys to make sure it's not sleeping, turn it off if necessary, then proceed.

  2. OWsiBCJUqRmBeg4N
    OWsiBCJUqRmBeg4N
    6q5Se4nNIB2Xjevn
    • The front cover of this laptop has a matte finish that looks like it would be easily scratched. As such, anti-static mat is strongly advised to protect the appearance of your laptop.

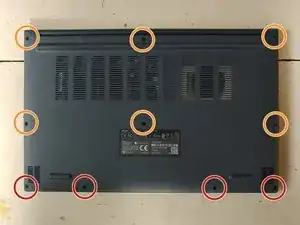
    • Remove 10 screws from the back of the laptop. Please note the four on the bottom are significantly shorter than the rest.

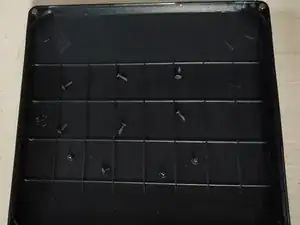
    • Place the screws in a parts organizer to save yourself stress. Lay them out in the same pattern as the back cover. The lid of the iFixit Essential Toolkit works great for this.

  3. XZJIhYOvjOEbRrDZ
    XZJIhYOvjOEbRrDZ
    OT5TfRGijH2dSpBV
    XBir1BdFikuLP5Al
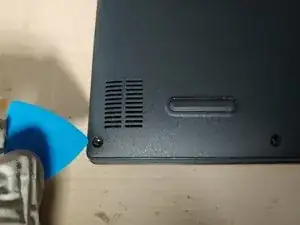
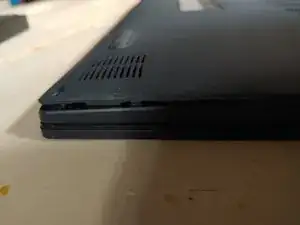
    • The back cover is attached to the laptop housing with a series of plastic tabs. The goal is to disengage these tabs by slowing prying the cover away from the body of laptop. We will create the opening for this with plastic opening picks.

    • The back cover has a VERY snug fit. You will have to use a lot more force than you probably expect to insert the picks. If you get frustrated, take a break for a few minutes to calm down. It may seem impossible but it will happen eventually.

    • It may be impossible to avoid marring the laptop surface slightly during this process, even with plastic tools.

    • Starting at one of the bottom corners, push hard on the pick to wedge it into the gap between the back cover and the rest of the unit. Try a few different spots and angles near the corner until you get the pick in.

    • Be careful not to put all of your weight on the back of the laptop as you do this. You may find it helpful to put the laptop on its side.

    • Once the pick is in, push it in further as a placeholder. If you remove the pick here, the gap will probably close back up.

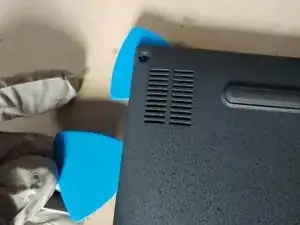
    • Take a second pick and work your way up the short side, towards the hinges. Twist the picks slightly as you go to open the gap further. Eventually you will be able to pull the cover enough to disengage the tabs. When a tab is disengaged, it will make a noticeable popping sound and the gap will stay open on its own.

    • Slowly work your way around the laptop. Be extra careful near the hinges. Eventually the cover will be completely removed.

  4. hITwq4tRMqSTYPgE
    hITwq4tRMqSTYPgE
    P1ygZ3BJ1IrYHsWG
    ZUEYAaAbcWIWDhqZ
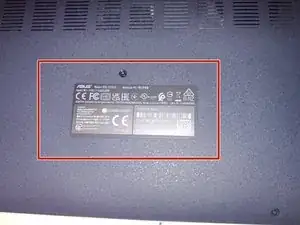
    • The model name, submodel, and serial number are all on the back label of your laptop.

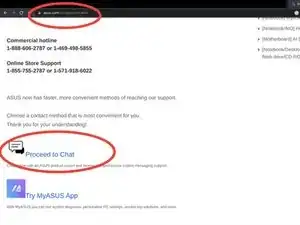
    • If you're having trouble finding the technical specifications for your model, contact Asus through their customer support webpage. Without knowing the specs, you won't know how much RAM to buy or if there's a SODIMM slot at all.

    • If you request an online chat, they'll take down your serial number, and let you know exactly what kind of RAM upgrade you can do for your model.

    • Ask questions if anything they tell you is unclear.

  5. cCOQPLP1sMBKaX26
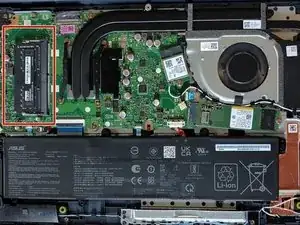
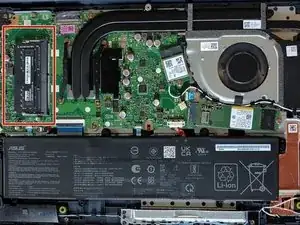
    • Locate the SODIMM RAM slot on the left-hand side of the laptop.

    • Note: when you first open the laptop, this slot will be empty.

    • Look closely at the the RAM slot and locate the notch towards the middle of the slot. Make sure the notch on the RAM stick lines up and gently insert.

    • You may find that there is significant resistance as you insert the RAM, but as long as the notches are lined up, you should be fine.

    • Once it's inserted all the way, gently press downwards. You will push past the clips on either side, then they will snap back in place once the RAM is inserted.

    • See this video if more assisstance is needed: https://youtu.be/6dh-kVbe11Y?t=88

    • The process is the same no matter what company makes the RAM.

Abschluss

To reassemble your device, place the cover on the back of the device in the correct orientation. Slowly press around the edge of the cover to re-engage the plastic tabs. Take your time and make sure all the tabs are engaged. Don't forget the top edge near the hinges. Then reinstall the screws.

The laptop may take slightly longer than usual to boot up. You can check that the new RAM has been recognized in the Windows Task Manager (if you're still using Windows).
Rob Bowman

Mitglied seit: 14/12/22

226 Reputation

0 Kommentare