Einleitung
So gehst du vor:
- Öffne die Time Capsule
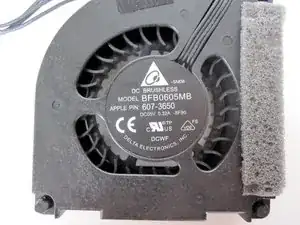
- Entferne den Ventilator
- Installiere den neuen Ventilator. Oder installiere den alten wieder, wenn du wie ich das nur zum Spaß machst ..
Ersatzteile
-
-
Um die Time Capsule zu öffnen, muss als erstes die Gummifläche entfernt werden, unter der sich die Schrauben verbergen.
-
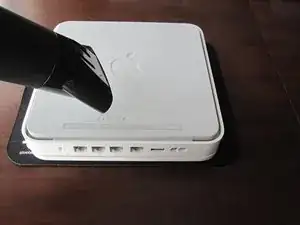
Benutze eine Heißluftpistole oder einen Haartrockner, um den Boden zu erwärmen; dies weicht den Klebstoff unter der Gummiabdeckung etwas an.
-
Beginne an einer Ecke vorsichtig den Boden anzuheben. Benutze einen Plastikheber oder Ähnliches, um das Gummi vom Metall zu trennen.
-
-
-
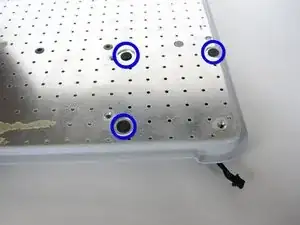
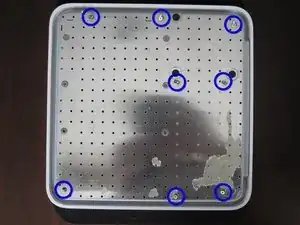
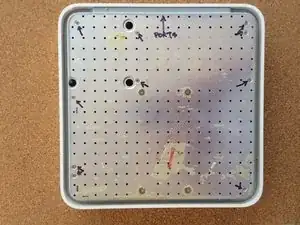
Sobald der Gummiboden entfernt ist, können die acht PH0 Schrauben ausgedreht werden, die den Metallboden festhalten.
-
-
-
Hebe die linke Seite der Metallplatte an und kippe sie über die rechte Seite.
-
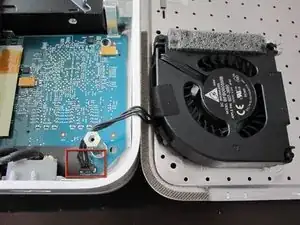
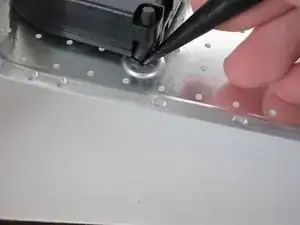
Da vielen Leuten beim Lösen des Steckers der Stecker kaputtgeht, ist es nicht zu empfehlen, ihn zu lösen! Sei sehr vorsichtig mit ihm, er ist sehr empfindlich. Wenn du ihn wirklich lösen musst, löse ihn SEHR vorsichtig mit einem Spudger oder einer Pinzette.
-
-
-
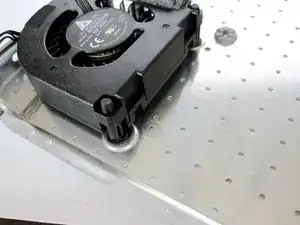
Diese drei Plastikklammern halten den Ventiltor fest.
-
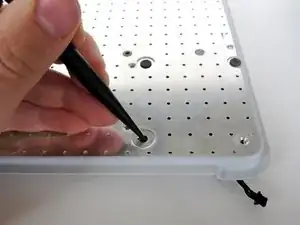
Mit einem Spudger oder Plastikstift kannst du die Klammern durch das Gehäuse drücken um den ventilator zu lösen.
-
-
-
Um den Ventilator wieder zu befestigen kannst du mit einem Spudger oder Plastikstift die Klammern wieder wie vorher eindrücken. Das kann etwas schwierig sein, mit etwas Übung gelingt es aber.
-

Um dein Gerät wieder zusammenzusetzen folge den Schritten in umgekehrter Reihenfolge.

4 Kommentare
would it be possible to remove the fan, or at least replace it with something quieter?
quieter maybe and adaptation now aa days can be possible, in the ballbearing ceramic espect is one , probably there are other ways to deal whit it…..because I think I know WHEN exectly you get irritated by that sound…..man, if I told you that Apple did all and much more bad decision according to the needs and capabilitys of the all equipment, there is why I &&^&^$^ angry about it, becuase when you get opened you will see the devil is in the details again…..lifatime determinied by this normal but fully controllable prooblem to resolev in name of there customers
Maurus -
there are significant emprovemtnes possible to the air flow doesn't acpmplish it mission that is RIP my product , I have done all changes I found since reoreantaded de cooler inlet outlet work as exemple , I'll try to bring this to here because these apple Timecapsluse were desing to fail due to overheat along the time, there are meny cases, incluisice at that time there was a page were you put the date that your time capsule were dead…
Maurus -
I did change my fan according to this solution as it became louder every day.
Getting the fan was a bit of a search - I finally found and ordered it directly from an online shop in China.
When changing the fan the rubbers holding it are quite something to handle - you need a lot of tamper to make that happen.
Being very careful regarding the connector and it’s socket at least to me there was no difference to other connectors compared to eg. a 2013 iMac where I just changed the HDD and the RAM.
So if you are careful and don’t use at lot of force the connector shouldn’t be a problem.
I didn’t have to use a heat gun, the heat the old hard drive of my TC (which I also changed) was quite enough to peel the bottom layer of.
Thanks for this guide!
Florian -
Slowly start peeling at one corner... worked better than shown on the pictures.
Markus -
Slow down particularly near the bottom label where it is stiffer. Either that or I needed to give it more heat. Going too fast can risk tearing the rubber base if the adhesive is strong.
ElvinC -
If you are wondering if the Time Capsule will still work as a router if you remove the HDD and leave it out, the answer (according to another webpage I read) is YES, it will still work. Apparently, you get a warning with the AIrPort Utility about a missing HDD, but it still works. I wanted to keep and reuse the 1TB Hitachi HDD for offsite data backup.
CraigH -
Use an iron instead of a heating gun or hairdryer!
Gradually raise the temperature while checking for separation, while moving over the rubber. I first cleaned the rubber with some soap, to avoid scorching dust or grease. The setting for synthetic fabrics seemed to do the job with my Tefal iron; probably a little over 100 degrees centigrade. No steam off course!
Worked like a charm without leaving almost any residual glue.
Sticking the rubber sole back after the repair was also successful.
Frits de Bruijn -
Thanks for sharing this.
kenatkenichikato -
Adhesive tape used is Nitto No. 5015. I found a piece of a back-paper left underneath the rubber…
vesa -
Is there a possibility to change an already changed 2TB SATA to a bigger one? Mine is full. because I added another MacBook Pro, but I’d rather not buy a newer TimeCapsule
Bette Rose -