Einleitung

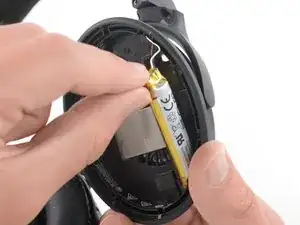
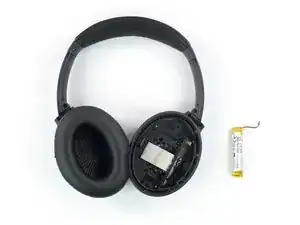
Verwende diese Anleitung, um einen schwachen oder defekten Akku in deinem Bose Quiet Comfort 35 zu ersetzen.

Wenn dein Akku aufgebläht ist, musst du entsprechende Vorsichtsmaßnahmen treffen. Zu deiner Sicherheit sollte der Akku auf unter 25 % entladen sein, bevor du die Kopfhörer zerlegst. Dies verringert das Risiko, dass sich der Akku entzündet oder sogar explodiert, falls er während der Reparatur versehentlich beschädigt wird.

Für diese Anleitung empfehlen wir die Verwendung eines Föhns oder einer Heißluftpistole. Die Demontage deines Kopfhörers mit Hilfe eines iOpeners ist machbar, allerdings wird die Demontage dann deutlich schwieriger.

Du benötigst Ersatzklebestreifen und einen Lötkolben, um die Komponenten während der Demontage zu lösen und sie beim Zusammenbau wieder anzubringen.

Dein Ersatzakku hat möglicherweise eine andere Größe oder Kapazität als der Originalakku. Soweit wir wissen, funktionieren alle QuietComfort 35 Ersatzakkus sowohl mit dem QuietComfort 35 I als auch mit dem QuietComfort 35 II.

  1. OWwFNrPush4kKkM4
    OWwFNrPush4kKkM4
    MXqJVmGsdnZ4j1et
    drT1YKymRxSBYWNS
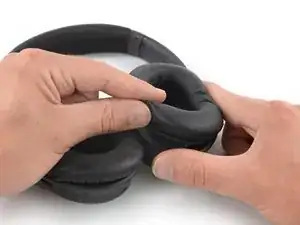
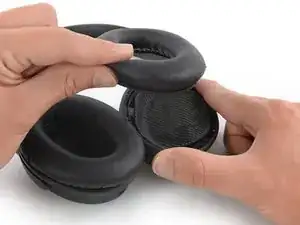
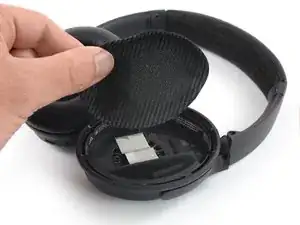
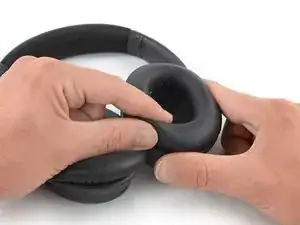
    • Die Hörmuschelpolster des Bose QC 35 werden durch kleine Kunststoffclips gehalten.

    • Fasse das Polster der linken Hörmuschel und ziehe es vorsichtig zur Mitte der Hörmuschel, um es aus dem Kunststoffclip zu lösen, mit dem es befestigt ist.

    • Wiederhole diesen Vorgang für alle Clips, mit denen das Polster befestigt ist.

    • Entferne das linke Hörmuschelpolster.

    gibts irgendjemand der dies als service anbietet?

    no name -

  2. jBfLJZDvKjgoSseB
    jBfLJZDvKjgoSseB
    2hpyjMBAhfHeFYAW
    cOLaNV2YHVPUQk5W
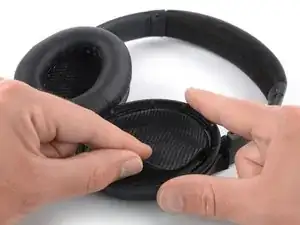
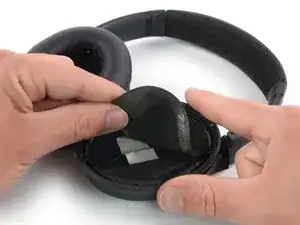
    • Ziehe den Schutzfilz, der die Innenseite der Hörmuschel bedeckt, vorsichtig ab.

    • Der Schutzfilz ist leicht festgeklebt. Wenn das Filz beim Entfernen zu reißen beginnt, lege einen erhitzten iOpener auf den Filz oder verwende einen Föhn/eine Heißluftpistole auf der niedrigsten Stufe, um den Klebstoff zu lösen.

  3. EslnhYmHdsAbD6Is
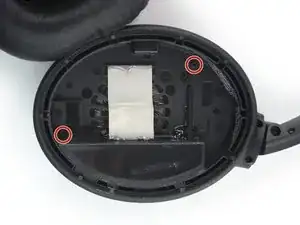
    • Entferne die beiden Kreuzschlitzschrauben #00 (Länge: 6,2 mm)

  4. WqBiYGLKPxQWQFIK
    WqBiYGLKPxQWQFIK
    J32Ja5cOcdWGTA1u
    FmCxOvFYVZtc2bke
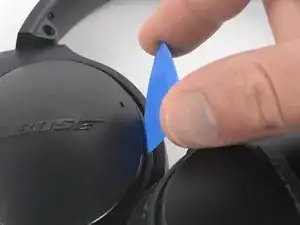
    • Drehe den Kopfhörer um.

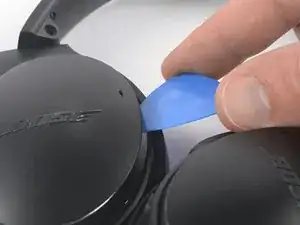
    • Setze ein Plektrum in den Spalt zwischen der Kunststoffabdeckung und dem Rahmen des Kopfhörers ein.

    • Heble die Kunststoffabdeckung auf dem linken Kopfhörer mithilfe des Plektrum ab.

    • Entferne die Kunststoffabdeckung.

  5. W6MqXeWf2LrYBwru
    W6MqXeWf2LrYBwru
    CmBRc6T6epR2uEMq
    dq22TcTwFBn6FZ1N
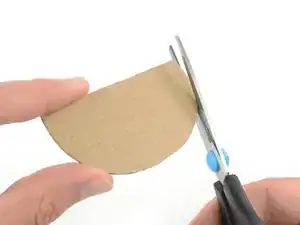
    • Um ein Schmelzen der Lautsprechermembran durch zu große Hitzeeinwirkung in den nächsten Schritten zu vermeiden, empfehlen wir, einen Schutz vorzubereiten.

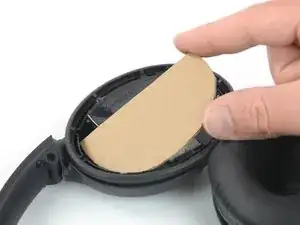
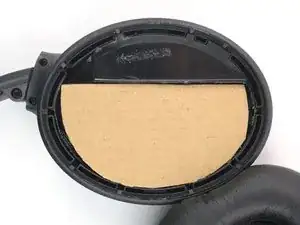
    • Schneide einen Karton, wie in den Abbildungen gezeigt, so zu, dass er alles im Inneren der Hörmuschel abdeckt, außer der Akkuabdeckung.

    • Setze die Abdeckung aus Karton in die linke Hörmuschel ein.

  6. oOkPqMiieWwFXHv4
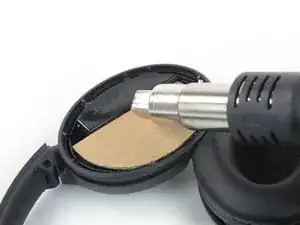
    • Auch bei Verwendung eines Hitzeschutzes empfehlen wir dringend, mit geringer Hitze zu beginnen, um den Kleber der Akkuabdeckung zu lösen und diese langsam zu erhöhen (maximal 100°C), wenn der Kleber nicht aufweicht.

    • Richte die Heißluftpistole nicht senkrecht auf die Akkuabdeckung, sondern nur in einem flachen Winkel zur Kante der Akkuabdeckung.

    • Verwende die Heißluftpistole, um den Kleber unterhalb des Randes der Akkuabdeckung zu lösen.

  7. kXJlcI3PmDUFkopN
    kXJlcI3PmDUFkopN
    crvlGHZIqlSdlBLH
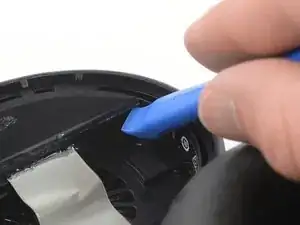
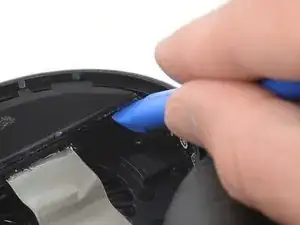
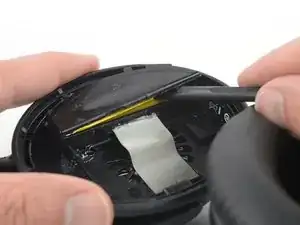
    • Vermeide es, den Akku während des folgenden Vorgangs zu durchstechen. Verwende keine Metallwerkzeuge oder übermäßige Kraft, wenn du im Bereich des Akkus arbeitest.

    • Führe die Kante eines Öffnungswerkzeugs unter die untere Ecke der Akkuabdeckung. Dies erfordert etwas Kraft.

  8. uEkYQNBaUfUv3IEq
    uEkYQNBaUfUv3IEq
    1g6KbZHH2fADyatC
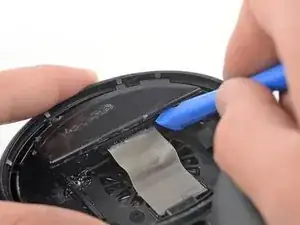
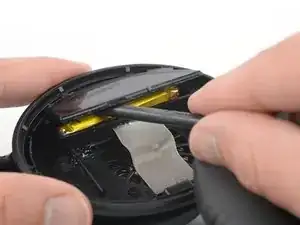
    • Schiebe das Öffnungswerkzeug an der Kante der Akkuabdeckung entlang, um den Klebstoff darunter zu lösen und einen kleinen Spalt zu schaffen.

  9. 4PMqcPkGHarmcsnn
    4PMqcPkGHarmcsnn
    rUeXSweEccRy4y6r
    SnfbmcHxPBYJdJMw
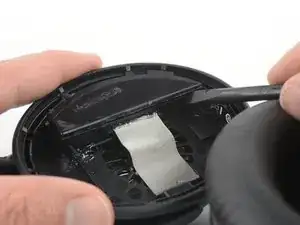
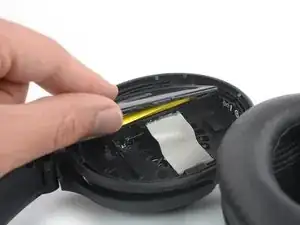
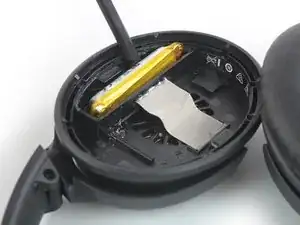
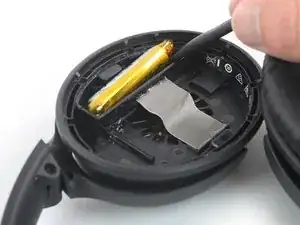
    • Setze das flache Ende eines Spudgers zwischen die Akkuabdeckung und den Akku ein.

    • Vermeide es, den Spudger als Hebel zu verwenden, wenn du im Bereich des Akkus arbeitest.

    • Verwende einen Spudger, um die Kunststoffabdeckung vorsichtig von der Hörmuschel zu trennen. Vermeide übermäßige Krafteinwirkung auf den Akku.

    What's that white part…I accidentally push it and it's bent down a little bit…is it gonna be a problem?…please help me

    Buvisuru Bandara -

  10. eovILqypMIothqHB
    eovILqypMIothqHB
    lfAekX2FhOAtgABe
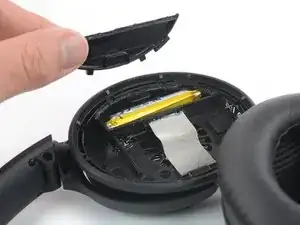
    • Entferne die Kunststoffabdeckung von der linken Hörmuschel.

  11. KhS5ylFgPkjKyCAI
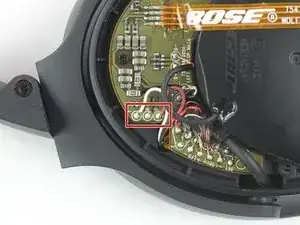
    • Im nächsten Schritt werden die Akkukabel entlötet.

    • Verwende dieses Bild als Referenz für das Wiederverlöten beim Zusammenbau oder mache ein eigenes Foto, wenn die Kabelreihenfolge in deinem Modell anders ist.

  12. g3siUu2cbZa6HK1F
    g3siUu2cbZa6HK1F
    yd2M52irAqCkbeK1
    j2GLGY63l5oRYepU
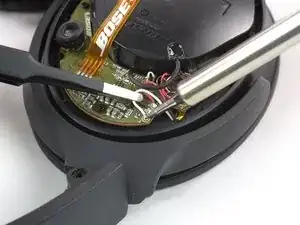
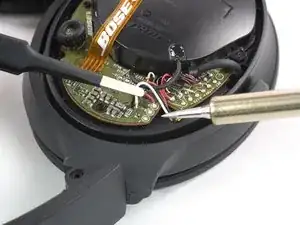
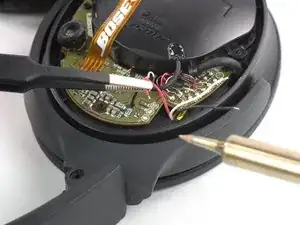
    • Entlöte die drei Akkukabel mit einem Lötkolben von der Leiterplatte.

    I didn't feel comfortable soldering in such a tight space, so instead, I cut the wires tot he old battery leaving as long of a wire as possible, making sure to cut each wire individually so it wouldn't have any chance of shorting. Then I soldered the long ends of the wire with the long ends of the new battery. Capped it off with the black shrink wrap stuff.

    abu hajar -

  13. ihLbR3DSgBiyxfD3
    ihLbR3DSgBiyxfD3
    GnECOqbiSayGhRUI
    miBb2KhPtATmFLnS
    • Vermeide es, den Akku während des folgenden Entfernungsprozesses zu verformen oder zu beschädigen. Aus Lithium-Ionen-Akkus mit weicher Hülle können gefährliche Chemikalien austreten, sie können sich entzünden oder sogar explodieren, wenn sie beschädigt werden.

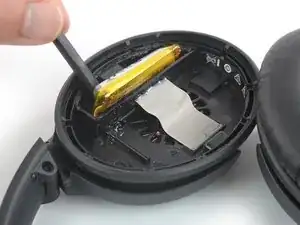
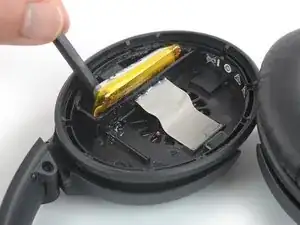
    • Setze das flache Ende eines Spudgers zwischen Akku und Akkufach ein.

    • Heble den Akku vorsichtig aus der Vertiefung.

    • Möglicherweise musst du die Position des Spudgers während dieses Vorgangs einige Male ändern, um eine übermäßige Krafteinwirkung auf einen einzelnen Punkt des Akkus zu vermeiden.

  14. RxOJgHnmGHBpjlEk
    RxOJgHnmGHBpjlEk
    PBELKDSJmWLLawtg
    DcrVJhsLpSSkHpiZ
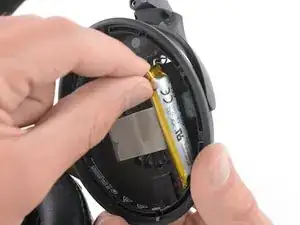
    • Entferne den Akku.

    • Setze nie einen beschädigten oder verformten Akku erneut ein, da dies ein potenzielles Sicherheitsrisiko darstellt. Ersetze ihn durch einen neuen Akku.

    • Entferne vor dem Einbau eines neuen Akkus den restlichen Klebstoff von den Kopfhörern und reinige die Klebeflächen mit Isopropylalkohol und einem fusselfreien Tuch.

    • Achte darauf, dass die Akkukabel lang genug sind, um sie auf die Leiterplatte zu löten, bevor du neue Klebstreifen in das Akkufach einsetzt.

    Hey, its circuit board not curcuit board.

    TimedIn -

    Really Bruno? Then I could say that your comment has also mistakes!:

    "Hey, its circuit board not curcuit board." is not, it is: "Hey, it's circuit board, not curcuit board."

    Thanks Dominik Schnabelrauch, Scott Head and Jeff Stephens for this guide.

    Jesus Areso -

    Lol timedin you are a dumbass. Go get a life

    Matthew Wilde -

Abschluss

Wenn möglich, schalte dein Gerät, nach erfolgter Reparatur ein, um es zu testen, bevor du neuen Kleber aufträgst und das Gerät wieder abdichtest.

Um dein Gerät wieder zusammenzubauen, folge diesen Anweisungen in umgekehrter Reihenfolge.

Um eine optimale Leistung zu erzielen, kalibriere deinen neu eingebauten Akku: Lade ihn auf 100 % auf, und lasse ihn noch mindestens zwei Stunden lang weiterladen. Benutze deine Kopfhörer dann so lange, bis sie sich aufgrund eines schwachen Akkus ausschalten. Lade den Akku ohne Unterbrechung abschließend nochmals auf 100 % auf.

Entsorge deinen Elektroschrott fachgerecht.

Die Reparatur verlief nicht wie geplant? In unserem Forum, findest du Hilfe bei der Fehlersuche.

Dominik Schnabelrauch

Mitglied seit: 23/11/16

167812 Reputation

26 Kommentare

спасибо ! будет полезно на будующее

Komar -

Hallo, tolle Beschreibung. Vielen Dank dafür.

kann man bei den Bose 700 NC auch den Akku tauschen ?

Würde mich sehr freuen, wenn das so wäre. Hat da jemand evtl bereits schon Erfahrungen gemacht. Könnte mir vorstellen, dass viele 700 NC jetzt auch in das Alter kommen, in dem der Akku schwach wird.

Jens Nußbaum -

Fk Bose for making it so difficult! They all care about the environment so much, don’t they?!

Batteries should be easily replaceable by any customer by themselves! Ear pads as well. Bose makes it harder so you would throw away your $300 headphones when battery dies. So much waste, plastic and other harmful stuff.

EU mandated to use USB-C on all devices to reduce the waste. Batteries are more harmful. They should make it mandatory for batteries to be user replaceable on tech like headphones. Manufacturers are making disposable headphones in purpose, obviously. Like AirPods and other similar earbuds. 18-24 months and you’re forced to throw them away. They should offer cheap battery replacement for AirPods and like earbuds as well. Maybe trade in deals. $70-$90 a bud isn’t cheap replacement.

Companies are lying about the love for the environment to make us buy more and add more harmful waste to it.

Usern@me -

Actually, you can buy the earpads separately, even from BOSE themselves. I’ve replaced mine 3 or 4 times already and it’s pretty straight forward
Florian Wendelborn -

Thanks. Replaced my bose qc35 headphone battery. Works perfectly!

Thomas Maher -

Wastage and ‘the environment’ are not quite the same thing. Most, if not all, of the material used to make the device is recyclable. It’s not an issue of damage to the environment for companies to make it difficult, or really, to not make it easy to replace a battery. You’ll find many companies do this in order to make their devices more water-resistant and dust-resistant. It’s not just because the big bad rich guys hate the planet.

If you’ve an issue with waste, contribute your waste to recycling. It’s your fault, not the company who made the product’s fault, if you don’t.

Great guide.

Harry Grade -

Of course it is. Recycling needs energy. And recycling needs to seperate all the parts and composites. If you really think this earphone can get completly recycled you also think the the Santa Claus who brought this to you is real. Just use Google to see where all this electronic parts are “getting recycled”. Poorest African childs are burning it to get at least the rare materials of it for a tiny bit of money. Leave your beautyful and peaceful bubble where for every problem comes a great technological solution.

Felix Kallenbach -

"its your fault the product is wasteful, not the company's". oh wonderful, a corporate stooge.

never mind the fact that even if all parts are recyclable, theyre often too uneconomical for anyone to bother. or that companies specifically design for them to poorly repairable, which means theyll end up being thrown away or be damaged while trying to do so.

its reuse, reduce, and then recycle.

and recycling your tech is hardly a solution when the battery needs replacing. what an absolutely braindead take.

Soban -

Sir do you have tutorial to repair bose quitecomfort earbuds with left side not working? thank you

densus88 densus89 -

Hi! Is this process needed to be done only for the left ear?

Andrei Verdes -

Hi Andrei,

if you want to replace the battery there is only one in the left side of the headphones you need to replace.

Dominik Schnabelrauch -

that's really important to know as the right ear as well has a shut glued battery compartment.

Florian -

Dit ziet er lastig uit, dat gaat mij niet lukken. Weet iemand een bedrijf die dit doet? Bvd, Hans

Hans Wiltink -

Unfortunately the battery is not available from reputable sources. I found a seller on ebay which sells compatible batteries from the brand vhbw. They look decent, however are available in 350mAh and 600mAh. If I see it correctly on the pictures above, the original battery has 495mAh.

Does anyone have a clue if those are legit and I can just use the 600mAh type?

Florian -

I just installed the 600mAh from vhbw. It works fine so far.

350mAh, 495mAh and 600mAh are different capacities and the higher is better. What's important is the voltage (3.7V) which should not differ too much.

If vhbw is not lying on its numbers, with the 600mAh you should get more music on a single charge than with the original battery, that's it 😉

Quentin H. -

Centralsound.co carries the battery

Michael H -

I just installed the 600mAh from vhbw. It works fine so far.

350mAh, 495mAh and 600mAh are different capacities and the higher is better. What's important is the voltage (3.7V) which should not differ too much.

If vhbw is not lying on its numbers, you should get more music on a single charge than with the original battery, that's it 😉

Quentin H. -

I didn't need to use any heat to lift the battery cover.

I used a thin blade / knife to cut the adhesive between the lid and the headphones on the exposed sides and then managed to carefully pry it open with my fingers.

The adhesive, in my case, was a bit rubbery and thus not too difficult to remove.

Obviously, be very careful with sharp objects around batteries, as stated in the guide also.

To put it back on, I just cut a couple of very tiny pieces of double sided tape. We'll see if that holds up well.

Also, I was wondering if the glue is there to somehow protect the wearer in case the battery does break down and catch on fire.

And thus if you should glue the battery lid shut properly after replacing the battery. Any ideas?

Albert Einstein -

I want to know how to do QC45

Please write about QC45

Ifixit is best!

woojae0128 -

So I surmise that the headphones come with one battery from factory. In the left cup. But there is space for anotherin the right ear cup... any reason i cant have a battery each side and double the life? I guess I'm the guinea pig..

DVS -

How are you going to run the wires over? you do realize there are 2 folding joints and then the headband to worry about?

abu hajar -

Thank you, this was extremely helpful! If anyone is struggling to soften the glue, be patient. Even if it seems like it isn't doing anything, the cap will lift much more easily if you evenly pre-heat the glue as described here. The rest was comparatively easy. Keep in mind that the battery is also glued to the bottom of the case, so be patient and persevere, it'll come off!

Chris -

OT: I use my BOSE 700 wired. Problem is I still have to charge them for NC and during charging they don't work. Is the a mod to charge and have NC at the same time? ??

Tom George -

There is a way that only developers of the headphones can use to run the headphones while they are still charging. It requires sending a special command I think over serial but you would need to know exactly the protocol used. But the product owners in their infinite wisdom decided against this option because it would be too confusing to the customer.

The only way is to somehow hunt down and make friends with a QA person at Bose who still has access to all the knowledge and hardware to actually enable and send that command.

source: I was there when they made that decision.

abu hajar -

Easier than I thought. I had never done soldering before.

Samuel -

Where can you find replacement #00 (6.2mm) screws (step 3)?

Jeff -