Einleitung

Der Akku am Soundlink Color ist bekannt dafür, nach einigen Monaten Gebrauch recht schnell an Leistung zu verlieren. Hier wird Schritt für Schritt das Auswechseln des Akkus gezeigt.

  1. O2XBTYDOtWyHNXnP
    O2XBTYDOtWyHNXnP
    XMIou3xebvNbErQO
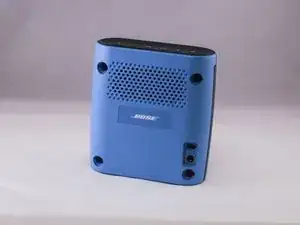
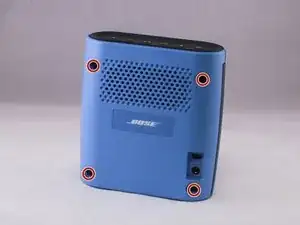
    • Auf der Rückseite des Geräts findest du vier runde Kunststoffstopfen.

    • Heble mit einem Metallspatel vorsichtig die vier Stopfen heraus.

    • Die Stopfen sind verklebt. Sei vorsichtig und zerkratze nicht das Gehäuse beim Entfernen. Benutze, wenn möglich, ein Werkzeug aus Plastik.

    hi i just finished prying apart those round buttons. it is very important to know if you dont want to mangle the button trying to pry it loose. if your looking down at the four buttons the inside part of all the four round circles is where you put a thin small tool, that is where the opening is to eventually pull up the whole thing without having to mangle the circle. so if your looking at the four circles the opening will be in the part of circle where all rounds face each other inward i hope this helps

    art -

    Note that the torx plus is a 5 star tool, and was the size 15 for me. Make sure you don't purchase the common 6 sided star tool.

    Mark -

    Knowing you have to replace battery, why are the %#*@ things glued on? Just sayin’

    Toni -

    Knowing battery needs to be replaced, why are these things glued??

    Toni -

    Not a tool to remove! Why’re they glued in the first place?

    Toni -

    I’ve ruined perfectly good tools!

    Toni -

    This has become stupid! Posting comments that never appear!

    Toni -

    Should be effing impossible!

    Toni -

    Sorry, just now found them! Honestly, this can become impossible!

    Toni -

    I found it not possible to remove the screw caps cleanly, without messing up the case around the caps. Here’s a new method. This method damages the screw caps, but it keeps the case from getting mangled.

    1. Use a spring-loaded center punch to emboss a small dimple in the center of each screw cap.

    2. Drill a hole (using a 1/8th-inch bit) in each cap, using the aforementioned dimple to center the bit.

    3. Use a small screwdriver shaft to pry out each screw cap, working each cap gently up and out, in a circular motion.

    NOTE: The prying action (not to mention the hole you just drilled) will damage the screw caps enough that you probably will end up just tossing them. They serve no functional purpose other than to make replacing the battery more challenging. (Thanks Bose!)

    If you do elect to re-install the screw caps, note that they’re keyed uniquely (in pairs). They are not interchangeable.

    I tossed mine.

    Riccardo -

    I used a similar method, however, I found a small screw to fit the hole, screwed it in place, I could then grab the upper part of the screw around the head area with a pair of pliers and pull the plugs out with no problem. Take note of the 5 sided torx bit. Not the standard 6 sided ones.

    timjamie -

    I also just filled a small hole in them and used a scre to yank them out. Tossed caps in garbage. I’ve now purchased multiple torx tools and still don’t have the right one. Trying again….

    Craig Stout -

    There is no such animal as a 1.8 cm Torx plus bit. A great site made poor with misleading information. Boo hoo

    phpeh -

    I’m also struggling to get the right tool, but now see it’s a 5 sided Torx size 15. Not the standard 6 sided Torx that I now have a few of.

    Craig Stout -

    It says: “1.8 cm LONG …” That’s actually not talking about the torx head size but rather the screw shaft. Just saying…

    Jeremy Cotter -

    These are indeed 5-sided Torx Security, size 15; however the shaft of my multibit seems too fat to fit in the plastic canal.

    Which multibit (precision?) screwdriver are you guys using? The canal seems to be just 8mm wide.

    Yklamin -

    This set worked just fine for me : )

    Yakamoz 2 Set of 7Pcs 1/4" Hex Shank Magnetic 5 Point Security Star Torx Screwdriver Bits Set | T10-T40, 2-Inch Length

    https://www.amazon.com/gp/product/B07T9S...

    Matt Monsour -

    Yep, removal of the plugs is messy. Obviously, BOSE intended these speakers to be a throwaway! There is a “sweet spot” on the plugs where I carefully hammered a very thin screwdriver blade along the edge of the plug until the screwdriver plunged further down along the side of the plug. At that point, I could pry the plug out. There was a little damage to the case at the edge of the plug hole, and the plugs were damaged enough that I would throw them away. I might consider putting some silicone gel in the holes where the plugs used to be. Next time, pulling out the silicone has got to be easier than pulling these !@#$%^&* plugs!

    Bryant Hozempa -

    ! WICHTIG! Deutscher Kommentar unten.

    So Yeah the plugs are a nightmare, I dont know if the warning is the same but in german it says: Use a plastic tool if possible. Dont. Simply because its not possible, its a tight fit of a plug, glued at the bottom.

    Same as some others here i used a screwdriver that is as thin as possible and as thick as needed for it not to bend or break.

    Obviously this will leave marks on the chassis. But i dont think i they designed it as a throw away product. It is waterproof afterall and i had mine repaired when there was still guarantee. I suppose they have some industrial vacuum tool and use new plugs everytime.

    DIE BESCHREIBUNG IST AUF MEIN GERÄT NICHT ZUTREFFEND!

    Ich weiß nicht ob es Unterschiede in den Geräten gibt, aber bei diesem kann ich sagen: aufgrund des Klebers kann man Plastikwerkzeuge vergessen und es wird Schäden geben. Da mein Gerät nicht lädt und lange keine Garantie mehr hat kann mir das persönlich egal sein. Nur finde ich die Beschreibung irreführend.

    Niero -

    To get these caps out I had to drill through them, and than pull them out.

    Before that I trird to pull these caps with little flat screw drivers but I ended broking 2 screw drivers

    Tamir Chartarifsky -

  2. 4NOhArtQLEA3EYqG
    4NOhArtQLEA3EYqG
    gvGFnesnGAEpAupQ
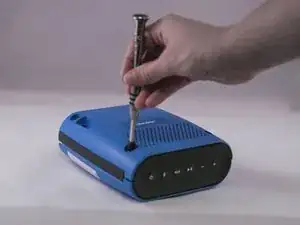
    • Entferne die vier 1,8 cm Torx Plus TR Schrauben vom äußeren Gehäuse.

    the torque sizing bit would be the number 5 torque bit which will fit in the screw to unscrew it

    art -

    My experience required a number 15 torx plus head.

    This was a 5 sided star, not a 6 sided star.

    Mark -

    It's NOT torx plus. It's torx SECURITY. Torx Plus is designed for high torque situations. The bit with the hole in the middle is Torx Security.

    Dennis Lupatsky -

    So what size Torx Security bit is needed for this task please and thank you

    Cobb Adams -

    Ok,how much more complicated can this get?

    Toni -

    Disappointed the Pro Tech Toolkit didn’t include the tip I needed. However I would like to know how to buy a 1.8 tip. The link you give in the list of tools needed takes me to a product on Amazon which includes 10, 15, 20 tips. I’d assume a 1.8 cm would be an 18?

    mark thornburg -

    1,8 cm is the length of the screw. Security Torx f a center pin, so you need a tip with a corresponding hole. Try 10, 15 or 20.

    VauWeh -

    1,8 cm is the length of the screw. Security Torx feature a center pin, so you need a tip with a corresponding hole. Try 10, 15 or 20.

    VauWeh -

    Security Torx 15 with 5 sides.

    agentbad -

    Hard to remove plugs, glue in the screw head, special torx security screws… it’s almost like Bose wants you to have to replace it when the battery dies. I will… but JBL makes one for about the same price. I won’t give Bose the satisfaction of having beaten me.

    cmajerle -

    Torx 5 point 15IPR

    Christopher -

    Luckily, there was no glue on the screws in my unit. The screws came out without incident, using a Protorq Torx Plus-IPR, 5-point tamper proof security bit, #15.

    Bryant Hozempa -

    On my speaker this dose not use a T15 torx security screw. It uses a P7 security bit of some sort. I bought a Ifixit Manta bit set which has a Pentalobe bits but not the right size or the security version and this is supposed to be there most complete bit set… very disappointed. I ended up using a 2.5 flat head to accomplish removing the screws.

    Samuel Tisdale -

    It's definitely TPS15.

    Markus Wingler -

  3. qbYhclh34PKILVhW
    qbYhclh34PKILVhW
    PKCtBsXBZWU2rcJs
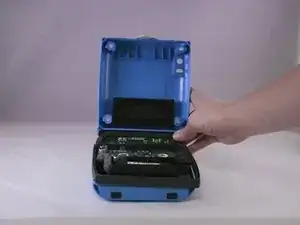
    • Öffne vorsichtig das Gehäuse.

    • Das obere Tastenfeld muss beim Zusammenbau wahrscheinlich wieder festgeklebt werden.

  4. rwTphweAJnGnNh3s
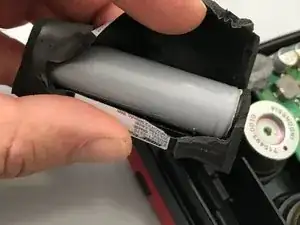
    • Entferne den Akku sorgfältig mit einer Pinzette.

    • Hebe die innere Einheit aus dem äußeren Gehäuse heraus.

    Where do you get replacement battery?

    Benjamin Rodriguez -

    Que modelo es la batería?

    alejoaargmen -

    En este caso: Panasonic NCR18650B (Paso 7)

    Es importante que sea el modelo con terminales para soldar.En caso contrario, tendrías que soldar directamente sobre la batería. Se puede hacer, pero no es recomendable ya que se puede sobrecalentar y causar un problema grave.

    Jukka Samish -

  5. AixOYx3JWZpER2Ax
    • Schneide die Abdeckung des Akkus teilweise an der Seite auf. Achte darauf, dass du nicht den Akku oder andere Bauteile verletzt. Schneide nur soweit auf, dass du den Akku entfernen kannst, die Abdeckung wird später noch gebraucht.

    Cual modelo es esa batería?

    alejoaargmen -

  6. VRvyyIGZfqFPTTnG
    VRvyyIGZfqFPTTnG
    UCHoHTajasXo2UVo
    5rZRhHKdvaByN5Rf
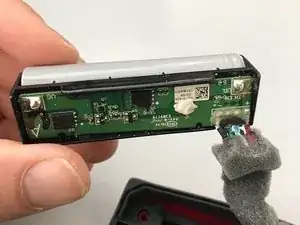
    • Entlöte die Akkuanschlüsse von der Platine und entferne den Akku.

    In my Soundlink there is a different PCB, which is much smaller. And there is no plastic frame that holds the battery. The battery is connected with nickel tabs to the PCB and glued to it with double sided tape. And this sandwich construction is sealed with heat shrink and covered with foam tape to make it fit in the enclosure. Procedure remains roughly the same, but you have to cut through the heat shrink to be able to remove the battery.

    Marcel -

    Wanna do mine?? I'd pay. Gilbertct. Hotmail

    Christian Gilbert -

    seem like you are showing two different PCBs here, with different styles of connection, no? Couldn’t find the battery with the attached soldering tabs - exact link, please?

    Ned Depew -

    I agree with Ned Depew, something is missing in the description because the pictures don’t match up and we can’t tell how you connected the new battery. The PCBs are different. This part does not make sense.

    Tracy M. -

  7. tbXgZgsrxNAVZkMN
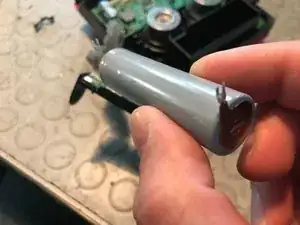
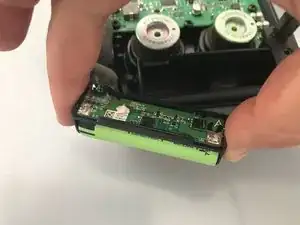
    • Ich habe mich für eine Panasonic NCR18650B entschieden. Wähle die Version mit den Lötfahnen, sonst ist das Verlöten fast unmöglich und der Akku passt nicht mehr. Vom Test her sieht er gut aus, mit der Zeit wird es sich zeigen. Schaue auch in die Kommentare.

    • Passe den neuen Akku ein, kürze die Lötfahnen auf die gewünschte Länge und achte auf die Polarität. Möglicherweise musst du die Löcher im Gehäuse mit einem Cutter auf weiten, damit die Anschlüsse durchgehen.

    “Pay attention to polarity” Please confirm: the positive lead solders to the PCB at the point marked “VP.” The negative lead solders to the PCB at the point marked “VG.” Correct? Can’t tell from photo. Thanks.

    Riccardo -

    Yes that’s correct. However I think it would be best to double-check using a multimeter before you solder the whole thing back together (that’s what I did).

    Krisprols -

    VP= Voltage Positive (+)

    VG= Voltage Ground (-)

    Giacomo di ciocco -

    Riccardo, did you get a response to your question?

    Deete -

    Michael, has the NCR18650B worked out ok?

    Deete -

    The NCR18650B is 3.7 but the one from the fatory is 3.6, Does it work?

    Aske -

    I can’t find any Panasonic NCR18650B . Can you tell what the specs should be to buy an alternative one?

    pparfait -

    Bought a LG 18650 - HG2 - Li-Ion 3000 mAh - Doesn’t seem to be charged but I put it to charge and it seems to be charging - the speaker at least is now working connected to a power supply.

    Didn’t come with solder tags. What follows is not strictly safe (soldering terminals on a Li ion battery): use a hot iron (I used 480ºC), a good flux and as little solder as you can get away with. Gently scratch the terminal a little. Tin the terminal as fast as you can: so as little heat as possible goes to the battery. Let it cool. Whilst cooling pull the tags off the old battery (Carefully). I used some small flat surfaced long nosed pliers and then flattened them with a hammer on a hard surface. Tin them as well: keep an eye on which side for each end. Do the other battery terminal tinning. With the first end cooled, quickly solder the tab onto the tinned surface.Do the second terminal when cooled, making sure that the tab alignment corresponds with that of the first terminal.

    Christopher -

    Here is a link to the battery that I bought, the NCR 18650B with the solder tabs. I trimmed the tabs to fit the slots in the battery holder, rather than attempt to widen the slots:

    https://www.amazon.com/NCR18650B-Recharg...

    Installation complete and all seems to be working!

    Bryant Hozempa -

    Link to amazon is no longer good - goes to a “page not found”. Which is the same as all the other battery links. Is there another or can you provide more of a description that can be searched? Please. Thx Ur Phil for comment about use any 18650 battery with tabs.

    Steve R -

    I can’t find the battery Panasonic NCR18650B. Looks like Amazon no longer carries it. Any other battery recommendations?

    Ur Phil -

    Hey Phil, if you read the comments there are plenty of suggestions for alternate batteries. Really any 18650 format battery will fit the needs of this speaker. I'd look for a name brand with a decent capacity. Solder tabs are preferred. I soldered the old battery protection board directly to a battery but this is not reccomended. I'd also reccomend having some foam on hand so your battery doesn't have room to shake around. The bose battery had foam wrapping it. Good luck!

    Garrett Parmenter -

    If anyone is still looking for a good replacement battery, I used this one from Sparkfun and it's been working fine: https://www.sparkfun.com/products/13189

    wminner -

  8. jIBBPYQKArtMI1vo
    • Lege die Abdeckung aus Schaumstoff wieder auf, sie ist wegen der Vibrationen nötig und hält den Akku gut fest.

    Glued the bits of sponge back together with cyanoacrylate.

    On re-assembly take care to get the rubber surround correctly in place, especially the end near the controls.

    Christopher -

    Quand la batterie est changée il peut être nécessaire de recharger le logiciel de l’enceinte pour qu’elle fonctionne de nouveau. Rendez-vous sur le site https://btu.bose.com

    Suivre les instructions. Le téléchargement de BoseUpdaterInstaller_7.1.6.5134.exe sur le PC ou d’une version ultérieure sera nécessaire pour faire la mise à jour.

    Une fois « BoseUpdaterInstaller » installé revenir si nécessaire sur le site https://btu.bose.com et branchez l’enceinte Bluetooth à l'ordinateur avec le câble micro USB et voyez s'il est reconnu. Si c'est le cas, appuyez sur les touches suivantes sur le clavier de l’ordinateur, dans l'ordre, une à la fois, 'a' 'd' 'v' puis "flèche vers le haut" et "flèche vers le bas". Vous avez alors la possibilité de recharger le logiciel en sélectionnant [Upload Now].

    Une fois la procédure terminée (une à deux minutes environ) l’enceinte fonctionne de nouveau correctement.

    HubertM -

    When the battery is changed it may be necessary to reload the speaker software for it to work again. Go to https://btu.bose.com

    Follow the instructions. Downloading BoseUpdaterInstaller_7.1.6.5134.exe on the PC or later will be required to update.

    Once "BoseUpdaterInstaller" is installed, return if necessary to the site https://btu.bose.com and connect the Bluetooth speaker to the computer with the micro USB cable and see if it is recognized. If so, press the following keys on the computer keyboard, in order, one at a time, 'a' 'd' 'v' then 'up arrow' and 'down arrow'. You then have the option of reloading the software by selecting [Upload Now].

    Once the procedure is complete (approximately one to two minutes) the loudspeaker functions correctly again.

    HubertM -

Abschluss

Um dein Gerät wieder zusammenzusetzen, folge den Schritten in umgekehrter Reihenfolge.

Michael Thorn

Mitglied seit: 31/03/16

542 Reputation

57 Kommentare

Any recommendations where to pick up/order a replacement battery from?

Rob Miller -

See the link in the description, it is available thru Amazon

Giacomo di ciocco -

Has anyone found where to order battery from?

amitos80 -

Put battery part number in google and search it on ebay. It will come up with your replacement

Ron Emerson -

Mine still works fine, but I'd like to know like the others here where to get a battery that will work as a replacement.

chandlerwebb -

The inside screws have a post in the center and the Torx screw removal tool is flat headed. How are you able to unscrew this if the attachment is being blocked by the post?

Eric Bernstein -

It is a security bolt, and requires a "Torx plus TR" tool to remove it, not just a Torx tool. You need a Torx tool with a pit in the center to allow for the raised post in the torx-shaped socket in the bolt. It's a specialty tool.

Michael Schwehr -

Also standard Torx screws are 6 pointed. This one is a 5 pointed Torx 15 security bit.

Adam Plocher -

I broke the middle pin.. and the used a flatheaded screwdriver

Aske -

I have this Bose color and the thing doesn’t hold a charge more than a day. I suspected the battery. I went about to open it, and had to pry up the plastic tabs, damaging them as I did to get them to come out. Then the torx security screws. I ordered three different sets of torx bits, but none worked. Finally after seeing a video of a guy open a unit like this, he had made his own tool. He took a small flat head screwdriver and filed the middle of it so it would sit over the center pin. So I decided to just break the center pin and use a standard flat head to finally get the screws out. This worked and I will be replacing those screws with regular ones.

Max Solomon -

Any more specific advice how to get the screw covers off? All the spudgers and knives and things that I own are not helping me, don't want to mar it too much.

Matt -

Matt did you find an answer? I don’t know if they have different models with different adhesives or something, but I’ve broken 2 little flat heads, all the tips of my plastic spudgers, and my metal one seems way too large (and bent now after trying). I almost got one screw cover out but it’s been beat to $@$* and the back is all scratched from the screw drivers slipping.

Adam Plocher -

The plastic screw covers put up quite a fight, as they are glued in place. As a very last alternative, one could drill out the plastic plugs using a 0.5 inch drill to a depth of 1/16” on the short side. Replace the plugs using adhesive tape, or caulking… or don’t replace the covers at all.

Ralph -

Bose does not sell battery for Soundlink Color. But if you call them and report that your battery is not charging they will replace the Soundlink Color speakers for free and only pay shipping. Technical people can replace the battery with UR18650 zy from the market.

Placid -

Replacing it because of a bad battery is exactly the kind of wasteful thing that brought me, and I’m guessing many others, to this site to begin with. Just saying…

Jeremy Cotter -

how much does battery replacement costs?

Sandeep Pilli -

What size of Torx Plus TR bit would I need? I don't see an 1.8 cm or 18 mm available anywhere?

Duane -

Thanks For this manual

robzeijen -

Duane, just found your pist, the torx are special 5 point 15, instead of normal 6,

Da Har -

I just contacted Bose , and they offered me a new speaker for $50. My speaker is almost 2 years old.

jose -

just wondering about sourcing other batteries, seems the only one posted was about UR18650 zy.

has anyone tried this yet? also im assuming 2 of the 4 leads is some sort of sensor, so does this need to be considered when using a generic replacement?

thefunny1 -

The LGABB41865 is the direct replacement.

bara jabali -

where to order a replacement battery from?

George -

2. - LGABB41865 for $11.99 on Amazon Prime.

Christopher Clark -

Don’t bother. When you buy the replacement battery it is a bare cylinder. No connectors. Two of the 4 wires must be somehow attached to the battery. I think the original was spot-welded - not soldered. And what to do with the other 2 wires? And good luck trying to scrape off all the black rubber they magically surrounded the original with. Bose went to great lengths to make this truly unrepairable. Starting with those ridiculous plastic plugs, to a special 5-sided screw with the center post, and a spot-welded battery! Shame on Bose.

david cogen -

How do i know its just the battery thats the problem?

Pwee Locc -

Don’t bother. Call Bose and they’ll offer you a reduced price on a new Bose speaker. By the time you find a tool that’ll open up the cover, another tool to open up the screws, and then purchase the specialty screws, you might as well get a new speaker for $79.

B Reynolds -

Brilliant idea! Last resort for me, but excellent advice.

Ralph -

Just performed this (semi)successfully. I replaced the battery with the recommended replacement from the article and it’s functioning fine but doesn’t seem like the new battery is being charged in the speaker. If when I plug the speaker into the charger the battery light doesn’t flash or respond in any way.

Is this expected behavior with using a 3rd party battery or should it still report as charging with a flashing light?

Any responses are appreciated!

Randy Catanach -

Welp, seems as though I actually had a charging issue, not a battery issue. Can’t see anything physically wrong with the device so I guess it’s toast.

Randy Catanach -

Hey Randy, which of the two batteries did you use??

1) UR18650 zy

2) LGABB41865

Pankaj Rawat -

If the battery is not charging try going to the Bose website and going to the software updater page (btu.bose.com). Plug the speaker into the computer with the micro usb cable and see if it is recognized. If it is, press the following keys in order one at a time ‘a’ ‘d’ ‘v’ “the up arrow” and “the down arrow” so a-d-v-up-down and you should get the options to either upgrade or downgrade the speaker (it will say “advanced mode” somewhere on the screen). Pick whichever one will work for the speaker, either upgrade if the software is old or downgrade if it has the latest firmware and if it installs, the speaker will magically be able to charge again. Also try this first if you have a speaker that is not charging, I have personally resurrected 4 speakers this way.

John Grosodonia -

Question: is the battery protected or not? That is the question!

omarian -

I suspect the PCB attached directly to the battery regulates and protects the battery.

Ralph -

Hi, I have a Bose soundlink color 2 speaker where can I found the replacement for this battery? because the electronic component is failing

FlanzZ Erased -

Seems I have kina bricked the speakers through this tutorial… TheThe computer also doesn't recognise anything once plugged in. Anyone pls help..

sounddaljit -

Can someone link me to where they purchased the battery replacement? I searched Amazon, eBay, and Google. I found some on Newegg.com but they were flat tops. I already have a new Bose speaker, but my teen son and I are starting a business repairing small electronics and this will be our first project. Thanks!

Megan Jackson -

The original battery is Bose model # 064541, but search for Bose 064454. This is a different battery for other Bose speaker models, however, it is the same physical size & voltage (3.7 VDC) and comes with the PCB attached. Different offerings will range from 2600 - 3400mA , which should translate to longer discharge periods. - Good luck with the new business endeavor!

Ralph -

Can the mini usb charging port be replaced?

Jeff Prince -

Not going to buy another bose product. $130 for something that lasts a year and then they want you to re up for another $80 - get lost. HUGE disappointment

Jeff Prince -

I cannot see the link for the battery in the description. Searching for Panasonic NCR18650B does not show that item in Amazon.

Steven Zawalick -

Very nice tutorial Mr. Thorn, et al. !

Most difficult portion of the project is removing the plastic plugs covering the screws.

If I might add:

“The inside screws have a post in the center and the Torx screw removal tool is flat headed. How are you able to unscrew this if the attachment is being blocked by the post? “ - The screws require a 15mm - 5 point Torx Security (or tamper proof) torx bit. (Protorq is a good tool brand)

“Any recommendations where to pick up/order a replacement battery from?” & “Has anyone found where to order battery from?”

- The original battery is Bose model # 064541 - 3.7 VDC (volts direct current), ~ 2400mAh (milli-amps), 9.62 Wh (Watt hours).

- Search for Bose 064541, if you can find a similar battery with higher mAh and higher Wh (takes longer to discharge).

Ralph -

Correction: Sorry - Don’t search for “Bose 064541” , as you won’t find much.

Upon careful examination of the pictures in this tutorial, the original battery shown being removed is Bose model # 064458 - 3.6 VDC, 2500 mAh.

(Excellent job with the pictures!)

The original battery I removed from my Bose Soundlink Color is Bose model# 064541 - 3.7 VDC, 2450 mAh.

This heightens my suspicion that the Bose model# 064454 (or equivalent) used in other Bose speaker products, which has the same physical dimensions, voltage (3.7 VDC), & up to 3400 mAh should work well as a replacement.

Ralph -

please help me with information about why my bose soundlink color when conect to the charger flashing the green light and sound short the music and dont charge

William Guerrero -

Great Guide, getting the caps off the screws was by far the hardest part. Mine looks a little worse for the wear, but the speaker works again. Thanks for the guide!

Tyler Duke -

This is great, however, I’d like to add some suggestions:

1. If your unit is not charging the 1st thing you should try is connecting to the Bose Speaker (software) updater. The app is located in both the Apple Store & Google Play. Or you can update it through a connection with your computer at the following site: http://btu.bose.com/ In many cases, this may solve your problem.

2. You will need to purchase or borrow a Torx FIVE (5) point TR size 15 bit (TR = tamper resistant due to an internal post on the screw). [Note that most Torx bits are SIX (6) points & Non-TR.]

3. Battery replacement options: NCR18650B, LGABB41865, or UR18650ZY

4. Bose has made it purposefully and excruciatingly difficult to try & do the fix yourself. Battery replacement is “getting even” & the 2nd way in which the consumer can fight back with this “use it for a year or two & then chunk it” mentality. The 1st is to refuse to purchase their products in the future (note Sonos here). There’s only so much landfill capacity left.

Allen Wall -

Battery with solder tabs is called “NCR18650B ZLF”

denisfou -

This worked like a charm. Mine was a SoundLink not SoundLink Color. Thanks, works like new

Dennis Hanna -

Thanks guys - your input helped me make the decision to junk the unit with nickle-cad batt and buy a fixable new non-bose speaker.

These things are like iphones. : )

Mike Agnew -

What speaker did you end up going with? My sound-links have lasted years and have great quality so i like them, but are starting to really not hold a charge very long.

Brian Duffy -

I read all of these comments and the one about going to the Bose website works. I just will add that you need to open the page, connect the bose to the USB cable and the laptop. Hit the A D V buttons in sequence then hold the up and down buttons at the same time til the advanced page opens…It will give you the option to update now. Do that…It takes about 5 minutes then the unit works again!

Maybe my battery is still working well enough to make the speaker last another few weeks til my JBL Xtreme 2 comes from overseas. ( am in Jamaica)

I have this Color speaker clipped to my mountain bike and it keeps me riding…

Thanks all for you suggestions to reinstall the battery…seems like a lot more trouble than it is worth though. I may do it for a project after the JBL comes.

steve -

I got my battery (Panasonic NCR18650B) from here https://www.batteriesplus.co.uk/ with the tabs on. One thing to watch out for…there is an electronic tab at the top of the internal circuit board that connects to the the control panel circuit board at the top. My one had slipped out so the controls didn’t work but managed to spot it and slip it back into its connector. Its now working perfectly! I love the fact i don’t have to buy a new one and I’ve saved it going into landfill. Bose should be ashamed for making it so difficult to replace the battery.

Dan Copping -

In my Bose speaker original battery is: SAMSUNG ICR 18650-26H.

Alexey Astashkov -

If you're looking for replacement battery in Europe, i bought mine on Nkon.nl. You can even ask connectors like needed in this repair as option for cheap. Also bought different battery for another repair (for a "Mighty" vaporizer). Both were good quality. Don't want to advertise, but i tend to avoid amazon if i can, especially for product sensible to storage and transport, like battery, hdd, etc. hope it will help

I. Wambo -

If you have stripped screws like many people, after trying a lot of things, i finally managed to remove them by first breaking the small metal rod at the center of the security torx screws, and then by adding aluminum foil and a piece of a latex glove to increase the grip of my screwdriver (used a flathead one large enough to almost grip). Now i'm looking for compatible screws to avoid the problem in the future. Will update if i find proper replacement.

Managed to unscrew one only by using a a small flathead that could fit between the rod and the sides, but the other one had the metal center rod break during this attempt.

I. Wambo -

Alright so as promised and in hope it will help someone in the future. I measured the screws to find fitting replacement (Small error is possible) :

Head Type : Pan Head

Head Height : 3.1 mm

Head Diameter 7.3 mm

Outer thread Diameter : 4mm (M4)

Inside thread Diameter : 3 mm

Thread Pitch : 1 mm

Screw Length : 14.5 mm

Number of thread : 9

I. Wambo -

Good work This

kulddep_singh86 -