Einleitung

Use this guide to disassemble an Asus N551JX laptop to gain access to the internal components.

  1. SEUtqtvuDMGfDkW5
    • Turn off the laptop.

    • Remove all USB connections and SD cards.

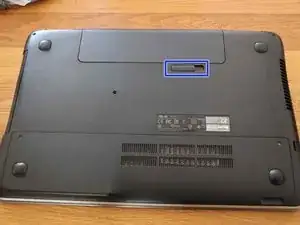
    • Turn the laptop upside down on a flat surface. Then, remove the battery by pushing the highlighted plastic slide to the right and lifting the battery out.

  2. DyOVFH5IFXNQ1XNF
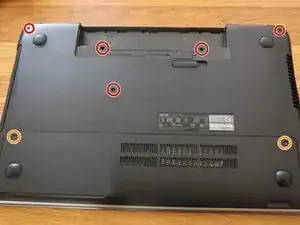
    • Remove all marked screws:

    • Five #1 Phillips screws

    • Two #0 Phillips screws

    • Note that the middle and bottom red screws are slightly narrower than the other red screws. So make sure you keep these screws apart to prevent any damage to your device.

    • The orange screws are slightly longer in size. Ensure you keep them separate from the red screws.

  3. aWg2itLXbTjsCNRW
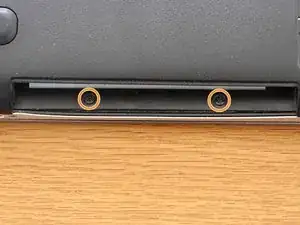
    • Slide the disk drive out of the laptop case.

    • Remove the screws marked in the photo:

    • Two #0 Phillips screws

    This is the DVD drive. Not the hard disk drive.

    Pieter -

  4. dFfxDjdQ4mTJvE2K
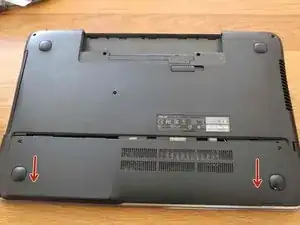
    • Remove the rear housing by sliding it downwards, as indicated in the photo.

  5. ohQGerkUqMP3WLqw
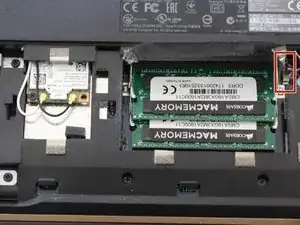
    • Use the flat end of a spudger to disconnect the connector marked in the photo.

  6. ccWRchmQLZWQhHjX
    ccWRchmQLZWQhHjX
    IqTFa3tipD4SmtF2
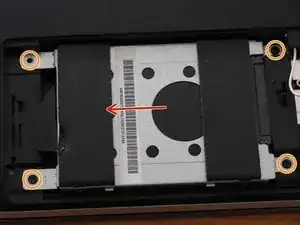
    • Remove the hard drive (HDD) by unscrewing the marked screws and sliding the drive in the direction of the arrow.

    • Four #0 Phillips Screws

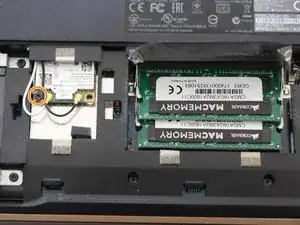
    • Remove the memory disk by gently pushing down the metal arms on the side of the disk.

    • Remove the WLAN module by disconnecting the antennas and unscrewing the screw marked in the photo.

    • #0 Phillips Screw

    • Use the tip of a spudger to disconnect the antennas.

    I have alu foil glued to the RAM. I gently wiggled the foil away from the RAM and kept the foil in place and removed the RAM.

    Pieter -

  7. WjV3XAZVHTtYlftt
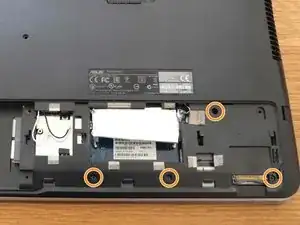
    • Remove the screws marked in the photo:

    • Four #0 Phillips screws

  8. kk16yChNQRcnNSty
    kk16yChNQRcnNSty
    dFJnUBSeHlOtOnyZ
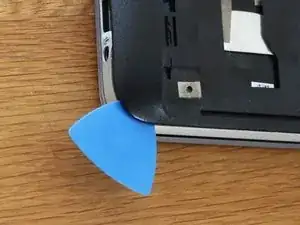
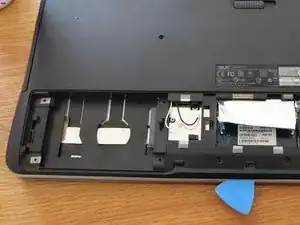
    • Start by inserting an opening pick in the corner where the headphone jack is located. Insert your pick between the two panels.

    • Continue by sliding the opening pick to the right.

    • Repeat these steps on the other two sides. Stick your pick in the corners on these sides as well. However, do not open the side of the case where the battery is located yet.

    • If you hear a clicking sound, this is not a problem; you may continue working.

    • Usage of a spudger may be needed. If so, use the flat end of the spudger.

  9. YYboyg6rS2OT3CvG
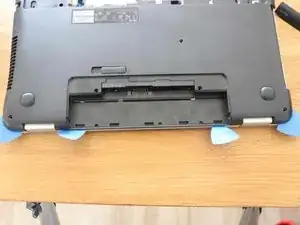
    • Insert your opening picks between the different parts of the case (example shown in photo) and make sure all the plastic clips are loose.

    • Turn the laptop 180 degrees.

    • Do not try to remove the black plastic body at this time.

    The back corners don’t open on the side of the battery! You need to “open the laptop” using the hinges to open the screen panel with the keyboard in the next step. Don’t try to pry open the whole black plastic body as it doesn’t come free from the lid.

    Pieter -

  10. Qtbu4BqrFMNOmL32
    Qtbu4BqrFMNOmL32
    SFhOHOYhKcJvWBVw
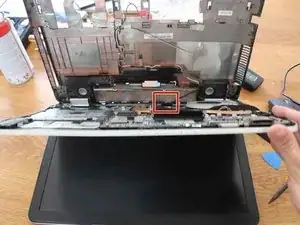
    • Open the keyboard side of the laptop while holding the aluminium body.

    • Carefully move the aluminum body towards you.

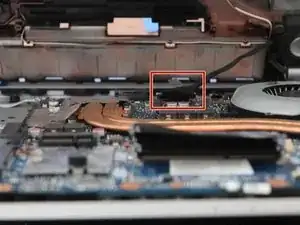
    • Disconnect the marked connector by pulling the plastic pull tab straight up.

    • It is essential that you keep the laptop in this position when opening it.

    • Stop immediately if you hear cracking sounds and try to reposition the housing.

    Important to be carefull here and not break the connector with the red square in the picture! When you hinge open the laptop there will come a tension on that connector!

    Pieter -

  11. fTf1lisYAuNABfVq
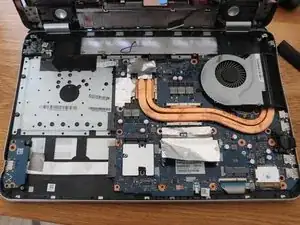
    • You now have gained access to the internal hardware of the laptop, and can perform any required maintenance.

    • Reassemble by following this guide in reverse order.

    • During reassembly, keep track of the unplugged connector in step 6.

    • During reassembly, be careful when closing the aluminum portion of the housing. The plastic clips on the side of the battery are very fragile.

Abschluss

To reassemble the device, follow these instructions in reverse order.

n9iels

Mitglied seit: 26/05/19

406 Reputation

2 Kommentare

Thank you for this guide, I'd have struggled without it.

I had a bit of a dent where my power socket was, and it snapped the surround of the screw holding it in place, a replacement is £25 on eBay.

I figured instead of paying that I'd try using a glue gun to fill the void between the socket and the plastic wall behind it.

Also bizarrely my HDD was only held in by two screws, which is a bit strange as I don't think I've ever had this laptop repaired before.

Ste Crook -

Thank you very much fot this guide. It helped me a lot since after remving all screws I had no idea how to procede. Step 8 and 10 especially were helpful for me.

Thomas
Thomas Kintzel -