Einleitung

Disabling DualShock 4's Blue LED

  1. NIXkFvO5X5pAyAGc
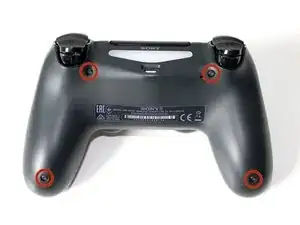
    • Remove the four Phillips #00 screws from the back of the controller.

  2. 3CaQOePiWtJySsD1
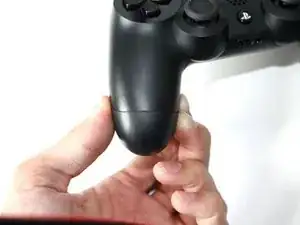
    • Remove the bottom half of the controller while monitoring the triggers and springs within.

  3. 6ifLBIlUJESMMiNF
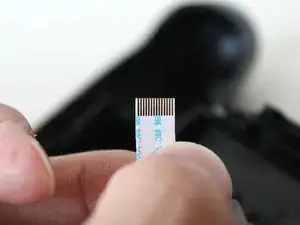
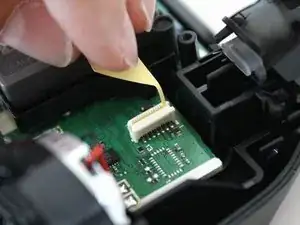
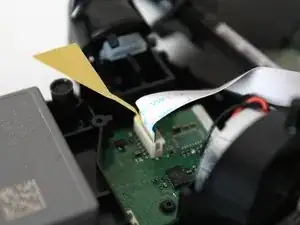
    • Pull the ribbon cable out of the LED/USB connecter assembly in the center of the controller.

  4. TOIyRkAVonMDOnaT
    TOIyRkAVonMDOnaT
    UxPoj6vRLGnYByXZ
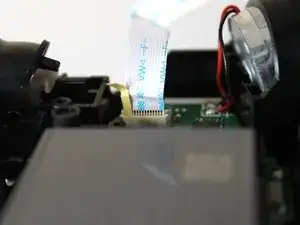
    • Place a thin piece of paper in front of the last 2 pins (counting from left to right).

    • The paper will prevent the motherboard from completing the circuit that enables the blue LED.

    So I found a diagram online, and it seems like the first pin on the left is a ground… is it a ground exclusively for the LED? I think I’m going to cover 2, 3, 4 and 5 from the left to cover all the light circuits and leave 1 alone just in case something else uses it. I don’t know anything about this stuff, full disclosure.

    Andrew Whightsel -

  5. DgFlNNLfsB6aeYfa
    DgFlNNLfsB6aeYfa
    cArDfmTfBAEXBONY
    • Don't twist the ribbon cable when inserting it.

    • Insert back ribbon cable with piece of thin paper already inserted.

    • Connect the bottom half of the DualShock 4 controller together.

    • Rescrew 4 Phillips screws on the back of the controller.

Abschluss

All you have to do now - is embrace the darkness; don't forget to screw the thing back together though :)

Darie H

Mitglied seit: 20/11/12

4528 Reputation

16 Kommentare

You are using the word "loose" incorrectly.

Loose is an adjective, the opposite of tight or contained.

Lose is a verb that means to suffer the loss of, to miss.

Matt Ferguson -

*crrrrcth*...."we've got a 10-O-3 in progress, disturbing the English language, requesting grammar assistance"....*crrrrctch*

*crrrrctch*...."roger dispatch, Ferguson en route"....*crrrrtch*

Fuzy Munky -

Yeah, some people actually prefer their guides to look as professional as possible. Correcting someone’s grammar in a guide is meant to help them properly establish their brand. If you prefer to write a guide, Fuzy, with completely broken English (or whichever language you prefer) then you’re free to do so. I’m quite sure many people would second-guess the information within if the grammar is terrible. It’s all about appearance, professionalism, and personal brand.

Robert -

Thanks - now I realised it too :))

Darie H -

This $@$* &&^& my &&^&^$^ controller up and now I'm mad fickle this $@$*

Mario Avila -

Messed it up how?

Adam U. -

@ Fuzy Munky: It's a guide to fixing something. If the author can't grasp the basics of the English language than they have no business writing a guide.

alex4371 -

I really don't get which side you're on .. Given how pristine your spelling is I'd say mine though .. Welcome aboard !

Darie H -

Someone who uses “than” instead of “then” has no business critisizing others grammar.

Cody Giles -

A few notes on this, with regards to the PS4 Slim’s revision of the controller:

1 - Opening the case with plastic spudgers WILL damage the case, and will make the seam stand out where the patterned and smooth pieces meet.

2 - The LED is an RGB unit. Pinout with the LED up and its pins facing you, from left to right: Ground, Green, Blue, Red.

3 - On this model, the ribbon cable is reduced to 10 wires. PCB Socket pinout where pin 10 is closest to the LED: (10) Ground, (09) Blue, (08) Red, (07) Green.

I was hoping to only disable the normally-on blue LED. It would prevent me from knowing the controller is on, but not from knowing if it is charging. As the cable layout makes this a non-trivial alteration, I settled for putting a piece of scotch tape over all four LED wires of the ribbon cable, folding the rest of the tape over the back side to keep it secure, and trimming the excess. This model has an extra/smaller light bar on top, it may be more convenient to just back the main translucent panel with electrical tape.

rbol -

After more experience, a few revisions:

1 - Use a triangular “guitar-pick” spudger, starting near the outer edge of L1 and R1.

2 - My above pin reference is incorrect! Pin 1 of the micro-USB port (+5V) is connected to the last trace in the ribbon cable. The above mod disabled the LED as planned, but it also prevented the controller from charging.

Have now affixed black electrical tape behind the front diffuser panel. While this negates any battery savings, it does allow the touch-pad to show the status, and is a lot faster than trying to cover up three tiny wires which are in the middle of the cable….

rbol -

You can slip a thin piece of plastic into the cable socket then put the ribbon in behind it! Took me about 20 minutes to get it right without blocking USB power too

Tanner Bennett -

As rbol said, newer controllers have a different pin layout. The ribbon is now on the left side instead of the right, too. From top to bottom, since the ribbon goes up and down:

10: something important

9: Blue

8: Red

7: Green

If you want to disable all LED colors, you want to cover up the 2nd, 3rd, and 4th pins from the top of the ribbon. I was able to do this by meticulously cutting a piece of plastic from a candy wrapper to the right width and placing it into the socket over the pins, then inserting the ribbon cable behind it.

Tanner Bennett -

Doesn’t work for v2

Pavel Churiumov -

with 12 pins in the ribbon. 2,3,4 -> works and charging

Pavel Churiumov -

Can you disable only the blue light but still have the orange charge light?

Adam U. -