Einleitung

Generelle grundständige Anleitung für DVD-Laufwerk Gehäuse #80.

  1. WPcg6hfCMkTtjj2Q
    WPcg6hfCMkTtjj2Q
    ACPTZX2IFKQ1K4WT
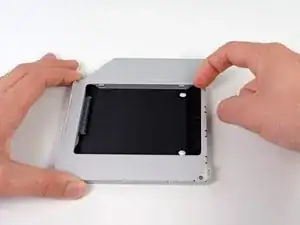
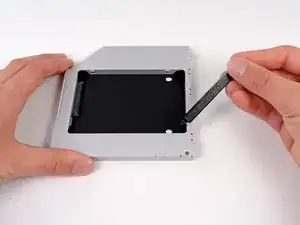
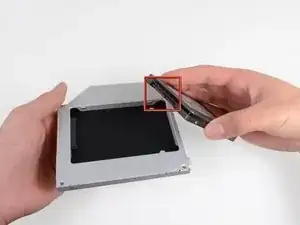
    • Entferne den Abstandhalter aus Plastik aus dem Gehäuse des DVD-Laufwerks, indem du auf einer der beiden Seiten die Plastiklasche eindrückst und den Abstandhalter nach oben herausnimmst.

    is it 9,5mm or 12,7mm for the caddy? My stuff macbook pro mid 2010, need advice what size is compatible. Thank you

    Adi Purba -

    All Macbooks use 9.5mm Optical Drive Caddy, also, If you’re wondering as well, the Optical Drive runs at SATA II speeds just like with the main hard drive area, so if you’re using a SSD, then it’s going to run at a slightly slower speed.

    - PS5iscool - -

  2. NLZqqjQlYQPglXyI
    NLZqqjQlYQPglXyI
    xMhBlQkNdV4PwSMS
    UeALDwtY1rY2dJX4
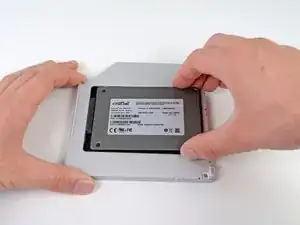
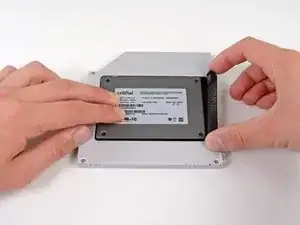
    • Achte darauf, dass die Anschlüsse für die Festplatte nach unten zeigen, bevor du die Festplatte in das Gehäuse setzt.

    • Setze die Festplatte vorsichtig in den dafür vorgesehenen Platz in dem Gehäuse.

    • Halte das Gehäuse mit einer Hand fest und drücke die Festplatte mit der anderen Hand in die Anschlüsse im Gehäuse.

    Okay it seems like some models of MacBook Pro have issues with a fast (6Gbit/s) SSD in the optical bay. Even though my Mac says it offers 6Gbit on both bays it simply didn't work in the optical bay. So I switched places between the two drives and everything seems to work. My Mac booted from the old HDD in optical bay automatically and then I cloned it afterwards and changed the startup disk to the new one. As said before, don't put a fast SSD in the optical bay!

    Carl -

    This is an extremely late response to an old comment, but… whatev’s. My 2011 MacBook Pro had that issue: the main (HDD bay) SATA operated at 6Gbit, and while the optical bay said it was 6Gbit, the “Negotiated Link Speed” was like 1.5Gbits regardless of what you put in it (I can understand 1.5Gbits for an optical drive, but not for an SSD). Some of the early 2012 models did the same thing, from what I understand, but that was corrected pretty early on; both my 13” and 15” 2012’s run at 6Gb/s on both SATA busses.

    AJH -

    It’s not wise to swop the optidrive for an HD as there is no physical protection. The caddy is only intended for an SSD.

    Ben Ormerod -

  3. 4bUrYFHS5udDCnIj
    4bUrYFHS5udDCnIj
    Ayxd2pXAkaRgHAFN
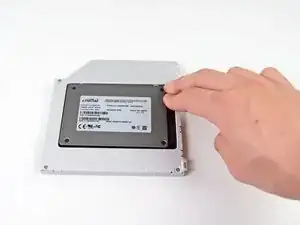
    • Wenn die Festplatte im Gehäuse sitzt, halte sie mit einer Hand fest und setze den Abstandhalter wieder in das Gehäuse ein.

    Normally with the HD enclosure there come a set of screws. use these to screw down the HD in the enclosure since you need to flip it up side down to reinstall it into the MBP

    Bart -

  4. oXd3ohEWeSgsIcWE
    oXd3ohEWeSgsIcWE
    QionNQlc1ANtll4c
    • Verwende zwei #1 Kreuzschlitzschrauben, um die Festplatte im Gehäuse zu sichern.

    Where are these screws coming from? Were they part of the original optical drive?

    Bradley DeHerrera -

    The new enclosure should include these two Phillips screws.

    Sam Omiotek -

    Can someone show the step of removal process of hdd/SSD placed in the caddy? I am unable to revert this process. Do we have to apply back greater force to remove back the hard drive/SSD from the caddy?

    Tarun Kumar Verma -

    Gads, I wish they made a caddy where the optical drive was removable without having to remove the entire caddy. That is a major peeve of mine. Like… just mount it the other way! I don’t want to have to go through this entire process every time I upgrade the secondary drive.

    AJH -

    These screws seems to be located in different places on different enclosures. I had serious trouble getting the SSD that the previous owner of this MacBook installed out of the enclosure until I realized the screws holding the SSD in place were on the side and not on the bottom. In case anyone else has the same issue!

    nessie1001 -

  5. wULpD1PuEZU6bo1R
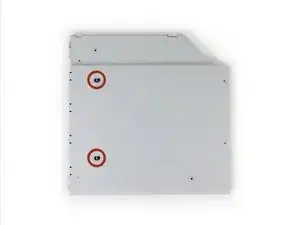
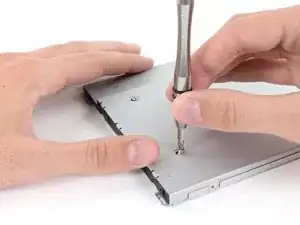
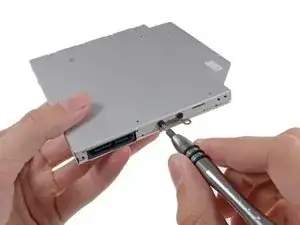
    • Befestige die Öse vom DVD-Laufwerk mit zwei #0 Kreuzschlitzschrauben am neuen Gehäuse.

    • Verbinde alle Kabel, die du vom originalen DVD-Laufwerk entfernt hattest, mit dem neuen Gehäuse.

    Replaced the optical with hdd, as well as replaced the hard drive with an ssd. Now I get the circle with a line through it. But, when I hold the option key down, it gives me both hard drives, PLUS, the thumb drive I have in the USB port with a Mountain Lion installer. It even shows the recovery disks, but gives me the circle with the line when I choose one. Any help is appreciated.

    claude -

    Mate,

    My mbp shipped with OS 10.8, and I had upgraded twice to 10.10

    I've a 10.7 USB which upgraded my old MBP.

    My plan today was to boot with my new ssd, my time machine back up and the Lion usb plugged in.

    I would then click on the Lion usb, and tell it to put the OS and time machine back up on the ssd.

    So I help down ALT and when it started it gave me the options of the usual Mac internal or the Lion USB.

    I clicked Lion, but instead of taking me to the install options (Disk utility, restore from time machine etc etc) it gave me that grey circle with a diagonal line through it. The no entry sign - grey on grey - that I think you have.

    Some googling said that it is because I was trying to usb a 10.7 install on a MBP that shipped 10.8

    You can't go back, apparently.

    So if any of the OSs are older than the mac you got, you will get this error. The grey in grey no entry.

    I just cloned my HDD to my ssd (Carbon copy cloner free 30 day trial) using an external stat-usb3 wire and all is good.

    Rory -

    I have a 17" Macbook Pro6,1 unibody with an Intel Core i5, 2.53GHz. I was successful installing a 250GB SSD in the DVD bay, and I'm able to boot from it. I did this by first installing OS X 10.9.4 on the SSD mounted into an external HD case, testing the system to see if it would boot up into the SSD, then installing the SSD and carrier in the DVD drive bay. The system now boots up from the SSD with no problems. If you are having installation problems, I recommend trying this method.

    roger hall -

    I just have finished installing second SSD to my MBP (unibody 15` 2010).

    First one was changed like one year ago. Samsung 500GB SSD. It is in my HDD bay and I'm running system from it.

    Today I put a new Samsung 1TB 850 Evo 1 SSD in to my optic bay.

    I encounter problem with SSD not recognized by Finder.

    But It was recognized by Disk Utility.

    What I did was I erase new SSD by Disk Utility. Then the new partition was created and now It has been seen by Finder.

    So If you see it in Disk Utility just erased it.

    Some extra info in under this link--> https://discussions.apple.com/docs/DOC-4...

    Wish you all luck :)

    rybafly -

    My installation went great thanks to the guide. I did notice a small thing that might make a good tip, and that is to inspect all the visible screws. I saw one that was slightly raised, and when I poked around with the spudger, I found 2 more that had worked themselves out a bit. Its probably something super rare but at the age of these things, it wouldn't hurt to check.

    Tineyi Chapisa -

  6. 3GeKNgsubSw2qWpF
    3GeKNgsubSw2qWpF
    YDaOtdHe4DPnEmIx
    fWvjh13qskVLHsiF
    • Wirf das alte Laufwerk nicht weg! Es kann mit Hilfe unseres SATA-Laufwerk USB Kabel immer noch verwendet werden.

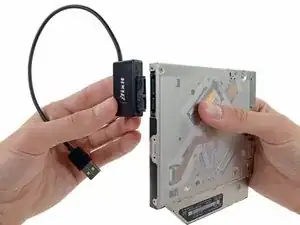
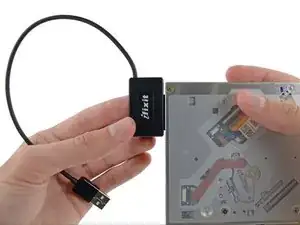
    • Richte den SATA Anschluss des Kabels mit dem Anschluss am Laufwerk aus und stecke ihn ein.

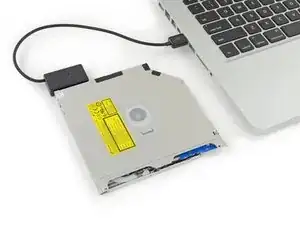
    • Stecke den USB Anschluss in deinen Laptop und das Laufwerk ist bereit zur Verwendung.

    There is a small metal button in the front of the drive and you can use that to eject the drive if you were wondering.

    Joseph Landry -

    Maybe that explain the eject button mechanism maybe….

    - PS5iscool - -

    Die neue SSD wurde durch das Laufwerk ersetzt aber leider wird jetzt die alte HDD nicht mehr erkannt. Hatte schon ein anderer das Problem?

    Alexander Richter -

Abschluss

Arbeite die Schritte in umgekehrter Reihenfolge ab, um dein Gerät wieder zusammenzubauen.

Brittany McCrigler

Mitglied seit: 05/03/12

88148 Reputation

0 Kommentare