Einleitung

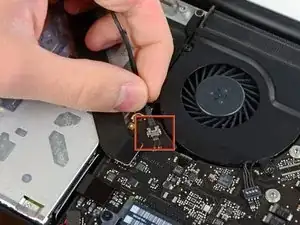
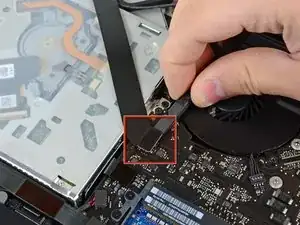
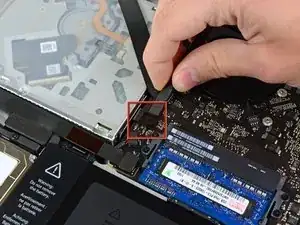
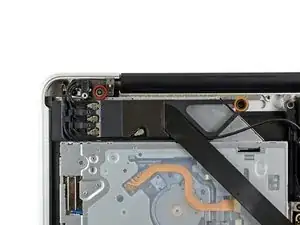
Es gibt viele Gründe eine zweite Festplatte hinzuzufügen, wie Geschwindigkeit, mehr Speicher, und kürzere Ladezeiten bei der Installation neuer Software. Benutze diese Anleitung, um eine zu installieren mit unserem CD zu Festplatten Gehäuse.

  1. cJVilSAppmEKRtFW
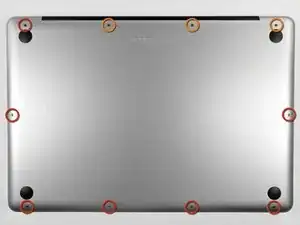
    • Entferne die zehn Schrauben, die das obere und das untere Gehäuse zusammenhalten.

    • Drei 13,5 mm (14,1 mm) Kreuzschlitzschrauben.

    • Sieben 3 mm Kreuzschlitzschrauben.

    • Schaue dir beim Ausdrehen der Schrauben genau an, wie sie leicht schräg herauskommen. Beim Zusammenbau muss das genauso sein.

    Step 1 (technically step 9 - replacing the base plate) Apparently one of my screws was a micron or two smaller than the others. This screw belongs to the hole above the optical drive, which is also apparently a couple of microns smaller than the others. It took seven attempts to figure which screw had originally been in that hole; all the other screws were too large, but fitted perfectly everywhere else.

    Bizarre much?

    Will -

    It might be a matter of how the screws are driven in, and not that they're slightly different sizes. When I reassembled my MacBook, a couple of the screws, including the one over the optical drive you mention, were hard to drive in and jutted up a little bit instead of sitting entirely flush. Swapping screws didn't help. The solution was to unscrew them and drive them in at a bit of an angle - perpendicular to the slightly curved surface of the back plate where the screw holes were, instead of fully vertical with respect to the ground the Macbook is sitting on. Doing it that way, the screws were easier to drive in and they all ended up flush in their holes. Didn't matter which screws they were. (I swapped a few around just to check after reading this.)

    Andrew Janke -

    I had no such screw issues. Either there are differences in manufacturing lots or I just got incredibly lucky during reassembly!

    xtophr -

    I discovered a great way of organizing the screws. I used an ice cube tray and added the screws in order, keeping the different kinds together. So when it came to reversing the steps, the screw order was an added control step to returning everything in its place.

    leonie -

    Great advise! Love it! :)

    Ririds -

    I used to do that and that worked really great until I bumped it by accident and the entire tray went on the rug! I spent the next day sorting things out.

    Now I use these:

    http://www.sciplus.com/p/50-114-CLEAR-PL...

    The lower ones 50 to a package. I mark them w/ blue tape. Often if it's part like the fans, or the optical drive I'll tape the screws into/near the holes where they belong. I did this a lot especially w/ the bottom screws from MBPs until I'd done so many I knew exactly where the longer ones went.

    Richard Sato -

    I wrapped the screws in a piece of blue masking tape and wrote the number on the little pouch I made. Then I stuck the blue tape pouches on the underside of the case bottom in order.

    Roscoe -

    I take double-sided tape, put that on a piece of paper, stick the crews to that, and label them.

    jelimoore -

    Best I've found is a bead sorting tray. They're like $5 at Wal-Mart and they have a lid that seals up and won't let them jump between containers.

    maccentric -

    I take a sheet of paper, pierce the screws through the paper, take a pen and box the screws and write out what step they belong to.

    Nils -

    @Will, in my case I had the same result as you did. As a reminder to myself the next time I need to open the computer, I put a dot of white paint on those two screw's head and a very, very thin ring of white on the very edge of each hole, that way I'll know they go into those two holes.

    Roger -

    Actually the four screws on the bottom were not threaded all the way up. I didn't check to see if the thread gauge was the same on them, but it wasn't until I had about four screws out (I didn't take them out in the order that the bottom all came out first) that I noticed a difference. I then took out the rest of the bottom ones to see if they matched the two that were already out that weren't threaded to the top. They did. So I went under the assumption that those were all bottom screws and when I put it back together everything went fine with no resistance.

    So there are three types of screws: Four for the bottom, three long ones as indicated and three others that might be slightly smaller than the bottom ones.

    wresnick -

    Hi,

    Although its more than a year since your contribution, I thought you might be amused to know that it is not just that the screws go in more easily when at an angle, Apple actually drilled and tapped the holes at a 15% angle. I too had tried to drive them in straight. An Apple "genius" - I was in for something else - clarified the design for me. It was done so that the screws lay flush on the angled part of the lower case. Nice design, but since Apple encourages DIY memory and drive changes, they could have mentioned this little ... trap.

    H Stahl -

    MacBookPro8,2

    Intel Core i7, 2,2 GHz, RAM 16 GB

    Mountain Lion

    May someone help me?

    I have installed the second drive with ssd 840 evo, but when I try to copy the file from the new drive to the main hd this in not allowed (errore -36)

    Piero -

    To my knowledge you can't transfer a single file more than 4gb. I advise compressing to a bunch of rars to split the file size and moving them individually

    1982sketcher -

    Hey everyone, here's the very best way to PERFECTLY organize your screws AND keep track of the order of the procedure: Get a piece of plain corrugated cardboard and a pen (I like using a Sharpie). For EACH step of the disassembly, draw a simple diagram of the layout of the computer on the piece of cardboard, with dots or Xs where the screws are located. Right after you remove each screw from the computer, poke a hole in the cardboard in its corresponding diagram position with your screwdriver and place the screw in that hole. If there are other non-screw related parts to be removed, you can add notes below each step diagram to remind you of where they go or how they should be placed. This cardboard method is great not only because your screws will not go flying or get mixed up by accident if bumped, but each screw goes EXACTLY back where it came from and you can keep the cardboard as a template for future use if necessary!

    - zerø K

    zeroK -

    These instructions worked great for me. I ordered a replacement battery from Key Power (on Amazon) for my 15" Macbook Pro (mid-2010). Cost was $74 shipped.

    Battery came with 3 different screwdrivers to help with installation. I just needed the one size though, since my 2010 seemed to use all the same size screws.

    Thanks!

    Marcos -

    During re-assembling (put the screws back in), it is important to note that the 3mm threaded holes are not completely vertical, but bent a little bit such that the hole direction is rectangular to the tapered surface. The force of the screwdriver must point towards the direction of the hole. Otherwise the screw gets jammed

    kusi -

    There is a FOOLPROOF WAY TO ORGANIZE ALL SCREWS and other parts removed.

    Print the repair guide.

    Yes, the actual photo of the bottom of the laptop with the circles around the screws.

    When you remove the screw, tape it to the photograph.

    You will tape the screw to the exact location that you just removed it from.

    Same thing with any part you remove.

    splashzoneent -

    Thanks Splash!!! I used your suggested method, and it was perfect: kept all my screws, and i was able to, very easily, put them back in their correct place. I greatly appreciated your feedback. Thank you for sharing!!

    Tommy Kedar -

    Thank you!!! This worked fabulously - even the I.T. people at my workplace were excited as they never thought to do that before. Replacing the battery took about 10 minutes!

    nclarke36 -

    Worked like a charm! Took less than 20 minutes.

    It's Oct. 2015, and the fan cost me about $10. it was the same brand/model...

    SUNON MG62090V1-Q020-S99 .

    SOME TRICKS -

    1- no T6 screwdriver- was careful using needle nose players to loosen 2 screws protruding up, then use a small phillips to push real hard into the T6 slots, SLOWLY turn , also used a small flat head screwdriver (for eye glass repair) was able to grab thread on T6's, made a small mark with screw driver across the top so I could see when it started to turn.

    2- no spudger -made one; cut a little strip 1/2" x 1 1/2" of plastic. couldn't get it to slide under plug, there's an edge where plug fits. so lifted old fan out, pulled upward on the plug it popped right out with very little effort. I used my home made spudger to push the new plug into place.

    3- download free "Macs Fan Control" This is how I was alerted to the fan not working in the first place. Program shows temperature of all key components in the computer.

    cheers- Durango CO!

    Dgodrummer -

    Watch the video first, read the entire tutorial and all the comments before you start, and spread a white towel on the floor so you can find screws when you drop them. Watch this first -- http://www.youtube.com/watch?v=qiBxhA29e...

    kevicoll409 -

    The link above is no longer available.

    Kristina Graham -

    I will be buying a battery from you and using your instructions. I just installed a new CD/DVD using your instructions and 1) I feel like I owe you something and 2) Although more expensive, I have the confidence your battery will work. My current battery is the original with 1399 cycles in 7.2 yrs. A tech buddy had bought me a replacement and I installed it. I had just installed a new OS and the kernel_task went going nuts, using 90% of the CPU. Hours on the phone with Apple did not resolve the issue. On a whim, I put the old battery back in and Voila! But I cannot risk my battery swelling and going south on me. I am also going to buy your installation tools. Yeah, I already have them. But you can never have enough tools…or beer. And you don’t sell beer.

    Pete Banks -

    The instructions say that I am removing PH00 screws. I found that my MBP, mid ‘12, Retina has pentalobe screws instead!

    jsandersonq -

    This laptop definitely originally shipped with Phillips screws—but, Apple has been known to replace Phillips screws with pentalobes when one of their devices is brought in for service. Sorry for the rude surprise! Fortunately the correct driver is easy to find nowadays. [Blatant self-promotion alert!] If you support free repair manuals, consider picking one up from iFixit. Good luck!

    Jeff Suovanen -

    Me, too, and it’s plausible that this machine has been serviced by Apple in the past, replacing the screws as Jeff Suovanen suggests.

    iFixit shipped a pentalobe bit with the kit, but it’s too large for the actual screws, so it looks like I now need to get another bit. But what size?

    Jeff’s link is to a driver with a P5 bit, and that page links to a P2 screwdriver, but since I don’t know what size I actually need (and I don’t have a micrometer to hand) I’m reluctant to buy two on spec.

    Norman Gray -

    (The bit in the kit appears to be a P6, so I’m inclined to order a P5 and see what happens)

    Norman Gray -

    You’re using the wrong repair guide. This guide is for the 2012 NON-Retina MBP. You have a Retina MBP. The stock case screws in the 2012 NON-Retina are all Phillips, just as the guide says.

    Steven Wymor -

    To keep track of screws, I used the suggestions above by taping a photo of the lower case to a piece of corrugated cardboard and inserting/taping the screws in place. Also, as some have noted, the screws go back in at a slight angle; they are angled toward the center of the unit.

    Kristina Graham -

    If your vision, like mine, is getting too fuzzy to be able to distinguish between a tiny Phillips screwdriver and a tiny Tri screwdriver, there’s an easy way. With a Phillips (or a Pozidrive) you can get two opposite wings to reflect the light from a lamp or window straight towards your eye at the same time. With a Tri (or Penta) you can only get one wing to reflect at a time, however much you twiddle it.

    Alan Waller -

    There’s a very easy way to avoid cross-threading a screw thread, any size.

    Put the screw into its hole and start by turning it gently, slowly BACKWARDS. When you hear a little “Click!” sound, the male thread has just passed the opening in the female thread and is in exactly the right position to enter into it correctly when you start to turn in the correct forward direction.

    Remember, all drivers except hex (Allen key) and TorX need pressure to avoid slipping out and damaging the head. So even when you want to turn it in with LOW moment/torque, keep the CONTACT PRESSURE high.

    Alan Waller -

    The keep the pressure on is on point. In my case once I loosened my first screw I thought I could relief my initial pressure. It was a mistake. I was doing the whole thing very slowly as a precaution. That helped me notice that the Phillips screw driver was sliding up out of the screw head. Not being sure why, I put pressure back on the screw driver until almost all the screw was out of the hole. Once out, I examined closely to find out that the threads have some sort of coating. It looks to me like some kind of locktite. Then I understood the importance of keeping the pressure on all the way through. It made me uneasy having to keep so much pressure on such tiny screws, but I found it was the only way to prevent damage to the “slots” on the heads. Anyway, all of them suffered some degree of damage, but I was able to successfully remove them and reinstall all of them back in their original holes.

    Martin Mejia -

    After reading this page on iFixit several times, I just could not face all the work of replacing the Logic Boards on two MacBookPro 2011s even if I was prepared to pay approx 400 USD (which I wasn’t). Then I read the reviews of a couple of folks who’d stripped down their machines and put their logic boards in the oven and, it worked! I wondered, if I just used my new Steinel Hot Air Tool (heat gun in my language) recently delivered from iFixit, on the logic board in-situ, without removing it? So I removed the battery, hard drive, and RAM and unplugged all the leads I could see WITHOUT removing anything else physically. Then using the 500 degrees set on the gun (setting 2) I ‘played’ the gun over the logic board for about 60 seconds on machine one with the restart problem (plus latterly, not completing start-up). Long story short… it worked! I spent a long time getting the s/w to load, but the commentary is too short to let me relate that part… ping me if I can help you do the same! blackaye@gmail.com

    Ian Black -

  2. S3X6juTLCvPG3qsj
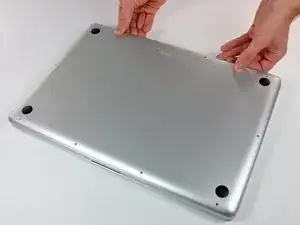
    • Hebe das Gehäuseunterteil nahe beim Lüfter mit beiden Händen an und löse es so von den beiden Clips, die es mit dem Gehäuseoberteil verbinden.

    • Entferne das Gehäuseunterteil und lege es zur Seite.

    What is the maximum amount of RAM that can be installed in this MacBook?

    michael -

    16 GB is the max

    Bradon Kelley -

    I can’t get the back panel off !! Removed all 10 screws but the panel is still on. Not a quick easy lift like in the picture of videos on youtube what going on…are the hidden screws locking tabs?

    Tachyon -

    Solved the tabs were hard to get off to the point I thought I was going to bend the back case off before it would let go.

    Tachyon -

  3. bYSpKoTKmjLUMOQk
    bYSpKoTKmjLUMOQk
    5mvrDVZ32FbB4C2A
    • Bei bestimmten Reparaturen (z.B. der Festplatte) ist es zwar nicht nötig, den Akku zu trennen, wird aber dennoch empfohlen, da es einem versehentlichen Kurzschluss von elektronischen Bauteilen auf dem Logic Board vorbeugt. Wenn du den Akku nicht abtrennst, musst du sehr vorsichtig sein, da manche Komponenten noch unter Spannung stehen können.

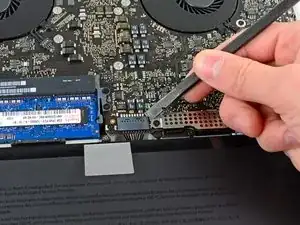
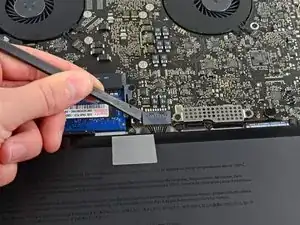
    • Benutze die Kante eines Spudgers, um den Akkustecker nach oben aus seinem Anschluss zu hebeln.

    • Es ist hilfreich, an den beiden kurzen Seiten des Steckers zu hebeln, um ihn so schrittweise aus seinem Anschluss herauszulösen.

    nails work pretty well as well...

    Sibe Jan Kramer -

    At first sight I was confused when I read the description at this step, 'cause it seemed that disconnecting the battery connector was optional, in order to eliminate static discharge. While it's a helpful advice in other circumstances (as mentioned as an example changing hard drives), when changing the battery it is not an option - you have to disconnect the battery connector.

    It would have been better to mention the optional disconnecting recommendation in a side-note.

    Other than that, an excellent guide!

    Damienn -

    the fact that this step is optional can not be stressed enough. i tried disconnecting the battery and in the process it short circuited which now leaves me with an even more expensive problem than i had before when i just wanted to change hard drives (at least the new hard drive works fine..)

    the hard drive changing worked though.

    nina -

    Any tool used to pry on the battery connector must be non metallic, to prevent unintentional short circuit between the connector pins. In my case, my index finger nails were strong enough.

    Martin Mejia -

    Excellent guide, it was as easy as a breeze to replace my battery. I can't believe I nearly followed Apple in their saying that this part was not user replaceable. Great job for this description, and many thanks. iFixIt is THE reference for Mac owners.

    Patrick.

    Patrick Demaret -

    So - I have a weird comment about this. I wanted to make sure that I was getting the right model - so I opened up my laptop and then thought "well, why not just remove the battery while i'm in here, it's shot anyway". Though, I forgot about the stupid screws (Apple really did us over on that one!). Though I disconnected the battery connector and didn't bother to re-connect it when I was finished and just put the cover back on.

    Here's the weird part - when I went to turn my laptop back on...MY BATTERY WAS RECOGNIZED...AND WORKING! I was under the impression that the connector "connects" the battery's charge to the laptop, but this just doesn't make sense! Plus, now my very dead battery is in "normal" condition according to the system report. I haven't worked for apple, but have about 5 years of IT experience and am baffled by this! I'm starting to think i've experience a miracle! Has this happened to anyone else?

    Shelly -

    Possibly disconnecting the battery caused the System Management Controller to reset. That might have been your problem rather than the battery itself. See http://osxdaily.com/2010/03/24/when-and-...

    Duke Briscoe -

    I'd just like an advise of where to dispose the old battery. Thanks

    Jaime Serafim -

    Any Best Buy or Batteries + Bulbs accepts batteries for recycling in their stores. Many other stores such as Home Depot do as well.

    xtophr -

    Office Depot will take any batteries and dispose of them for free

    silas -

    My battery connector pulled off parallel to the board surface

    Mazo -

    I tried spudging the corner closer to the wires which was probably a bad idea. The corner broke off! I can't believe it was that brittle. So be careful. If it did it again, I'd aim for the corners AWAY from the wires or the sides themselves, though I seem to recall there not being much of a lip.

    Dave Kitabjian -

    I used the spudger to gently ease the battery connector out. I then placed a q-tip between the connector and it’s socket to avoid making an accidental connection. A toothpick or some other soft stick might also work.

    Kristina Graham -

    My battery connector had a shiny metal cover over it like a male USB plug. I had to take the 3 peace symbol screws oit and remove the battery before I could access thr plug properly. My battery plug also came off parallel to the board by walking the black plastic part off the metal part towards the battery. It required quite a bit of force to walk it off the connector. I broke a spudger trying. Something nonconductive but strong like a wittled down bamboo chopstick could work well.

    Pii -

    Translate to Spanish:

    Para ciertas reparaciones (por ejemplo, el disco duro), no es necesario desconectar el conector de la batería, pero evita cualquier cortocircuito accidental de la electrónica en la placa base. Si no desconecta el conector de la batería, tenga cuidado ya que partes de la placa base pueden estar electrificadas.

    Use el borde de un spudger para levantar el conector de la batería hacia arriba desde su zócalo en la placa lógica.

    Es útil hacer palanca hacia arriba en ambos lados cortos del conector para "sacarlo" de su zócalo.

    Pakito Villaseñor -

    The BATTERY MUST BE DISCONNECTED - it is NOT OPTIONAL if you are going to remove the logic board.

    These instructions are for Removing The Logic Board, so if that is what you are going to do the battery MUST be disconnected.

    The informational item beginning with the words “For certain repairs (e.g. hard drive), disconnecting the battery connector is not necessary … “ is NOT applicable to a set of instructions on removing a logic board and it should be deleted from this otherwise excellent set of instructions.

    Michael Walsh -

    In my opinion the RAM should be removed first - i.e., before the battery is removed.

    The RAM DIMMS are just in the way if they are left in their sockets on the logic board until step 33.

    I cannot see any useful reason to not remove them very early in the sequence.

    Michael Walsh -

    I disconnected the battery because it is an opportunity to reset the SMC (which is how the SMC has to be reset in some older Macs.)

    Barb -

  4. eTItfxSqYQIKnTf1
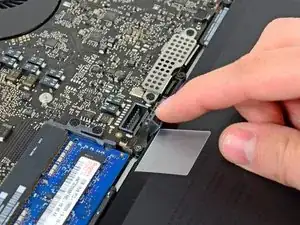
    • Biege das Akkukabel leicht von seinem Anschluss auf dem Logic Board weg, damit es sich nicht versehentlich wieder selbst verbindet, während du arbeitest.

    My battery connect was like mid 2010 model

    Iain Friend -

    Why not go ahead and remove the battery at this point instead of bending the battery connector back (see steps 23 -25 below)?

    BilMcKelvy -

    Translate to Sanish: Doble el cable de la batería ligeramente lejos de su zócalo en la placa lógica para que no se conecte accidentalmente mientras trabaja.

    Pakito Villaseñor -

  5. AKQUReHjHNQXBJeN
    • Trenne den Stecker des Kamerakabels von seinem Sockel auf dem Logic Board.

    • Hebe das Kabel beim Abstecken vom Logic Board nicht an. Zieh den Stecker parallel zur Oberfläche des Logic Boards.

    That's exactly what I did. I did not pay attention. Where do I find a replacement?

    Erikmendez -

    I found this website for replacement parts : https://www.powerbookmedic.com/MacBook-P...

    Guillaume Lamaison -

    My camera is not working. What should I do now.

    NARSIMHA CHARY -

    Desconecte el conector del cable de la cámara de su zócalo en la placa lógica.

    No levante el cable mientras lo desconecta de la placa lógica. Tire del cable paralelo a la cara de la placa lógica.

    Pakito Villaseñor -

  6. tFnLZiqtUWwiGyYn
    • Benutze das flache Ende eines Spudgers, um den AirPort/Bluetooth-Stecker von seinem Anschluss auf dem Logic Board zu lösen.

    Use el extremo plano de un spudger para levantar el conector AirPort / Bluetooth de su zócalo en la placa lógica.

    Pakito Villaseñor -

  7. OX2dgDgIvZ3eEhFM
    • Benutze das flache Ende eines Spudgers, um den Stecker des optischen Laufwerks von seinem Anschluss auf dem Logic Board zu lösen.

    Use el extremo plano de un spudger para levantar el conector de la unidad óptica de su zócalo en la placa lógica.

    Pakito Villaseñor -

  8. yILuc15KUC2TLdLi
    yILuc15KUC2TLdLi
    akD3xoiDQLhJEDaN
    • Entferne die folgenden zwei Schrauben:

    • Sei vorsichtig, diese Schrauben sind besonders leicht zu beschädigen. Übe festen Druck auf die Schrauben aus, während du sie herausdrehst. Lies die Kommentare durch, bevor du fortfährst.

    • Eine 8,6 mm Kreuzschlitzschraube

    • Eine 3,9 mm Kreuzschlitzschraube

    • Drehe vorsichtig das Gehäuse der AirPort/Bluetooth Karte (mit den immer noch angeschlossenen AirPort/Antennenkabeln ) aus dem unteren Gehäuse.

    Beware of step 8. Screws strip extremely easily. For some reason, that are extremely tough to get out and the metal is extremely soft so you are likely to screw yourself over real quick even if you use the right screwdriver. Happened to me and now it's impossible for me to take the @$%# thing off so I have to return my HDD bay and deal with having a useless disc drive.

    Alex Pascal -

    I got burned here also. Unfortunately iFixit defaults to comments off, so I didn't see this until it was too late.

    eawortman -

    Yes, and I got stuck on step 8 for this simple task. Is there no way we can get the drive out while leaving the wireless/bluetooth board in place? I prefer to drill a small hole in the plastic of the board to reach the drive's screw underneath and find a way to slide it out towards the hard disk side.

    Albert Kok -

    I had the same thing happen with the 3.9 mm screw. To remove the drive afterwards I used a 1/16" drill bit to carefully remove the (stripped) screw head. I left most of the screw threads intact, and the remaining "post" is enough to hold the airport/bluetooth fixture in place with the one remaining screw. These are some seriously soft screws, folks, be careful!

    Steve -

    Just a sign, how insufficciently the whole computer is made. My impression is with every proper replacement it becomes rather valuable (not a market value by the way). I advice to replace these soft screws. It does not matter what the head is, as long as you have the screwdriver for it and it fits to the hole and to the height (which is important here).

    Hasan al-Abulafia -

    i also screwed the screw, never saw a screw this soft. Still figuring out how to "unlock" it again...

    KlawWarYoshi -

    Well. I too stripped the head on the left side screw. First I used a cheap #000 screwdriver. Stripped the head and the driver. Not realizing just how bad I had stripped the screw I got a #0000 and the right one came out. I made sure to apply firm downward pressure to minimize slip. The left side was to far gone. So...

    I broke the housing. Yep. I'm a brute.

    Anyway. I rolled it up out of the case as if I had actually removed the screw. Only to realize I don't have a T6. [facepalm]. I've spent way too much time just getting that #0000. I'll order myself a nice kit for future 'repairs'.

    Oh and yes, the bluetooth and wifi work just fine. The right screw and the tight fitting of the housing seem to keep it in place ok.

    David Couch -

    Also stripped the right screw, taking to to Apple Genius Bar, hopefully they can get it out...

    Adrian -

    I also failed here.... How can i unscrew both screws if the star of the head is destroyed??

    Alex de Graaff -

    I located the part number for the 2 easily stripped screws in this step. The 3.9mm is Apple part 922-8974 and the 8.6mm is Apple part 922-9107 pbparts.com has them available for $2 each.

    Hope this helps, it was not easy to track down.

    Roger -

    I too stripped the screw on the right, and while I tried a few basic things to remove the screw, eventually I drilled out the screw head so I could remove the airport/bluetooth housing. Only the head came off, enough to free the housing, but it sits pretty snugly on there with just the one screw and that's enough for me.

    mainframe -

    The part numbers from Roger on Feb 11 aren't right. They were too large.

    dan Lim -

    Hi, Dan. The Apple part numbers supplied were used to order exact replacements now in my MBP 15. I have also checked them against Apples official Screw Chart for the MBP 15. I am very sorry you have been supplied the wrong screws but the part numbers listed are correct.

    Roger -

    Alright, Genius bar just made it worse, ended up taking a drill to it hoping to break the head off so I could pull it out bit it just wouldn't come off. In the end I pushed a flat screw driver down as hard as I could and It shifted.

    I know many of you wont want to put a drill to your shiny (expensive) mac, but the screw is surrounded and strong so you wont break through or damage anything.

    Just have a steady hand ;)

    Adrian -

    I stripped both screws before reading these comments- disaster.

    The only reason for removing these screws is so you can get access to the Torx screw beneath the Bluetooth/wireless board (ie the top left screw circled red in step 9). I Had the idea of drilling directly into the black wireless/Bluetooth plastic board directly above this top left Torx screw shown in step 9. I could then use a long thin Torx screwdriver to reach through the hole and unscrew it, without having to remove the stripped screws holding the wireless/Bluetooth board in place at all. Be careful drilling into the board(!), but worked perfectly for me. Once the Torx screws are removed, it just takes a bit of jiggling to carefully remove the optical drive out from under the board, and put the hd drive in.

    If you're reading this before having stripped the two screws, I'd recommend not even trying to unscrew the Bluetooth board and just drill a hole in it, assuming you have steady hands. I'll try to upload a photo to show what I mean.

    Laurence -

    I’ll second this - seemed a bit daunting at first but with a stripped screw and no screw extractor my options were limited. Having weighed up the options and carefully studying the pictures I decided that Laurence’s idea was feasible (if not a little leftfield!). I carefully marked out an educated estimate of where the screw would be under the black wireless/Bluetooth plastic board (you can see it from the side so used this plus the images supplied here) and drilled, firstly with a 1.5mm to mark the spot and then with a larger 4mm. Obviously this needs to be done very carefully so you do not continue and drill into the torque 6 screw you are trying to get to, but once the hole was drilled my bit reached down to the screw and could *carefully* be lifted up and through the newly created hole. Once the screw has been removed, along with the other 2 torque 6 screws in this step, the optical drive / caddy will slide out as opposed to being lifted vertically out in the instructions, but this proved little hassle

    Andy -

    That worked for me too :) Thanks for the hint!

    Dim Petrakiev -

    Hi, this part to be drilled is metallic and not plastic. Is there any impact of the drilling on the wireless/ Bluetooth functioning? The proposed solution is attractive if it does not impact how the Macbook works… Thierry

    thierrydestainto -

    Hello there, I'm looking for some help. I am planning on doing this "procedure". I have the 54 Bit Driver set from iFixIt. If I have to unscrew the 8.6 mm Phillips screw and 3.9 mm Phillips screw. What bits should I use from the 54 Bit Kit? The PH1, PH0, PH00, PH000? I really don't want to strip the screw, which one should I use?

    Josh -

    Josh I would use the PH00 bit from the 54 Bit Kit. Apple use a different non standard screw head design to Phillips which does not have the cam-out geometry and uses a pointed tip. The PH0 and PH00 bits are a reasonable approximation. I have to say that even with the best match between the screwdriver and screw they may still strip as the original screws seem to be made of painted cheese. If that happens you could try using a tough steel small flat screwdriver bit to drill/scrape out a round hole in the screw head and then gently force in the next largest slotted bit. This has worked for me twice.

    Roger -

    As a warning i had to take a near new refurbished mid 2012 MacBook Pro into Apple to have a missing/stripped bottom case screw repaired under warranty and in the process of taking it apart they stripped five more screws and damaged the LCD screen cable, upper case and keyboard, speaker, Bluetooth module and several other assemblies. It was all repaired properly under warranty but it took over 2 weeks and the only original parts I got back were the logic board and baseplate. Some of these MacBook Pro's are a real challenge and come with stuck and sometimes pre stripped screws from the factory. Take your time and remember Apple keep all the screws at genius bars, if you ask nicely and give the the Apple part number they are often happy to fit them for you. Good Luck!

    Roger -

    I found success using the CR-V 1.5 bit without stripping either screw head.

    Firmly plant the tip and maintain pressure throughout unscrewing and re-screwing.

    Use a magnet if needed to get the 3.9mm screw out.

    chris -

    Hi,

    I've mailed with pbparts and got the clarification:

    * http://www.pbparts.com/shop.php//9229107... = 8.6mm screw

    * http://www.pbparts.com/shop.php//9228974... = 3,9mm screw

    PBParts said: Measurements from iFixit are better than the printed length by Apple manuals. I'll give these screws a try.

    Robin Kluth -

    All you need to unscrew the short screw (and don't screw up) is a soldering iron. You should apply heat to aluminum column located below the head of the screw. Loctite-like glue in thread loses its grip when heated, so you probably will unscrew that little bastard without any issues. It worked for me, even with semi-stripped head!

    Dvadzatdva -

    THANK YOU! Heating the aluminum post with a soldering iron worked perfectly for me! I was certain that I wouldn’t be able to get the short right screw loose, but a minute or two of heating the post with a soldering iron loosened the blue thread locking compound and the screw came out without any problem. Thanks again!

    Marv Ruona -

    Just use Philips #000 bit and put pressure.

    Filip -

    Siht. I screw up the screw too. And then I realize there are 24 comments in this step. Now I make 25 of it. That little fcuking 3.9mm...

    Anyway, so I drilled that striped screw head with 3mm tip, totally striped that screw so seperated rim, removed Airport supports, there still 1mm of screw steam thingy, got rid of that using small nipper, put new screw in.

    Use very, I mean very sharp even your finger bleed when touch the edge of small screw driver. Regular #0 or #00 driver will distroy your screw head.

    Anonymous -

    I stripped the screw on the right, and finally got it out with one of the screw extractors sold by iFixit: Schraubenentferner-Set

    anonymous 5548 -

    I used a Philips PH000 with applied pressure and the screws came out fine.

    jasonmartinegoudy -

    Made same mistake here (rushed through the directions and didn't even notice the warning!). I completely stripped the smaller screw but I was able to get it out easily with an extractor drill bit, the kind readily available in hardware stores (Grabit Micro was the brand name here in the U.S.). Ordered a replacement screw from pbparts re the advice above (thanks for the part number!).

    yonidass -

    Stripped this one too. I think it was fixed in with Locktite. Had to buy a Grabit Micro to remove it. Started with the #1 but when I reversed the bit it wouldn't catch. Thought I would have to drill it out completely, but tried with the #2 and the hole drilling end of the bit caught in the hole I'd already drilled with the #1. If you're about to follow through these instructions I would make sure to have some Grabit drill bits or other stripped screw removal tools on hand before you start.

    Kevin Hooke -

    I was able to do this step very easy with a Philips #0 instead. I guess sometimes its better to go bigger than smaller.

    Nils -

    I have done it using an 1,5 mm cross slot screwdriver from a screwdriver set by LIHAO (I bought it at Amazon). First, ensure that the screwdriver is well fitted into the screw head, then press down and try to turn it(without forcing it!). If the screw does not turn easily, stop, take out the screw driver and repeat the process till the screw get loose. Be patient, take your time and keep in mind that your main priority is to preserve the heads of the cheese screws

    Catalina -

    I got it out with no trouble by using a Moody Phillips #2006 .100" (the one recommended by iFixit for this repair), and by using very firm pressure and very gentle rotation, checking at about an 1/8 turn to see if the screw was turning or stripping.

    David Albertsen -

    For what it's worth, on my 2011 MBP 17", the bluetooth/wireless unit was held down with two flat-head phillips screws; the one on the left, the 8.6 was attached to the metal clip just to the right of it in the picture. It came out very easily. The one on the right definitely had some kind of loctite adhesive, but eventually I got it free with firm, quick short twists. Didn't strip. Also, the torx screws on the superdrive were all phillips heads as well. Not sure if that's a 17" thing or what. Thanks!

    Joe Mac -

    Although these screws look like PH00 Philips heads, if you’ve got one of the iFixit toolkits, the best driver to use is the J000 or JIS000 driver. Unless the screws have been terribly stripped, it’ll pop them out effortlessly every time.

    something2sea -

    These comments saved me a lot of trouble with my swap of drives.  Unfortunately the donor Mac had both screws stripped and I had to drill those out; took me about 10 minutes to accomplish.

    Thanks for pointing this out and posting it.

    Ken Short -

    I took a different method with these screws. I removed the black coating from the head of the screw with a sewing needle and a small bit of acetone while using a magnifier. This got it right down to shiny metal inside which I believe helped make better contact with the Phillips bit. I also took a small file to the bit to sharpen it like new. These screws came right out for me with just this little bit of advance prep.

    Mike Jones -

    I applied pretty firm pressure and was very careful with my rotations. They both came right out. I noticed the left longer screw was sort of tight on the first initial turn or two but after that it loosened up. I didn't have any slip on either screw so I can't speak for striping but I can say it was either because I applied firm pressure (as the instructions say to do) or because lock tight had worn off.

    Yayna -

    retire los siguientes dos tornillos:

    Tenga cuidado, ya que estos tornillos son inusualmente fáciles de pelar. Aplique una presión firme mientras desenrosca. Lea los comentarios antes de continuar.

    Un tornillo Phillips de 8.6 mm

    Un tornillo Phillips de 3.9 mm

    Con cuidado, gire la carcasa de la placa AirPort / Bluetooth (con los cables AirPort / Antenna aún conectados) fuera de la carcasa inferior.

    Pakito Villaseñor -

    the screw f***ing stripped. i just used some flush cutters do deal with that….

    domenicsto5 -

    Aug 3, 2020

    I have a mid 2012 MacBook Pro that I am trying to replace the optical drive with an SSD. And I believe I scraped a bit to much on the right side of the screw (horrible design, thanks Apple) and I’m getting angry and upset that I spent money buying this #00 Philip screw driver from this site and also purchasing the caddy and ssd from another source. Do anyone have any ideas how I can remove the right screw? Anyone? I’m trying to upgrade this thing one last time so I can have at least a efficient MacBook.

    Kareem Caldwell -

    i stripped both screws since it was on too tight. i was lucky enough to use a stripped screw extractor to extract the left screw. for the right one, sadly i had to use a pair of tin cutters and cut the V section. The frame was metal so nothing snapped. I then used pliers to pull straight up and twist eventually getting the other stripped screw out. Going to buy the replacement frame and BETTER screws that don’t strip and replace the wifi frame. ugh. didn’t want to cut the wifi frame but had to.

    Kevin Chiu -

    These were fine for me thanks to all the comments. I used a CR-V PH000 from an old Maplin screwdriver set after reading above comments. I applied a lot of downward pressure before attempting to turn. The PH000 actually got lodged in the right hand screw so I removed the screw tip from the driver with the screw still attached and left it on there until I needed to put the screw back in. The mac I’m working on was second hand and was missing the left hand screw, I checked another machine I had lying around and borrowed the left hand screw and put it back in with the same PH000. Good luck!

    louiseakempton -

    Please Help!!! Inverse problem. I can’t reassemble :(

    Today for the first time I became aware of this concern and read the comments but didn’t knock on wood. I removed them with no detectable problem.

    But now when putting back together left spins freely without catching. Right one screws in nice and level, straight and true, until a fourth of the screw is left to go then tilts and looses the vertical axis and starts to bind up. This behavior makes me think it is the aluminum deformed by the screw contrary to the standard supposition of soft screws?? So uncertain if quality replacement screws would solve.

    I would love some advice on how to tighten my blue tooth down so it isn’t left to continually rattle but don’t end up with a stripped screw stuck in place by forcing it (if I even could.)

    Also if anyone has thoughts on this janky aside, I suspect the right piece of tape could solve everything but it would need to be suitable to the inside like the pull tab on the drive (no melting or conductivity problems)

    Aaron -

    As some people have said, just leaving a post in there is enough to hold the board in without issues. I ended up doing that with my 13” 2012 (which is slightly more of a pain because you actually have to remove the wiring connectors on that board instead of just moving it out of the way with everything still connected); I think where there were three screws I’ve now just got one and the rest is held in with sheer force of hope, and maybe a random screw I had laying around from a ::shudder:: old Dell laptop.

    If you can get a shorter screw that tightens down before the point where the right one binds, that’d probably work. Even if it’s a bit loose, as long as the bottom goes on without that screw interfering, you’re probably alright.

    AJH -

  9. dYPUx5ShE6cLSREb
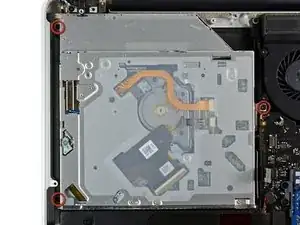
    • Entferne die drei 3,5mm T6 Torx Schrauben, die das optische Laufwerk im oberen Gehäuse halten.

    I actually found this section to be the most difficult, the T6 screws are soft as butter, apply plenty of pressure when removing. The one towards the front of the laptop looking from the back is the most problematic.

    Richard Howell -

    I had a hard time putting these screws back in with the HDD bracket. It looks like the bracket doesn't leave room for the bolt heads, so they go in at an angle. I tried for a while getting them lined up just right, but eventually gave up and now I'm pretty sure those T6 are cross-threaded into the aluminium. =( The original optical bay does have room for the bolt heads so they stay vertical.

    jfcaron3 -

  10. KgZXcFEoqNQAgudL
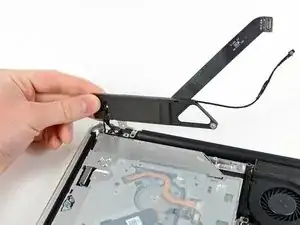
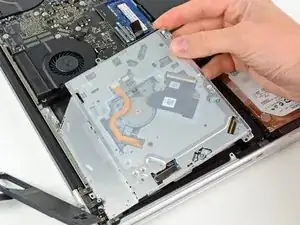
    • Hebe das optische Laufwerk in der Nähe von seinem Stecker an und ziehe es vom oberen Gehäuse weg, um es aus dem Gerät zu entfernen.

    110/5000

    Levante la unidad óptica cerca de su conector y extráigala de la caja superior para extraerla de la computadora.

    Pakito Villaseñor -

    Hola pakito, ¿Por qué no traduces directamente? En las instrucciones solo presione los tres puntos en la esquina superior derecha y elija "traducir".

    VauWeh -

  11. HkZuVpCYxtLwMPxh
    HkZuVpCYxtLwMPxh
    ldigjQblSvfSXj5T
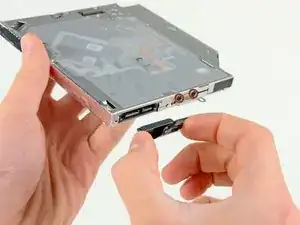
    • Ziehe das Kabel für das optische Laufwerk aus dem Laufwerk heraus.

    • Ziehe das Kabel an den Kanten des Steckers heraus, nicht am Kabel selbst.

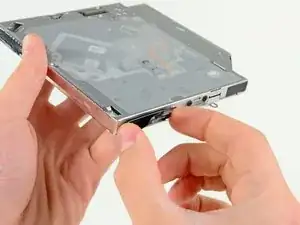
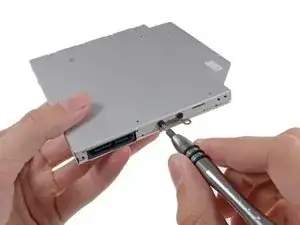
    • Entferne die zwei schwarzen Kreuzschlitzschrauben #0, welche die kleine Metallhalterung sichern. Montiere diese Halterung an dein neues optisches Laufwerk oder das Festplattengehäuse.

    I found that placing the SSHD back into the laptop was a major issue; it was a very tight fit back into the rest of the machine.

    joelfirenze -

    Mine too. I'm going to retry back in original position which is less likely to overhead or be shocked because no rubber mounts

    Failing that buy a WD 7mm drive which is not ideal.

    Andrew -

    Those were Phillips #00 in my case, not #0, on the small metal mounting bracket.

    Oliver Creighton -

  12. WPcg6hfCMkTtjj2Q
    WPcg6hfCMkTtjj2Q
    ACPTZX2IFKQ1K4WT
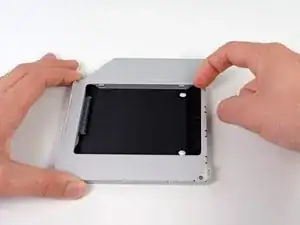
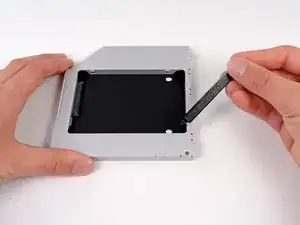
    • Entferne den Abstandhalter aus Plastik aus dem Gehäuse des DVD-Laufwerks, indem du auf einer der beiden Seiten die Plastiklasche eindrückst und den Abstandhalter nach oben herausnimmst.

    is it 9,5mm or 12,7mm for the caddy? My stuff macbook pro mid 2010, need advice what size is compatible. Thank you

    Adi Purba -

    All Macbooks use 9.5mm Optical Drive Caddy, also, If you’re wondering as well, the Optical Drive runs at SATA II speeds just like with the main hard drive area, so if you’re using a SSD, then it’s going to run at a slightly slower speed.

    - PS5iscool - -

  13. NLZqqjQlYQPglXyI
    NLZqqjQlYQPglXyI
    xMhBlQkNdV4PwSMS
    UeALDwtY1rY2dJX4
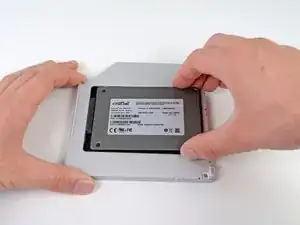
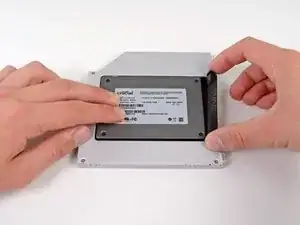
    • Achte darauf, dass die Anschlüsse für die Festplatte nach unten zeigen, bevor du die Festplatte in das Gehäuse setzt.

    • Setze die Festplatte vorsichtig in den dafür vorgesehenen Platz in dem Gehäuse.

    • Halte das Gehäuse mit einer Hand fest und drücke die Festplatte mit der anderen Hand in die Anschlüsse im Gehäuse.

    Okay it seems like some models of MacBook Pro have issues with a fast (6Gbit/s) SSD in the optical bay. Even though my Mac says it offers 6Gbit on both bays it simply didn't work in the optical bay. So I switched places between the two drives and everything seems to work. My Mac booted from the old HDD in optical bay automatically and then I cloned it afterwards and changed the startup disk to the new one. As said before, don't put a fast SSD in the optical bay!

    Carl -

    This is an extremely late response to an old comment, but… whatev’s. My 2011 MacBook Pro had that issue: the main (HDD bay) SATA operated at 6Gbit, and while the optical bay said it was 6Gbit, the “Negotiated Link Speed” was like 1.5Gbits regardless of what you put in it (I can understand 1.5Gbits for an optical drive, but not for an SSD). Some of the early 2012 models did the same thing, from what I understand, but that was corrected pretty early on; both my 13” and 15” 2012’s run at 6Gb/s on both SATA busses.

    AJH -

    It’s not wise to swop the optidrive for an HD as there is no physical protection. The caddy is only intended for an SSD.

    Ben Ormerod -

  14. 4bUrYFHS5udDCnIj
    4bUrYFHS5udDCnIj
    Ayxd2pXAkaRgHAFN
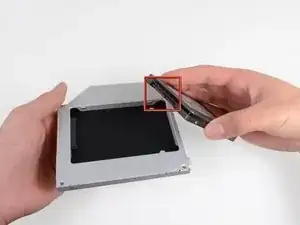
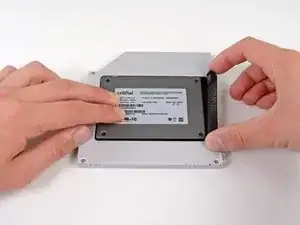
    • Wenn die Festplatte im Gehäuse sitzt, halte sie mit einer Hand fest und setze den Abstandhalter wieder in das Gehäuse ein.

    Normally with the HD enclosure there come a set of screws. use these to screw down the HD in the enclosure since you need to flip it up side down to reinstall it into the MBP

    Bart -

  15. oXd3ohEWeSgsIcWE
    oXd3ohEWeSgsIcWE
    QionNQlc1ANtll4c
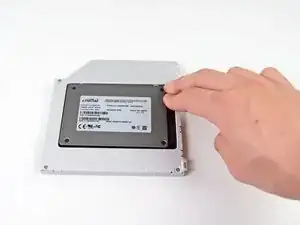
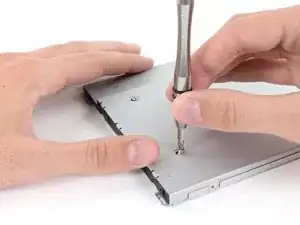
    • Verwende zwei #1 Kreuzschlitzschrauben, um die Festplatte im Gehäuse zu sichern.

    Where are these screws coming from? Were they part of the original optical drive?

    Bradley DeHerrera -

    The new enclosure should include these two Phillips screws.

    Sam Omiotek -

    Can someone show the step of removal process of hdd/SSD placed in the caddy? I am unable to revert this process. Do we have to apply back greater force to remove back the hard drive/SSD from the caddy?

    Tarun Kumar Verma -

    Gads, I wish they made a caddy where the optical drive was removable without having to remove the entire caddy. That is a major peeve of mine. Like… just mount it the other way! I don’t want to have to go through this entire process every time I upgrade the secondary drive.

    AJH -

    These screws seems to be located in different places on different enclosures. I had serious trouble getting the SSD that the previous owner of this MacBook installed out of the enclosure until I realized the screws holding the SSD in place were on the side and not on the bottom. In case anyone else has the same issue!

    nessie1001 -

  16. wULpD1PuEZU6bo1R
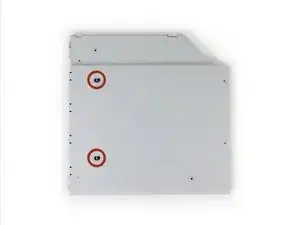
    • Befestige die Öse vom DVD-Laufwerk mit zwei #0 Kreuzschlitzschrauben am neuen Gehäuse.

    • Verbinde alle Kabel, die du vom originalen DVD-Laufwerk entfernt hattest, mit dem neuen Gehäuse.

    Replaced the optical with hdd, as well as replaced the hard drive with an ssd. Now I get the circle with a line through it. But, when I hold the option key down, it gives me both hard drives, PLUS, the thumb drive I have in the USB port with a Mountain Lion installer. It even shows the recovery disks, but gives me the circle with the line when I choose one. Any help is appreciated.

    claude -

    Mate,

    My mbp shipped with OS 10.8, and I had upgraded twice to 10.10

    I've a 10.7 USB which upgraded my old MBP.

    My plan today was to boot with my new ssd, my time machine back up and the Lion usb plugged in.

    I would then click on the Lion usb, and tell it to put the OS and time machine back up on the ssd.

    So I help down ALT and when it started it gave me the options of the usual Mac internal or the Lion USB.

    I clicked Lion, but instead of taking me to the install options (Disk utility, restore from time machine etc etc) it gave me that grey circle with a diagonal line through it. The no entry sign - grey on grey - that I think you have.

    Some googling said that it is because I was trying to usb a 10.7 install on a MBP that shipped 10.8

    You can't go back, apparently.

    So if any of the OSs are older than the mac you got, you will get this error. The grey in grey no entry.

    I just cloned my HDD to my ssd (Carbon copy cloner free 30 day trial) using an external stat-usb3 wire and all is good.

    Rory -

    I have a 17" Macbook Pro6,1 unibody with an Intel Core i5, 2.53GHz. I was successful installing a 250GB SSD in the DVD bay, and I'm able to boot from it. I did this by first installing OS X 10.9.4 on the SSD mounted into an external HD case, testing the system to see if it would boot up into the SSD, then installing the SSD and carrier in the DVD drive bay. The system now boots up from the SSD with no problems. If you are having installation problems, I recommend trying this method.

    roger hall -

    I just have finished installing second SSD to my MBP (unibody 15` 2010).

    First one was changed like one year ago. Samsung 500GB SSD. It is in my HDD bay and I'm running system from it.

    Today I put a new Samsung 1TB 850 Evo 1 SSD in to my optic bay.

    I encounter problem with SSD not recognized by Finder.

    But It was recognized by Disk Utility.

    What I did was I erase new SSD by Disk Utility. Then the new partition was created and now It has been seen by Finder.

    So If you see it in Disk Utility just erased it.

    Some extra info in under this link--> https://discussions.apple.com/docs/DOC-4...

    Wish you all luck :)

    rybafly -

    My installation went great thanks to the guide. I did notice a small thing that might make a good tip, and that is to inspect all the visible screws. I saw one that was slightly raised, and when I poked around with the spudger, I found 2 more that had worked themselves out a bit. Its probably something super rare but at the age of these things, it wouldn't hurt to check.

    Tineyi Chapisa -

  17. 3GeKNgsubSw2qWpF
    3GeKNgsubSw2qWpF
    YDaOtdHe4DPnEmIx
    fWvjh13qskVLHsiF
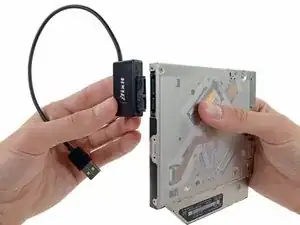
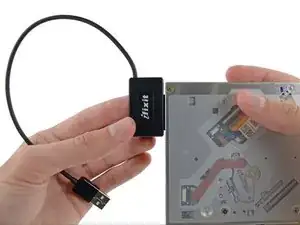
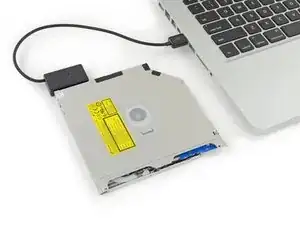
    • Wirf das alte Laufwerk nicht weg! Es kann mit Hilfe unseres SATA-Laufwerk USB Kabel immer noch verwendet werden.

    • Richte den SATA Anschluss des Kabels mit dem Anschluss am Laufwerk aus und stecke ihn ein.

    • Stecke den USB Anschluss in deinen Laptop und das Laufwerk ist bereit zur Verwendung.

    There is a small metal button in the front of the drive and you can use that to eject the drive if you were wondering.

    Joseph Landry -

    Maybe that explain the eject button mechanism maybe….

    - PS5iscool - -

    Die neue SSD wurde durch das Laufwerk ersetzt aber leider wird jetzt die alte HDD nicht mehr erkannt. Hatte schon ein anderer das Problem?

    Alexander Richter -

Abschluss

Arbeite die Schritte in umgekehrter Reihenfolge ab, um dein Gerät wieder zusammenzubauen.

Andrew Optimus Goldheart

Mitglied seit: 17/10/09

493949 Reputation

13 Kommentare

great guide!

Pham Duc Hieu -

I had problems initialising the SDD drive in the optical bay. But have placed it in HD bay and it works fine.

My old Hard drive is a really snug fit in the caddy (its a 9.5mm drive) - when installed in the HD bay it sits on rubber shock absorbers and has air around it.

With a HD in the optical bay, I expect there to be some overheating or shock problems in the future.

Andrew -

!! Hard drive !! The Harddrive with the OS X on it for booting, has to be to be in the Harddisk bay and not the optical bay!

The System does only startup regularly on the SATA connector meant for the Harddrive, not the SATA connector of the former optical drive! (Even for MID 2012)

So, cause the most of us will add a SSD and want to run the System from it, we have to change the old Harddisk to the Optical bay where it is mounted without the anti shock rubbers.

In my case it did´t die there for over a year yet, so, not the big deal it seems at the first look ;-) lucky
pianogreg -

I have a mid-2012 MBP. I just replaced the superdrive with a Samsung Evo 840 1TB SSD. My mac will boot from this drive when it is in the primary bay, and also if it is connected externally with a USB3/SATA cable. However it will not boot from the optical drive bay.

Also, if I install my original drive (Seagate Momentus XT 750GB hybrid) in the optical drive bay it will not boot.

If however I install an old 5400 HDD in to the optical drive bay, it WILL boot.

All three of the above mentioned drives have the same cloned OS on them. When the hybrid or the SSD are installed in the optical drive bay I can see them in the system profiler; both read a negotiated link speed of 6g.

Am I missing something...?

Crumbs -

Crumbs :

Yes you are missing something… MPB MI2012 have just ONE Sata3 to read SSD… The sata for optical drive bay is on sata2.. So it can’t read SSD drive. Put your DD5400 on the optical drive bay, and boot with your SSD (install on the primary bay) and everything will be okay ;)!

Micke -

All the guys having problems with installing OSx on the ssd, you might have forgotten to first use the diskutility to erase the disk to journalled (also on the bootable usb drive), then installing OSX.

hope this helps.

nijssie -

can you run two ssds at once? consecutively? one in the primary slot where the old hdd used to be and one in the optical drive?

stephen elliot -

and does it matter if the drives are different in brand? does one have to be a hybrid drive?

stephen elliot -

Has anyone installed 2 SSDs (1 as HDD replacement and 1 into the optical drive bay) and connected them to a striped level 0 RAID? Both of the SATA connections are 6 G/s. A RAID 0 based on 2 SSDs both running at 6 G/s must be close to the speed of the 2016 MBP Models.

Wandowaiato -

http://randomnerds.com/solid-state-drive...

You may want to check that out. I haven't tried this approach yet but am considering it. Good luck.

Matt Sickon -

Great guide. Would have been better if I had realised I had to initialise the drive first as it was not recognised in the optical bay. I took macbook all apart again put optical bay back, closed it all up started MacBook. Attached HDD with USB and initialised and partioned it. Placed HDD in optical bay again and this time the drive recognised. Need a good link now to move my photos to optical HDD and there must be a way that they are automatically saved there and not on the main drive. I am enjoying my retirement and learning. I fix it is a great site I really appreciated the detailed guide with superb pictures which could be enlarged on my I pad to ensure this pensioner was getting it right. Big thankyou

Geoff Gale -

Hi! Great guide indeed, so to good to be able to upgrade mine with 2TB.

I got the same issue as you and really didn’t want put everything apart and together again! I found that you can initialize the disk without taking everything apart with few commands in the terminal. This guy explains it very well https://www.youtube.com/watch?v=sJG5Woef...

Thank you to helped me understand why I could’nt find my disk and thanks again to tutorial’s writers from iFixit!

Johan Huysman -

I have a MBP13 Early 2011. Can I use this tutorial?

schmidtmario1 -