Einleitung

In dieser Anleitung wird gezeigt, wie du die kaputte Touchscreen-Einheit deiner Fitbit Charge 2 ersetzen kannst.

Wenn der Rahmen der Uhr verbogen ist, empfehlen wir sehr, ihn zu ersetzen um sicherzustellen, dass das neue Touchscreen-Display korrekt sitzt und nicht durch ungleichmässigen Druck beschädigt wird.

  1. HDkAIjnmFWIxZvJf
    • Nimm deine Fitbit Charge 2 vom Ladegerät und schalte sie aus, bevor du anfängst.

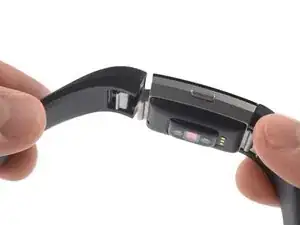
    • Entferne das Uhrarmband von beiden Seiten.

  2. i422SWE1DsRxIFgv
    • Erwärme einen iOpener und lege ihn zwei Minuten lang auf den Touchscreen.

    • Das Display ist zwar nicht festgeklebt, aber durch die Wärme lässt sich die Touchscreen-Einheit einfacher ausbauen.

  3. ZDfpEYSaodni3xB4
    ZDfpEYSaodni3xB4
    n2dUMJPGr6J2VMOX
    mTkjvNkA2XQijuTo
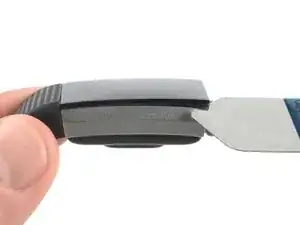
    • Setze einen iSesamo in der oberen linken Ecke in den Spalt zwischen dem Touchscreen und der restlichen Uhr.

    • Schiebe den iSesamo an der linken Kante entlang zur unteren linken Ecke.

  4. DLupgJGBZygrIpEB
    DLupgJGBZygrIpEB
    YOnoaWo4stJfruno
    • Schiebe den iSesamo um die linke untere Ecke herum.

    • Schiebe ihn dann an der Unterkante entlang zur rechten unteren Ecke.

  5. L2BwFVEvsPODp5BD
    L2BwFVEvsPODp5BD
    NAGVOvHFMm1HbR1B
    5YXt2oFHQGfwoVBL
    • Schiebe den iSesamo um die rechte untere Ecke herum.

    • Schiebe ihn an der rechten Kante nach oben zur oberen rechten Ecke.

  6. NuJTYMPgguXnNCp1
    NuJTYMPgguXnNCp1
    3KVRMGVCuIANKDAE
    • Schiebe den iSesamo um die obere rechte Ecke herum.

    • Schiebe ihn an der Oberkante entlang zur oberen linken Ecke.

  7. IpJNGoab1qNhmKL6
    IpJNGoab1qNhmKL6
    xA5bQIJYvkDJXGAT
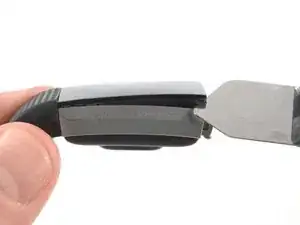
    • Setze den iSesamo unter die obere linke Ecke.

    • Um deine Uhr besser halten zu können, kannst du das Uhrarmband für diesen sowie den nächsten Schritt wieder anbringen.

    • Heble die Touchscreen-Einheit hoch, indem du den iSesamo zur Seite hin drehst, um einen Spalt zu erzeugen und die Kunststoffklammern, mit denen das Display befestigt ist, zu lösen.

  8. Q5ZyrDO6J6wO4svd
    Q5ZyrDO6J6wO4svd
    suExZbcdvRTneXDM
    • Setze den iSesamo unter die obere rechte Ecke.

    • Heble die Touchscreen-Einheit hoch, indem du den iSesamo zur Seite hin drehst, um einen Spalt zu erzeugen.

  9. bUDeGIxIxNPhv3KA
    bUDeGIxIxNPhv3KA
    a41lPRB6HlRMS4q4
    • Setze einen Spudger in den Spalt an der Oberkante deiner Fitbit Charge 2.

    • Heble die Touchscreen-Einheit mit dem Spudger hoch.

    • Entferne die Touchscreen-Einheit noch nicht ganz, sie ist noch mit dem Motherboard verbunden.

  10. uSiQXVUSqlYlE5ba
    • Klappe die Touchscreen-Einheit vorsichtig zur Unterkante hin.

  11. DqC5odFRZFFvXvfB
    DqC5odFRZFFvXvfB
    mbLRTjJN2HSRZ5JO
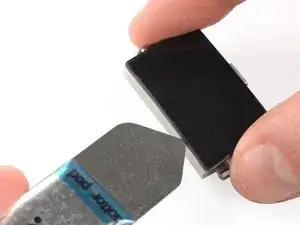
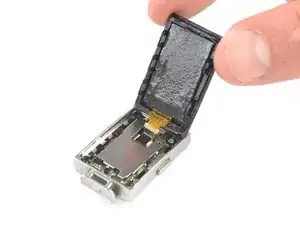
    • Entferne den schwarzen Schutzaufkleber über dem Touchscreen-Stecker mithilfe einer stumpfen Pinzette.

  12. tHAqUYGNsQXOPMeV
    tHAqUYGNsQXOPMeV
    lwweMrnBuOCOTyaa
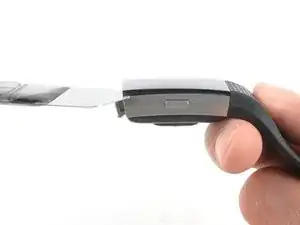
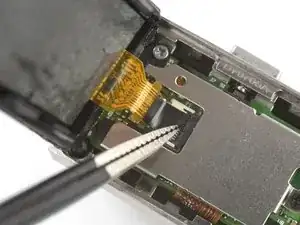
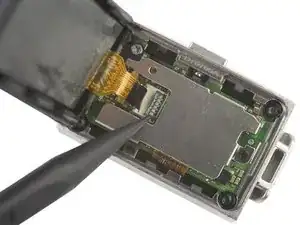
    • Benutze das spitze Ende eines Spudgers, um den ZIF-Stecker zu öffnen, indem du die schwarze Klappe hochdrückst.

    This step was a little confusing for me as I thought the "gray flap" was the part directly under the black sticker that we were told to lift in the previous step. Making this more confusing is the order of the photographs. To me things follow an orderly procession from left to right; by that standard, the "gray flap" was already "pushed up" in the first photo and you can't push it up anyway. It is also BLACK not gray! Anyway, I know it is my fault for not scrutinizing the photos better before I undertook the task of changing my battery. I broke the gray part of the connector and it just crumbled away. I have a small electronic microscope and it looks like I got the ribbon under the tabs correctly, but the display screen will not come on. I can feel the device vibrate when I put it on the charger and the app on my phone looks like it is working properly. I have prior experience with these type of connectors but my old eyes can't focus as well as they used to. Any suggestions for what I can do now? chazasmith@gmail.com

    Chuck Smith -

    Dear Chuck Smith,

    you're completely right. The photos in this step were in wrong order. I changed the order and the color to black for easier understanding. I'm very sorry the flap of your connector broke off.

    The only suggestion I can give is to push the ribbon cable as far into the connector as possible and test if you're able to turn on the display (do this before resealing). If you're able to bring the cable in the right position and the display turns on, you can try to tape it to the connector with kapton tape or a similar strong tape (like it was before with the black tape). Try to tape the cable tight to the connector. Otherwise there might be some play for it to move and loose connection.

    Dominik Schnabelrauch -

  13. EpWDBaUomZ6jPuOK
    EpWDBaUomZ6jPuOK
    4qVFGIBZVTaQ2DJE
    tH1wQYhSCjX3k31Y
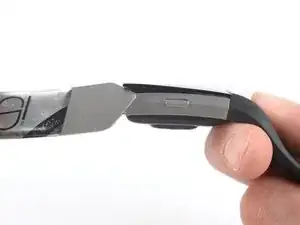
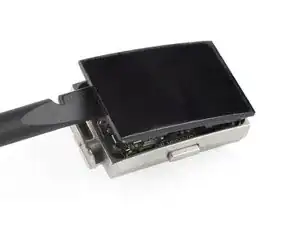
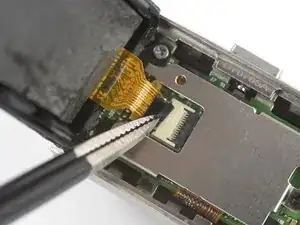
    • Ziehe das Flachbandkabel des Touchscreens gerade aus seinem Anschluss heraus.

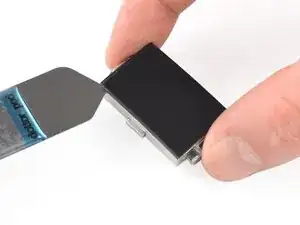
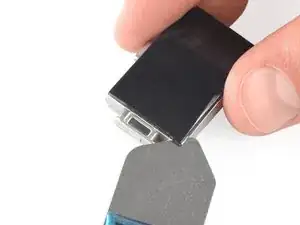
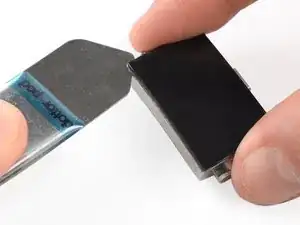
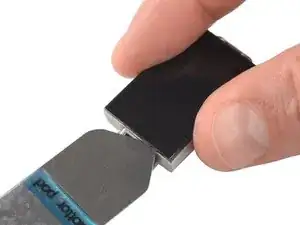
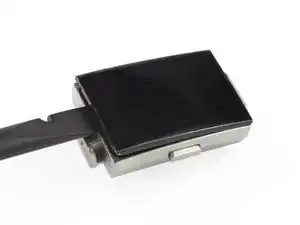
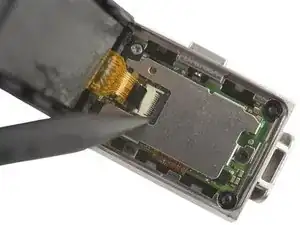
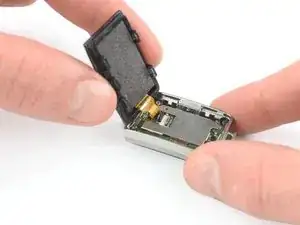
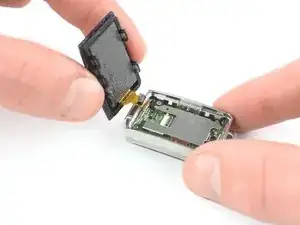
    • Entferne die Touchscreen-Einheit.

    New touch screen will not turn on

    Lisa McGee -

Abschluss

Schalte dein Gerät wenn möglich ein und teste deine Reparatur, bevor du es wieder zusammenbaust.

Um dein Gerät wieder zusammenzubauen, folge den Schritten dieser Anleitung in umgekehrter Reihenfolge.

Entsorge deinen Elektromüll sachgerecht.

Hat die Reparatur nicht ganz geklappt? In unserem Forum findest du Hilfe bei der Fehlersuche.

Adriana Zwink

Mitglied seit: 18/12/19

38806 Reputation

0 Kommentare