Einleitung

  1. RUUQWoFXBrAS1cM5
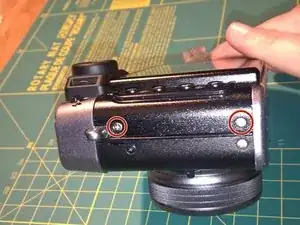
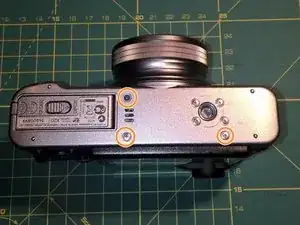
    • Remove the battery and the SD-Card.

    • Remove the three marked screws from the bottom of the camera.

  2. gtoZMDmADXORuAPH
    gtoZMDmADXORuAPH
    LFTrN4bMkSj2KUKd
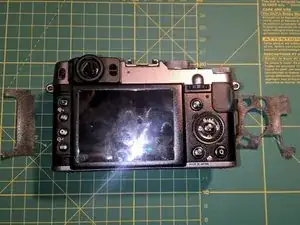
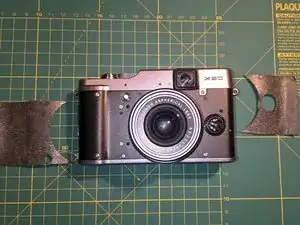
    • Remove four pieces of leatherette from the front and the back of the camera. Lift the edge of the leatherette and pull. The material itself is quite sturdy and the glue will still be good if you re-apply the pieces after you are finished.

  3. GURhbBENHDeJZcAy
    GURhbBENHDeJZcAy
    DeWiQlYTDqF4PSl4
    pYDERKdeYOXHlVCO
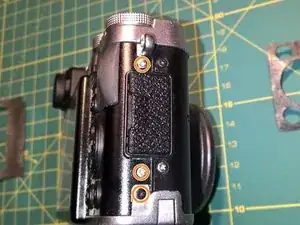
    • Remove two screws from the left side of the camera

    • Remove three screws from the right side of the camera

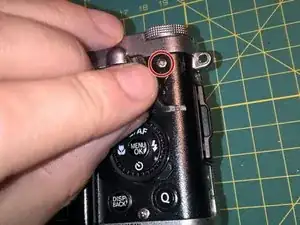
    • Remove the screw between the Q and the DISP/BACK button.

  4. ZCKOaat6V6MMqiZG
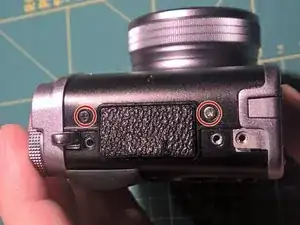
    • Remove the screw hiding below the rubber-pad.

  5. gDuElXEgVSkOyJHm
    gDuElXEgVSkOyJHm
    TcxaNr6bs56G2onw
    LU2BptSXdjoHQLbn
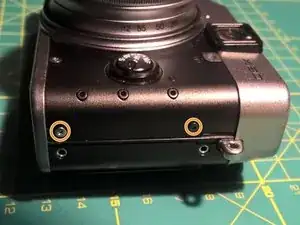
    • Remove two screws from the left side of the camera.

    • Remove two screws from the right side of the camera

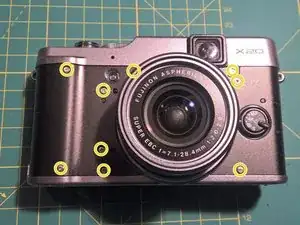
    • Remove nine screws from the front of the camera.

  6. HvQfbCU2EpJgciHj
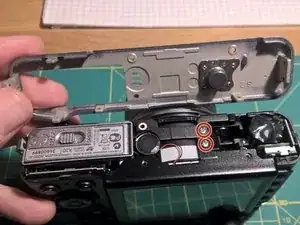
    • You can now remove the plastic base cover.

    • Below you will see two more screws. Please remove them as well.

  7. PkmTXyH2VvRY4RgJ
    PkmTXyH2VvRY4RgJ
    eh1kFYKx6TWOLTpF
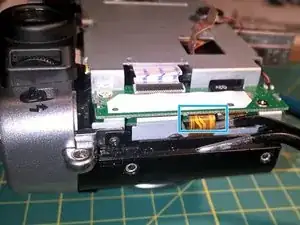
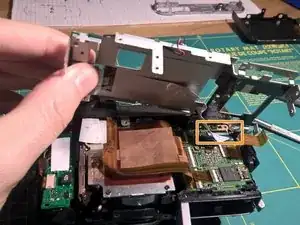
    • Now the two metal covers will get loose. Start by removing the back-cover containing the LCD.

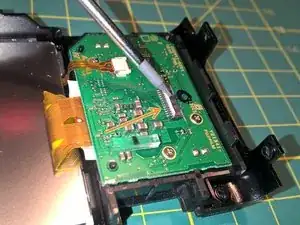
    • Open the connector holding the FPC (the orange wiggly thing) and remove it.

    • You open the connector by lifting the little clip on the opposite side of the oranged FPC (second picture). Then you can pull out the orange FPC.

  8. ZE3MryqvngY2hiso
    ZE3MryqvngY2hiso
    rP3kOXeVFAW5RHwq
    LtZ3EXH2VElmw1TD
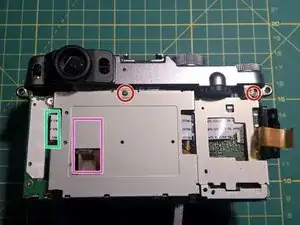
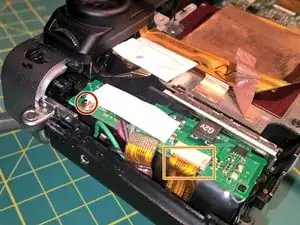
    • Remove two screws (red).

    • Disconnect the FPC on the left side (green rectancle). You have to open the lever.

    • Remove the copper foil from the upper part, but do not remove it completely (pink rectangle).

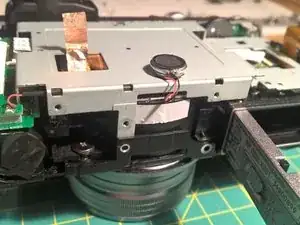
    • The small round part on the bottom is the beeper. Free the connecting wire from the white duct tape. The beeper itself is glued in his place and can easily be removed by pulling.

    • On the left side is one FPC left. This connector can not be opened, the FPC must be removed by pulling (blue-ish rectangle)

  9. mU5VlvpmpRq5TbB4
    mU5VlvpmpRq5TbB4
    SGB3OAsEXgjiaZZ2
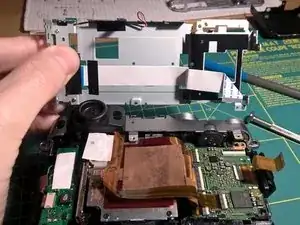
    • Finally! You can move the steel part away and by opening the last remaining FPC connector on the main PCB you can remove this steel thing completely.

  10. A2ySoHu1XnC6Bawo
    A2ySoHu1XnC6Bawo
    mU1pWvDCYJlVfXwb
    RjU6UWIbKaihGwje
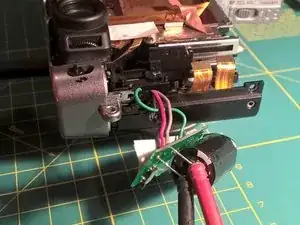
    • Cameras ready, prepare the flash. You will now access the flash capacitor. This can be dangerous. If you are not sure, do not continue.

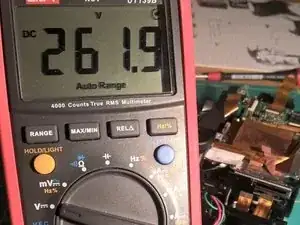
    • The capacitor for the flash can hold dangerously high voltages. I measured 260V across the terminals 2hrs after disconnecting the battery. Either monitor the voltag with you multimeter until it is safe or discharge the capacitor using an resistor of adequate wattage. Do not short circuit the terminals of the capacitor.

    • Remove the screw below the white plastic.

    • Remove the lower FPC as well. This connector does not have a lever. Remove the cable by pulling.

    • You can now remove the little PCB from the housing.

  11. USSU6EL2b5hSRZWI
    USSU6EL2b5hSRZWI
    o4trUHkDcX6IX12Z
    hMrxEJcpg1N53Q3O
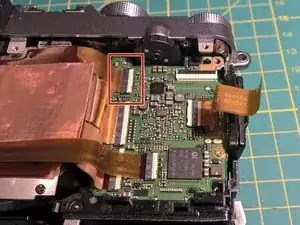
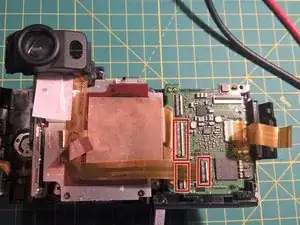
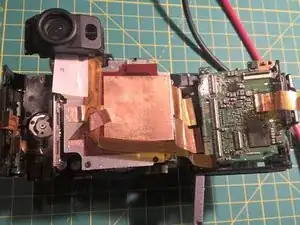
    • Ok, only two steps, then the top-cover can be removed.

    • First, remove the marked FPC from its connector. This leads to any button or wheel on the silver top part.

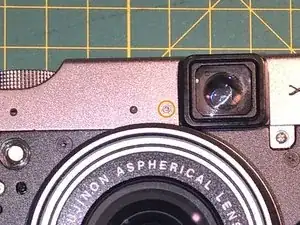
    • The remove the tiny screw beneath the viewfinder on the front with an TORX T1.

    • Then you can remove the silver top cover by pulling.

    • The big capacitor will still be attached.

  12. ZJjVBLY2kjF4TkHM
    ZJjVBLY2kjF4TkHM
    3GpDQEJC2LaURtgw
    • Separate the right PCB by disconnecting the remaining three FPCs.

    • This part (PCB and containing plastic) can now be removed as well.

  13. BQLkTjAVfrnHqyVX
    BQLkTjAVfrnHqyVX
    4sIjRAoABUtsMER2
    UEea5V6m1s1rZTls
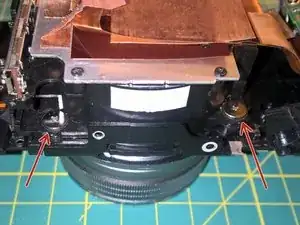
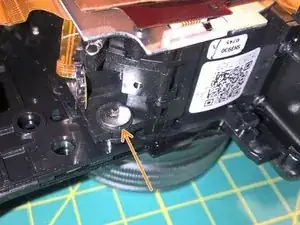
    • The lens is screwed with four big screws to the body.

    • Two screws on the bottom are easily accessible

    • One screw on the top left is also easy to reach.

    • The fourth screw is a bit hidden under two FPCs. You don't have to remove these FPCs to remove this screw.

  14. RavENG1KKEtSvURD
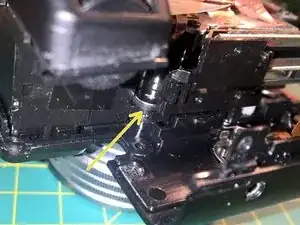
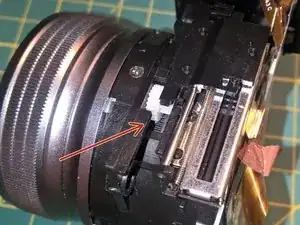
    • Do you still remember why I opened the camera in the first place? Because I could not turn the lens any more due to sand.

    • I found some sand lodged between the big and the little gear shown on the picture. I turned the lens so that the opening pointed down and carefully turned the lens back and forth. A very small amount of sand fell out but it was enough to get things going again.

  15. p3ni4THbT5KkGy3L
    p3ni4THbT5KkGy3L
    QJEaqE2kyqZK1wwr
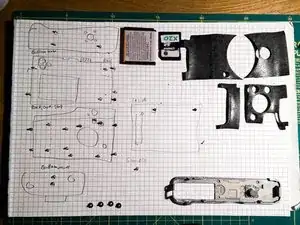
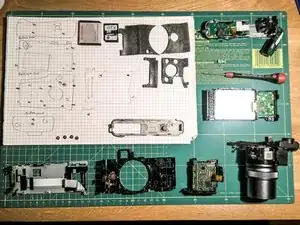
    • Two pictures showing a) the parts and b) the screws and their position.

Abschluss

To reassemble your device, follow these instructions in reverse order. Please pay attention to the following steps:

-On the PCB with the big capacitor you have to push the FPC in. There is no lever on the socket.

- On all other sockets, open the lever first, slide in the FPC and close the socket.

- Be careful with the thick wires going to the flash, They may keep keep the flash from opening. Try this out before closing the camera.

- Don't forget so secure the beeper and his wire.

- Also remember to glue on the copper foil.

Christian

Mitglied seit: 09/03/14

1381 Reputation

18 Kommentare

Excellent guide my friend

It is useful to work with the previous model Fuji X10

amigo_alegria_clown -

Hi Christian, thank you very much for this detailed guide.

Question: I had the same problem, sand or similar which for a while blocked my lens. I tried to open and close more times in a few days and after a while apparently the problem was solved… but now I have “dust” inside the lens (and/or on the sensor). To clean lens and sensor do I need to follow all the guide? Because I’m not expert and the part of the flash scares me a little. Moreover my camera is still working and perhaps my niece would like to use it even if the result has a bit of sand-and-dust in two or three points.

A request: I would never send my camera to Fujifilm after they told me that they wouldn’t tell me the cost of the fix, and that for sure it would be at least 200€. Do you think that I could find any other option?

Again, thank you for your job.

Mauro Piccotti -

Hi Mauro, if it fits your wallet and if I were you I would give the camera to your niece and buy myself a new one. There are so many awesome cameras out there.

Regarding the flash, if you take the battery out and leave the camera alone for two days there should not be any voltage left. To be sure you could hook up a multimeter like I have shown in Step 10, right picture, and measure. As soon as you hook up the multimeter the voltage will slowly drop to zero volts.

The CCD Sensor is mounted together with the lens, you can see this unit on the very last picture on the bottom right corner of the green mat. Four screws hold a PCB, to which the sensor is mounted IIRC. I didn’t open this, there was no need to do this and I did not want to deal with an misaligned sensor afterwards. So to say, yes, you have to open the whole thing to get to the sensor.

Christian -

Hi Christian, thank you for answering. I’ve already bought a new camera (a Sony A6000), but I don’t like to keep a not perfect camera, so probably I’ll give it to my niece to teach her how to take pictures. If she doesn’t like the present I’ll try to fix it, at least I know that I don’t risk an explosion of a capacitor :)

Thank you again.
Mauro Piccotti -

Hi. Great guide. I have a x10 and is not turning on. Do you know if is a easy access to the lens switcher, or any idea about what can be the cause? It is there a way to press a combination of buttons and reset the camera? Best regards.

Mihai Radu -

Hi, what Happens if you hold the PLAYBACK-Key on your X10? Does the camera start in Playback-Mode?

Christian -

Hi Christian! Thanks for this beautifully detailed guide, excellent work. I own X20 and at the moment facing this issue. When I switch the camera on, there’s no visual feedback on my LCD and I’m unable to take a picture. There seems to be no “communication” from the side of the lens. On the other hand, I’m able to access the playback or even the setting menu when holding an appropriate button, so the screen is functioning well. Do you have any suggestions as to what might be the solution to this problem? Thanks in advance!

Karel Neumann -

Hi Karel, I am very sorry that I did not answer your question right away. I did not get a notification from iFixit that someone has commented.

Regarding your problem: If I remember correctly there is a small mechanical switch which gets activated when you turn the lens. Then the camera knows that someone wants to take pictures and switches on in “Take Pictures Mode”. Maybe this explains as well why you can play back but not record. This is be the point where I would look first.

I scrolled through my pictures but unfortunately I did not photograph this switch.

Christian -

Thanks a stack for this guide; very helpful.

One issue:

When removing the lens (Step 13), a small rubber tube about 3x6mm dropped from the camera, Any idea where this is suppose to fit?

Thanks

Les

Les -

Hi Les, this might be one of the four “rubber tubes” which are wrapped around the screws which hold the lens. These are the screws with the big silver heads which you can see on the three pictures of step 13. I guess the rubber tubes are there to dampen the vibration.

Christian -

Thanks, Christian for responding.

Only one rubber tube in the four screws, though. Will investigate further.

One more issue:

Step 11 First picture FCB refitting. I can't seem to get the flex cabe back into the slot.

Is the connector plating supposed to go in at the top? I have an X10 which is very much similar to the X20, except for this flex cable which is not twisted as shown in the third picture (Step 11).

Thanks again

Les

Les -

Re my previous Q:

The 3 FCB.s do have clips after viewing through a high power handheld lens (from my neighbour…)

Thanks!

Les -

Hello Christian,

thank you for your detailed explanations! My X20 does not accept the super macro mode any more. When trying to localize the problem, I noticed that the camera apparently does not recognize when the lens is mechanically turned to its farthest wide-angle position of 28 mm (which is required for the camera to accept the super macro mode). That is, in this position the „zoom bar“ on the display indicates somewhat more than 28 mm. Therefore, my idea is that a rotary position sensor for detecting the angular position of the lens needs to be re-adjusted. Do you (or anybody else) know/remember whether my assumption is correct and - if so - whether it is reasonable to try re-adjusting it based on your disassembling instructions? Any other idea?

Thanks & regards

Bernhard

Bernhard -

Hi Bernhard, basically I share your opinion about the Super Macro Mode, which gets only activated if the Zoom is in the Tele-Position. However I don’t have any idea how to re-adjust the position of the cogwheels in Step 14. I would try to block one cogwheel (the small, white one), try to move the big black one and see, if something changes.

Christian -

Hi, Great guide, thank you. My X20 stops suddenly to turning on (nor lens turning on, neither playback). I have two batteries that were working well. I followed your guide and everything seems to be ok. The only thing that seems a little bit different for me is that the red cable on the bipper is break. I really don’t know if that could be the reason why the camera is not turning on. Do you have sope idea of what could be broken?

guilevar -

Hi, I don’t think that the red beeper cable is the cause. If your batteries are OK and playback doesn’t work either I’m really out of ideas. I would check the batteries with a multimeter and maybe try a third one. Then I would try to trace the current from the battery pins to the main logic.

Christian -

Fascinating to see this teardown. After taking a lot of neighborhood photos during the pandemic, this morning the SOUND(!) of all things quit working. Since everything else still works, I suspect the speaker, though I don’t know how that could have died (I have checked and I’m not in silent mode, nor do I have the volume turned down. Any thoughts?

Andrew Marchant-Shapiro -

Hey everybody,

My X10 stays black. the LCD turns on, I can choose all functions, but when i take a picture, it's black.

Is that the sensor?

Does anybody have any hints?

I thought it might have something to do with sand, after a North Sea vacation with lots of wind and sand...

I've cleaned out some sand, but the camera still makes black pictures.

thanx

Bruno

Bruno Konnerth -