Einleitung

Akkus ermüden nach vielen Ladezyklen und ihre Kapazität sinkt. Auch Herstellerfehler oder falsche Lagerung kann ihre Speicherfähigkeit beeinträchtigen. Diese Anleitung zeigt dir, wie du den Akku austauschen kannst, egal warum er nicht mehr so gut funktioniert.

Durch den Austausch erledigen sich alle Akkuprobleme. Nimm dir auch etwas Zeit und beachte die Umgangsregeln für den Akku, so dass seine Lebensdauer verlängert wird. Einige Grundregeln sind:

  • Lagere das Gerät bei Raumtemperatur und nicht in direkter Sonne
  • Lade den Akku täglich oder wenigstens jeden zweiten Tag
  • Entlade nicht unter 5%

Wir hoffen, dass du Erfolg mit der Reparatur hast und wünschen gutes Gelingen.

  1. Wke3RXPxEITEdrYW
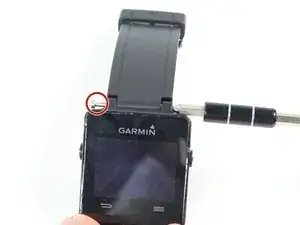
    • Halte einen Schraubendreher mit Torx T5 Bit in deiner rechten Hand. (Als Linkshänder natürlich links)

    • Halte einen zweiten Schraubendreher mit T6 Torx Bit in deiner anderen Hand.

    • Platziere den Schraubendreher mit T6 Torx Bit wie gezeigt auf der einen Seite des Armbandendes und halte damit den Kopf des Armbandstiftes fest, während du gleichzeitig mit dem Schraubendreher deiner rechten (als Linkshänder linken) Hand den Stift auf der Gegenseite (entgegen dem Uhrzeigersinn) herausschraubst.

  2. iHZrlAOxAibMEQoc
    iHZrlAOxAibMEQoc
    DHvCLduZknYp2DEV
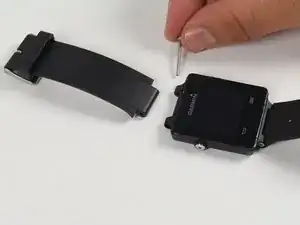
    • Nachdem die 1mm Schraube entfernt wurde, führe den Schraubendreher wieder in das Loch ein.

    • Drücke jetzt vorsichtig den Stift des Armbands nach links heraus. Er wird dann auf der anderen Seite ein Stück herausschauen.

    • Fasse den freigelegten Stift mit den Fingern und ziehe ihn vorsichtig ganz heraus. Das Armbandelement sollte jetzt vom Gerät gelöst sein.

  3. FHvJBAyOBBVovRNu
    • Platziere einen iOpener über das Display um den Kleber zu lösen

    • Nach etwa einer Minute kannst du den iOpener entfernen.

    • Für eine genaue Anleitung für die Benutzung des iOpeners, benutze folgende Seite

  4. 1LIGImQxI1UYN24Q
    1LIGImQxI1UYN24Q
    OxDeG4ElFBWgnaZW
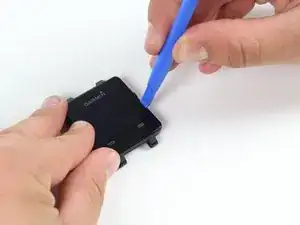
    • Führe das blaue Plastiköffnungswerkzeug zwischen Display und Kunststoffgehäuse der Uhr ein und heble das Display langsam an einer Seite hoch.

  5. KJOfBmUEigVob5xF
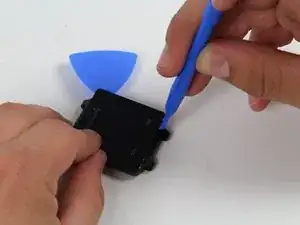
    • Wenn die erste Seite frei ist, dann zwänge das Plektrum zwischen Scheibe und Gehäuse auf der anderen Seite.

    • Befolge diese Schritte einmal ringsherum um auf allen Seiten den Kleber zu lösen.

    • Dringe nicht zu tief ein, um Beschädigungen an internen Komponenten zu vermeiden.

  6. wSPLZifAkvTAFtwS
    • Benutze das Öffnungswerkzeug um die Seite des Glases soweit anzuheben dass du mit dem Fingernagel drunter kommst.

    • Befolge dies auch für die andere Seite bis du sicher bist, dass du es gut greifen kannst.

  7. rXGeDCIZgiXrrIMJ
    • Greife das Display vorsichtig von zwei Seiten.

    • Hebe das Display vorsichtig aus dem Rahmen, jedoch nicht zu weit - um Beschädigungen vom Flex zum Mainboard zu vermeiden.

  8. BGpivIgOHIUqnyop
    • Löse vorsichtig die Verbindung des Kabel mittels eines Plastik Öffnungswerkzeugs.

    • Nachdem dies erfolgt ist, ist das Display vom Rest befreit und kann herausgehoben werden.

    Thank you. The repair worked out very well. The tools made it possible. I had cracked the screen and now it is back to being a touch screen.

    Luigi Vitalini -

  9. q4WVJYdtVsMLuSKL
    q4WVJYdtVsMLuSKL
    LvJSDvCkJyIKHSKD
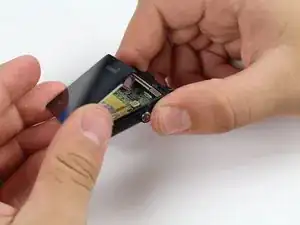
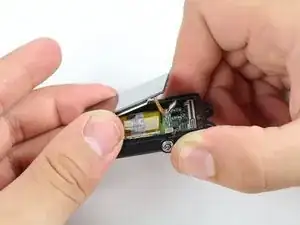
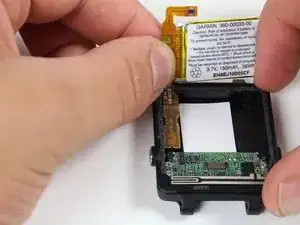
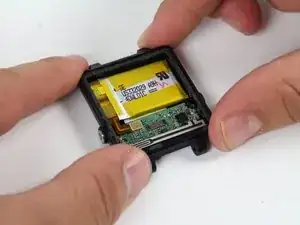
    • Der Akku liegt jetzt offen vor dir.

    • Löse den Akkuanschluss ab.

    • Benutze dafür kein Metallwerkzeug, du könntest dich verletzen oder elektrische Bauteile beschädigen.

  10. WUrq1Kg22rYiKCXm
    WUrq1Kg22rYiKCXm
    X2V2UPu2UBpcbIJj
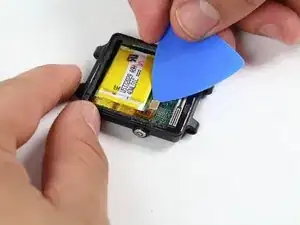
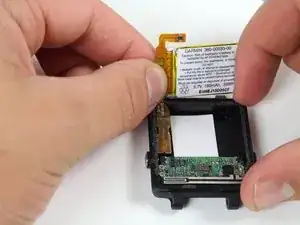
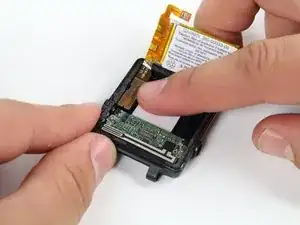
    • Hole den Akku vorsichtig wie gezeigt mit einem Plektrum heraus.

    • Es handelt sich um einen Lithium Polymer Akku. Beachte die Vorsichtsmaßnahmen und verforme ihn nicht beim Ausbau.

  11. gaECBlp221rFLZVJ
    gaECBlp221rFLZVJ
    etRdxdHXaIpMJblr
    IngjYfMOdgTDmOEI
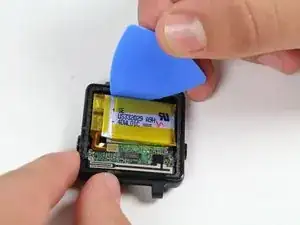
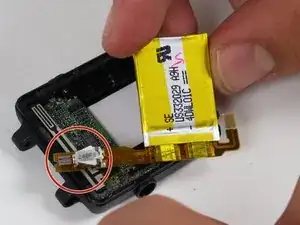
    • Wenn der Akku vom Gehäuse gelöst ist, dann drehe ihn herum. Am Akku ist eine Lasche angebracht, die nun sichtbar wird.

    • Löse die Lasche vorsichtig mit einem Fingernagel ab.

    • Bewahre den Vibrationsmotor auf, hier mit einem roten Kreis markiert. Du musst ihn später beim Zusammenbau an den neuen Akku anlöten.

    After reaching step 11, you have to assemble the watch by reversing the steps. But how do you reverse step 3?

    How do you glue the watch face on again? What glue do I need to buy?

    alan

    Alan Rickayzen -

Abschluss

Um dein Gerät wieder zusammenzusetzen, folge den Schritten in umgekehrter Reihenfolge.

Michael Clark

Mitglied seit: 01/10/15

658 Reputation

28 Kommentare

But battery buy where?

sanborn -

where to buy battery?
Whitney Oliver -

I have the Same question... where can i buy the replacement?

Roli -

I've tried everywhere to find a battery for my vivoactive, with no luck. Where should I look to find a battery? HELP!

David -

Battery is a 3.7 V, 150 mAh Li-Polymer type.

Gary K -

Does anyone know where to buy the 3.7 V, 150 mAh Li-Polymer type, battery.

Dan M-1-20-2018

Dan andMarj -

Same question…

ruben_beniamin -

same question…

Jorge Catepillan -

I have the same questions as everyone else and that is where can you purchase the battery. The Garmin part number 360-00033-00 (taken from the photo) cannot be found anywhere including the Garmin site. The number US332029 A9H (also taken from the photo above) cannot be found anywhere. The specification of the battery is 3.7V 150mAh and is a polymer Lithium battery. I attempted to find other batteries which meet these requirements on Aliexpress and I found a number of batteries which are close (3.7V 140 mAh P Ion). They look identical to the photos above and are 30m x 20mm x 3 mm. The only problem is that they will not last as long as the original Garmin battery and the connector on top of the Garmin battery would have to be removed and somehow attached to the new Aliexpress battery. The battery to search for on Aliexpress is 302030 and the cost (including shipping) is roughly $10.00. I am not sure if these are identical to the original Garmin batteries but the dimension appear to be correct.

P H -

Same question as everyone above. Where do you buy the replacement battery from?

kathryn.ward -

Anyone found a battery solution?

Paul Martin -

Same question. This is ridiculous. You pay a lot for this watch, and once the battery no longer holds a charge, you are supposed to throw it away?

sportif -

nobody know where to buy this battery?

sir_moreira -

$99 for Garmin to replace the battery is all I could find…that sucks.

vaughan Reynolds -

Same issue here. I contacted garmin support and they want to charge me almost 80 euros to replace the battery. My watch has 2 years and 5 months. What a waste of money. I will never buy garmin again.

pablo calahorro -

So let’s say you DO find a battery (or a replacement screen) these “detailed” directions simply state that “to reassemble your device follow the directions in reverse order”. How does one “reverse the order” of warming the watch cover and levering off the screen? Does the adhesive need to be replaced? If so, with what?

Peter Caddle -

Smavtronics claims to have the battery for $20.00. Who wants to be first to try it?

Peter Caddle -

hi, can someone help me with the polarity + - for the Garmin Vivoactive Smart Watch , thanks

JESUS GALINDO -

https://www.smitacn.com/back-cover-with-...

You can buy pin here, me trying and very goodBạn can buy pin here, me trying to use and very good

letronggiau2000 -

Google "360-00033-00", you will find plenty of shops (including ebay, aliexpress).

Ivan Zezyulya -

How to proceed for the vivoactive HR

gilles PIERSON -

After reaching step 11, you have to assemble the watch by reversing the steps. But how do you reverse step 3?

How do you glue the watch face on again? What glue do I need to buy?

alan

Alan Rickayzen -

Just ordered my Garmin Vivoactive battery on https://www.smitacn.com/

The cost is $30 USD or $41.39 CAD (Dec 2nd, 2019)

Takes 3-4 weeks from China (E-Packet)

Richard Paquin -

Garmin in the UK do not sell battery or replace the battery on this Vivoactive. This guide is excellent but can’t find an exact match. This one below is very similar and only £6 but 2mm thicker and not sure if this watch could take this extra thickness. Be great if someone who has done this could comment on my comment!

https://www.ebay.co.uk/itm/3-7V-250mAh-5...

MsCabbage001 -

What is the best adhesive to use to reseal? I would like the watch to be at least water resistant after I change the battery - is this possible?

Sgt. Peppermint -

J’ai trouvé une batterie, elle dure longtemps, sauf qu’on a oublié le vibreur sur l’ancienne batterie ! Sur ebay :https://www.ebay.com/itm/224196564297?_t...

girl -

I was lucky on AliExpress, and it seems to work

Ingvar Richard Olsen -

Here is the battery with the back cover for $30 (USD) https://www.smitacn.com/back-cover-with-...

Or go to Amazon and search, Garmin 360-00033-00 There are many batteries listed with the above shown ribbon cable and connector from about $15 to $18 USD. The delivery time for most appears to be 10 to 14 days except for the few coming from China. For the reassembly, if you were careful in opening the watch and didn't damage the adhesive, you may be able to just put it back together and maintain water resistance. Or, look for adhesive remover and Tesa tape on https://www.ifixit.com/Tools/Consumables.

I'm Me -