Einleitung

In this guide we will be showing you how to replace the speaker assembly in your GoPro Hero4 Silver. The speaker allows for audio playback when viewing recorded videos. Before you begin make sure the battery is removed from the device and that you have the necessary tools to preform this repair.

  1. nPsmTbsWHKkgBbKI
    nPsmTbsWHKkgBbKI
    oMtWnxCTqnvWgNxq
    GliLhHeZiuKLNNx4
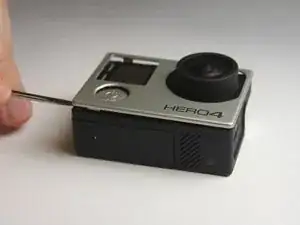
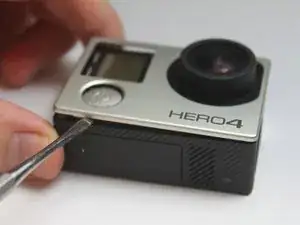
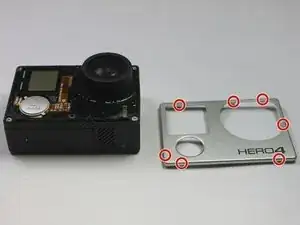
    • Start by removing the silver plastic face from the camera using a plastic opening tool. Insert the plastic opening tool into the middle of each edge and lift up the tabs that keep the camera face on.

    • The seven plastic tab locations are marked in red.

    • Try using the plastic opening tool before switching to the metal spudger. We tried using the plastic opening tool to pry the camera face off, but found that it did not give us enough leverage.

    • There may be glue holding the camera face on to the housing. Be careful not to flex the camera face too much, or it will crack.

    First step should be make sure you remove memory card first. I accidentally left mine and broke it trying to remove the assembly from the case.

    Brad Hodgkinson -

  2. v2wTHDQUSpNscOnL
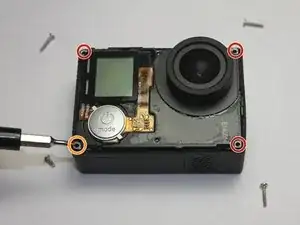
    • Remove the three 8 mm Phillips #000 screws on each corner of the camera.

    • Remove the single 4 mm Phillips #000 screw on the bottom left corner of the camera.

    The screw heads are Philips #0 on my Hero 4 (and not #000 as described in the instructions).

    Marcus Jaschen -

    Definitely a 000

    Brad Hodgkinson -

    Just want to point out that the screw in the top left corner is slightly placed beneath the LCD. Use caution when trying to unscrew.

    Ben Resnick -

    Mine was as well, I’m glad I’m not the only one

    Robert Ditch -

    and &&^&^$^ instructions waste my money

    jiaweiboss -

  3. tJEQBhukublYoCsD
    tJEQBhukublYoCsD
    DYYUiwyHAvHOSXjI
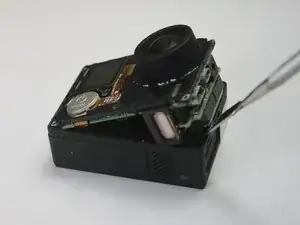
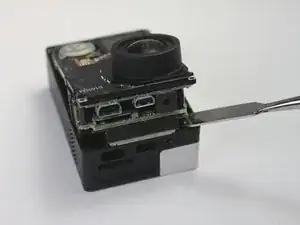
    • To remove the motherboard assembly from the camera casing, use the plastic opening tool on the lens side of the camera to pry the motherboard assembly out of the camera housing.

    • To avoid breaking the plastic on the lens side of the camera (see photo), pry along the edges near the corners.

    • Try using the plastic opening tool before switching to the metal spudger. We tried using the plastic opening tool to pry the motherboard assembly open, but found that it did not give us enough leverage.

    • Do not try to pry near the power button side of the camera. This will break important cables inside.

  4. NnW3hPSdcaTZdAvH
    NnW3hPSdcaTZdAvH
    FIyLHanugVpGU1ck
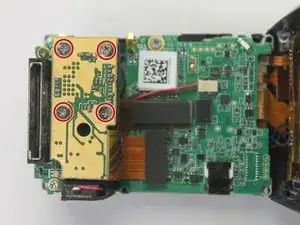
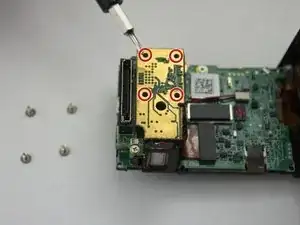
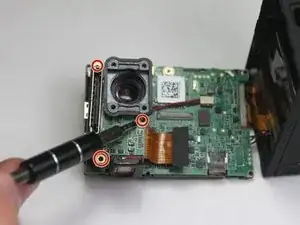
    • Remove the four 8 mm Phillips #000 screws securing the camera sensor assembly.

  5. EEcIgyq1mfLObrqA
    EEcIgyq1mfLObrqA
    dM5AqjeYiqOUXUSE
    vdcOGcDKrBoarpZr
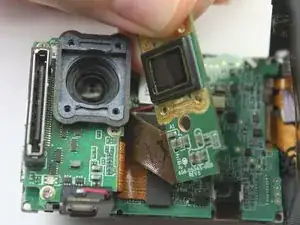
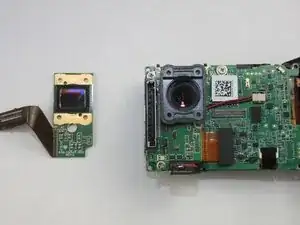
    • To remove the sensor assembly, simply peel off the lens towards the attached ribbon cable.

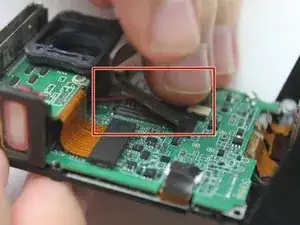
    • The sensor has ribbon cables running to the motherboard via a black rectangular connector.

    • To remove the sensor, use the spudger to pry up each side, Then, lift the connector straight up from its socket.

    • With the old camera sensor assembly removed, you can now replace it with a new sensor.

    The thin copper tabs, visible on the far right screen of STEP 5, have pulled out (as it did with mine). How do you get these back in? They are very thin and when the 2 halves of the camera are put close together, there is no room to access this, or get leverage to force them back in the slots they came out of.

    Keith -

    did you guys figure it out on how to put it together?

    gens909 -

    Same thing happened to me. Nightmare to put back in. The ribbon connectors are for the rear lcd and I think the side button. To re attach the cable you basically need to remove the motherboard from the front piece to get to the tabs where the ribbons go into. There is very little cable length to attach it and it comes off very easily while trying to re assemble.

    Brad Hodgkinson -

    @ keith

    looks like you can't. Mine did the same thing and I think it's now trash. I should have just used the procedure to unscrew the lens without taking the camera apart.

    Larry Clark -

    I was able to flip up the white tabs and after much frustration got the ribbons back in. However once my camera got back together the touch screen wasn't working. Anyone know which ribbon or connector this is?

    Derek W -

    I either damaged something or dislodged something because the colors on the LCD screen are washed out and the image is not clear, almost pixelated. The camera itself works and the image taken appears to fine. I'll live with it like this.

    Steve Remsing -

    I bought the image sensor form ifixit, replaced it, and... 3/4 secs after turning the GoPro on, it still freezes :(. Now I do not even see the image in the display anymore -_-'

    ALEJANDRO ALCANTARA -

  6. OkdXRuiOXEZnI5ec
    • Remove the three 8 mm Phillips #000 screws securing the Hero port to the motherboard.

    The screw under the lense is unable to be removed as it hit the lense.

    Aaron Singh -

    I went to step 9 and once the lense was seperated from the motherboard I had plenty of room.

    Aaron Singh -

    I removed the screw in the top middle of the picture so the mother board would come loose. I then gently pried the motherboard up off the black plastic of the lens plate and the assembly moved enough that the third screw of the port assembly could finally be removed. When going back together, hook the port assembly cable up before screwing it down with the three screws. Its a bit easier.

    Rich Greenwood -

    I did this too, much easier

    Brad Hodgkinson -

    Thanks Rich. That's what worked for me.

    John Mills -

    WARNING: I almost broke my camera following this step. If you are following these instructions in order to replace your lens, stop now. These instructions are incomplete, and misleading; you don't need to remove this piece in order to complete a lens replacement. What you're looking for instead is this: https://www.youtube.com/watch?v=fLxQC_55...

    john mcgowan -

  7. shXMldHSEUZ1NR6G
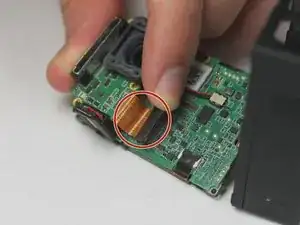
    • Locate the copper-colored ribbon cables connecting the Hero Port to the motherboard.

    • To remove the connector, use tweezers or a spudger, pry up each side of the connector. Then, lift the connector straight up from it's socket.

    • When reassembling this piece, do not use too much force to put the black rectangular pins back onto the motherboard. When done right, there will be a 'click'.

  8. LOivDECWOPsmi6pQ
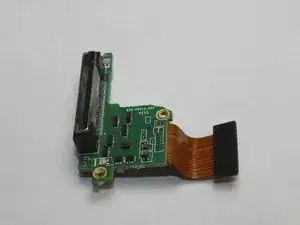
    • To remove the free port, simply slide it out from the left side of the camera. It should come out with slight coercion.

    • This piece can be replaced, fixed, or set aside for further tear-down of the GoPro.

    • Pictured left is the port when separated from the motherboard.

  9. WVkfBlBn6ZRZOiee
    WVkfBlBn6ZRZOiee
    k3FQG6DHGNZUbCbs
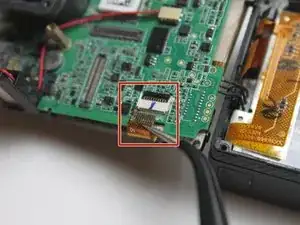
    • Use a pair of tweezers to disconnect the ribbon cable from the ZIF connector by flipping up the black retaining flap. You should then be able to pull the cable free.

    • Once the ribbon cable is disconnected, you can remove the black plastic bracket which holds the camera lens.

    • Be careful removing the ribbon cable. It is very fragile and can tear.

    What can of cable is this? Which are the specs? I need a 10cm length piece of ribbon cable but I don't know the keywords to command it on the internet.

    David Izquierdo Gomez -

    Before removing the black plastic bracket you need to remove one more screw on the motherboard (top centre))

    Arthur -

    Need more information about the other set of ribbon cables on the back of the boards, about three ribbon cables ???,need pintures of those .

    Luis Villarroel -

  10. S1B6gZV3YRd42AhW
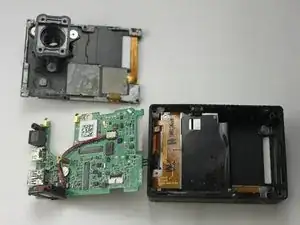
    • Once the camera assembly has been removed, you can begin separating the motherboard assembly from the camera housing.

    Before separating both parts I had to remove one more #000 screw - right side of the lens (Hero4 Silver)

    Arthur -

  11. aIHbYOgpWfZI1WdR
    • Flip the motherboard assembly and camera housing over so you can access the back of the motherboard.

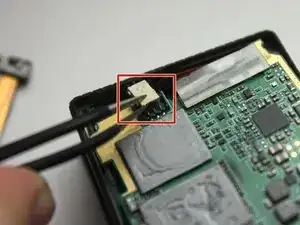
    • Look for the white connector that has two wires that lead from the mother board to the battery compartment in the camera housing.

    • Using the metal tweezers, pull upward on the connector to disconnect the clip.

    • Be careful when prying on the clip. It is made of plastic, so it is breakable, and requires significant force to disconnect it. Try to apply the force as evenly as possible.

    Next to this little white connector there are three ZIF connectors. These need disconnected too. During my first attempt at this I reconnected the white connector first when reassembling the unit. This appears not the best order of doing things. You may want to put the black plastic cover back first, followed by connecting the 3 ZIF connectors. Then continue to re-assemble the unit and leave the white connector to later.

    Arthur -

  12. ymFcNqLoqfxXS4ud
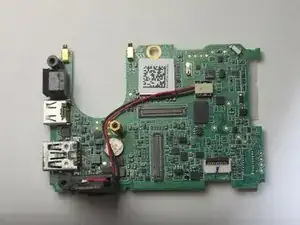
    • With the connector removed you can now set the camera housing aside and work on the motherboard.

  13. yZAl1JuIFhxmKnXG
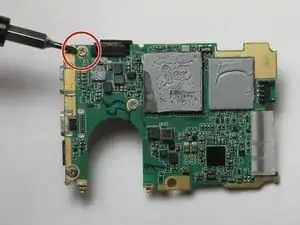
    • Flip the motherboard over.

    • Remove the single 8 mm Phillips #000 screw.

  14. rZrqcWQaWtQXD2re
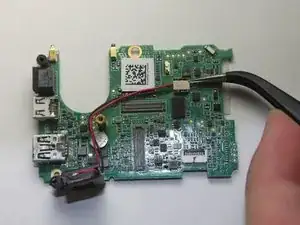
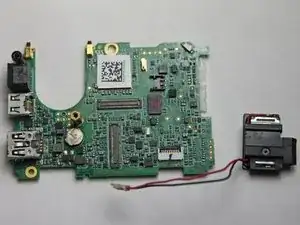
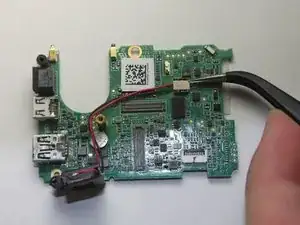
    • Flip the motherboard over. The speaker assembly should be loose and only connected by two wires leading to a white connector.

    • Using the metal tweezers, pull upwards to disconnect the connector from its port.

    • Use caution when prying on the connector. It is made of breakable plastic, and it requires significant force to be removed. try to apply an evenly distributed force when removing the connector.

  15. pVAYpTgtm1Uskf15
    • Once disconnected from the motherboard, the speaker assembly can be removed.

Abschluss

To reassemble your device, follow these instructions in reverse order.
Zack Hoover

Mitglied seit: 27/08/15

1100 Reputation

0 Kommentare