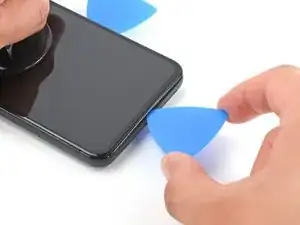
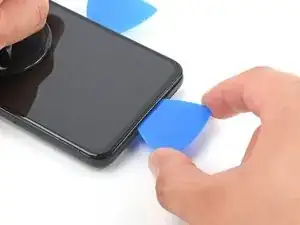
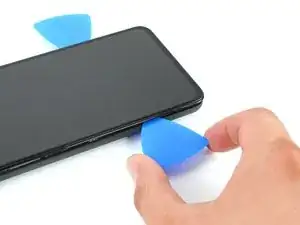
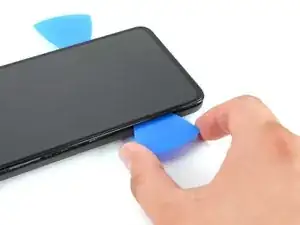
Einleitung

Diese Anleitung zeigt, wie das Display im Google Pixel 5a ausgetauscht werden kann.

Entlade zur Sicherheit den Akku vor Reparaturbeginn auf unter 25%. Dadurch reduzierst du das Risiko eines Brandschadens während der Reparatur. Wenn der Akku aufgebläht ist, musst du entsprechende Vorsichtsmaßnahmen treffen.

  1. fX42PHSMxaPL3GMb
    fX42PHSMxaPL3GMb
    6jVUHksrsjD6AYrP
    • Schalte das Gerät vor Reparaturbeginn aus.

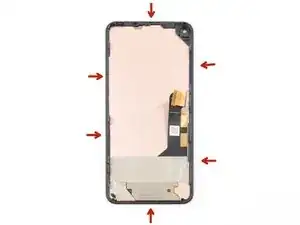
    • Um das Display zu entfernen, muss es hochgehebelt werden. Lies zuerst sorgfältig folgende Hinweise, bevor du anfängst.

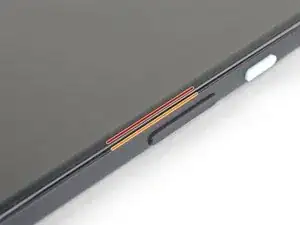
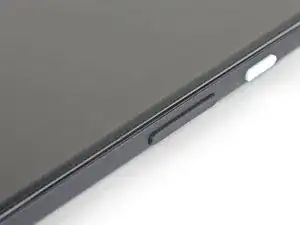
    • Schaue dir genau die beiden Nähte an den Kanten des Gerätes an:

    • Displaynaht: diese Naht befindet sich zwischen dem Display und dem restlichen Gerät. Heble nicht an dieser Naht.

    • Blendennaht: diese Naht befindet sich zwischen der schützenden Kunststoffblende und dem Rahmen. Sie ist durch Rasten befestigt. Hier musst du hebeln.

    This will be clear if you examine your replacement part first.

    bcling -

    True, but one may be disassembling the device prior to receiving their replacement 😉

    Niels Klassen -

    I'm not sure why it's recommended to pry at the bezel seam. I followed this guide but the bezel that's held in by clips, provides some additional housing for the front facing camera as well as the ear-speaker grille. I ended up separating the old screen from the bezel and putting the bezel back into the phone first, before installing the replacement screen.

    Kevin Kim -

    My replacement screen did not come with the bezel, and I had to remove it from the old screen. I didn't notice this until i attempted to replace the screen. Be sure to look at your replacement screen prior to reassembly. It will save you some heartache. All was good though and the phone is working.

    jak ll -

  2. GZIYSPIQxNHkQ6Yr
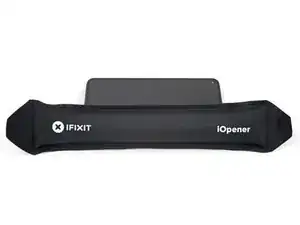
    • Erwärme den rechten Displayrand eine Minute lang mit einem erwärmten iOpener.

    • Je nachdem, wie stark der Kleber an deinem Smartphone ist, musst du den iOpener eventuell mehrfach wieder erwärmen und auflegen.

    • Optional kann hierfür auch ein Haartrockner, eine Heißluftpistole oder eine Heizplatte verwendet werden. Hierbei muss jedoch darauf geachtet werden, dass das Smartphone nicht überhitzt wird. Sowohl das Display als auch der interne Akku sind anfällig für Hitzeschäden.

    Use the full length of the iOpener to soften the adhesive on the right edge and top or bottom. My repair required three applications of the iOpener.

    bcling -

    I needed about 4 applications of the iOpener before the adhesive was weakened enough to stick the opening pick in.

    Ibukunoluwa Amusan -

    Do you have to wait 10 minutes between each application?

    Joey -

    I heated the iopener twice for 30sec (weak microwave) then applied for a couple minutes without success. Then reheated iopener for 30 more sec. Then used the blue tool supplied in kit to help push down on bezzle and that did the trick to separate enough to get the picks in.

    Ilya Pittel -

  3. 5DUi2kWQhyIOgxBE
    5DUi2kWQhyIOgxBE
    1xEVsm3hjC1fXsQZ
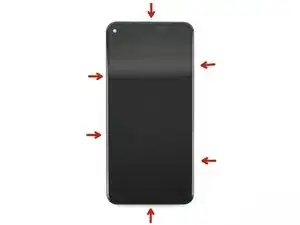
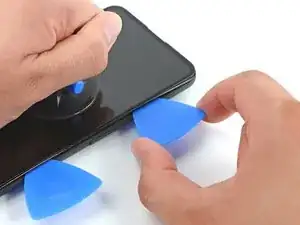
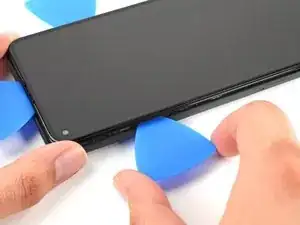
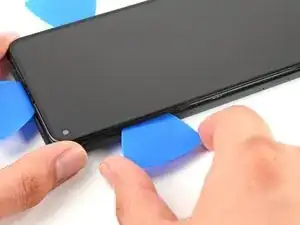
    • Um das Display zu entfernen, musst du Plektren bei den schwarzen Rasten einschieben, mit denen die Blende am Mittelrahmen befestigt ist.

    • Beachte die Stellen, an denen die Plektren am Besten eingesetzt werden sollen.

    Use an old credit card or hotel key card to provide additional thickness and leverage to pop the bezel off.

    bcling -

  4. GZ1fbKOGAqkxKTIf
    GZ1fbKOGAqkxKTIf
    SSCqlsTeddwiTGRV
    • Sollte dein Display stark gebrochen sein, kann durch ein Überkleben des Displays mit durchsichtigem Paketband der Saugheber besser halten. Alternativ kann entweder mit Panzertape ein Griff geklebt oder der Saugheber mit Sekundenkleber auf das Display geklebt werden.

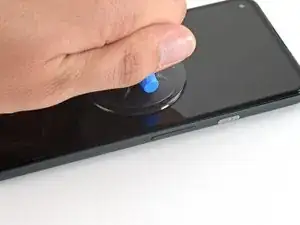
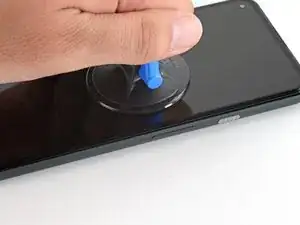
    • Platziere einen Saugheber so weit wie möglich an den rechten Bildschirmkante.

    • Ziehe den Saugheber fest und gleichmäßig nach oben, bis ein kleiner Spalt zwischen Mittelrahmen und Blende entstanden ist.

    Do we use the suction cup before inserting the picks? After applying the I opener 3 plus times, I am having difficulty removing the broken screen. Any tips?

    William Maniss -

    This was the most difficult part. What really helped was putting a piece of packing tape on the screen. It has to be wider than the suction cup. If there is any hint of a crack where the suction cup is located, it will not stick. I had to warm the right side and the top a couple of times to get the screen to give a little bit. It will only give just a little bit and you have to to slide the pick in with more force than I was comfortable with.. It really would help to have a third hand to hold the phone, pull the suction cup and the other to slide the pick in. I had to use my ring finger to apply force to the suction cup and with the same hand slide the pick between the phone and the screen. After this step it was easy peasy!

    Dustin Ashberry -

    Agree this was the hardest part. I heated the right edge of the phone multiple times with the iOpener before the glue was soft enough to flex. My screen only had a crack, was not shattered. I had to wet the suction cup to get it to hold strong enough to pull up to open a gap to insert the pick. Once the first pick was in, heating the other edges and moving around the phone was fairly easy.

    Lisa McManis -

    The screen itself has a large lip that makes it harder to insert the picks. what worked for me was pulling up the screen just enough to insert the pick slightly. next I rotated the pick towards the phone and pushed it down (the phones chassis has a bezel that will catch the tip so you can use a bit more force). Once the pick is inserted like that you can rotate away from the phone, pulling up the screen easily.

    Mason Tate -

    Ended up using Gorilla tape on the screen, a more powerful suction cup from a windshield phone mount, moving it back 1/2 inch from the edge so the tape wouldn't peel from the edge when I pulled.

    Scott Chaney -

    You definitely need a third hand to get the pick in, have someone nearby to help if possible.

    This is the step that requires the most energy.

    Ibukunoluwa Amusan -

    This was by far the most difficult part of the repair hands down. I heated the phone several times before the adhesive softened enough to stick a pick in

    Niels Klassen -

  5. asHyCDKsG4yji5Fe
    asHyCDKsG4yji5Fe
    jUNOIOHOXGBaNKZl
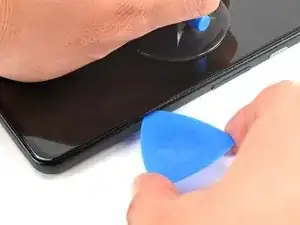
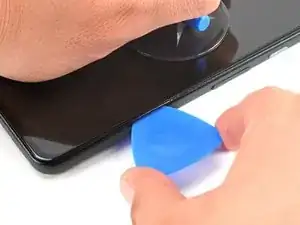
    • Die Blende ist mit dem Mittelrahmen durch eine Reihe von Plastikrasten verbunden. Um diese zu lösen, musst du ein Plektrum mit der Spitze entlang der Naht einsetzen.

    • Setze die Spitze eines Plektrums ungefähr 4 - 5 cm von der Unterkante des Smartphones entfernt in die Blendennaht ein.

    Angling the opening pick downward helped with the initial opening

    barely_diy -

  6. mS2wgYAtWH4DdKMW
    mS2wgYAtWH4DdKMW
    fZhjnvKUSrtCg4rZ
    • Setze die Spitze eines Plektrums ungefähr 3 - 4 cm von der Oberkante des Smartphones entfernt in die Blendennaht ein.

  7. 3JuiDEjApfsvZMyY
    3JuiDEjApfsvZMyY
    5o3k6kB1WhiBnrUG
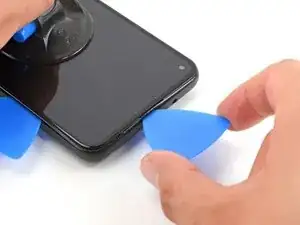
    • Setze die Spitze eines Plektrums an der Oberkante des Smartphones in die Blendennaht ein.

    • Wenn das nicht leicht geht, dann schiebe das Plektrum um die obere rechte Ecke des Smartphones herum, bis der Spalt an der Oberkante groß genug für ein Plektrum ist.

  8. DwlHOpRXErlgGARH
    DwlHOpRXErlgGARH
    jxBHgsEXpF5lFNht
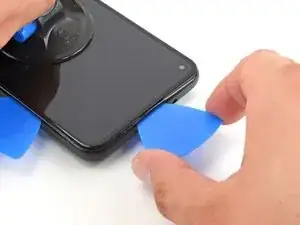
    • Setze die Spitze eines Plektrums an der Unterkante des Smartphones in die Blendennaht ein.

    • Wenn das nicht leicht geht, dann schiebe das Plektrum um die untere rechte Ecke des Smartphones herum, bis der Spalt an der Unterkante groß genug für ein Plektrum ist.

  9. 16NYBGQThq6OQYWF
    16NYBGQThq6OQYWF
    uXfBAHoMTjEiJwr1
    • Setze die Spitze eines Plektrums ungefähr 2 cm von der Unterkante des Smartphones entfernt in die Blendennaht an der linken Seite ein.

  10. XKFXWfI3ITIMXgNq
    XKFXWfI3ITIMXgNq
    qhZkNuNgUFReXQqH
    • Setze die Spitze eines Plektrums ungefähr 3 - 4 cm unterhalb der Frontkamera in die Blendennaht ein.

  11. IwDnYZSfsesPABtr
    IwDnYZSfsesPABtr
    pABb1qrEZjBGAVUO
    IuGC2HDdXdKxPQgC
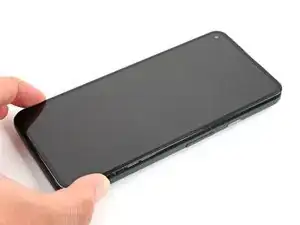
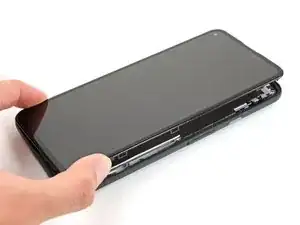
    • Überprüfe, ob alle Rasten gelöst sind. Trenne alle Kleberreste mit einem Plektrum auf.

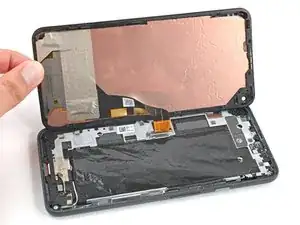
    • Klappe das Gerät von rechts her wie ein Buch auf.

  12. bn2XsPBnxwGGDFwk
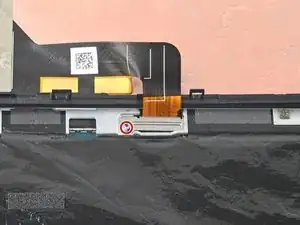
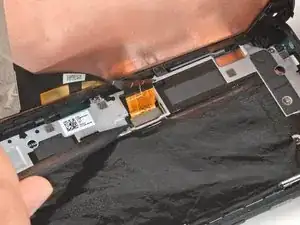
    • Drehe die 4,6 mm lange Torx T3 Schraube heraus, mit der die Halterung des Displaysteckers befestigt ist.

    • Achte währende der gesamten Reparatur darauf, dass deine Schrauben gut sortiert bleiben, und hinterher wieder an genau die Stelle zurückkommen, wo sie vorher waren.

    There is just this one screw.

    bcling -

  13. EEhHcXvoBwWPeKwE
    EEhHcXvoBwWPeKwE
    rOTkyQT1VnH4eMYM
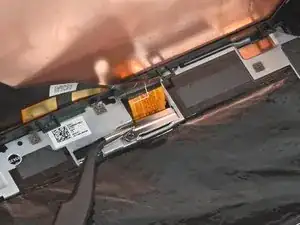
    • Entferne die Halterung des Displaysteckers mit einer Pinzette.

  14. XQFGXqnTUPrFtPYl
    XQFGXqnTUPrFtPYl
    VjciX1nAWKBhhJxS
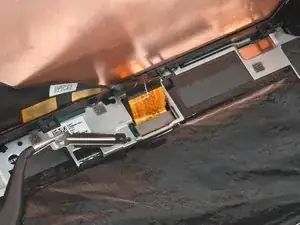
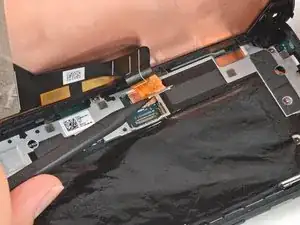
    • Heble das Flachbandkabel zum Display mit der Spudgerspitze hoch und trenne es ab.

    • Um Druckstecker (Press-Fit-Verbinder) - so wie diesen hier - wieder anzuschließen, musst du ihn erst an einer Seite andrücken, bis er einrastet. Wiederhole das dann an der anderen Seite. Drücke nicht in der Mitte. Wenn der Stecker schlecht sitzt, können die Kontakte verbogen und dauerhaft beschädigt werden.

    This was the most tedious part for me when reassembling. I used the gold colored corners on the board to line up the connector. Also, I recommend using your finger and not the spudger for pressing down when you reattach (even if you don't have small hands); this helps you feel the slight click when it's in place.

    Additionally, you can use the suction cup as a sort of kickstand so you have enough ribbon cable to work with (because there's not a lot.)

    Lol No -

    Just successfully completed my screen replacement & agree with the comments above. This guide would be improved if there was a close-up picture showing the gold alignment marks. Sorry, I would have posted a picture of this myself, but my phone was being operated on at the time. LoL

    CRAIG MCKAY -

    Operation success! Had some trouble when disconnecting and removing the old screen because I didn't know how much range I had when opening it up like a book. Ended up bending the connector on the old screen and bent the connector on the motherboard a little. Be very careful when opening up the screen while the screen is still attached to the frame. Only open it up like 30 degrees at first to see what the cable is doing and how much slack you have.

    This led to me trying to straighten out the pins on the motherboard connector for like 3 painstaking hours because every time I tried to insert the new connector by clicking down on one side at a time it kept popping up on the opposite end and shifting up/down a little bit. Assumed the pins were still misaligned with the screen connector and eventually got frustrated enough to just push down the connector in the middle, which explicitly contradicts the instructions. The connector still popped off with some light pressure but I just put the bracket on & it all works!

    A Husk -

  15. QD4rdj6JKP6NgSL6
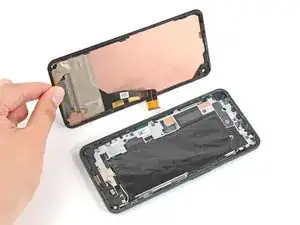
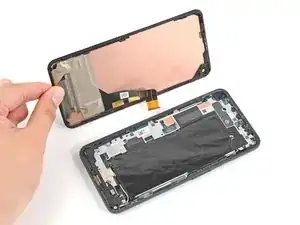
    • Entferne das Display vom Smartphone.

    • Folge beim Zusammenbau dieser Anleitung, wenn du vorgestanzte Klebestreifen verwendest.

    • Beim ersten Systemstart nach dem Zusammenbau durchläuft das Display einen Kalibrierungsprozess. Berühre das Display dabei nicht, es könnte falsch kalibriert werden, dadurch könnten Probleme mit dem Touchscreen entstehen.

    The ribbon connector is a little tricky to attach to the pcb. Just be patient with the spudger and it will connect. The precut adhesive strip is such a nice touch for finishing the project.

    Dustin Ashberry -

    I also struggled with the ribbon connector. Be patient. It is hard to see the alignment so is done by feel and some outline guides on the pcb. I plugged in the new screen, tested by powering up the phone, then unplugged the screen to install the pre-cut adhesive. There were no instructions with the pre-cut adhesive sheet. First remove EVERY trace of old adhesive. I used the spudger plus isopropyl alcohol on a lint free wipe. Once the old glue was gone, I aligned the pre-cut adhesive with the clear plastic side down, folded down about 1", confirmed my alignment, then pulled on the clear plastic and secured as I removed the clear liner. Then I removed the large blue plastic liner, then there was a very small blue pull tab that exposed the top sticky side of the adhesive. Carefully pull on that to removed. Be sure to re-install the metal latch and screw over the ribbon connector before snapping the screen back onto the phone. I forgot it and had to re-open the phone. Face-palm!

    Lisa McManis -

    Custom cut adhesive is great. No instructions.

    Do not reattach the ribbon cable before applying the adhesive.

    Check the alignment of the adhesive with the clear plastic down.

    Carefully remove the clear plastic. This can be done all at once or gradually starting at the bottom of the phone.

    Apply the adhesive starting at the bottom of the phone pressing the adhesive in place and rechecking alignment as you go.

    Once the adhesive is in place, press the adhesive down again.

    Remove the blue plastic using the tabs at the top and down each side.

    Reattach the display cable by pressing the connector down from one side and then the other. The alignment of the connector is difficult since it is not visible, but starting at one side makes alignment easier.

    Reinstall the connector retaining plate and screw.

    Remove lens and connector tape from the top of the new screen

    Reinstall the screen and press down firmly on all of the edges making sure there are no gaps around the bezel.

    Power on without touching the screen to calibrate.

    craig potts -

    Precut adhesive is installed in 3 steps:

    1. Place adhesive before attaching cable. Remove clear plastic from adhesive and align with phone. Place adhesive onto phone using camera hole as starting point. Make sure blue plastic is properly aligned with edge of phone around entire perimeter

    2. Once adhesive is aligned and fully on, remove blue plastic starting from top right corner. A rectangular tab there can be lifted and used to remove blue plastic. Thin blue plastic strip will remain on adhesive after removing blue sheet. Leave it on to prevent damaging adhesive while screen is being installed

    3. Attach screen cable and retaining clip. Remove thin blue plastic strip starting from bottom. Two tabs there can be used to get started. Align and attach screen

    When attaching cable, hold screen perpendicular to phone with screen facing bottom charging port. This will give the cable more slack to work with. Two corner outlines are printed next to the plug on the phone that can be used to help with cable alignment

    barely_diy -

    The display connector's snaps are quite weak and will come undone easily. The connector's bracket seems to be the only thing keeps it in place. Try to get the connector to snap in as best you can (as others have said it's about feel) then install the bracket to lock it down. Lastly, the ribbon cable is fragile but it can be gently bent to help with installation. I bent mine outwards around 120 degrees and had no issues.

    Mason Tate -

    Remember after the cable retainer plate but before the screen is laid down, peel the proximity sensor protective film, and the tiny red tab on the camera peephole protective film.

    Then you can start to pull a little bit on the thin blue strip tab so it hangs out, rest the screen clips in position but do not push down.

    This will leave enough gap for you to now fully pull out the thin strip. Then click the screen down.

    I had a bit of a scare, during 1st power on test screen just showed snow, super long pressed to turn it back off but there was no feedback to tell me it had done so. Un&re-plugged screen and got a bigger scare when it wouldn't turn on. Insanely super long press and it did come on to a normal boot sequence and a beautiful screen.

    Stephen Cass -

Abschluss

Um dein Gerät wieder zusammenzubauen, folge den Schritten dieser Anleitung in umgekehrter Reihenfolge.

Entsorge deinen Elektromüll fachgerecht.

Lief die Reparatur nicht wie geplant? Probiere zunächst einige grundsätzliche Lösungen oder frage in unserem Forum nach Hilfe bei der Fehlersuche.

Vergleiche das Ersatzteil mit dem Originalteil. Möglicherweise musst du fehlende Bauteile übertragen oder Schutzfolien vom Neuteil abziehen, bevor du es einbauen kannst.

Clay Kim

Mitglied seit: 16/02/21

6899 Reputation

19 Kommentare

Thank you, this was useful for removing the screen from my device without damaging it further! With the invisible fasteners, a guide like this is invaluable for knowing where the latches are and how to get to them.

As a guide for replacing a screen, there are a few other things worth mentioning:

• Is it necessary to remove the old gasket ("adhesive film")?

• How do you apply the new display adhesive, the one that comes on a blue card? Do you need to do that before re-attaching the new screen cable? Why are there cut-outs in the blue card that mostly match the positions of contacts on my device, but not entirely? Do I remove it before closing the device?

• In addition to a couple pieces of tape, the replacement screen also comes with a small piece of film protecting the camera area. Do pull it out by the small red tab before re-assembly.

• Any other tips for reattaching that press-fit board-to-board connector? Should I really expect it to click into place? It took me many tries to get that aligned and secured!

keturn -

1. Depends on what you mean by "Necessary," but it is recommended

2. In Step 15, there is a guide linked for custom-cut adhesive; follow that one.

Yes, before you reconnect cable.

I don't know what the cutouts are for, but you will remove the blue card anyway after applying the adhesive to the frame. The important part to line up is the adhesive to the frame; the blue card doesn't matter beyond that.

And yes, you will remove it before closing the device.

3. Didn't see that. I hope my device's camera works. I'll check that now.

4. Reconnecting this was the most tedious part for me. I used the gold colored corners on the board to line up the connector(you can see these in the picture for step 15. Also, I used my finger and not the spudger for pressing down when reattaching (and I don't have small hands); this helps you feel the slight click when it's in place.

Also, you can use the suction cup as a sort of kickstand so you have enough ribbon cable to work with (because there's not a lot of it.)

Lol No -

Literally went step by step by this guide and repaired my own Google pixel 5A phone. If you purchase the entire repair kit for the Google Pixel 5A you have essential every tool you'll need. I will recommend ordering screens for this phone here from this website.

Tomas Serrano -

Muy buen tutorial, hay que mejorar la parte donde se coloca el adhesivo ya que no lo explica pero el resto esta muy bien. demore 30 minutos en remplazar la pantalla.

Lucho -
Good guide but agree with keturn that it would be great to have more tips and reminders for replacing the screen.

I mostly figured it out, heres how I did it:

- I removed the old adhesive, and tried to scrape and clear it all.

- next I attached the new adhesive before connecting the screen cable since I figured it would be hard when its attached. I did try to make sure to press all along the adhesive with tweezers to set it. I left the next set of backing on to minimize the time the adhesive is exposed (avoid dust or me touching it)

- then I attached the connector. This was a little difficult, but also not very experienced with this.

- then I removed the adhesive backing and closed it up right after. I used rubber bands (3 across and 1 down the middle) to clamp the screen and put some books on it as much as I could over the next day.

Sid Kundu -

I added instructions in the comments about installing the custom-cut adhesive. Please feel free to edit them and add them to the step-by-step instructions.

This is my first phone repair since the days of removable batteries, but your parts, tools, and guide were fantastic.

craig potts -

It was half the price to replace the screen myself than taking it to Assurion. It is so empowering fixing your own devices, and I got to know my device a bit better too. Thank you iFixit! Bless the Right to Repair movement!

Alex Jacobson -

First of all, a very well made tool kit and package by ifixit team; very impressed. I followed the instruction and managed to remove the cracked screen. But when tested the new screen, nothing came up. When pressed the power bottom there was only a short vibrate. I tried to connect the old screen (it was working with cracked glass) and it didn't turn on. Does anyone know the issue here?

JoHF -

This guide and the associated parts (screen, adhesive, and tools) work with the pixel 5a 5g as well.

Mason Tate -

Good guide, but it would be nice if the adhesive was included when buying just the part, so I don't have to get tools every time. I thought the adhesive would come with the screen but I only realized after I removed the old adhesive.

Yusef -

Kit had everything needed and instructions covered it well. Other than it being tiny parts to work with, it was actually quite easy and after shipping still saved $60 over having it fixed at a local store. If I'm in need again, I'll definitely buy again. Thanks!

tailwheelcfi -

Top-notch equipment and instructions! Only difficulty I had was getting the screen off. Ended up using Gorilla tape on the screen, a more powerful suction cup from a windshield phone mount, moving it back 1/2 inch from the edge so the tape wouldn't peel from the edge when I pulled. I didn't use the adhesive layer cutout as the clips seemed to be enough.

Scott Chaney -

This is a life saving site, I mean it! Can't believe that I could fix my own screen, first time ever trying that.

Thanks iFixit!

Ibukunoluwa Amusan -

Replaced my screen using this guide tonight. Took about 45 minutes, with the most time consuming part being removing the old adhesive. Great guide and great parts from iFixIt!

Bradford Strom -

It works, it really works!!! The screen and the whole device is like new now. The only thing - removing the old screen is a real challenge and the suction cup was not helpful. I had to use very strong tape, as advised there.

Mikhail Spiridonov -

This was actually much easier to do than I was expecting until the last step. As soon as I screwed down the screen connector, the new screen turned on & worked perfectly (apparently the phone wasn't completely shut off before doing the repair even though it had been sitting around for nearly 2 weeks -- without access to the screen I couldn't tell). Very stupidly, I panicked about using it before calibration to get all my data off the phone and instead shut it down immediately so I could close the front back up, and it could reboot & do all the steps necessary. At which point I discovered that 1) How you're supposed to reattach the screen without enormous pressure that risks breaking either your new screen or the phone itself isn't at all obvious (to me, at least) and 2) The new screen is also now a dud -- flashing & flickering just like the old one.

Did everyone else just push down easily on the corners and have their screen pop into place??

Laghee McG -

The kit and instructions were amazing. And all the details in the comments were a huge help!

My screen was too cracked to use the suction cup, and I was all out of packing tape. So I heated the screen a couple times and went after it with the blue spudger. This was a big challenge because I had zero leverage -- I had to hold my phone between my knees to keep it from sliding all over the place. But I finally was able to jam the first guitar pick in, and the rest were much easier.

I had no problems with the adhesive thanks to the detailed instructions. The hardest part was lining up the new ribbon cable, but the tip to use the gold marks on the board as a guide helped me get it.

And my case just snapped together easily at the end once I lined up all the tabs. It feels like I got a brand new phone!

Michael Baden Roufa -

PLEASE Remove the adhesive. My inner lcd broke because of the build up of old adhesive just remove it using isopropyl alcohol.

cats o lot hi -

The guide is great! Followed the steps as described and it worked perfectly. The one thing I'd add is that removing the screen is by far the most time-consuming part. The whole repair took me about 35-40 min. 25 of those minutes were working on removing the screen. I had to apply the iopener 5 times before the screen moved sufficiently. I think this could be sped up by using a spudger to pry, but I was taking the cautious route. Since I was doing a screen repair this was probably excessive. But if you're replacing a battery or some other internal component you certainly want to go slow and steady. Just be patient and it will come lose.

Roove -