Einleitung

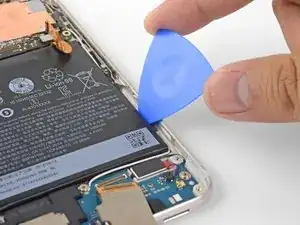
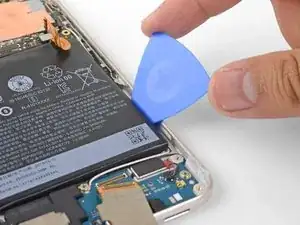
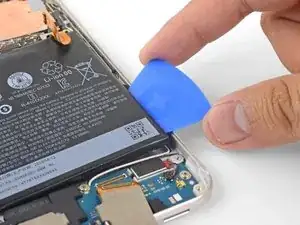
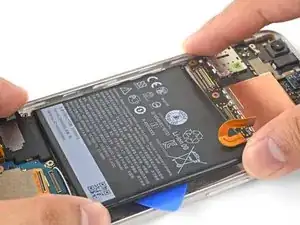
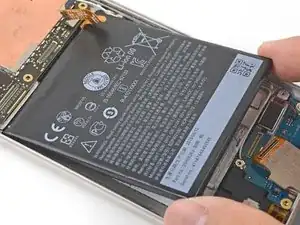
Folge dieser Anleitung, um das Google Pixel XL zu öffnen, den Akku zu entfernen und auszuwechseln. Wenn dein Akku aufgebläht ist, dann treffe geeignete Vorsichtsmaßnahmen.

Bevor du anfängst, das Gerät zu zerlegen, solltest du den Akku auf unter 25% entladen. Ein geladener Lithium-Ionen Akku kann Feuer fangen und/oder explodieren, wenn er versehentlich perforiert wird. Wenn er entladen ist, ist das weniger wahrscheinlich.

Das nicht verstärkte Display des Pixel XL ist zerbrechlich und mit zähem Klebstoff am Rahmen befestigt, dadurch sind Reparaturen schwierig. Es kann leicht passieren, dass das Display bricht, besonders wenn es schon Mikrorisse hat. Wende ausreichend Wärme an und sei beim Hebeln besonders vorsichtig.

Der Akku ist stark verklebt. Wahrscheinlich musst du hochkonzentrierten Isopropylalkohol (mindestens 90%ig) benutzen, um den Akku vom Smartphone abzulösen.

  1. JCWIBsMDNLhS3ugB
    JCWIBsMDNLhS3ugB
    IsbHv3IfVrsgV3Yk
    csYWfVjLGAnK2GIa
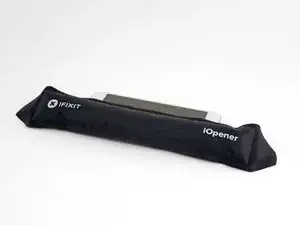
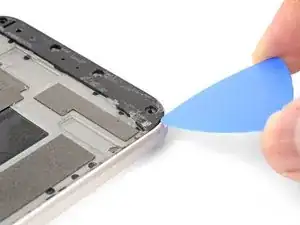
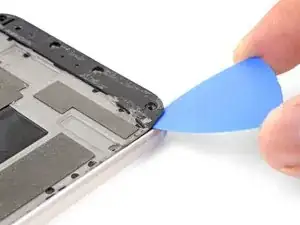
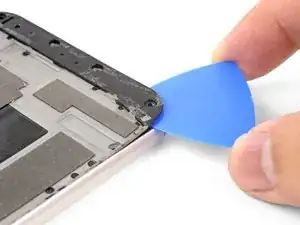
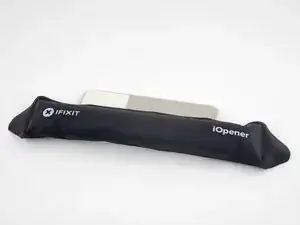
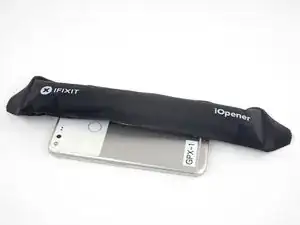
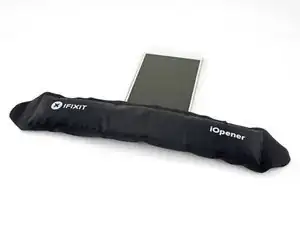
    • Erwärme einen iOpener und lege ihn zwei Minuten lang auf die linke Displaykante.

    • Es geht auch mit einem Haartrockner, einem Heißluftgebläse oder einer Wärmeplatte. Sei aber vorsichtig und überhitze das Smartphone nicht. Das Display und der Akku können durch Wärme leicht beschädigt werden.

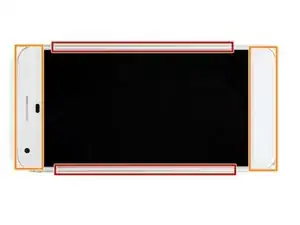
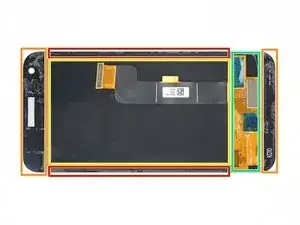
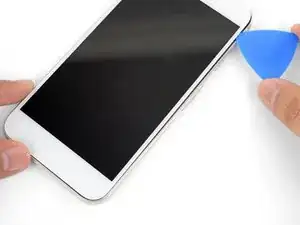
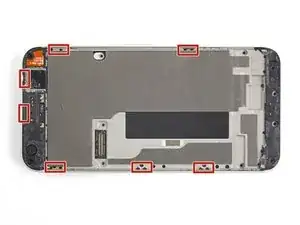
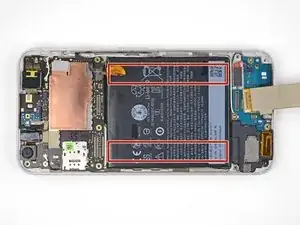
    • Achte auf die Klebezonen, bevor du anfängst zu hebeln:

    • Dünne Klebestreifen am Displayglas

    • Dicke Klebestreifen

    From my experince, it’s better to use a heat gun (if iFixit sold a good heat gun in volume, they should spruik that). Also, heat ALL sides at the same time BUT concentrate on the top part of the phone where the foam adhesive tape is thickest, second on the bottom where the foam is almost as thick. It also helps to use the 2nd & 3rd images in the series to visualise where the adhesive is.

    Jon T. -

    Ty for the advice I prefer heat gun but my first pixel

    Michael Koch -

  2. qASf1QrPQmpGloI5
    qASf1QrPQmpGloI5
    G1uOPFiNFQAx2AYG
    k1w2b3IGML5O5Ltu
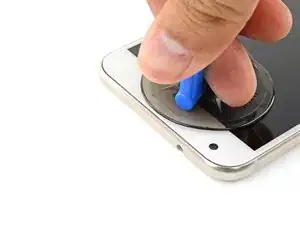
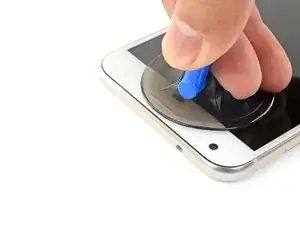
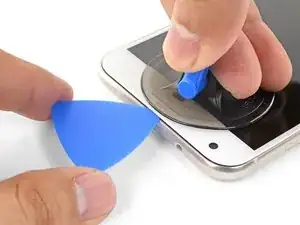
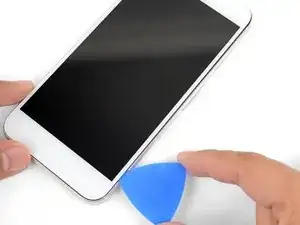
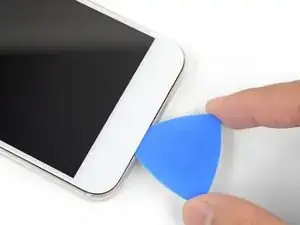
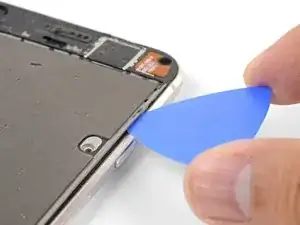
    • Wenn sich der Rand warm anfühlt, dann setze einen Saugheber nahe an der Kante an.

    • Hebe den Saugheber hoch und setze ein Plektrum in den entstandenen Spalt ein.

    • Setze das Plektrum nicht tiefer als 13 mm ein, du könntest sonst die Displayeinheit beschädigen.

    • Wenn es schwer geht, einen Spalt zu öffnen, dann erwärme den Rand nochmals und probiere es erneut.

    • Du kannst auch anstelle eines Plektrums eine Spielkarte benutzen, um den anfänglichen Spalt offen zu halten.

    From my experience, I had to use a thin blade (such as the ones included with the deluxe iFixit repair kit) to slide into the small gap, and cut away at the foam adhesive. Once enough of a gap is created, the picks can then be used to push the adhesive aside - but the adhesive is so thick, especially -as Brewmaster396 observed in the comments below - at the top right corner behind the screen, that the knife is required to cut it. I failed here - cracking the back layer of my screen - because I didn’t take time to cut all the adhesive away from that thick part, and kept trying to pull the screen off. It doesn’t take a lot of pressure to crack - so maybe it’s more a thing of cutting and floating the screen up, not pulling and prying.

    Jon T. -

    Mark the picks with lines that show how deep you can go in that part of the screen. This will help keep you from accidentally hitting the fragile screen

    Matthew Goodwin -

    Matthew Goodwin - Excellent suggestion.

    casper911ca -

    Jon T made a great suggestion about creating a mark on the picks (see above).

    Matthew Goodwin responds with an “Excellent suggestion.”

    Here we are 8 months later and no lines on the picks in my new pro-tech tool kit, not sure why this hasn’t been implemented at this point in time.

    Bob H.

    Bob Hawley -

    Thin, but sturdy pieces of paper (playing cards, bits of paper box packaging) helped me a lot when trying to open my screen. The plastic picks are useful, but very slippery so you should use extra caution when applying pressure with those.

    diplomat -

  3. SMZnqLZpAXo1VRBW
    SMZnqLZpAXo1VRBW
    VsRjq1iUnCfBoJPf
    Wid4niEfNUS4OGlP
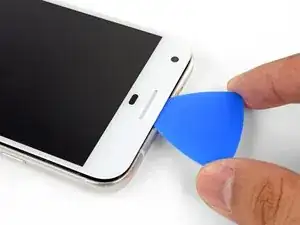
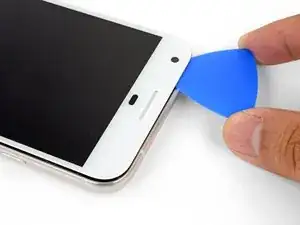
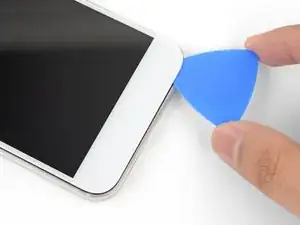
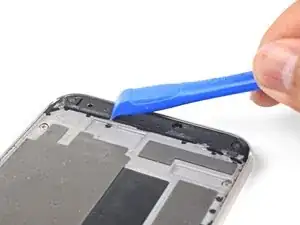
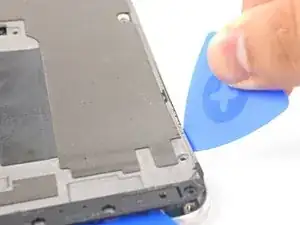
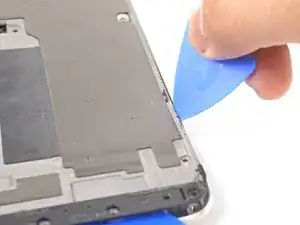
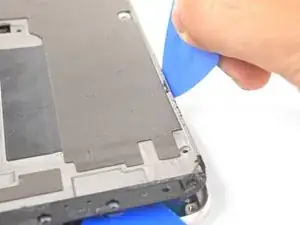
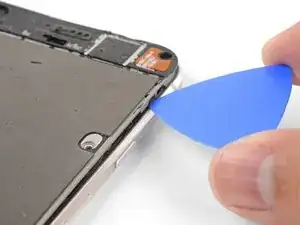
    • Schneide mit dem Plektrum an der Oberkante entlang, um den Kleber aufzutrennen.

    • Achte darauf, dass du nicht tiefer als 13 mm schneidest , du könntest sonst das Display beschädigen.

    • Lasse ein Plektrum in der Kante stecken, damit der Klebstoff sich nicht wieder verbinden kann.

  4. NEbOsdqV3KJ5ZDYJ
    NEbOsdqV3KJ5ZDYJ
    Ea54AOUcRKSxcBPx
    sUVRPYSMABVFCEDF
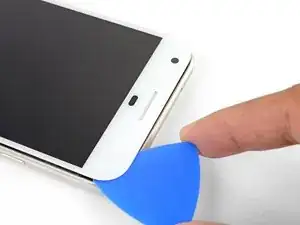
    • Erwärme einen iOpener und lege ihn zwei Minuten lang auf den rechten Rand des Smartphones.

    • Setze ein Plektrum nahe an der Oberkante des Smartphones ein, dort wo du den Kleber vorher schon aufgetrennt hast.

    • Führe das Plektrum um die rechte Ecke herum.

    • Schneide den Kleber mit dem Plektrum behutsam an der rechten Kante nach unten auf.

    • Setze an dieser Kante das Plektrum nicht tiefer als 1 mm ein, du könntest sonst das Display beschädigen.

    • Wiederhole das Ganze an der linken Kante des Smartphones.

  5. DS5CTgYQ5c2wdS6D
    DS5CTgYQ5c2wdS6D
    M3AN6f2NGJ43UVMZ
    • Erwärme zwei Minuten lang den unteren Rand mit dem iOpener.

    • Setze ein Plektrum nahe an der rechten Kante, wo du schon den Kleber gelöst hast.

    • Führe das Plektrum behutsam um die Ecke herum.

    • Trenne mit dem Plektrum den Kleber entlang der Unterkante auf.

    • Schneide nicht tiefer als 8,5 mm, du könntest sonst das Displaykabel beschädigen.

  6. GQmZMQBPF3AkZoqx
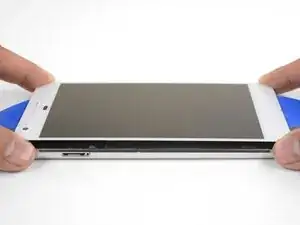
    • Wenn du um das ganze Smartphone herum aufgeschnitten hast, dann hebe die Displayeinheit vorsichtig an den rechten Ecken ein wenig hoch.

    • Versuche noch nicht, die Displayeinheit zu entfernen. Sie ist immer noch mit einem Flachbandkabel angeschlossen.

    • Schneide mit einem Plektrum durch alle restlichen Verklebungen.

    As long as you’ve disengaged the adhesive relatively evenly around all sides, I found mounting the suction cup in the middle (biased a little to the left or right side), helps a lot on this step.

    casper911ca -

  7. PIERGMK3Gtacn6aA
    PIERGMK3Gtacn6aA
    XHJEpWcHnAbJjCvF
    4vLYP1IQBnVBBWRY
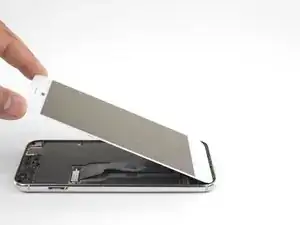
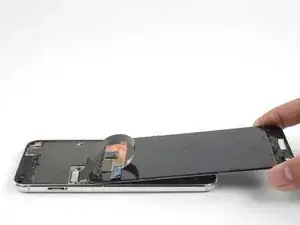
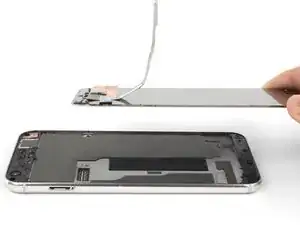
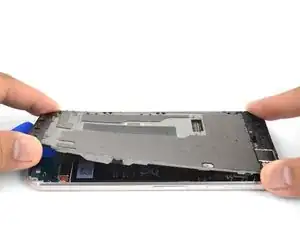
    • Hebe die Displayeinheit am oberen Ende hoch und klappe sie herum, so dass sie mit der Rückseite nach oben auf dem Rahmen liegt.

    • Achte beim Aufklappen der Displayeinheit darauf, dass das Flachbandkabel nicht zu stark belastet wird.

  8. ZZGE4WvqaqrACxPP
    ZZGE4WvqaqrACxPP
    2fAiN1W2cPLIDxRf
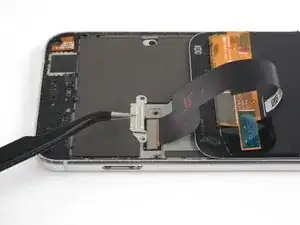
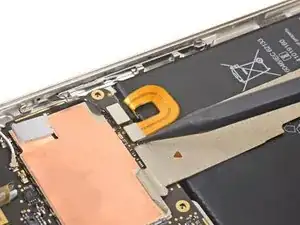
    • Entferne die beiden 4 mm Torx T5 Schrauben, mit denen die Displaykabelhalterung befestigt ist.

    • Entferne die Displaykabelhalterung.

  9. HliwdtsQpkqAcMWj
    HliwdtsQpkqAcMWj
    pI2dWacJFpklo1so
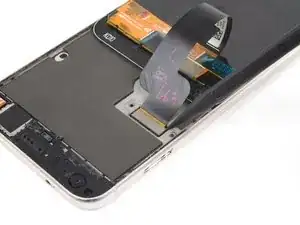
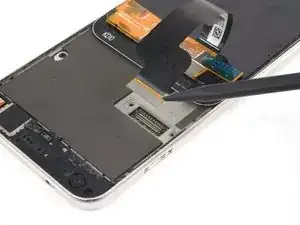
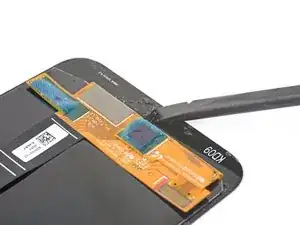
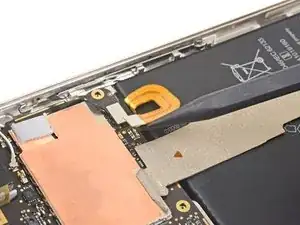
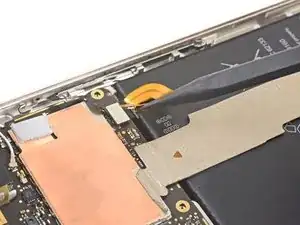
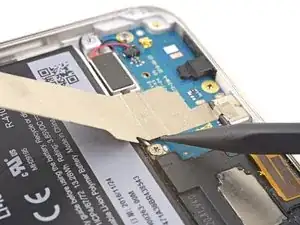
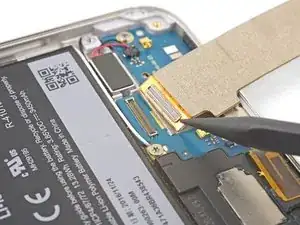
    • Heble mit der Spudgerspitze das Displaykabel hoch und löse es aus seinem Anschluss heraus.

    • Um Druckverbinder, wie diesen hier, wieder anzuschließen, musst du ihn erst an einer Seite sorgfältig ausrichten und herunterdrücken, bis er einrastet. Wiederhole das Ganze für die andere Seite. Drücke nicht in der Mitte. Wenn der Stecker nicht richtig sitzt, können die Kontaktstifte verbogen werden, so dass der Stecker dauerhaft beschädigt bleibt.

    i have to agree with the comment here about the connector. If you press it in the middle, it will bend. Resulting in either bent pins on the motherboard or the display. In my case it was both !

    Richard St.Hilaire -

    Be careful prying up the connector and apply force only from the side as shown in the picture cause in the longest side there are capacitors that can be broke doing the lever ( happened to me Repair missing capacitor near display connection port )

    Daniele Maggio -

  10. 2mnuHXKublYPptTh
    2mnuHXKublYPptTh
    TOKGWQrGUFvol5sE
    tJRxJuCIDcoV4ERh
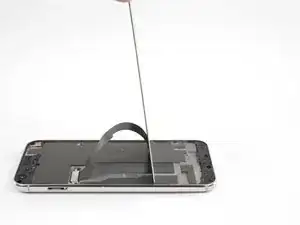
    • Entferne die Displayeinheit.

    • Wenn du eine noch umfassendere Anleitung zum Einbau der Displayeinheit benötigst, dann folge dieser Anleitung.

    • Bevor du eine neue Displayeinheit einbauen kannst, musst du den Rahmen erst von allen Klebstoffresten befreien. Schabe sie mit einem Spudger oder einem Plastiköffnungswerkzeug ab und reinige die Klebeflächen mit hochkonzentriertem Isopropylalkohol, so dass keine Reste mehr anhaften.

    • Wenn du die alte Displayeinheit wieder befestigst, dann achte darauf, dass auch dort alle Klebstoffreste vom Panel und vom Rahmen gründlich beseitigt sind.

    • Schalte dein Smartphone ein und überprüfe alle Funktionen, bevor du Klebeband anbringst und das Gerät wieder verklebst.

    The Parts List does not state you need a replacement display. Is this portion of the Repair Guide copied and pasted from another guide (perhaps the screen replacement guide) or will I need to procure a replacement screen before I attempt to replace the battery?

    casper911ca -

    It is possible to replace the battery without replacing the display, but there is a significant chance you may break the display during removal. It depends on if your display already has micro-fractures, and how stubborn the screen adhesives are. I would personally buy a screen just in case, and return the part if I didn’t need it.

    Arthur Shi -

    Hello, I recently bought a refurb screen off of eBay to fit. The phone was 100% working before and just needed a new display/battery.

    The battery came before the display. I wanted to test the display before doing too much reassembly, so I plugged in the battery, connected the mother/daughter boards with the interconnect cable, and then plugged in the LCD.

    When I press the power button there is the usual single buzz from booting, but the display is completely blank.

    Is the replacement screen DOA, or are there important traces/connections made by fully assembling the midframe and missing screws before testing the LCD?

    If I already have all the ingredients for a fair test of the LCD, then it seems the LCD is bad?

    Like I said the phone worked perfectly before… and if the new battery is dead, I would expect no buzz, or at least a battery graphic?

    John -

    Hi John,

    If the phone buzzed, that usually signifies that it has booted up—having no image at that point usually means some kind of display issue. I would suggest disconnecting the display connector, carefully checking for any debris in the socket, and carefully re-connecting it.

    I’ve also seen a comment in another Pixel guide that suggests plugging in the display connector before the battery. If that works, please leave a comment!

    Arthur Shi -

    battery connector is not accessible without removing the display first………. and reassembling, battery has to be connected first, then the plastic piece and then the display

    Alan Sears -

  11. IigBNtK2OILOOCld
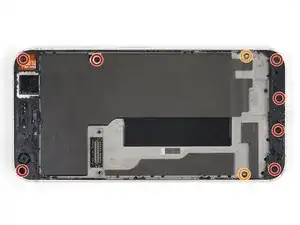
    • Entferne folgenden Schrauben, mit denen der Mittelrahmen an der Rückseite befestigt ist:

    • Sieben schwarze 4 mm Torx T5 Schrauben

    • Zwei silberfarbene 3 mm Torx T5 Schrauben

  12. ZkJJqpKjvBbGcrdk
    • Kunstoffrasten, welche in die Kanten des rückwärtigen Gehäuses eingreifen, halten den Mittelrahmen sehr fest.

  13. 5GatHAD1iNhBg2UG
    5GatHAD1iNhBg2UG
    xWeZKp1SYS4GQ2Bo
    NsfOeQvUBqnEjIMG
    • Finde die Vertiefung in der unteren linken Ecke des Rahmens und setze dort ein Plektrum ein.

    • Schiebe das Plektrum an der Unterkante des Smartphones entlang bis zur unteren rechten Ecke und lasse es dort stecken.

    This step was impossible on my phone as a gap could not be formed at the notch to pry the corner up using either pick or playing card . Flathead micro screwdriver was required causing insignificant cosmetic damage at that area.

    Darren Bass -

    This step takes a few tries, starting with the pick perpendicular to the phone. Eventually, after gentle prying, it will catch the corner so you can slip the pick underneath. Like everything in this repair, it requires you to be exceedingly delicate and patient.

    Damian Matthews -

    Take the tip of the tweezers, insert it in the screw hole near where they show to insert the pick and gently pry up. You should be able to move the plate upwards enough to insert the pick

    Michael hobbs -

  14. NfSuTWeOHmrvseOO
    NfSuTWeOHmrvseOO
    joKE5kWHTsCOYkrQ
    wEGrlmCkwgkmOMhB
    • Setze ein weiteres Plektrum unten in die rechte Kante ein.

    • Schiebe das Plektrum in der Naht langsam nach oben, bis sich die ersten Raste löst.

    • Die Toleranzen sind sehr eng, deswegen kann es schwergängig sein und du brauchst ziemlich viel Kraft. Wenn du Schwierigkeiten hast, dann kannst du probieren, eine Spielkarte einzusetzen und zu verschieben.

    • Wenn du die Raste gelöst hast, dann lasse das Plektrum stecken, damit der Mittelrahmen nicht wieder anhaften kann.

    I found that leaving the pick in the middle, and using it as a lever (think like bending a pipe over one’s knee and the pick in the middle is the knee) to “pop” the top edge up helped a lot more than trying to use more picks to pry this mid layer up…

    Jon T. -

  15. cehEhNBMRcWpfmHK
    cehEhNBMRcWpfmHK
    FUAduUtTI6olJlpK
    • Setze ein Plektrum in die rechte Kante des Smartphones ein und schiebe es nach oben bis zur obersten rechten Raste.

    • Du brauchst das Plektrum nicht tiefer als 2 mm in die Kante einzusetzen. Wenn du es ganz einschiebst, riskierst du einen Schaden an den Flachbandkabeln.

    • Schiebe das Plektrum langsam an der Raste vorbei, bis sie sich vom Rahmen löst.

    • Jetzt sollte die rechte Kante des Mittelrahmens vomGehäuse losgelöst sein. Wenn dass nicht der Fall sein sollte, dann schiebe das Plektrum an der rechten Kante hoch und runter.

  16. mt4oxePhw1AkvvsT
    mt4oxePhw1AkvvsT
    fyZJQLWDHxSFQntS
    2joL1cwEWUDAmsYf
    • Fasse die rechte Kante des Mittelrahmens an den Ecken und klappe die Kante langsam hoch.

    • Wenn sich die linke Kante lose anfühlt, dann hören mit dem Hochklappen auf und hebe den Mittelrahmen nach oben.

    • Entferne den Mittelrahmen.

    • So gelingt der Einbau des Mittelrahmens: lege ihn passgenau in das Gehäuse, drücke ihn dann ringsum fest, bis alle Rasten einschnappen. Wenn alles korrekt durchgeführt ist, dann liegt der Mittelrahmen flach im Gehäuse.

  17. xvbTKKB1ZMLCsiIG
    xvbTKKB1ZMLCsiIG
    uWlan5ir1xddylZl
    nPaHCS1BiiNasTRj
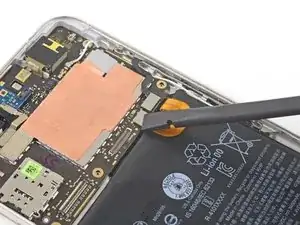
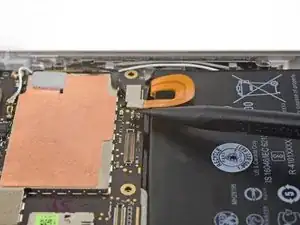
    • Heble den Akkustecker mit der Spudgerspitze hoch und trenne ihn ab.

    • Biege das Flachbandkabel zum Akku ein wenig weg, so dass es nicht versehentlich die Hauptplatine berühren kann.

    I found the black ribbon from the button power button board had broken off during phone disassembly, right where the cable bends 90°. That is the black ribbon connector adjacent to the battery flex cable pictured here (mine doesn’t have the brass looking rivet in it).

    I bought a new one on iFixit to replace it and the phone works great now: Google Pixel Power Button Board

    Lionel Di Giacomo -

  18. nWH2qiQNrTQ4qDE6
    nWH2qiQNrTQ4qDE6
    5PD5kcmYcr4ISBWo
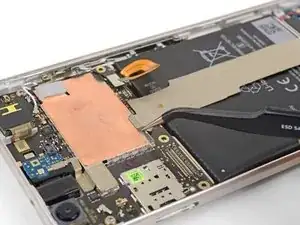
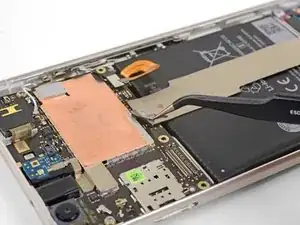
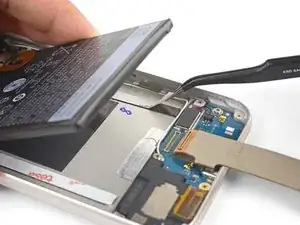
    • Ziehe das Klebeband oben am Zwischenverbindungskabel mit einer Pinzette hoch.

  19. HJ2rxfH3ZhJDVYFH
    HJ2rxfH3ZhJDVYFH
    QTXyVaKRUg3B2SQn
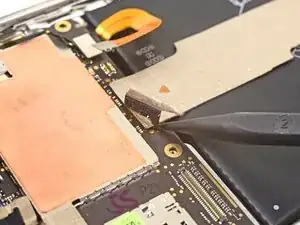
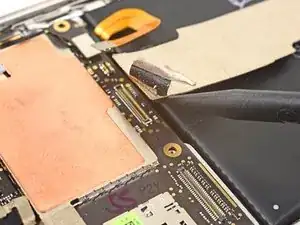
    • Heble das Zwischenverbindungskabel mit der Spudgerspitze hoch und trenne es von der Hauptplatine ab.

    • Um das Kabel beim Zusammenbau wieder zu verbinden, musst du es am Anschluss ausrichten und mit dem Finger erst an einer Seite herunterdrücken, dann an der anderen. Wenn du das richtig gemacht hast, dann wird das Kabel gut vom Anschluss festgehalten.

  20. QT2bDXCMQKqJEYNm
    QT2bDXCMQKqJEYNm
    lL3aNVahOSut2ZE5
    • Heble das Zwischenverbindungskabel mit der Spudgerspitze hoch und löse es von der unteren Tochterplatine ab.

    • Du kannst das Zwischenverbindungskabel an der Tochterplatine kleben lassen, oder es aber auch ganz entfernen.

  21. tWYPmytTTG4Dq3MG
    tWYPmytTTG4Dq3MG
    WspNYtDFXnEIG5K4
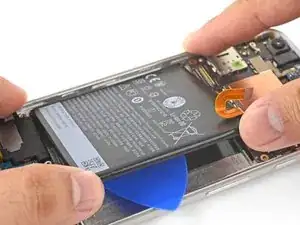
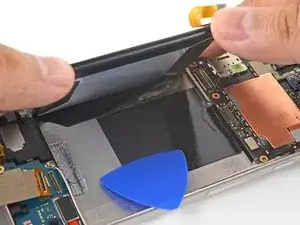
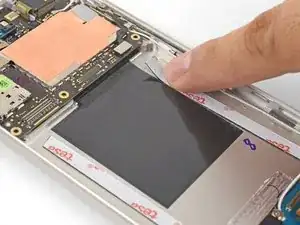
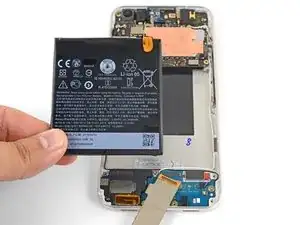
    • Der Akku ist mit zwei doppelseitigen Klebestreifen befestigt.

    • Erwärme einen iOpener und lege ihn zwei Minuten lang auf die linke Kante der Rückseite des Smartphones. Wahrscheinlich musst du den iOpener mehrfach erwärmen und wieder auflegen.

  22. eXmwlxjE5WCOXaSg
    eXmwlxjE5WCOXaSg
    hdXLL1aTeKkSeS2K
    AMo2wQiZimodplrP
    • Drehe das Smartphone herum.

    • Schiebe ein Plektrum langsam und fest unter der rechten Kante des Akkus nach unten (sie sollte noch warm sein). Schiebe es vor und zurück, um den Kleber aufzuschneiden.

    • Bleibe beim Herunterschießen des Plektrums nicht an dem weißen Antennenkabel hängen, das an der Kante des Akkus entlang läuft.

    • Wenn Schwierigkeiten hast, das Plektrum unter den Akku zu schieben, dann erwärme den iOpener erneut und lege ihn auf, so wie es im vorigen Schritt beschrieben wurde.

    • Zum Aufweichen des Klebers kannst du auch etwas hochkonzentrierten Isopropylalkohol auf die Kanten des Akkus träufeln.

    • Wenn die rechte Seite des Akkus vom Gehäuse gelöst ist, dann lasse das Plektrum darunter stecken, damit der Kleber nicht wieder anhaftet.

    Alcohol was the best bet for me - and I have a strip of class 2 HDPE plastic cut from a used chocolate milk bottle for the purpose of sliding underneath and “bridging” the alcohol underneath the battery and onto the adhesive. However, the actual adhesive tape bonding the battery to the case is far more resilient than the adhesive holding the plastic wrapping of the battery together - and, IMHO, only a little bit of it - less than a quarter of the original surface area - is required.

    Jon T. -

  23. KGOGJ6S6vG1CstfX
    • Erwärme einen iOpener und lege ihn zwei Minuten lang auf die rechte Kante der Rückseite des Smartphones. Wahrscheinlich musst du den iOpener mehrfach erwärmen und wieder auflegen.

    • Du kannst auch eine Pipette oder eine Spritze mit hochkonzentriertem Alkohol füllen und einige Tropfen davon unter beide Kanten des Akkus geben. Lasse ihn eine Minute lang wirken, um den Kleber unter dem Akku zu schwächen.

    How is the battery connector positioned during this step? Is it fully folded over on itself?

    gsetter -

    The battery connector is not folded over itself. It makes a U-shape.

    Arthur Shi -

  24. tdWeNCpi6yR6ZsbC
    tdWeNCpi6yR6ZsbC
    ZviPaUqL1VYGpV6A
    EAQO1Mj6dRYlsVYn
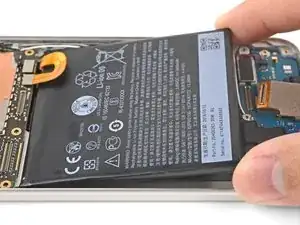
    • Halte die gelöste rechte Seite des Akkus an den Ecken fest und kippe die rechte Kante langsam nach oben.

    • Wenn du fühlst oder siehst, dass sich der Akku dadurch verbiegt, dann halte sofort an und erwärme erneut mit einem iOpener oder gib mehr Alkohol dran, so wie es im vorigen Schritt beschrieben wurde.

    • Wenn der Akkupack aus der Klebeverbindung befreit ist, kannst du den Akku langsam vom Rahmen ablösen.

    • Entferne den Akku.

  25. ltkY6dpHp3DRbopK
    ltkY6dpHp3DRbopK
    BcDZkmZSN3UHxptt
    wSdZrCJag3YDkUYS
    • Reduziere das Risiko eines Brandes oder eines Chemikalienaustritts und verwende einen ausgebauten Akku nicht mehr.

    • Um einen Akku einzubauen, befestige neue Klebestreifen und achte darauf, dass der Akkustecker korrekt ausgerichtet ist.

    • Bringe dehnbare Klebestreifen, doppelseitiges Klebeband oder vorgestanzte Klebestreifen an.

    • Setze den neuen Akku in seine Vertiefung hinein.

    • Schließe den Akkustecker mit den Fingern oder dem flachen Ende des Spudgers an die Hauptplatine an.

    If you are ever planning to replace this battery again, it could be helpful to make a pull-tab with some tape so that it will be easier to remove next time.

    Arthur Shi -

    The adhesive strips might be slightly too long. I used scissors to trim it.

    BD Berk -

  26. iZiUlglrUUKtKAXQ
    iZiUlglrUUKtKAXQ
    UPwXmy4J2UGqEnUy
    UHPGD3pYAoq6Mp3N
    • Lasse den Akku immer noch angeschlossen und hebe ihn am unteren Ende hoch.

    • Ziehe die Schutzfolien mit einer Pinzette ab.

    • Lege den Akku sorgfältig wieder zurück und drücke ihn zum Aktivieren des Klebers an den Kanten fest.

    • Heble mit einem Spudger den Akkustecker hoch und trenne ihn von der Hauptplatine ab. Biege ihn leicht zur Seite.

    • Fahre mit dem Zusammenbau fort.

    My Fixit failed here. Once you plug in the new battery DO NOT UNPLUG IT AGAIN! My phone power socket became damaged during the two unplugging directions here. I’ll propose an edit to the directions, but I am now waiting for a new phone as this step rendered my phone mulch.

    Gil Brice -

    Hi Gil,

    I’m really sorry to hear of your news! Can you describe how the socket is damaged and how it happened, so that I can better update the guide steps to prevent it?

    Arthur Shi -

    Also, power socket is on the daugtherboard, it’s not attached to the motherboard in any way on this step

    Igor Sharipov -

    First time I try to repair a phone myself. I was being very patient on the first step of removing the screen but I think at somepoint the blue triangle tool slipped in too much. The iOpener did not provide sufficient heat to loosen the adhesive even after I reheated and reapplyed it multiple times so I needed more force than necessary to remove the adhesive which lead to the slip up.

    Sidak -

    Need a link to the re-assembly process here please.

    Patrick Boake -

    It was my first time doing a battery replacement and I seem to have somehow managed to put it together.

    However, after I completed the reassembly I noticed that the phone was not charging. I had to re-open the phone and had to do some self troubleshooting and it turns out the bottom part of the interconnect cable was not fitted in.

    Quick fix, but if you want to save yourself the trouble of potentially having to re-open up your phone, I would suggest that after you place your replacement battery into place - connect your display to the display connecter to see if the battery works and charges properly before closing up.

    diplomat -

Abschluss

Wenn sich dein Pixel nach der Reparatur nicht einschalten lässt, kann es sein, dass es sich beim Anschließen des Akkus von selbst unbemerkt eingeschaltet hat. Halte die Einschalttaste einige Sekunden lang gedrückt, bis der Ausschaltvorgang durch Vibrieren angezeigt wird. Schließe danach das Display erneut an und versuche es noch ein Mal.

Um dein Gerät wieder zusammenzusetzen, folge den Schritten in umgekehrter Reihenfolge.

Nach Abschluss dieser Anleitung sollte der neu eingebaute Akku kalibriert werden.

Bringe deinen Elektromüll zu einem zugelassenen Entsorger.

Die Reparatur hat nicht den gewünschten Erfolg gebracht? Unser Antwortenforum kann dir weiterhelfen.

Arthur Shi

Mitglied seit: 03/01/18

218617 Reputation

45 Kommentare

I applied the heat with the iOpener multiple times around the edges (reheating it as needed to where it could barely handle it), and they refused to lift up with the suction cup.

Eventually the screen cracked as I was attempting to pry up an edge out of desperation. First attempt at fixing my own phone = fail whale :(

john fatteu -

Sorry to hear about the unsuccessful repair, John!

Our Support team is here to assist in the event you need to find additional parts to complete your repairs, or if you decide you wish to return the kit that you ordered. Feel free to reach out to us via help.ifixit.com and we’ll do our best to assist you.

Cheers,

Kadan Sharpe -

Is there an ideal temperature to head the adhesive to without destroying the screen?

Jeremy Sing -

@martinsing For most adhesives, 80-85° C is about right. You might have to maintain that temperature for a few minutes before it softens up.

Jeff Suovanen -

How much deeper do I need to cut with the picks/etc top and bottom. The ~1.5mm of my picks isn’t deep enough to cut all the glue on the bottom (haven’t tried on the top yet); my sides were ‘easy’ to free in that my bad battery already lifed them free leaving the screen secured only top and bottom. I can probe deeper with a card or spudger, but how much farther should I be going.

Dan Neely -

Hi Dan,

The 1.5 mm is mainly for the sides. You can push the pick into the top and bottom to the extent that you are cutting under the bezel and not reaching the fragile display panel. I’ve updated the step to include the clarification.
Arthur Shi -

Broke the screen in the first 5 minutes. The corner is what got me and it appears it is less than 1.5mm from the edge of the device. For all the Americans on here that are unfamiliar with the metric system…1.5mm is slightly larger than the tip of a sharpened pencil. You might be wise to measure it on your triangle pick and put a peice of tape on it so you don’t go too deep. I thought it was much more than that hence me breaking the screen. Also…what you are trying to avoid is literally a paper thin piece of glass. If you even touch it with your triangle pick its over. Maybe a playing card is the better solution because it gives a little? Not sure. Definitely not worth the risk for a 10 dollar battery.

Edit: Also! If you need help visually how deep you can go with your triangle pick, look at your new replacement adhesive for the screen. The tiny tiny line of adhesive on the edge is 1.5mm for a frame of reference.

Jeffrey Higgason -

Do not try if this is your first time. Broke the screen when trying to remove the screen.

Alex Lindner -

I ended up looking up a video on youtube which resulted in me not following the instructions correctly for Step 8. (The video used the flat portion of the spudger) and ended up destroying part of the motherboard (Those tiny parts are ultra-fragile), the screen doesn’t work at all now and i can’t figure out the action sequence to enable TalkBack (Text to Speech). Be extra careful about those tiny parts!

Also I couldn’t figure out how to use the adhesive that was provided in the kit, it seems to be inverted. . .

John Taylor -

Hi John,

I’m really sorry to hear that. Did you break the connector on the motherboard, or did you knock off some tiny components near it?

There is a guide for the adhesive! You can find it in step 9, or you can find it right here.

Arthur Shi -

1 hour stuck in step 2 as the adhesive will not even give a tiny bit…so gave up, I guess I’ll continue to use my dying battery until I can hopefully get a new phone.

Host Gaming -

Great guide! A few comments:

As others mentioned, I had to apply a lot of heat to get the adhesive to release. I probabaly reheated 2x and heated for 10 minutes before I could get the first suction lift.

The time in this guide is waaay too short. Took me about 6 hours.

Be careful not to crush the antenna cable when replacing the inner chassis.

Jason -

Be careful around the top right corner where the antenna is, but this is really not all that bad as long as you keep heating it repeatedly and working the white area of the screen with the playing cards. Keep working around the edges and your patience will pay off.

brewmaster396 -

This phone definitely does not deserve a 7 repairability rating - and I kick myself that I bought it based on that rating. It deserves a “2” like its predecessor, the Nexus 6P… and I have firsthand experience trying to do battery replacements with the Pixel XL and the Nexus 6P.

Jon T. -

A small part of the Pixel XL screen started to lift off my phone.  The screen would not press back in, appeared to be pressure lifting it off  in the center of the phone.  I decided to replace the battery since I could not get anymore than a few hours out of a full charge (phone ~1.6 years old).  I used a blow drier to heat up the phone and the playing card.  The screen is extremely delicate so I took my time working it off.  I found the original battery appeared to have expanded.  The screen partially lifting off probably helped. I recommend to use adhesive strips for putting the phone back together.  I replaced the battery and I’m getting a few days now out of a full charge.

Michael Heywood -

Everything seemed done right, but at the end, the screen didn’t really turned on.

Just a little part of the screen at the top is flashing and not working like supposed to be…

what went wrong?

Monica Hamlin -

A note on this repair. I think it needs to be emphasized that the display screen is extremely delicate and one must be super careful when removing it! I did this repair and damaged the display. Thankfully there are used/refurbished ones available for around $60. I still fixed my own phone cheaper than having someone else do it and I have a new display! :-)

markduenas -

Completed repair, when attempting to power the phone on it just vibrates once, nothing ever comes up on the display so I’m assuming I killed it with the picks. I had to get in pretty deep to get all the glue. Just wondering if anyone had the same symptoms when powering on and if it was a bad display. I dont want to sink more money into replacing the display if its a lost cause. Thanks

Mark Zizzamia -

The exact same thing happened to me :( Seemed to go fine but the screen no longer turns on and it just vibrates once.

Blake Coonrod -

Well written guide. Followed it and successfully replaced the battery on my Pixel XL. Be patient when removing the screen and just take your time. Also it helps to mark the picks with lines to show how deep you can go with the picks to cut through the glue. That will help keep you from accidentally damaging the screen.

Matthew Goodwin -

What kind of tape is used on top of the interconnect cable? The grey one.

Alex Miller -

I did this repair, screen came off ok, etc. When I got everything put back together though the screen wont turn on. The phone will turn on and answer a call etc, but the screen is black. Checked to make sure it wasn’t just the backlight but no luck. It also will not connect to my computer when I plug it with a USB cord. Rendered the device useless. Any tips on how to fix this issue would be greatly appreciated!

Blake Coonrod -

Sorry to hear that! If you have the Pixel still open, can you test this:

1. Disassemble the Pixel to the point where you can disconnect the battery.

2. With the battery disconnected, connect the display cable to the motherboard. You do not need to re-attach the midframe at this point.

3. Re-connect the battery, and try to power up the phone.

Be sure to only use plastic tools while prying. Using metal tools may bridge some contacts and short delicate circuitry.

Arthur Shi -

Well that was a waste of money, the iOpener does not get hot enough. I spent over an hour heating and apply the iOpener to the top to complete step 2 and it would not move, not even slightly. Eventually I decided to try heat it up a little more than 30 seconds and the iOpener burst.

Steve Gardner -

Update: I had much more success with a hair dryer. Everything seemed to go fine but after all the step were complete my phone wouldn’t switch on. Just a single vibrate and nothing. Dead.

Steve Gardner -

Hey Steve,

It may be that the phone is powering up fine, but the display is not. If you still have the phone open, try disconnecting the battery, connecting the display, and then re-connecting the battery. You can do this with the phone open, and you don’t have to install the plastic midframe to test this.

Arthur Shi -

Not the best of the best, but I have taken a part 10 or so phones. Never broke one until this one. This job deserves it Difficulty rating. Order a screen with your battery instead of being stuck buying a new phone suddenly like I now am since the battery took over 2 weeks to get to me.

Nick Smith -

A heat pad is better than iopener in my opinon.

Dustin Liu -

Continue with the reassembly process.

But where? There is no link?

Clive McCarthy -

Hi Clive,

To reassemble, follow the directions in reverse order, taking note of any reassembly bullet notes.

Arthur Shi -

Successfully replaced battery and screen. Phone works like new except the new battery lasts only 7 hours. Yes, I followed the instructions for draining and charging the new battery. Seems that the “replacement” battery is no where near the quality of the original.

Ryan Jellesed -

Ryan, did you ever find a solution to making your replacement battery last longer? I have the same issue.

Dberk -

I biffed the screen of the first Pixel XL I had to do this on. I didn’t want to cut too deep and chance hitting the display since the adhesive is so close to the screen, but given the phone is 3 years old, it didn’t want to come off that easy.

What I did was cut all around as close as I was comfortable, then applied heat back to the top of the phone, and was gently lifting the screen while slicing through the remaining adhesive. Then once I got the top of the screen to lift with light pressure, I started working on remaining adhesive on the sides. My mistake was I should have stopped, and started trying to gently lift the bottom of the screen and slice that remaining adhesive, then that would likely get the screen up without fracturing it. Instead, as I got the top and sides of the screen free and started to go around the bottom, some adhesive on the bottom came off easier than I thought which resulted in the screen popping up and cracking.

Also, my iOpener needed 35 seconds to be effective, Weak microwave

Donabed Kopoian -

In addition, I had to use the Jimmy to get the subframe to break on that corner. A pick wasn’t cutting it. I tried for about 20 minutes and ended up needing to go with a tool that wouldn’t give so easy.

The good new is, I put the phone back together (minus the screen adhesive) and booted the phone, and aside from the cracked display randomly flashing on, everything appeared to work, and I was even getting feedback on the digitizer and was able to shut the phone off (knew where the off button was from using the phone so long), so it seems like I just need to replace the screen and it should be good.

Here’s to hoping the second Pixel XL I fix tomorrow is complete with a surviving screen. I won’t feel terrible if I’m 50% on my first go with changing a battery on a phone like this and only have to pay for one screen and not two…

Donabed Kopoian -

Also, the speaker grill was causing my suction cup to not seal good enough to really lift the top of the screen, and placing the suction cup was too far from the edge to lift it with the pressure I was comfortable applying on that potato chip screen.

So what I did was wiped my screen clean, and applied wide packing tape along the top edge of the screen, covering the speaker grill (and rolled the ends so that it wouldn’t try sticking to the frame or the table I was working on), and that did the trick.

Also, if your phone is old, be prepared to spend about an hour just removing the old adhesive so you get a fresh surface for the new adhesive to grab on to. I used a paper towel with 99% iso and cleaned it. Watch for the cushions on the mid frame. The alcohol will attack it, so pay attention to where you wipe off especially on the sides.

Donabed Kopoian -

That was a bust… 0/2. Hope the battery on the Pixel 4a can be done with just a battery and not other parts…

Donabed Kopoian -

Needed a replacement battery since one of the new ones only had 50% the capacity of the other new one. Was able to get the new screen off without breaking it (granted the new screen was only on the chassis for barely two weeks). This time, the second I got a gap on the top of the screen, I pretty much used a dispenser bottle filled with 99.9% Isopropyl Alcohol and applied it very, very liberally into the gap of the screen. I held the phone upright and applied it through the entire width of the top of the screen with the hopes it would run down and attack as much adhesive as possible. Then I let it soak while heating up the left side of the phone, cut the adhesive on the side, and when the pick was in the bottom corner I applied more alcohol to the bottom part of the phone. Ended up being able to lift the screen off the chassis without even slicing the right side and bottom since pretty much the entire parameter was soaked in alcohol.

Definitely the way I’ll remove ANY screen on any phone from now on.

Donabed Kopoian -

So I replaced my battery, put everything back successfully. Now it bootloops, any suggestions?

jhustle -

Well, I took it apart again and put it back together again and now it works. Must have been a loose connection.
jhustle -

The guide worked well for me! Plan on taking at least 2hrs for repair if this is your first time repairing a phone. Also, probably at least 75% of your time will be removing the screen. If your screen already has a crack, then you might not be able to remove it intact. Really take your time on the screen, especially at the end when you are lifting up the last bit of screen, as this is like a lever putting a lot of pressure on the part of the screen still attached. I had good luck using the picks in a cutting motion, back and forth while slowly advancing into the case. Reheated each area so that it stayed warm while cutting the glue. Even spending 3hrs on the screen is faster than shipping a new one :) . Also, after everything is replaced and you are ready to glue the screen back on, read the guide for using the screen adhesive. Again, do everything in this guide very slowly and you should be fine. Thanks for the great guide!

Matthew Wilson -

This screen is terrible to remove. The top bezel glue is no joke. Go very slow. I destroyed mine.

brundmc -

i wouldnt bother with this, i have 2 phones here and man that glue is no joke. both screens crack. mind you im not a noobie niether, i run a shop and done hundreds if not thousands of repairs within the last 10 years or so…. dont do it!

javierponcejr -

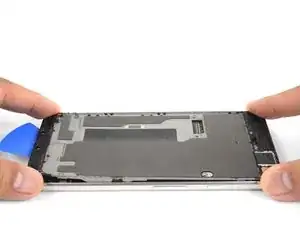
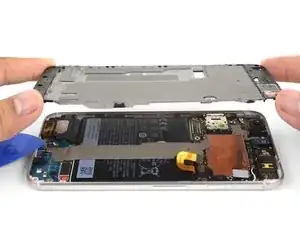
I tried this and ended up cracking the screen, but it wasn’t the way I was expecting to. The external part of the screen, I guess it would be the digitizer screen, actually seems fairly sturdy, but the part I broke was an internal glass pane, which I think is actually part of the AMOLED screen. It’s the innermost hard surface of the screen, and it can be seen in the pictures of steps 8 and 9 and the third pictures of 7 and 10. There’s a black film on the back of it.

The part that broke for me was around the bottom corners, which the pictures of steps 8 and 9 are focused on. Basically, those corners were apparently still stuck down well when I brought the pick down along the side and rounded the corner to the bottom edge, and the pulling up of the outer screen caused the inner screen to break at the corner. I got the feeling that the adhesive holding the screen onto the frame had seeped down around the edge a little bit and was holding onto the more internal parts of the screen, not just edge of the digitizer.
Sam Kremer -

My phone's battery is back to its original state now, this guide worked wonders! CAUTION: Be prepared to break your phone's screen while doing this - seriously, its a high likelihood you will. But the way I see it, a bit over $100 for a new screen and battery (screen was scratched up anyways) is certainly more cost effective than a new smartphone. Best of luck anyone who tries this!

Lucas H -

If I destroy the display, can I just buy another one and repair that too?

Gabe Darrett -