Einleitung

Wenn der Computer hochfahren will, aber nicht kann, häufige Windows Bluescreens auftreten, wenn er oft einfriert, dann hilft vielleicht ein Austausch der Hauptplatine. Dies wird hier beschrieben.

  1. gWywe5neYZcZxVGF
    • Das Gerät zu öffnen, während es eingeschaltet ist, kann zu Stromschlägen führen. Kontrolliere, ob das Gerät ausgeschaltet und vom Netz getrennt ist.

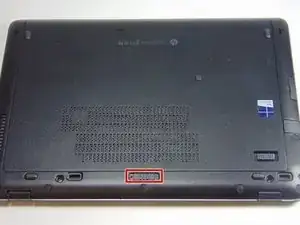
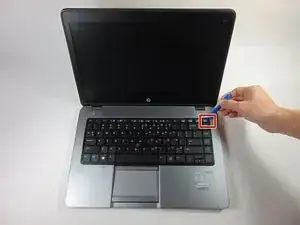
    • Schiebe den Verschluss nach rechts, also vom Schloßsymbol weg.

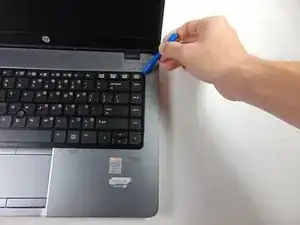
    • Schiebe die Abdeckung von der Verriegelung weg und nimm sie ab.

    Slide to your "other left", on this screen it would be to the right, to slide open the cover

    petunia8107 -

    l’expression “Détachez le cache du loquet pour le retirer “ est ambigüe et source d’erreur, elle donne à penser qu’il faut retirer un “cache” qui serait sur le loquet.

    Ce qu’il faut c’est détacher le cache (la grande plaque où il y a la logo bleu) de la partie fixe sur laquelle se trouve le loquet. Pour ça il faut glisser une lame fine dans la fente entre le cache et la partie fixe.

    merci pour le tutoriel.

    Philippe Fayolle -

    Bonjour Philippe,

    Vous avez bien raison ! J’ai adapté la traduction. Merci pour l’observation ! N’hésitez pas à corriger le texte la prochaine fois. Vous trouverez l’interface de traduction en cliquant sur Traduire en haut à droite de l’étape.

    Bonne réparation !

    Claire Miesch -

  2. OLckbFrMaxkOhAMW
    • Unter der Abdeckung siehst du den Akku und die beiden Rasten, die ihn festhalten.

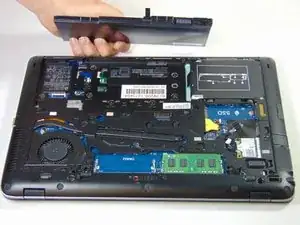
    • Beide Rasten müssen zurückgezogen werden, eine von ihnen steht unter der Spannung einer Feder. Du musst sie beim Ausbau des Akkus festhalten.

  3. QYAwwGFtPxS2PZvH
    • Der Ausbau des Akkus sollte dann sehr einfach gehen.

  4. EPNSdBGLgMgrXIge
    • Finde das RAM und die Zuglaschen, welche du im nächsten Schritt benutzen wirst.

    • Lege beim Arbeiten am Computer ein antistatisches Armband an.

  5. bLOMwkRvm1lZLTWQ
    • Drücke die beiden Rasten an jeder Seite des RAM zurück, so dass das RAM frei wird.

    • Beim Hantieren an einem Speicherriegel solltest du es vermeiden, die Platinen zu berühren. Du könntest sonst die Speicherchips beschädigen.

  6. aZNAZTTqpwUxVUpi
    • Hebe die Speicherriegel vorsichtig nach oben, wenn die Rasten frei sind.

  7. vFKwCyvoTDAT2KhR
    vFKwCyvoTDAT2KhR
    6ggcTLdBI1K1U4WO
    • Löse die vier Kreuzschlitzschrauben, welche die Festplatte befestigen.

    • Diese Schrauben bleiben in der Halterung der Festplatte hängen.

    These are J1 Phillips screws

    Bradley Pinkston -

  8. GsdX1PnNxnyBB4yy
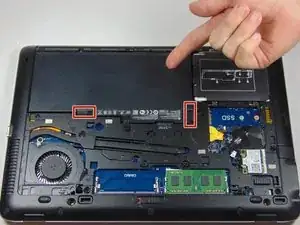
    • Fasse die Zuglasche am Kunststoffgehäuse der Festplatte und ziehe es daran zur Seite.

    • Achte daruf, dass vor diesem Schritt wirklich alle Schrauben vom Boden lose sind.

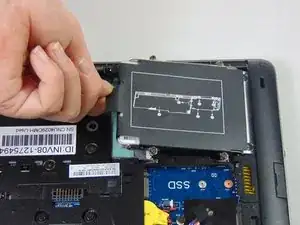
    • Entferne die 2,5" Festplatte von der Kunstoffhalterung.

    Festplatte ist leer wie bekomm ich Windows drauf

    Böhser Ossi -

  9. yLSRsCHIk6fwYpjn
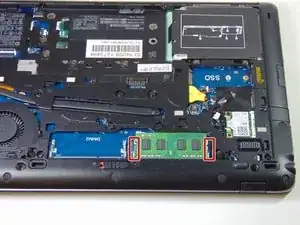
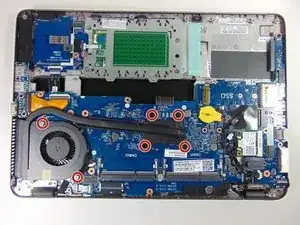
    • Um an den Kühlkörper und Lüfter zu gelangen, musst du zuerst die Kunstoffabdeckung abnehmen.

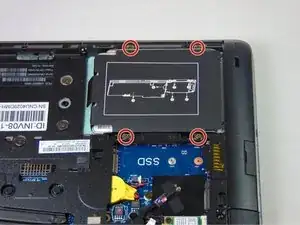
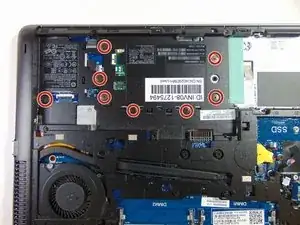
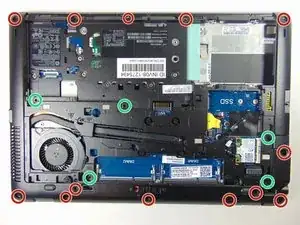
    • Entferne die acht 2 mm Kreuzschlitzschrauben #1.

  10. qyZU5V5DnITyWO1P
    • Schiebe die SD Karte heraus und entferne sie.

  11. oQc3ohZWKV2Hoxxe
    oQc3ohZWKV2Hoxxe
    al4yeqmO6wIjbSrK
    XWONbdTtwLhEqAW2
    • Entferne dreizehn 6 mm Torx T8 Schrauben.

    • Einige Schrauben sind mit einer Plastikabdeckung bedeckt, die erst entfernt werden muss.

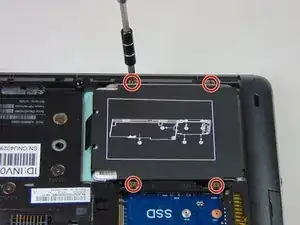
    • Entferne fünf Torx M2.5x5 Schrauben.

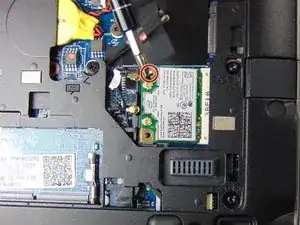
    • Entferne die einzelne 7 mm Kreuzschlitzschraube #1.

    • Löse die beiden Kreuzschlitzschrauben #1. Diese Schrauben bleiben im Gerät hängen.

    T8 Torx screws - I had something like 16 before the black bottom cover removal was possible, and two (marked here as offset from the bottom edge) were not installed at all, so there are 5 total in places not marked in the above photo.

    Daniel Powell -

    I had 16 of them as well. The missing ones are:

    1. Right next to Ethernet drop jaw.

    2. To the left of the battery connector.

    3. Next to VGA, right above the fan.

    Arthur Dubrovsky -

    I actually had 18. The additional ones are between the fan and the RAM slots, and between the fan and battery.

    Aldric Degorre -

    Sorry, I actually had 16, but two from the picture did not exist (and I cannot edit my comment anymore !).

    Aldric Degorre -

    Several screws are missing, one near the ethernet port, and 3 out in the middle, and 1 near the fan (inline with the two below the fan)

    Michael Gardner -

    Do I need to purchase the exact model fan with the sbs number the same?

    toni.edie -

    I added the missing M2.5x5 screws, also deleted the step to remove the keyboard since it’s not needed if you want to replace the fan.

    waltergg -

  12. aoZlTCwpVcjxuVvG
    aoZlTCwpVcjxuVvG
    N2pH5niBse2QXmBJ
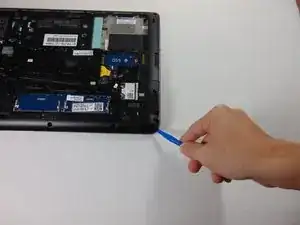
    • Entferne mit einem Plastiköffnungswerkzeug die Kunststoffabdeckung, fange dabei an einer Ecke an und heble sie hoch.

    After this step you can replace the fan.

    Ron Kihn -

  13. toSE5vDAKeLaVgC3
    toSE5vDAKeLaVgC3
    lSvwLDTmRTI1yINE
    • Fange in einer Ecke an mit dem Plastiköffnungswerkzeug die Tastatur abzulösen. Du musst sie zum Entfernen oben anheben und dann in Richtung Bildschirm bewegen.

    • Wenn die Tastatur entfernt ist, musst du Flachbandkabel zur Tastatur ablösen. Heble dazu die kleine Lasche hoch und ziehe das Kabel heraus.

    Keyboard removal was not necessary to remove the fan for me. Once you get the bottom shell off, the fan subassembly is completely accessible.

    Daniel Powell -

    There is a hole by the fan to push the keyboard out instead of prying it out.

    Paul Yoder -

    True, i used the hole by the fan to push the keyboard out.

    LRD -

  14. bitoXMSwHQL4fFkF
    bitoXMSwHQL4fFkF
    DMNjsVHYCLV1veuo
    • Löse die sechs Kreuzschlitzschrauben #1. Diese bleiben im Kühlkörper hängen.

    Heatsink removal is not necessary to take the fan out. You can remove just the fan with its two screws if that is the only thing needing replacement. Like for mine, the fan bearings were bad, but the heatsink was okay though a little dusty..

    Remember, though, to have fresh thermal grease ready if you do decide to remove the heatsink anyway.

    Daniel Powell -

    Warning: I removed the heatsink and now that I’ve re-applied the paste it no longer makes any contact at all with the graphics substrate and barely any with the CPU. HP have a habit of splurging several mm of paste onto their CPUs during manufacture and this has either bent the heatsink or it’s just a poor design full stop. I guess I’ll get a thermal pad and use that as it’s at least designed to conduct heat probably better than an ocean of thermal paste would

    T H -

    Yes, it could work, you can also try to unbend the heat sink but this laptop can become very hot, if the heat sink is bent, you should consider a heatsink replacement for an optimal heat dissipation.

    Brendan -

  15. 5KdHnMX4ahhYO6aB
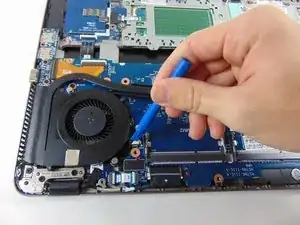
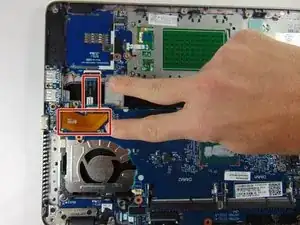
    • Löse mit dem Plastiköffnungswerkzeug das Klebeband von den Kabeln zwischen Lüfter und Hauptplatine ab.

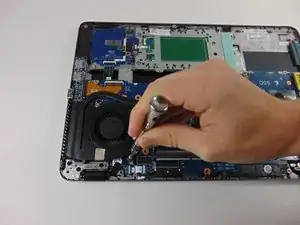
    • Trenne die elektrische Verbindung des Lüfters und löse das Kabel ab.

  16. YyTpnqIOqTghVHLp
    YyTpnqIOqTghVHLp
    YKHAcDUQjFIfoypK
    • Hebe den Lüfter hoch und entferne ihn.

    • Hebe den Kühlkörper hoch und entferne ihn.

  17. Pc6CoikjwvJnkYUT
    • Löse beide Antennenkabel ab.

    • Sie sind mit 1 und 2 markiert und müssen beim Zusammenbau an die gleiche Stelle.

  18. aRBLWKBklT6do2Rb
    • Entferne die einzelne 3 mm Kreuzschlitzschraube #1, welche die Wi-Fi Platine befestigt.

  19. nvctVG3fYhUGKHOh
    nvctVG3fYhUGKHOh
    bl6feTbVqBWIFR2g
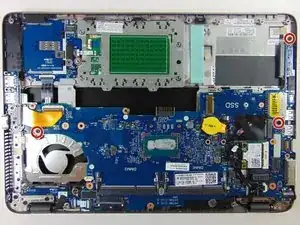
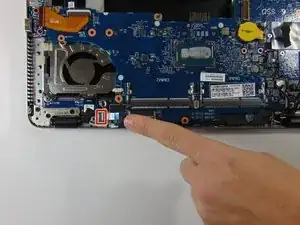
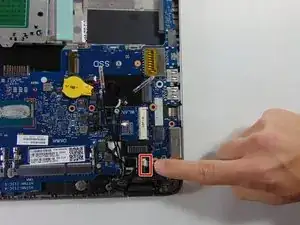
    • Entferne die drei 4 mm Kreuzschlitzschraube #1.

    • Entferne die einzelne 2 mm Kreuzschlitzschraube #1.

  20. 3o2VeKfHJZBqnlKr
    • Löse die beiden markierten Flachbandkabel.

    • Bevor du sie lösen kannst, musst du erst die kleinen schwarzen Laschen, die sie befestigen, hochhebeln.

  21. oVSWCAXs1OEgqUCL
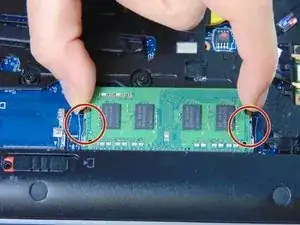
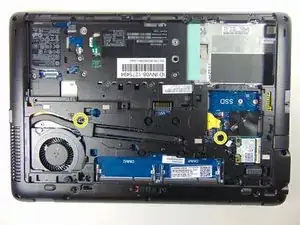
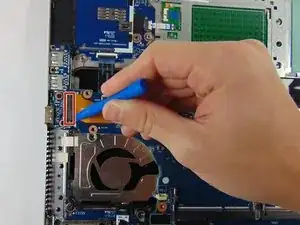
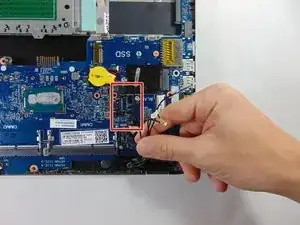
    • Heble die graue Kunststofflasche von der orangenen Lasche, um sie zu lösen.

    • Wiederhole für die durchsichtige Lasche.

  22. tHWFHrEaRKKhbcOI
    • Löse die Kabel, indem du das Klebeband ab ziehst und die Kabel von unten her hochhebst.

  23. q5odG2UMD1Pk4lJa
    • Entferne das Flachbandkabel von der Hauptplatine.

    • Heble vorher die kleine weiße Sicherung hoch.

  24. O6O5tCQL1PH55QLm
    • Löse den Kunststoffanschluss.

  25. yx66RPYZN4tjErFY
    • Löse das schwarze Klebeband am Rand der Hauptplatine ab.

  26. x2OH4KWyOJZvBm4w
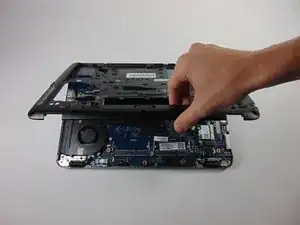
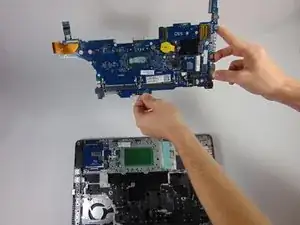
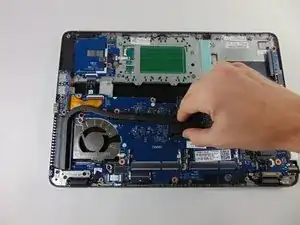
    • Jetzt kann die Hauptplatine leicht angehoben werden. Wenn sie sich dabei irgendwo verhakt, dann prüfe nochmals, ob alle Kabel abgelöst sind.

    • Achte beim Zusammenbau darauf, dass nichts unter der Hauptplatine festgeklebt ist.

    There is a ribbon cable under the board you will need to disconnect as well.

    Dustin -

    And in which part the BIOS is configured?

    Albert -

Abschluss

Um dein Gerät wieder zusammenzusetzen, folge den Schritten in umgekehrter Reihenfolge.

Ashley Williams

Mitglied seit: 27/08/15

2311 Reputation

5 Kommentare

thanks a lot for this good article ... could you please advice where to buy the replacement motherboard online ?

many thanks again

Siyamand Rashid -

Alibaba or AliExpress is cheaper than eBay or Amazon but if in USA then buy from

Baba Callum -

Does someone know if we can replace a 745 g2 motherboard by another model like a 820 g2 or something like this ? Tks.

Rusterholtz -

745 G2 can only be replaced with 840 G2.

While 725 G2 can only be replaced by 820 G2

Baba Callum -

How can i find this mother card

Heritier Habumugisha -