Einleitung

Diese Anleitung wird dir beim Austausch des Akkus im HP Pavilion 15-bk020wm helfen. Stelle sicher, dass du den richtigen Ersatzakku gekauft hast, bevor du den alten Akku ausbaust. Es gibt eine grundständige Anleitung, um die Unterseite des Laptops zu öffnen, um leichter daran zu kommen. Achte darauf, das Gerät auszuschalten, bevor du es auseinandernimmst.

  1. 5JDfpjDHM3BgT4Tq
    5JDfpjDHM3BgT4Tq
    vwjTLwKTAJaUGcOK
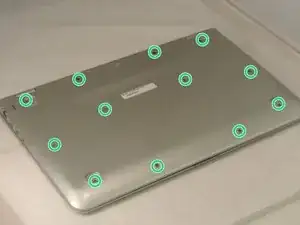
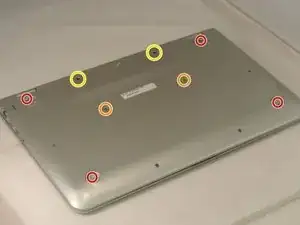
    • Schalte vor der Reparatur den Computer aus und trenne ihn vom Netzteil.

    • Entferne die vier Füße des Computers. (Unser Gerät hatte keine; man kann sie mit einem Spudger entfernen.)

    • Entferne die zwei Schraubenabdeckungsstreifen.

    • Entferne die beiden Schraubenabdeckungsstöpsel.

    • Schraube alle 12 Kreuzschlitzschrauben (Größe: M2.5×7.0) von der Unterseite des Computers heraus.

  2. HuS6aVIuJZXdHuFo
    HuS6aVIuJZXdHuFo
    ZQsihYbTsKZJYCUp
    xBUWIoia6OnsKLSV
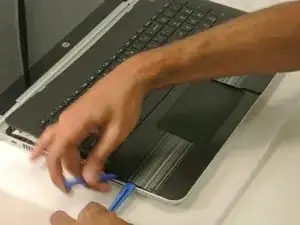
    • Drehe den Computer mit der Vorderseite nach oben.

    • Klappe den Laptop auf.

    • Benutze das Öffnungswerkzeug, um die Tastaturabdeckung nahe am rechten und am linken Scharnier hochzuheben, arbeite dich dann nach vorne zum Touchpad.

  3. 6bEaccJno5DQ15ue
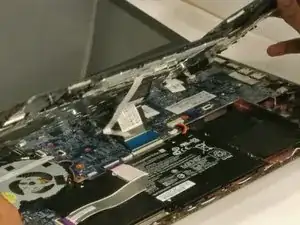
    • Kippe die Tastaturabdeckung ein wenig hoch.

    • Entferne die Tastatur noch nicht, sie ist immer noch durch einige Kabel mit dem Laptop verbunden.

    I don’t have the 2 orange screws under my laptop, but when I unscrew the other 10, and try to lift the keyboard, I can’t lift it fully because it’s being held down by something.

    R. Ali Powell -

    The ribbon cables for the keyboard and trackpad are held in place by some clips. Unlatching those clips allow you to carefully remove the ribbon cables and place the keyboard assembly aside. This gives more room for removing the hard drive.

    Miles Carmany -

  4. giKAnsMcX5L16IEE
    giKAnsMcX5L16IEE
    LBZOJHOAyDoCpyqB
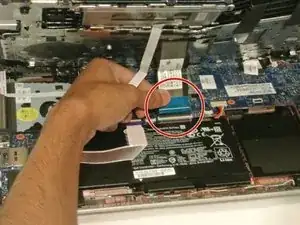
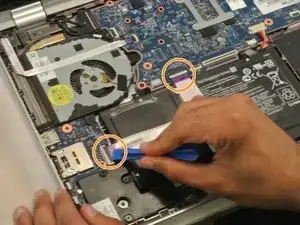
    • Trenne das blaue ZIF-Kabel vom Unterteil des Laptops.

    • Benutze ein Plastiköffnungswerkzeug, um die beiden ZIF-Kabel, die den Akku mit dem Motherboard verbinden, nach oben zu klappen.

  5. Ippow1vMScPRWlhp
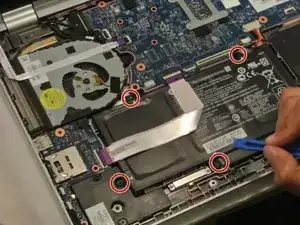
    • Entferne die vier #00 M2,5×4,4 Kreuzschlitzschrauben um den Akku.

  6. u3ENQGLXIUEehyfh
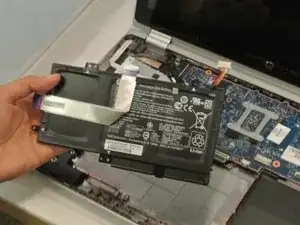
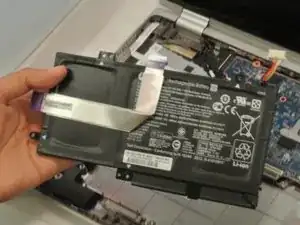
    • Hebe den defekten Akku aus dem Laptop.

    • Lege den neuen Akku ein.

    Exallent, most easy and clear steps to follow. Very good expiation !! Thank u.

    Skanda -

    I didn't actually do this particular repair because i don't have this particular laptop(thank God), however in reading through the directions, if i did have this one, these would've been a God sent without a doubt !

    i was thinking how much easier replacing the cooling fan would've been in my old Compaq laptop if I would've had instructions like these.

    Again, GREAT JOB !!!

    MAX POWER

    Max Power -

    I did this and the beeping stopped, and it seemed like it would power up, and it is turning on now, but it’s not booting up and the screen is dead.

    Robert Sadlowski -

Abschluss

Um dein Gerät wieder zusammenzubauen, folge den Schritten dieser Anleitung in umgekehrter Reihenfolge. Entsorge deinen Elektroabfall fachgerecht.

Hannah Paine

Mitglied seit: 28/06/17

377 Reputation

2 Kommentare

Hidden bolts are tricky to understand at first.

Riben Deguhur -

can i still use my laptop without the battery (the same type of battery shown on those picture) and directly plugged in?? I've been worried since it's just stuck on a very low percentage
Shouko kazumi -