Einleitung

Wenn die Tastatur defekt ist, folge dieser Anleitung, um sie auszutauschen.

  1. oUUsahBa2QJygRJM
    oUUsahBa2QJygRJM
    N1gkgc6vxlnCO4CW
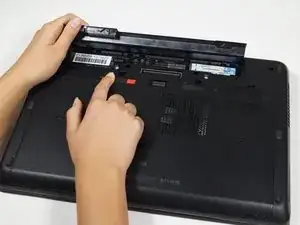
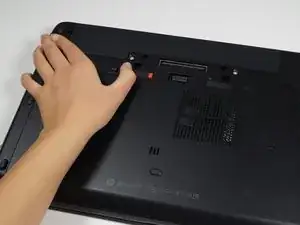
    • Drehe den Laptop um.

    • Schiebe den Hebel mit dem Akkusymbol daneben fest zur Seite bis der Akku herauskommt.

    • Entferne den Akku aus dem Gerät.

  2. xMjHnW1tbPTDwMS2
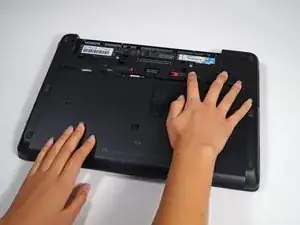
    • Schiebe den rechten Hebel fest nach rechts.

    • Ziehe die Abdeckung zu dir, um sie zu entfernen.

  3. Hf6ZKpTDOjPUKrAA
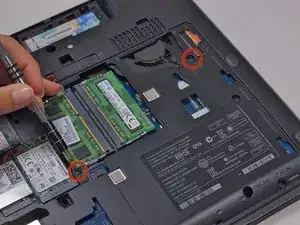
    • Entferne die beiden 16 mm Schrauben mit einem Kreuzschlitzschraubendreher #0.

    • Die Schrauben müssen auf zwei Gewinde-Ebenen gelöst werden. Nachdem die erste Gewinde-Ebene lose ist, musst du weiter schrauben, um auch die zweite Gewinde-Ebene zu lösen.

    Note that it is not necessary to completely remove these screws. They are meant to be 'captive' and not removed completely. If you unscrew them to that 'first thread' so they are loose and floppy, they are no longer holding the keyboard in place and it is safe to continue to the next step.

    Joe Kyle -

  4. ycKDGh1DHcWTnCRs
    ycKDGh1DHcWTnCRs
    C4JHZevwgHwKpwaJ
    3GNrSOVUL6UYOQrk
    • Versuche nicht, die Tastatur von unten hochzuhebeln. Sie ist mit Rasten links, oben und rechts befestigt. Metalleinsätze auf der Unterseite befestigen die Tastatur, sie müssen zum Entriegeln nach oben und heraus geschoben werden.

    • Achte darauf, den Computer beim Hebeln nicht zu verkratzen. Wenn du ein Plastikwerkzeug hast, das lang genug ist, um als Hebel verwendet zu werden, verwende dies anstelle eines Metallwerkzeugs.

    • Auf der Unterseite sind Flachbandkabel befestigt, achte darauf, dass du die Tastatur nicht mit zu viel Kraft löst, da du diese sonst beschädigen könntest.

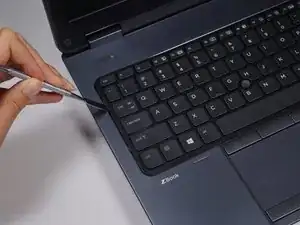
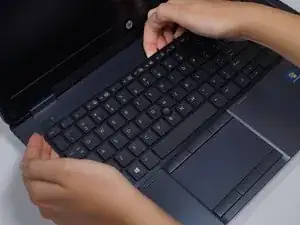
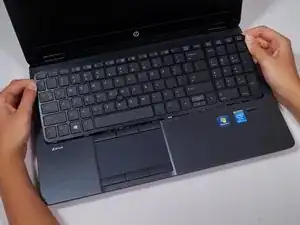
    • Drehe das Notebook so, dass die Tastatur sichtbar ist.

    • Setze den Spudger unter die linke Seite der Tastatur.

    • Hebe die Seite der Tastatur vorsichtig an, und ziehe kräftig an der linken Ecke der Tastatur, bis sie sich herauslöst.

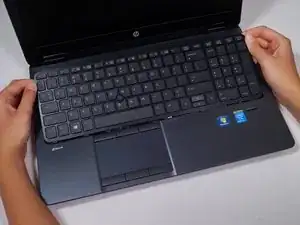
    • Fahre jetzt mit den Fingern unter die Kanten der Tastatur von links nach rechts an der Oberkante entlang , um die restlichen Rasten zu lösen.

    • Schiebe die Taster vorsichtig nach oben in Richtung Bildschirm und entferne sie aus dem Gehäuse.

    Please keep in mind that the keyboard comes with a metal plate. If you managed to pry one of the plastic rivets out of the keyboard, you've damaged the keyboard...

    (I should have read the comments about taking the optical drive out first, haha...)

    Brandon Lu -

    that you for the info…. have a HP Zbook 15 G2 of my own.. this site is.. so.. helpful :)

    josephwin -

  5. jBhTUKaLEUWUl1ZX
    jBhTUKaLEUWUl1ZX
    WT4XIsGjgrcNLefa
    FT55cNklpZYJmCgb
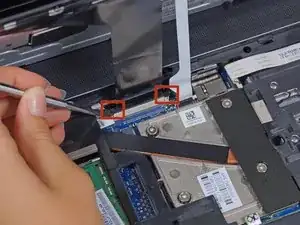
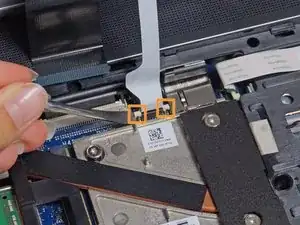
    • Hebe die beiden Laschen auf jeder Seite des schwarzen Flachbandkabels vorsichtig mit einem Spudger an, bis sich das Kabel löst.

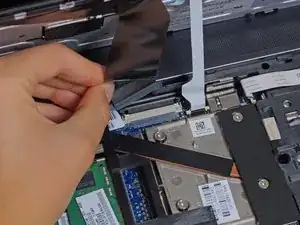
    • Trenne das schwarze Flachbandkabel, indem du an der blauen Lasche ziehst, die daran hängt.

    • Wiederhole diesen Vorgang bei dem weißen Kabel.

Abschluss

Um das Gerät wieder zusammenzubauen, folge dieser Anleitung in umgekehrter Reihenfolge.

Grant Terris

Mitglied seit: 31/01/15

2795 Reputation

13 Kommentare

I found that if you remove the optical drive, you have access to push the keyboard form the back to disengage the side with the number pad.

bryanholder81 -

I agree with Bryan...much easier to start that way. Pushing from the back will disengage the top right corner (seen from the user position)

advrider -

In addition to the comments about pushing the keyboard out after removing the optical drive (which is actually the documented way of removing the keyboard) I'd add that the bit about "There are two sets of threads to get past. Once unscrewed from the first thread, lift the screw up until it hits the next set and begin unscrewing again." is incorrect. The screws are deliberately designed to be self retaining. You only need to unscrew it until the screw turns freely (i.e. not fully).
Dominic Cioccarelli -

please, will they have the part number of this keyboard ?, it hurt me and I saw the steps that are followed to extract it, and replace it, but I can not find the part number of the keyboard replacement, if someone could have it tell me which is please?

cesar rios -

Go to partsurfer.hp.com with the p/n of the machine and you'll get the exact part number of the keyboard you need

Johan Rios -

Thanks for this! Back in the day, I didn’t know about the PartSurfer. It’s a great resource, for sure!

Also, it’s great to see many people sharing solid advice in the comments. Thanks, everyone!

Luis Alejandro Araúz -

Great set of instructions! Two things I would add:

1. There are two “layers,” if you will, to the keyboard (that you can see from the edge as you begin to pry up your first edge/corner). The top, plastic layer (that fills in around the keys) and the bottom sub-platform. It’s this bottom, metal layer that you want to get under to pry up.

2. You have to put some strength into prying. I was being too gentle and careful and the dang thing just would NOT release. Once I decided that I didn’t care if I broke the keyboard or its clips (I'm putting in a new one), I got a little more aggressive and it popped right out. It required way more force then I thought necessary, but it worked - and nothing broke.

Thanks!

jasellewis -

The white clip ribbon broke while pulling it up. Is there a way to replace or fix it? Any kind of glue maybe?

Ulf Klose -

I found that the keyboard clips on this removable were very sturdy and to be extra careful when removing the keyboard. I had to give it some force to get the keyboard out of its clips.

It has clips at the following areas:

- Tip of the ‘Enter’ key on the Num-Pad

- The the ‘-’ symbol on the Num-Pad

- Under the ‘Page-Up’ button

- Under the ‘Insert’ button

- Between the ‘F9’ and ‘F10’ keys

- Under the ‘F5’ key

- Under the ‘F1’ key

- Just above the ‘Tab’ key

- Under the ‘Shift’ key on the left

Hopefully this helps someone else looking to replace it and allows them to put pulling force on the right areas.

Jordan Lance -

Hi Team, I have bought a zbook 15 g2 and the keyboard is not backlit. is it possible to straight swap this existing keyboard with a keyboard fit for this laptop frame that has backlit capability? Guess my question is, IS the slot for black-lit illumination on my frame that is simply not used? would appreciate your help. cheers.

Kamal Merai -

Well Backlit feature depends on a different flex ribbon from the one for the keyboard communication, if the keyboard was replaced and the backlight ribbon was still attached to the keyboard, then you’re out of luck, because HP won’t give you another flex ribbon,

when replacing the keyboard, the backlight flex ribbon needs to stay attached to the motherboard, replace the keyboard and put reconnect the KB ribbon and the backlight ribbon on their places…

I tell you that because this happened to me with my zBook 15 G3 :(

Johan Rios -

This procedure also applies to the ZBook 17 G1/G2, which uses the exact same keyboard.

Thanks for this guide! It helped me replace my faulty keyboard on which the keys became too stiff to type comfortably.

Luis Alejandro Araúz -

Replacement keyboard just orded had 3 screw posts. Zbook working on has 2. What is correct part number? Used hp service manual to lookup.

Also, how to replace point stick cable? Keyboards do not seem to come with this cable.

hcalhoun -