Einleitung

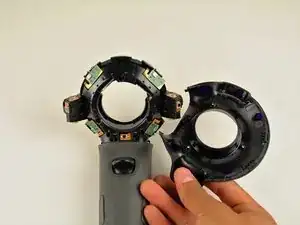
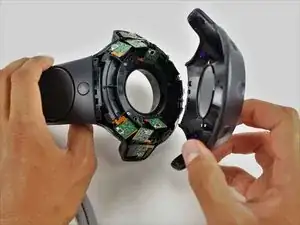
Benutze diese Anleitung, um die Gehäuse der Sensorringe deines HTC Vive Controllers zu ersetzen. Diese Gehäuse müssen ausgebaut werden, bevor du an andere Komponenten des Controllers herankommen kannst. Entferne das obere und das untere Sensorringgehäuse vorsichtig. Die Kunststoffklammern, mit denen sie befestigt sind, können brechen, wenn man zu grob vorgeht.

  1. qspXEGpclMcc4FU6
    qspXEGpclMcc4FU6
    f5aVdykiHKTKwZrt
    WaHUHm3CCPZva2kE
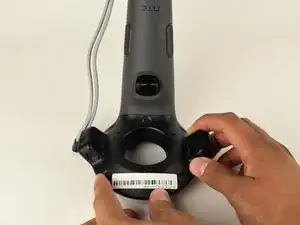
    • Drehe den Vive Controller so, dass der untere Ring nach oben zeigt.

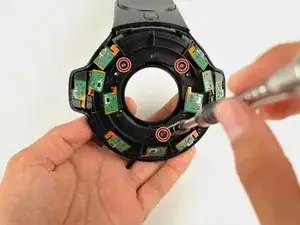
    • Entferne die drei schwarzen 21 mm T5 Torx Schrauben am unteren Ring.

    Where can I buy new t5 21 mm screws? Mine are getting stripped out!

    jeremyvanwoerden -

    Where can you get replacement batteries?

    Mike Justice -

  2. EGCPx1qHeDmAW5Ml
    EGCPx1qHeDmAW5Ml
    jIuFdwxxDs4sPAoK
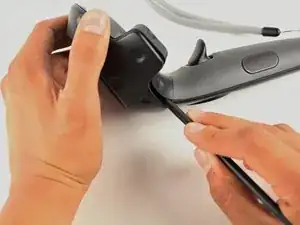
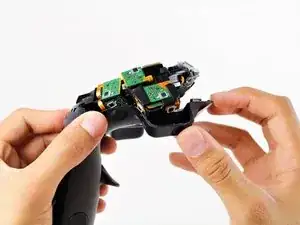
    • Benutze einen Nylonspudger, um die Abdeckungen des unteren und des oberen Rings an allen Kanten voneinander zu lösen.

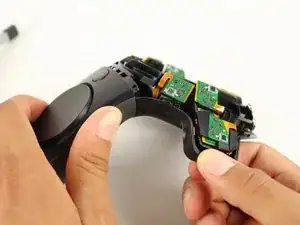
    • Entferne nur die Abdeckung des oberen Rings, indem du sie mit der Hand nach oben ziehst.

    My top saucer was REALLY stubborn. Don’t force it with your hand, use the spudger to separate it at the seam. Try not to poke your spudger in too deep, there are internals just inside the seam.

    trevorsklar -

    The second time around, I learned why it was so stubborn. The picture suggests that you should start at the base of the saucer and work your way around, but that’s backwards.

    Start separating with your spudger at the distal side of the saucer and work your way toward the handle. Then for the last part, pull the piece up and away, like peeling a banana. See the second picture for the bottom half of the saucer, below. Do the same on the top.

    trevorsklar -

  3. eopOkINCcVTJW1m1
    eopOkINCcVTJW1m1
    iTZHnfipdduRqsQD
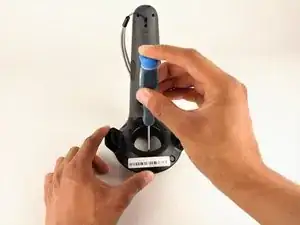
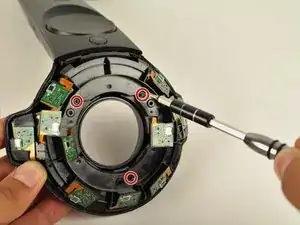
    • Entferne die drei silbernen 12,8 mm #00 Kreuzschlitzschrauben vom freiliegenden oberen Sensorpanel.

    It’s Phillips 0, not 00.

    trevorsklar -

    You do not need to remove these screws to remove the bottom saucer. They provide stability to the two halves of the donut.

    pacoavocado -

    I had the same experience. Putting the screws back in made the bottom shell easier to remove.

    Nate Plamondon -

    I concur, you don’t need to remove these screws to take the bottom shell off.

    I found mine had ph#000 screws size, not ph#00.

    Rocko the fixit cat -

    please do not remove the Phillips-head screws it is not necessary to remove them.

    Darkwolf Darkside -

  4. RwISVSeNWEEMabNP
    RwISVSeNWEEMabNP
    MpnwlFakAusPfs3P
    ESDnXEfXK21LaofB
    • Ziehe die Abdeckung des unteren Rings vorsichtig mit der Hand ab.

    • Es ist hilfreich, die Basis des Controllers mit deiner anderen Hand zusammenzudrücken (wie im zweiten Bild gezeigt), um das Entfernen der Ringabdeckung zu erleichtern. Dadurch wird das Ablösen der Klammern vereinfacht und es kann vermieden werden, dass sie kaputt gehen.

    I found the re-assembly of this difficult until I concentrated on two areas - the lugs which go into the handle first, then the central ring. My earlier concern was for the optical sensors on the wings but these snapped into place easily as the central ring was manoeuvred.

    Doug -

Abschluss

Um dein Gerät wieder zusammenzubauen, folge den Schritten dieser Anleitung in umgekehrter Reihenfolge.

Ryan Grewohl

Mitglied seit: 02/10/17

828 Reputation

3 Kommentare

Where do you get the replacement parts?

dmitri.walker -

Vive dont less these parts we need to 3D print them its a Nightmare RN for business especially arcades

superseani2 -

My controller only has 2 screws that are different sizes than a t5 and the 3rd is completely covered up by plastic. I have the sticky button problem, halp pls

bizkidjordan -