Einleitung
SSDs use a technique called wear-leveling, which distributes data evenly across the drive to avoid certain blocks being used more than others. As a result, when a file is deleted from an SSD, the data is not removed from the drive immediately. Instead, the SSD marks the area as invalid and keeps the data until the block is needed again, at which point the SSD will write over it with new data.
However, unlike HDDs, data recovery from an SSD is much more challenging. This is because an SSD's wear-leveling technique means that data is spread out over multiple blocks, making it difficult to recover the complete file.
To securely erase data on an SSD, it's necessary to overwrite the data with new data or perform an ATA Secure Erase command. The ATA Secure Erase command tells the SSD to erase all the data on the drive, including any data that may be hidden or inaccessible. This command also resets the encryption key that was used to encrypt the data, rendering the data unrecoverable.
The only surefire way to ensure that data is irretrievable from an SSD is to physically destroy the drive, especially if the ATA Secure Erase commands were not properly implemented in the device firmware. This could be due to firmware bugs or vendor-specific implementations that do not properly execute the ATA Secure Erase command.
Encrypting your drives from the start is an excellent way to protect your data and make the erasure process simpler. When you encrypt a drive, the data is automatically encrypted as it is written to the disk, and the encryption key is securely stored in memory. To securely erase the data on the drive, you only need to delete or destroy the encryption key, which makes the data on the drive unrecoverable.
If you were looking to destroy data on a HDD, take a look at my companion guide here How to safely and securely destroy hard disk data
-
-
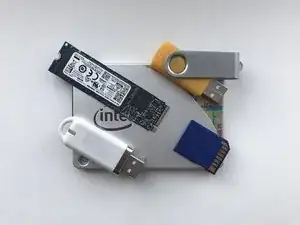
The first step is to open the device in order to expose the storage chips.
-
In the case of an SSD, if you're lucky you may only have to remove the screws holding the lid on (ignoring warnings about voiding the warranty). Otherwise, and for other devices, look for any crack between two halves of the case which might give you a weak point you can work on. You may need a hammer or a dremel with a cutting disk.
-
When you get inside you will see a circuit board with components on one or both sides. The largest of these will be the memory chips, and may be mounted on both sides of the board. There will be one or more similar looking but smaller controller chips which you probably don't need to worry about.
-
-
-
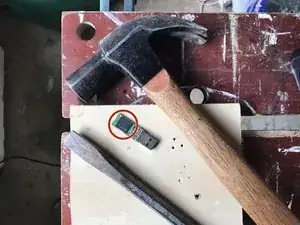
With the device on a firm surface, place the tip of the cold chisel across the middle of the memory chip and strike the cold chisel firmly with the hammer.
-
The chip should split neatly in two. Half of it is likely to take flight - make sure there are no children around with their eyes at a similar level to the chip.
-
Repeat for all other memory chips on both sides of the board.
-
-
-
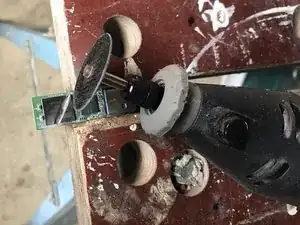
If you had to use a dremel to open the device you can use this as an alternative to the hammer and cold chisel.
-
With a cutting disk, grind through each memory chip until you can see the circuit board underneath.
-

To reassemble your device - err, forget about it!
But please dispose of the remains of your day’s work responsibly, in a manner appropriate for electronic waste.