Einleitung

Disassembling the monitor allows for replacement of various internal components such as the charging port, screen, speaker, or antenna.

  1. GOcvjwfgMcdXpsse
    GOcvjwfgMcdXpsse
    ZsNhD23SUDoHGrU5
    jT1ghDUBpspqWsjW
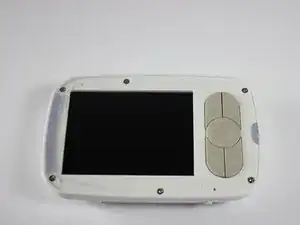
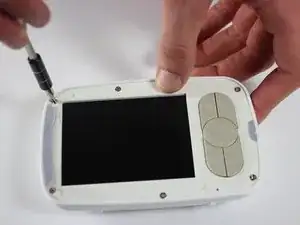
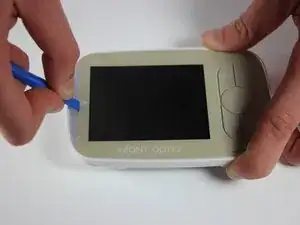
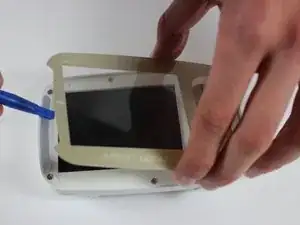
    • Using the plastic opening tool, remove screen protector from front of monitor.

    There's a layer of adhesive between the screen protector and the white plastic behind it.

    Jared Astillero -

    The cover is glued on. So you’ll nee d quite a bit of force to bend it up. But then it’ll come lose glue point by glue point. At first I was afraid that I’ll break it.

    Marco Smolla -

  2. N5QZknKvCQOlQXcL
    N5QZknKvCQOlQXcL
    GhBMVduKGErGhmVM
    lI14wgJlKmQ6WYFx
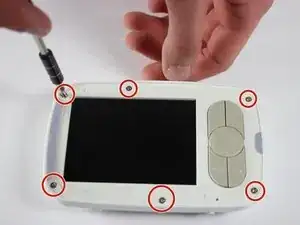
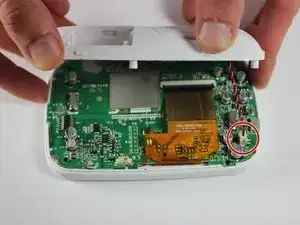
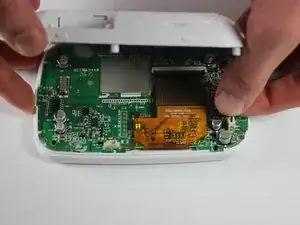
    • Remove the six 4mm screws using a Phillips #00 screwdriver.

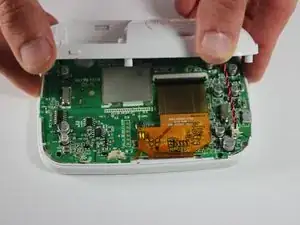
    • Remove the screen, exposing the circuit board.

    • Turn device over to expose rear circuit board.

  3. eZKvBkxC6t3jITrS
    eZKvBkxC6t3jITrS
    PhVBd2P6MqTojxIG
    dGHmHmoHMHY1YTkv
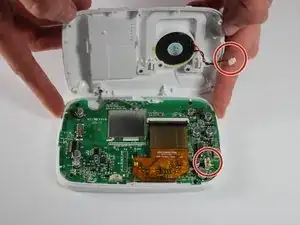
    • Disconnect speaker from monitor for ease of access by unplugging wire.

    Thank you so much for this - and thank you to the commenter who walked through the additional screen replacement steps! I’ve never done anything like this and I managed to replace the screen myself.

    Lauren Skinner -

Abschluss

To reassemble your device, follow these instructions in reverse order.

Peyton Ulrich

Mitglied seit: 25/01/17

491 Reputation

26 Kommentare

Great walkthrough. One suggestion i have is to make sure to remove the battery before doing any of the disassembly. Great guide!

Derrick Brown -

Any idea where I could buy a replacement screen though? I just dropped mine and the screen is broken. The front plastic is still undamaged.

Jon Woolery -

I bought a Sharp LQ035NC111 LCD Display eBay for $8.46 and it did the trick

Nathaniel Wolf -

Do you know where I could buy a replacement screen for this device? I just dropped mine and the only damage that I can see is a crack in the LCD that is making the image almost entirely unviewable.

Jon Woolery -

I replaced mine with a “3.5" Inch QVGA 240x320 TFT Color LCD Display Module LQ035NC111 54pin” I found on ebay for $8.81, works great.
Just Being Helpful -

Anyone know where I could get a replacement switch for the on/off switch on this unit? Seems to be a simple component but I’m not sure where I could pick one up.

any thoughts?

Andrew -

Did you ever find one? Ours was dropped and I think my switch is little wonky now.

red_wyatt -

Hi, thank you for the guide here. I was able to take it apart easily. I need to replace the charging port. How do I do that? It seems that it is glued to main part. Thanks

K hand -

Did you manage to replace?

aboelzaz -

Can anyone advise if they managed to replace the charging port? If yes please let me know how and from where to get the port. Thanks

aboelzaz -

Looking for the same thing. Charge port failed. Does anyone have any input here?

Dr Daffy -

My toddler spilled water all over the monitor, and the screen is all grey/black permanently, and the sound only comes through if it’s feeling up to it. Anyone know where I can get a replacement monitor alone??

Ingrid Fanella -

My toddler threw the monitor in the bath tub and it got wet for a few seconds. We dried it off and it wouldn’t turn off. We unplugged the battery, and now it won’t turn on. Is this fixable or should I look for a new monitor?

ajrittle -

I’ve tried to pop the screen off but it’s really tight on there. Is that just the glue holding it down? Do I need to just keep pushing?

Allyson Pittman Gattin -

See below if still need answer, I have posted all the missing steps.

Hresna -

This is guide is missing a lot of steps. Like how to take the actual screen off. This only shows you how to take the plastic off

Keith Lee -

for anyone who has replaced the screen, is it glue holding down the screen or is there a better way to take it off? Also, how should you removed the band from the circuit? TIA

Matthew Cyriac -

I have posted all the missing steps below if you still need this answer.

Hresna -

[1 of 3]

Lol, yes, many steps are missing. Thankfully, I was successful in replacing mine and took enough photos I should be able to recall it here.

-Once you finish ifixit’s step 3, you have 4 black screws to remove to get the motherboard free from the front cover plate. The round button in the middle will likely fall out of place. Note also that the power button is loose, and a very tiny black gasket (which I am pretty sure goes in the center of the round direction pad buttons).

-The screen is affixed to the front of the motherboard via two vertical strips of thin padded double-sided foam tape. I used a spudger to gently worm through that stuff from both sides (careful on the inside edge not to damage components on the motherboard) and prise the thing off.

The screen frame is pretty fragile and got bent out of shape. The ribbon also tore at some point during that, so I ended up cutting it. Good thing the screen was already broken.

Hresna -

[2 of 3]

-The connector ribbon is clamped into place by the black portion of the connector, which rotates upward. Don’t try to pull the ribbon with the bar down… use a tiny plier or tool to flip it up first. The new ribbon slides snugly into place without much force. It seemed to seat itself properly without difficulty but, I personally picked the inside edge as a guide (arbitrarily).

-This is a good time to test that it works, either by connecting the battery (note the connector for it is not in the backplate anymore) or the USB / power connector (depending which version you have).

-Then you fold the screen around into place and I just let it sit gently on whatever residue of the foam tape was left, ensuring it was snug against the power button at the top.

Hresna -

[3 of 3]

-Now you have to put the sandwich back together. I seated the motherboard back not the backplate, put my black gasket roughly in the middle of the four buttons, and the circular d-pad on top of it (note, that the little fins go on the outsides, not up and down). Then, ensuring the power button was in the right spot, placed the cover down over top. Then I flipped it, removed the back cover, and re-inserted the black screws for the motherboard. Reconnect the speaker.

-Flip it over again, and put in the silver screws for front plate. There’s enough umminess left in the screen cover to plop that back into place.

Hresna -

just a note, you can try gently removing the frame on the damaged screen before attempting to remove the entire structure from the adhesive. I just did this and it worked just fine. it would be easily bent though. the replacement screen 3.5" Inch QVGA 240x320 TFT Color LCD Display Module LQ035NC111 54pin has an extra enclosure if you damage it.

Joe F -

Hi, I wonder to know where I can by the lcd screen to replace it on my Infant Optics Monitor? Do you have the link/website where I can find it, please,?

kibe_klang -

Could you send my the ebay ink to the seller please?

kibe_klang -

Great walkthrough! Any idea what to replace if the device keeps freezing up (screen is still on, but the picture audio locks in place)? I'm thinking capacitors maybe?

Jordan Sites -

my 18 month old decided to drop it in the dog’s water bowl! opened it up to dry it. Wish me luck!:)

Mi Aba -