Einleitung

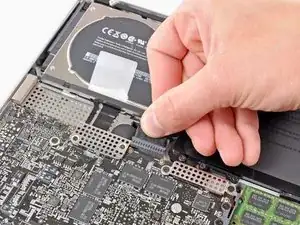
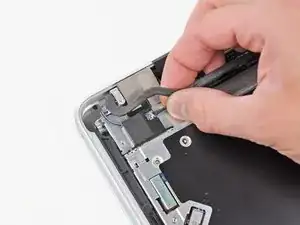
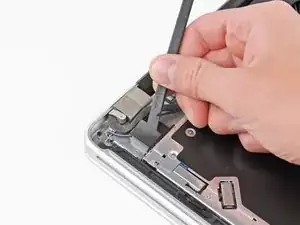
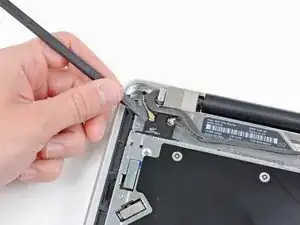
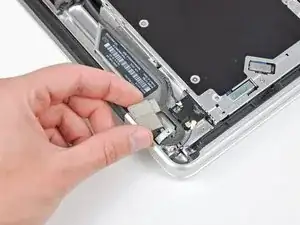
There are many benefits to adding a second drive (either HDD or SSD) to your laptop, such as improved speeds, greater storage space, and less heartache when installing new software. Use this guide to install one using our optical bay hard drive enclosure.

Warning! If you have an older 3.0 Gb/s (SATA II) based system you need to make sure the drive you use is able to run at this slower speed. Review your drives spec sheet, make sure it clearly lists compatibility with 3.0 Gb/s (SATA II) systems. Most drives sold today are fixed speed 6.0 Gb/s (SATA III) which won’t work in 3.0 Gb/s (SATA II) systems properly.

  1. syE2ybccRrcFeJJi
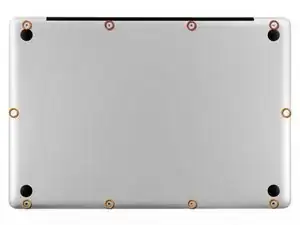
    • Remove the following ten screws securing the lower case to the upper case:

    • Three 13.5 mm Phillips screws.

    • Seven 3 mm Phillips screws.

    important to reassemble the "lower case" successfully: the threads of the seven 3mm phillips screws are drilled at an angle :-/

    mysterioes -

    Same issue with me. After reassembling my 13-inch and my 17-inch, one of the screws are sticking out ever so slightly. Very annoying, especially since I scratch whatever surface I'm on now.

    Kyle Spadaro -

    Very important note; this guide is NOT correct for the Macbook Pro 17" A1297 late '11.

    The A1297 has an assembly adjacent to the optical drive, identifiable by 4 antenna connectors, 1 usb cable (with very small connector) and one PCI-e flat cable running across the optical drive.

    I did not take pictures, but found one on the web. I'm very new to iFixit and have no idea yet on how to create a guide, but here's the picture showing the assembly on top (this pic only has 3 antenna wires, the A1297 has 4, but at least you'll know what to look for.

    - carefully undo all connections and 2 screws

    - remove the assembly and flip it over

    - again carefully remove the shielding tape

    - undo 3 tiny screws

    - gently pry the airport card from the assembly (the flat cable will be a bit of a pain)

    - reverse process with replacement card.

    image can be found here:

    https://dl.dropboxusercontent.com/u/2446...

    Remon -

    It helps if you mark the holes where the long screws go so you can easily find them when the time comes to button things up. Also, a little dish or custard cup to hold those tiny screws is essential.

    Human -

    3 x 13.5 mm screws are actually TWO different types! Return to EXACT SAME HOLES.

    -I discovered this on my mid-2010, but from comments, sounds like it may affect other models as well

    2 x 13.5 mm screws are pointed ends

    1 x 13.5 mm screw is a FLAT end <- CORNER HOLE

    These areTWO slightly different lengths, and must return to correct holes. If you put the flat end screw in the wrong hole, it will stick out slightly. If you put either of the pointed screws in the wrong hole, they will go in all the way, but will not catch threads, and will simply fall out when laptop is flipped back over.

    scottbernardis -

    I printed out the image above and taped each screw to the photo as I removed each one, just to make sure I put them in the right location.

    Grace Morris -

    This is a brilliant suggestion! I did this for all the steps that involved removing screws, numbered the sheets, and that made it very easy to put it all back together in reverse. Thanks!

    Steve Adamczyk -

    Be sure to use Loctite on the screws when re-attaching the bottom of the computer. The screws can and will fall out once they have been removed for repairs if you do not put Loctite on them when you reuse them. Otherwise, purchase new screws before repairing the computer as the new screws come with Loctite material on them. (I have personal experience with this problem.)

    johnpartridge -

    Be sure NOT to Buy this Battery from iFixit. I bought it from eustore.ifixit.com and the Condition of Battery is : Service Battery ,

    from the &&^&^$^ first day.

    Till today my battery Cycle Count is: 80.

    I’ve tried everything as: Battery Calibration, resetting the SMC, PRAM, reinstalling the battery,

    and Service Battery warning still there.

    Just DO NOT BUY crappy, trash from here.

    I have very bad experience.

    Doruntin Koci -

    Hi Doruntin,

    we’re more than sorry to hear about your bad experience.

    I’ll inform our customer service team who’ll reach out to you and offer either a replacement or reimbursement.

    If ever you’d need assistance again, please feel free to directly write to eustore@ifixit.com, as comments are not regularly checked for service issues.

    I’m confident that we’ll find the solution that suits you best!

    Sandra Hiller -

    PLEASE OBSERVE: The image of the left speaker used is NOT for a 2011 model. A 17inch MacBook Pro A1297 - LEFT SPEAKER + MICROPHONE - 2011 has IDENTIFYING NUMBER: Apple Part #:922-9821, 922-9822. And its COMPATIBILITY: 17 inch MacBook Pro Unibody A1297 - Early 2011 MC725LL/A 2.2 i7 - Early 2011 MC725LL/A 2.3 i7 - Late 2011 MD311LL/A 2.4 i7 - Late 2011 MD311LL/A 2.5 i7

    kenneth krabat -

  2. FWQlrWBX33M4QNJC
    FWQlrWBX33M4QNJC
    eqC63VPAuJvHpSVE
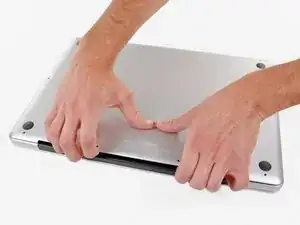
    • Wedge your fingers between the lower case and the vent, and lift upward to release the two clips holding the lower case to the upper case.

    • During reassembly, carefully align the lower case and then press it firmly until both clips engage.

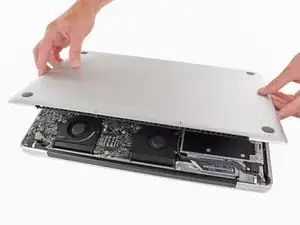
    • Remove the lower case.

    I recommend using anti-static protection, i.e., wearing a ground strap, or at least touch metal chassis inside the computer before unplugging cables. Otherwise, you might create an ESD discharge into your RAM and have to replace it like I did!

    d68ef792 -

  3. IY3hYv13cwDkbBZo
    IY3hYv13cwDkbBZo
    atoPupptXJoHHWsm
    tVLmCpvOQX5JxfZV
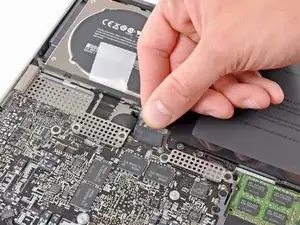
    • Whenever working near the logic board, it is always wise to first disconnect the battery to avoid short circuits.

    • If present, grab the plastic tab attached to the battery connector and pull it toward the front edge of the device. For Late-2011 models the battery connector will not have a tab and is simply a plug that inserts straight down into the motherboard--to remove pry the plug straight up.

    • If the plastic tab is missing, use a spudger to pry the connector up from its socket.

    • Pull the tab parallel to the face of the logic board.

    This step is a little difficult in reverse, that is, when re-attaching the battery. It helps to tilt the laptop up so you can see the edge of the board that accepts the plug. It may look like there are two slots for it, it goes in the bigger slot that is further away from the board.

    yary hluchan -

    Is this step really necessary? It is not part of the instructions how to replace the HDD in Apple's User Manual of the 2011 17" MBP.

    Tobias Hahn -

    As it says in the step: "Whenever working near the logic board, it is always wise to first disconnect the battery to avoid short circuits." It is not required, but it is simple insurance to avoid a $1000+ repair should you accidentally short components on the board with something metal.

    Andrew Bookholt -

    There was no tab on my model. Battery is affixed to board and screws must be removed.

    bhodges2 -

    Mine also, and looks as if removing connector could damage motherboard.

    Stephen -

    The battery on my 17” mid-2010 (MC024LL/A -A1297 ) is held by 3 specialty screws CR-V1 (3-wings similar to Mercedes-Benz tri-star)

    It has a tab which I pulled straight up

    The connector to the motherboard came away easily by pulling toward the front edge.

    Peter Grierson -

    * There is no tab on the A1297 (late 2011) model's battery connector. Be careful with the connector, it chips off the edges easily! Otherwise the same as bhodges2 & Stephen's notes.

    ** (Pleas also include the exact Model and Part numbers like P/N: MD311D/A; Mod.: A1297 in the comments and notes for your MBP)

    Pingumann -

    Why are there no guides for the Late 2011 17" MacBook Pro A1297 (2.4GHz i7 quad core, MD311LL/A)??? I just replaced the RAM in mine and discovered that not only is there no tab on the battery connector, but the connector pulls straight up, perpendicular to the logic board, rather than parallel. I almost ripped the wires out of the connector by trying to pull it out parallel to the logic board like this guide instructed! After finally getting it out, my advice to those with the Late 2011 model is to use a spudger to loosen the edges of the connector then lift the connector straight up to get it out safely.

    Dave -

    I replaced the display on my late 2011 model and noticed that it was quite different than the tutorial given here so I detailed all the differences to help others with late-2011 models on my blog: http://johnfixesstuff.blogspot.com/2014/...

    jmueller -

    I just put an SSD in a model #A1297 - MC226LL/A and the battery connector had to be removed by pulling it parallel to and away from the logic board — in other words, not up. I was definitely a bit confused when I tried to pull it up.

    Doug Hogg -

    With some dexterity and carefulness, the MagSafe could be removed from its place without the need to remove the whole logic board!

    Phil Boy -

    Same here, I used a head-band light to see it and got it done without removing anything but the battery connection, the charging port and the display data cable. Then I had to do it again because amazone sent me the wrong charging port, the board has different width between screw holes, and on closer look, different components soldered on, also. AND, one is labeled 2008, the other 2009… make sure you get the correct one, the other ( “wrong”? ) might work, but I’m not risking it! So why does the 2008 fit in my 17” macbook pro(5,2) mid-2009 and the one labeled 2009 does not fit ? It is what it is…

    Tom Seaman -

    The battery on my 17” mid-2010 (MC024LL/A -A1297 ) is held by 3 specialty screws CR-V1 (3-wings similar to  Mercedes-Benz tri-star)

    It has a tab which I pulled straight up

    The connector to the motherboard came away easily by pulling toward the front edge.

    Peter Grierson -

  4. fL4HNo1lPsrDb1rO
    • Before disconnecting the camera cable, a small plastic retainer stuck to the logic board must first be moved out of the way.

    • Use the tip of a spudger to push the small plastic cable retainer away from the camera cable socket for enough clearance to remove the camera cable.

    This step does not apply to the A1297.

    Katherine Williams -

  5. xNVDxnvPenQ1WIjQ
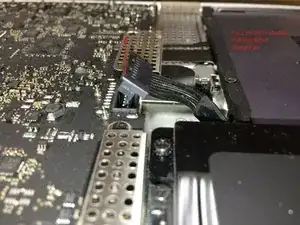
    • Pull the camera cable toward the optical drive opening to disconnect it from the logic board.

    • The camera cable socket is very fragile. Do not apply any upward force to this socket, as it may break off the logic board. Pull the camera cable parallel to the face of the logic board.

    • For Late 2011 models, the camera connector plugs straight down into the motherboard—to remove this connector, gently lift it straight up.

    My A1297 looks very different from this picture. The camera cable is not affixed with any plastic piece, it was a small blade connector that was at the top left corner of the mobo. It is removed by pulling it horizontally from the socket. It is my least favorite type of cable connection and the one most likely to be bent in the process (or the socket, be careful).

    maccentric -

    My mid2010 1297 was also different. Camera cable is per "step 7" here (http://www.shareyourrepair.com/2014/11/h...). Very very delicate.

    scottbernardis -

  6. 4yxJD4wJRo14Bh5s
    • Carefully pull the Bluetooth cable toward the fans to disconnect it from the Bluetooth board.

    • Pull the cable parallel to the face of the optical drive.

    Once again, this step, and the rest that follow regarding the bluetooth board, bears no resemblance to my A1297. Luckily, it looks like things have been made simpler. Remove the camera cable from it's socket, the bluetooth cable (flat, black, just shy of .5" wide), and the DVD cable from their sockets. Remove the screw from the top right side of the black plastic piece that holds the bluetooth board and all the skinny black cables. Remove the screw at the top of this piece that fastens to the hinge (look for the shiny metal). Then just lift that piece out of the way, remove the 3 screws holding the DVD in place, and you can pull the drive out (I just grab it by the orange cable and pull it out, but that's probably not the preferred method).

    maccentric -

    Again, also mid 2010 A1297, the large flat cable crosses the drive. Remove on logic board end by prying carefully "UP" away from the board. Step 8 here: (http://www.shareyourrepair.com/2014/11/h...)

    scottbernardis -

    I was switching the optical drive from my non-functioning 17" to my 15" (same early 2011 MBP) and I was confused, as the arrangement looked almost exactly like the arrangement in my 15" machine rather than what is pictured here. So one can follow the instructions for the 15" MBP here on iFixit instead if you don't recognise what you see!

    Lami -

  7. dykEom62YREuoSyW
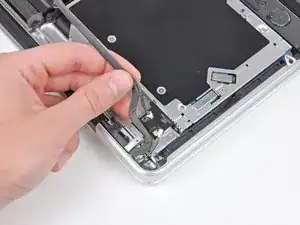
    • Use the flat end of a spudger to peel the thin plastic cover off the top and sides of the Bluetooth board housing.

    Is there any real need to remove these cables from the Bluetooth Board? Are you not able to simply conduct step 14 here instead, leaving cables in place, therefor not jeopardising integrity of the housing?

    Does the indicated Dual HDD housing replicate the holes found on the Optical Drive to allow this?

    Fletch Christian -

    mid 2010 A1297 again. Different configuration. I had a black plastic housing along this whole side. The large flat ribbon connects to it and I LEFT THE RIBBON IN PLACE on this housing. I removed 3 screws here to allow this black housing to be lifted off the drive and to the side, along with the camera line (held down by 3rd screw). When REPLACING this black housing after installation is complete, note there is a small tab on the disc slot side of the housing that needs to be inserted into a slot for correct placement. Then SKIP TO STEP 10 on this IFIXIT tutorial.

    scottbernardis -

    On the A1297, there is a 4” black bracket held by two screws. Remove those, a short and long one. The cable runs along the lower edge of the bracket and connects near the fan screw, near the optical drive connection. Remove that cable by print toward the optical drive in the direction of the cable, NOT UPWARDS.

    Katherine Williams -

  8. mMUpe3HjBQSGGtgh
    • Use the flat end of a spudger to pry the Bluetooth antenna connector up and off its socket on the Bluetooth board.

  9. 12YwqsCq22TxKYhC
    12YwqsCq22TxKYhC
    EmOuqEBZjJT6RmdS
    • If present, remove the small piece of EMI foam near the Bluetooth board.

    • De-route the camera cable from the slot molded into the Bluetooth board housing.

  10. KqKruKOGSOMiKPtS
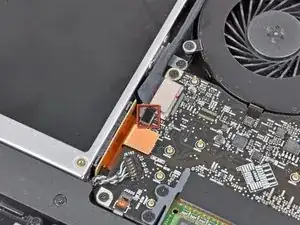
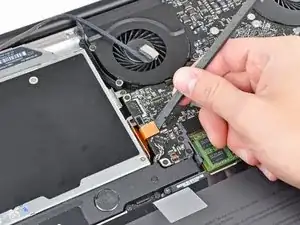
    • Use the flat end of a spudger to pry the optical drive connector up and out of its socket on the logic board.

  11. GqN3KxB2rMQHLqCY
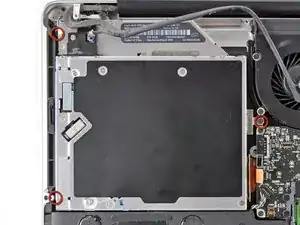
    • Remove the three 3.5 mm Phillips screws securing the optical drive to the upper case.

    • To remove the screw closest to the battery, it may be helpful to use a T6 Torx screwdriver to first remove the upper case bracket directly above it.

  12. NDUrggqg1qewMhDk
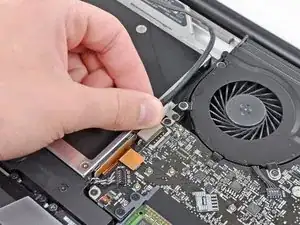
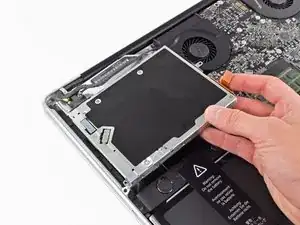
    • Remove the optical drive from the upper case, minding any cables that may get caught.

  13. 5vIAiPoGacNLKOyX
    5vIAiPoGacNLKOyX
    uHh5qXEwFRZNus3l
    pUapQi3DoyhVIdXb
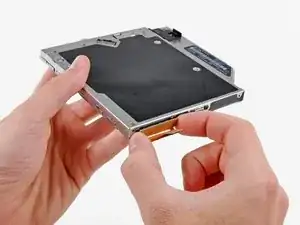
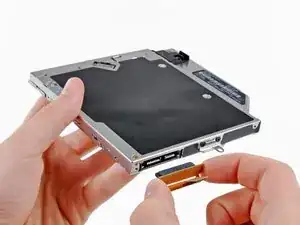
    • Grab the optical drive cable by its connector and pull it away from the body of the hard drive.

    • Pulling on anything but the connector may damage the optical drive cable.

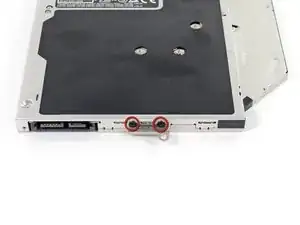
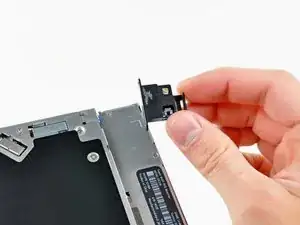
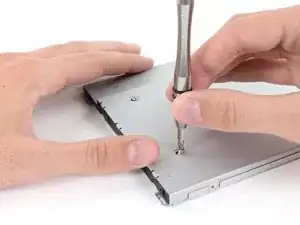
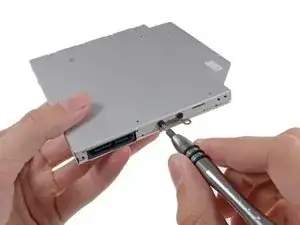
    • Remove the two black Phillips #0 screws securing the small metal mounting bracket. Transfer this bracket to your new optical drive or hard drive enclosure.

  14. umcWMKeyWw1gbyrk
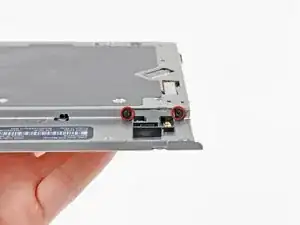
    • Remove the two 2.2 mm Phillips screws securing the Bluetooth board to the side of the optical drive.

    mid 2010 A1297. This is NOT HERE. Skip Step 14-15.

    Step 16 ((NEW)) (unless I am crazy, this was not detailed). After removing original drive, remove bracket (2 screws) from its side, and reuse on new drive. If you are confused which bracket, the drive is held in place with 3 screws. The 3rd screw on the center of the logic board side, goes through this bracket that you need to reuse. Top view of bracket can also be seen in Step 11 picture.

    scottbernardis -

  15. ljHlUnIGChSRHkgL
    • Remove the Bluetooth board from the optical drive.

    • Optical drive remains.

    what happens to the bluetooth board once you've removed it?

    Jayke Wright -

    install it on the new drive

    scottbernardis -

  16. WPcg6hfCMkTtjj2Q
    WPcg6hfCMkTtjj2Q
    ACPTZX2IFKQ1K4WT
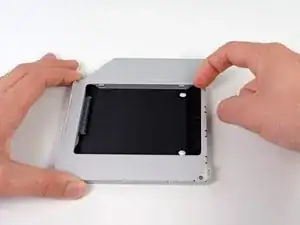
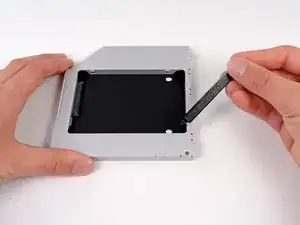
    • Remove the plastic spacer from the optical bay hard drive enclosure by pressing in on one of the clips on either side and lifting it up and out of the enclosure.

    is it 9,5mm or 12,7mm for the caddy? My stuff macbook pro mid 2010, need advice what size is compatible. Thank you

    Adi Purba -

    All Macbooks use 9.5mm Optical Drive Caddy, also, If you’re wondering as well, the Optical Drive runs at SATA II speeds just like with the main hard drive area, so if you’re using a SSD, then it’s going to run at a slightly slower speed.

    - PS5iscool - -

  17. NLZqqjQlYQPglXyI
    NLZqqjQlYQPglXyI
    xMhBlQkNdV4PwSMS
    UeALDwtY1rY2dJX4
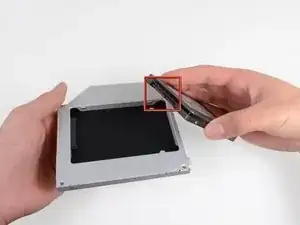
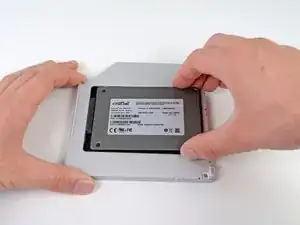
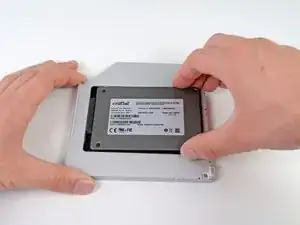
    • Make sure that the hard drive connectors are facing down before placing it into the enclosure.

    • Gently place the hard drive into the enclosure's hard drive slot.

    • While firmly holding the enclosure in place with one hand, use your other hand to press the hard drive into the enclosure connectors.

    Okay it seems like some models of MacBook Pro have issues with a fast (6Gbit/s) SSD in the optical bay. Even though my Mac says it offers 6Gbit on both bays it simply didn't work in the optical bay. So I switched places between the two drives and everything seems to work. My Mac booted from the old HDD in optical bay automatically and then I cloned it afterwards and changed the startup disk to the new one. As said before, don't put a fast SSD in the optical bay!

    Carl -

    This is an extremely late response to an old comment, but… whatev’s. My 2011 MacBook Pro had that issue: the main (HDD bay) SATA operated at 6Gbit, and while the optical bay said it was 6Gbit, the “Negotiated Link Speed” was like 1.5Gbits regardless of what you put in it (I can understand 1.5Gbits for an optical drive, but not for an SSD). Some of the early 2012 models did the same thing, from what I understand, but that was corrected pretty early on; both my 13” and 15” 2012’s run at 6Gb/s on both SATA busses.

    AJH -

    It’s not wise to swop the optidrive for an HD as there is no physical protection. The caddy is only intended for an SSD.

    Ben Ormerod -

  18. 4bUrYFHS5udDCnIj
    4bUrYFHS5udDCnIj
    Ayxd2pXAkaRgHAFN
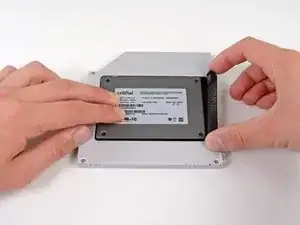
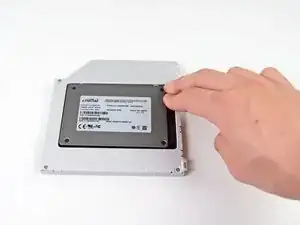
    • Once the hard drive is snug, reinsert the plastic spacer while holding the hard drive against the bottom of the enclosure.

    Normally with the HD enclosure there come a set of screws. use these to screw down the HD in the enclosure since you need to flip it up side down to reinstall it into the MBP

    Bart -

  19. oXd3ohEWeSgsIcWE
    oXd3ohEWeSgsIcWE
    QionNQlc1ANtll4c
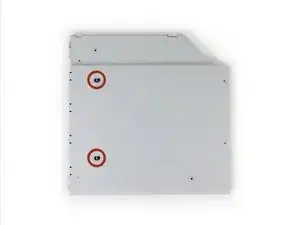
    • Use two Phillips #1 screws to secure the drive to its enclosure.

    Where are these screws coming from? Were they part of the original optical drive?

    Bradley DeHerrera -

    The new enclosure should include these two Phillips screws.

    Sam Omiotek -

    Can someone show the step of removal process of hdd/SSD placed in the caddy? I am unable to revert this process. Do we have to apply back greater force to remove back the hard drive/SSD from the caddy?

    Tarun Kumar Verma -

    Gads, I wish they made a caddy where the optical drive was removable without having to remove the entire caddy. That is a major peeve of mine. Like… just mount it the other way! I don’t want to have to go through this entire process every time I upgrade the secondary drive.

    AJH -

    These screws seems to be located in different places on different enclosures. I had serious trouble getting the SSD that the previous owner of this MacBook installed out of the enclosure until I realized the screws holding the SSD in place were on the side and not on the bottom. In case anyone else has the same issue!

    nessie1001 -

  20. wULpD1PuEZU6bo1R
    • Attach the optical drive bracket to the new enclosure with two Phillips #0 screws.

    • Reconnect any cables you have removed from the original optical drive onto the optical bay enclosure.

    Replaced the optical with hdd, as well as replaced the hard drive with an ssd. Now I get the circle with a line through it. But, when I hold the option key down, it gives me both hard drives, PLUS, the thumb drive I have in the USB port with a Mountain Lion installer. It even shows the recovery disks, but gives me the circle with the line when I choose one. Any help is appreciated.

    claude -

    Mate,

    My mbp shipped with OS 10.8, and I had upgraded twice to 10.10

    I've a 10.7 USB which upgraded my old MBP.

    My plan today was to boot with my new ssd, my time machine back up and the Lion usb plugged in.

    I would then click on the Lion usb, and tell it to put the OS and time machine back up on the ssd.

    So I help down ALT and when it started it gave me the options of the usual Mac internal or the Lion USB.

    I clicked Lion, but instead of taking me to the install options (Disk utility, restore from time machine etc etc) it gave me that grey circle with a diagonal line through it. The no entry sign - grey on grey - that I think you have.

    Some googling said that it is because I was trying to usb a 10.7 install on a MBP that shipped 10.8

    You can't go back, apparently.

    So if any of the OSs are older than the mac you got, you will get this error. The grey in grey no entry.

    I just cloned my HDD to my ssd (Carbon copy cloner free 30 day trial) using an external stat-usb3 wire and all is good.

    Rory -

    I have a 17" Macbook Pro6,1 unibody with an Intel Core i5, 2.53GHz. I was successful installing a 250GB SSD in the DVD bay, and I'm able to boot from it. I did this by first installing OS X 10.9.4 on the SSD mounted into an external HD case, testing the system to see if it would boot up into the SSD, then installing the SSD and carrier in the DVD drive bay. The system now boots up from the SSD with no problems. If you are having installation problems, I recommend trying this method.

    roger hall -

    I just have finished installing second SSD to my MBP (unibody 15` 2010).

    First one was changed like one year ago. Samsung 500GB SSD. It is in my HDD bay and I'm running system from it.

    Today I put a new Samsung 1TB 850 Evo 1 SSD in to my optic bay.

    I encounter problem with SSD not recognized by Finder.

    But It was recognized by Disk Utility.

    What I did was I erase new SSD by Disk Utility. Then the new partition was created and now It has been seen by Finder.

    So If you see it in Disk Utility just erased it.

    Some extra info in under this link--> https://discussions.apple.com/docs/DOC-4...

    Wish you all luck :)

    rybafly -

    My installation went great thanks to the guide. I did notice a small thing that might make a good tip, and that is to inspect all the visible screws. I saw one that was slightly raised, and when I poked around with the spudger, I found 2 more that had worked themselves out a bit. Its probably something super rare but at the age of these things, it wouldn't hurt to check.

    Tineyi Chapisa -

  21. 3GeKNgsubSw2qWpF
    3GeKNgsubSw2qWpF
    YDaOtdHe4DPnEmIx
    fWvjh13qskVLHsiF
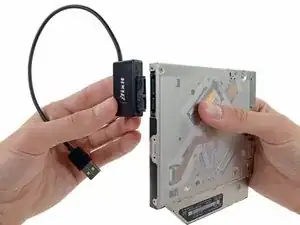
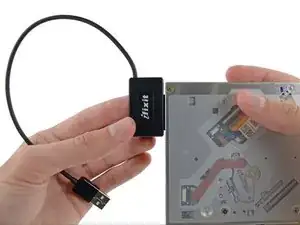
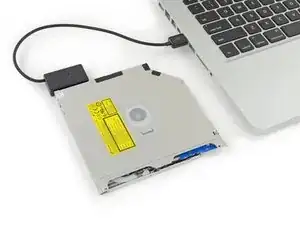
    • Don't ditch that drive! You can still use your optical drive externally with the help of our SATA Optical Drive USB Cable.

    • Align the cable's SATA connector with the drive's port and plug in securely.

    • Plug the USB connector into your laptop and your optical drive is ready for use.

    There is a small metal button in the front of the drive and you can use that to eject the drive if you were wondering.

    Joseph Landry -

    Maybe that explain the eject button mechanism maybe….

    - PS5iscool - -

    Die neue SSD wurde durch das Laufwerk ersetzt aber leider wird jetzt die alte HDD nicht mehr erkannt. Hatte schon ein anderer das Problem?

    Alexander Richter -

Abschluss

To reassemble your device, follow these instructions in reverse order.

Andrew Optimus Goldheart

Mitglied seit: 17/10/09

493949 Reputation

8 Kommentare

I went through these steps. I dint really have any trouble but now my computer won't turn back on. I have a fair bit of experience opening macbook pros, but I can't figure out what happened. I retrace the steps and look through everything but I can't see why it won't turn on. Any thing I can test? Any help?

signupjordanmathis -

I was able to use the original HDD for Time Machine backups and put a SSD in the original HDD spot, which is a great setup. Of course, I have backups going to a Time Capsule too. The only thing with my model MBP (mid-2011) is that I only get 3 Gigabit speeds, which isn't a huge deal since I'm mainly using the extra space for backups. I really like that I don't have to hear the DVD drive winding up and making spinning noises when I boot up anymore.

mtlangr -

When these steps are completed, I should be able to turn the machine on and it just work? No formatting or configuration needed?

David -
I just installed a SATA III SSD (Samsung EVO 850 1 TB) into my MBP late 2011 17” with the Highfine data doubler. It works like a clock so far - it’s been a week of booting from the optical drive at SATA III speeds. All discussions say this is impossible. It’s not and I’m getting 450 MB/s write and 500 MB/s read. It’s a miracle!

The caddy was $8.99 on Amazon

Erick McWayne -

Fantástico!!! I followed The Steps …. Very easy. Thank you

vilamoura2016 -

My mid-2010 17” MacBook Pro is VASTLY different around the optical drive than this guide shows. I’m not sure what model they are using here, but it is useless for many models it claims to work for. Please consider narrowing its coverage to only those models it covers. Thanks!

blazzo flazzo -

My comments echo, blazzo flazzo - January 5

Is there any change you will do a guide for this mid-2010 17” MacBook Pro i5?

Gordon -

Are you sure you are looking at the correct guide? There is the older 17” MacBook Pro 17" Models A1151 A1212 A1229 and A1261 Optical Drive Replacement.

There are a few differences between the Core 2 Duo and the newer i5/i7 series. but the guide is close enough to get you through it.

Dan -