Einleitung

Nach einer gewissen Zeit wird ein Akku schwächer und kann nicht mehr so lange verwendet werden. Diese Anleitung zeigt, wie du den Akku deines Lenovo Yoga 3 Pro erreichst und entfernst.

  1. L4UY2Ehcpga5T6FU
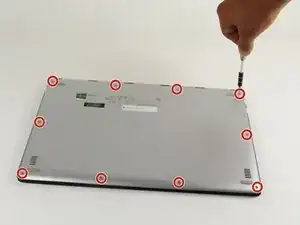
    • Bevor du beginnst, gehe nochmal sicher, dass der Rechner heruntergefahren ist.

    • Entferne die zehn 3,3 mm Torx T5 Schrauben an der Gehäuseunterseite.

  2. FhZsNHb4GEEZ1old
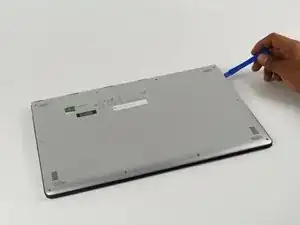
    • Schiebe ein iFixit Opening Tool zwischen die Gehäuseunterseite und den Rahmen, um den Rechner aufzuhebeln.

    • Fahre mit dem Opening Tool an der gesamten Unterseite entlang, bis sich alle Kanten gelöst haben.

    • Gehe sicher, dass du das Opening Tool nicht zu tief in das Gerät steckst.

  3. 2ManvTSsWRrd1BvD
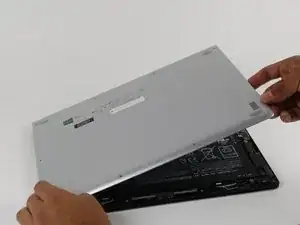
    • Entferne die Gehäuseunterseite und lege sie auf eine weiche Unterlage.

  4. Zu2hXZW5EjLqRLkC
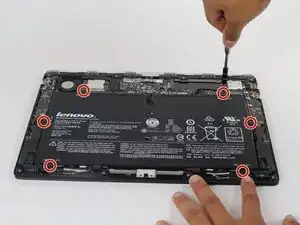
    • Entferne die sechs 3,6 mm #00 Kreuzschlitzschrauben, die den Akku fixieren.

    Hi

    I have a Lenovo Yoga 3 pro - 1370

    I take off the SSD without remove the battery. Is this a problem?

    TKS

    Stanley

    Stanleyslaw Castro -

  5. SeLo6RSnCK6ciITI
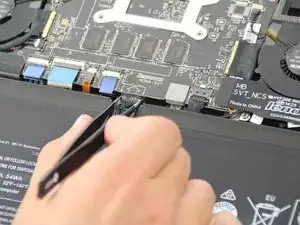
    • Greife den Akkuanschluss mit einer Pinzette oder deinen Fingern an den Rändern und ziehe Richtung Akku.

  6. Mb2uUJk5vWNA46Mp
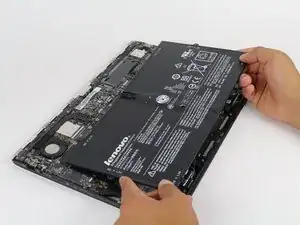
    • Hebe den Akku vorsichtig hoch und entferne ihn.

    If you have the right tools, this is really straightforward to do. Took me about 10 minutes. The instructions are very accurate.

    Kevin Lawless -

    Regarding the battery connector, the male plug is attached to the battery wiring (you will know what I mean when you look at it) and the female socket is attached to the logic board. There are small ridges on either side of the plug that can be grasped with fingernails to gently tease the plug out of the socket.

    Ron Westfall -

Abschluss

Um dein Gerät wieder zusammenzubauen, folge den Schritten dieser Anleitung in umgekehrter Reihenfolge.

Bitte entsorge deinen Elektroschrott fachgerecht.

Federico LopezCasildo Jr

Mitglied seit: 08/10/15

1307 Reputation

8 Kommentare

Very good and very easy to understand

barri.smith -

Your really good love watching how you take apart Samsung S5 me I want to take out my mother board

and replace it with a motherboard that recognizes Optus and also download the firmware which it cannot do right now

had it repaired stuffed the phone right up so not sure if I can do this as good as you have the tools

Raewyn Dowd -

does this same process work for a lonovo yoga pro 2?
Abi Alexander -

Awesome and simple! Thank you!

Hong K. Nguyen -

I have changed my battery and it won't turn on. I followed all the steps and the changing light won't even light up. My laptop with the old battery was working (only when connected). Not sure what to do next?

Erika

Erika Mackintosh -

I replaced the battery…easy peasy….but now the icon for ‘battery being charged’ has an X over it; reads….there is no batter…but obviously there is as I type this. It is not holding a charge it seems. It only works if the laptop is plugged in? Any suggestions? Thanks.

Ria Swift -

Having the same problem. Replaced the battery as instructed - process was simple. However, the laptop does not recognize the new battery; I booted up plugged into the wall outlet and laptop saying “no battery installed.” I reconnected the new battery exactly as instructed and as the old battery was connected before. PLEASE HELP!

Keith Ashton -

————————-

UPDATE: I uninstalled and reinstalled the battery… and now it seems to be recognized and is now beginning to charge.

Keith Ashton -