Einleitung

Meistens werden Kunstoffschrauben verwendet. Achte beim Zusammenbau darauf, dass sie nicht schief aufgesetzt sind und den Kunststoff beschädigen.

  1. JFe3hZpcNcMwfMMY
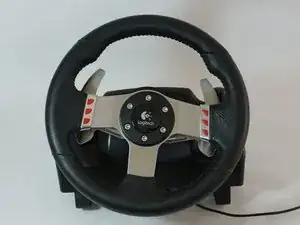
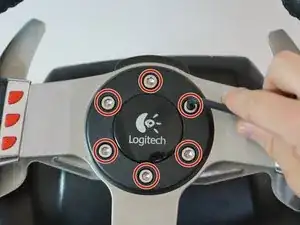
    • Entferne die sechs grauen 25mm Sechskantschrauben mit einem 4mm Inbusschlüssel.

    • Sei vorsichtig, wenn du das Rad hochhebst, da an der Unterseite zerbrechliche Drähte hängen.

    • Hebe das Rad vorsichtig an, trenne es jedoch nicht vom Rest des Geräts.

  2. wnfiUv2VBuSB31AK
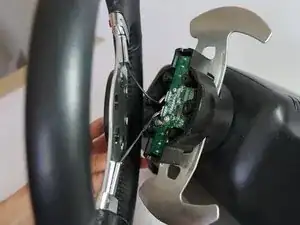
    • Hebe vorsichtig das Rad von der Nabe ab und lege die 2 Schaltpaddeldrähte und die Platine frei.

  3. NZhmVBB6Bqh3Wu2P
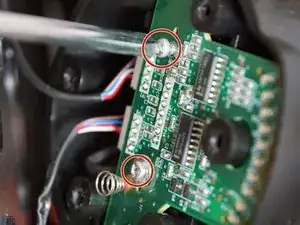
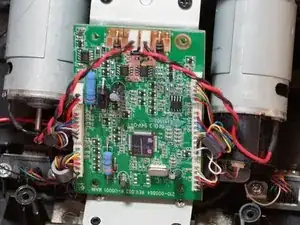
    • Entferne die beiden 7,5 mm silbernen Schrauben, die die grüne Platine im Rad befestigen, mit einem Kreuzschlitzschraubendreher # 1.

  4. foUkt5y4AwJkc2ET
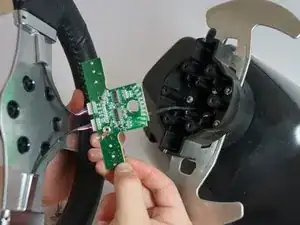
    • Entferne vorsichtig die Platine von der Radnabe.

  5. Qtmlc6TkePtrVyam
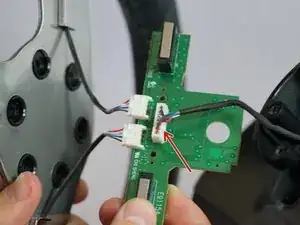
    • Fasse vorsichtig den großen 7-poligen Stecker unter der Platine und ziehe ihn ab.

    • Sei vorsichtig, wenn du diesen Adapter abziehst, versuche, nicht an den Kabeln zu ziehen, um sie nicht zu beschädigen. Wackle stattdessen um den Kunststoffverbinder herum, während du daran ziehst, um ihn zu lösen.

    These screws refused to go all the way back in for me, and one of them stripped completely. If this happens to you, you can get replacement screws that are shorter here - https://www.amazon.com/gp/product/B01MFA...

    This works for the G27, not sure about the G25 or any other wheels.

    Obviously the screws being shorter means the wheel isn't as strongly attached to the base in this direction, so if you have to do this remember not to put unnecessary stress on these screws by pulling the wheel straight off the base.

    SouthernPotato -

    bro i need new long cable i think and that connector or just replace the whole thing .. i put new grease, screw it more tight by the encoder so it woulnt go to the left .. wheel works verry nice tho all my buttons and shifter pedals wont work now tho the lights works dont know what to do now.. and now i kinda regreat opening it.. my wheel run so good now just these buttons are off not working at all and it kinda screws up midle of the game..

    Alexander -

    @alexdinpoik I’ve had the same problem when the 7 pin connectors blue and green cables broke off. First, only the blue one was broken which only took the led indicators gradual increase but all buttons were working then when i tried to plug in back, the green one broke off leading to none of the buttons working but the led indicators just working. Now i’ll try to fix it with iron soldering.

    Okan Akgül -

    okan can u pls share a video of you doing it? so i can do the “copy paste” hahah where can i buy cables and stuff i need for that? whats the name of these white connectors ? im new to this but share me a link to buy. i rather just try to fix it then buy a new wheel since its a great wheel compare to g29 that has bad software and the other wheels are to expensive. g27 cant be found in stores anymore neither and if im gonna buy one it has to be new haha hopefully u can share some knowlage thanks!

    Alexander -

    Where i can Buy the 7 pin cable for Main board please

    Ojilve jose -

    Hey guys!

    i broke the 7 pin cable anyone know where can is buy it? Thanks

    Richard Hajdu -

  6. FiRu5bFZLB5YBEuV
    • Du kannst das Rad jetzt vollständig von der Nabe entfernen. Lege es beiseite, bis du das Rad wieder zusammensetzt.

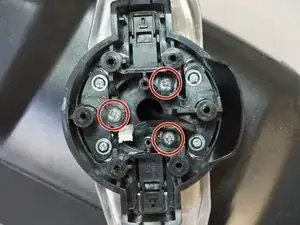
    • Entferne die innersten drei 37,5 mm silbernen Schrauben mit einem Kreuzschlitzschraubendreher # 1.

    • Entferne die Radnabe und schiebe den Stecker durch die Mitte der Nabe.

  7. hRAYY1mMrAVKZJFD
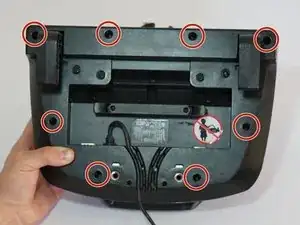
    • Lege die Radnabe zur Seite und drehe das Lenkrad Gehäuse herum, um an die Unterseite heranzukommen.

    • Entferne die acht silberfarbenen 15,9 mm Kreuzschlitzschrauben #1 am Rand der Unterseite des Lenkradgehäuses.

  8. UidVkwPtGC2eJLMK
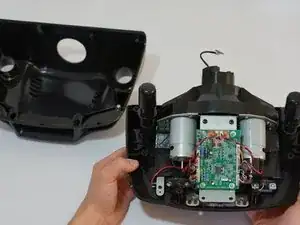
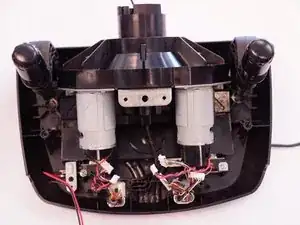
    • Drehe das Gehäuse wieder um und entferne die obere Gehäusehälfte, so dass die meisten Bauteile des Lenkrads sichtbar werden.

    • Lege die obere Gehäusehälfte zur Seite, du brauchst sie erst beim Zusammenbau.

    need two new black screes abouve the pcb board.. lost them need to know the size since the screws i replace it with was not exact..

    Alexander -

    Loosen the desk clamps before removing the housing, otherwise you risk breaking something. The housing should come off without having to use any force whatsoever.

    Oula Kuuva -

  9. AmPXsBqhnwifCPIb
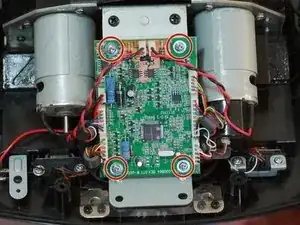
    • Entferne die vier silberfarbenen 7,3 mm Kreuzschlitzschrauben#1, mit denen die grüne Leiterplatte am Motorgehäuse befestigt ist.

    I’d do steps 9 and 10 in reverse order, the connectors are much easier to unplug while the board is secured in place.

    Oula Kuuva -

  10. CyrTKTeAZ5fqJSPi
    • Löse die drei Plastikstecker an der linken Seite der Leiterplatte.

    • Löse die beiden Plastikstecker oben an der Leiterplatte.

    • Löse die drei Plastikstecker rechts an der Leiterplatte.

    • Zum Abziehen der Stecker brauchst du ziemlich viel Kraft. Sei aber vorsichtig und ziehe nicht direkt an den Kabeln. Versuche die Steckerseite der Verbinder herauszuhebeln.

    • Beim Heraushebeln der Stecker kann eventuell ein Öffnungswerkzeug aus Kunststoff helfen.

    • Durch den Ausbau dieser Stecker erhältst du leichteren Zugang zu den vier Schrauben der Leiterplattenbefestigung am Motorgehäuse.

    Some of the connectors have locks on them, I would recommend this as a two person job.

    Reuben Andrews -

    I didn't take them off :)

    Evaristo Rivieccio Vega -

    I messed up and broke the cables of the 5 Pin Connector on the right. Can anyone tell me what it’s called so I can buy replacement? The Rest of the cable is stuck in there so I can’t re-use it sadly.

    Felix Weschke -

  11. a4odqtXHQyqDcUbg
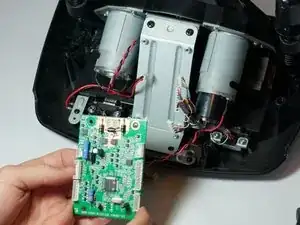
    • Wenn alle Stecker gelöst sind, kannst du die Leiterplatte entfernen.

    • Lege sie zur Seite.

  12. Hvf5BHMD5r3wZDec
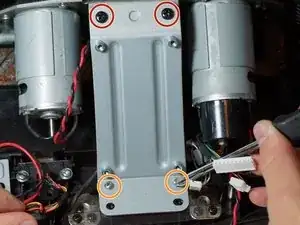
    • Entferne die oberen zwei schwarzen 12,3 mm Kreuzschlitzschrauben #2.

    • Entferne die unteren zwei silberfarbenen 15,5 mm Kreuzschlitzschrauben #1.

  13. q4XLbMAPFVVY2XSU
    q4XLbMAPFVVY2XSU
    EXbOLKj6XwlTA2Zp
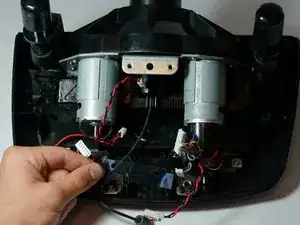
    • Entferne die Leiterplattenbefestigung und entferne das durchsichtige Kunstoffstück darunter.

    • Bewahre sie bis zum Zusammenbau gut auf.

Abschluss

Um dein Gerät wieder zusammenbauen, folge den Schritten in umgekehrter Reihenfolge.

Nicholas Gholdoian

Mitglied seit: 21/04/15

1090 Reputation

Ein Kommentar

Hi - help please. I disassembled my G27 and a 2 inch long semicircular metal clip fell out during the process. I don’t know what it is or where it came from.
tony davies -