Einleitung

Wenn "Tintenabsorber voll" oder "Tintenabsorber fast voll" auf dem Druckerbildschirm erscheint, ist es an der Zeit, die Tintenabsorberbox (und/oder die Spülkammer) zu ersetzen.

  1. qS4SgmUmhjRewDYm
    qS4SgmUmhjRewDYm
    24yKwPdrE1VSWLhE
    i2LnGl2sktFjS1PM
    • Bevor du mit der Demontage beginnst, schalte den Drucker aus und ziehe das Stromkabel ab.

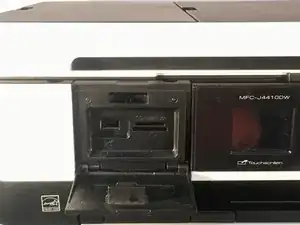
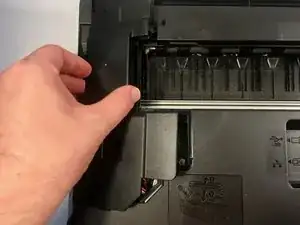
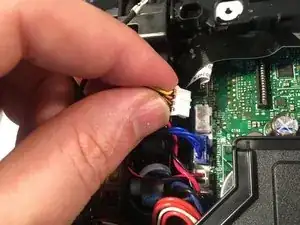
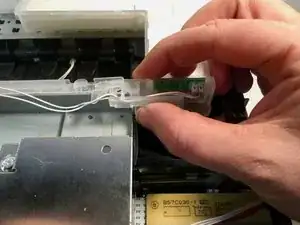
    • Öffne die vordere Zugangsklappe und entferne alle vorhandenen Karten und Kabel. Schließe die Zugangsklappe.

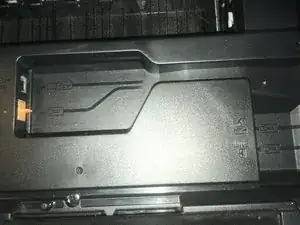
    • Entferne das Papierfach.

    • Entferne die Tintenpatronen.

    • Es empfiehlt sich das Schutzteil zu installieren, um zu verhindern, dass die Tintenschläuche austrocknen, während die Patronen entfernt werden.

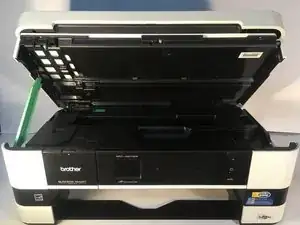
    • Öffne die Druckerabdeckung mithilfe der Fingergriffe an den Seiten.

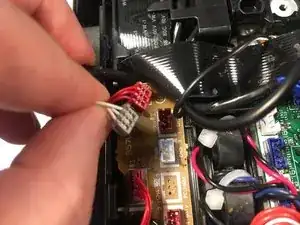
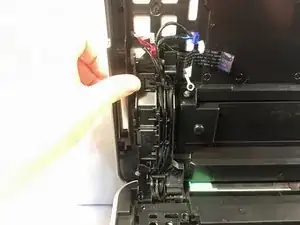
    • Trenne und entferne alle Kabel, die sich unter der Abdeckung befinden.

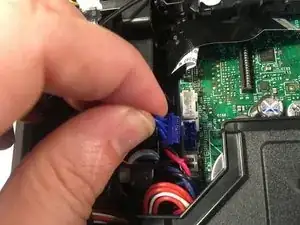
    • Entferne die Kappen des LAN-Anschlusses und des EXT-Anschlusses (sofern vorhanden).

  2. beafp1tFZWWSqYAT
    beafp1tFZWWSqYAT
    nAR5pPrA5wQSRkHw
    RtX1Gcd2BLlCMeLk
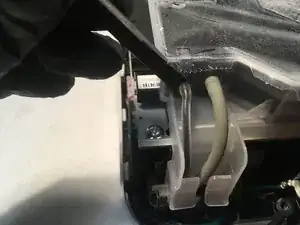
    • Halte die Abdeckung mit einer Hand und ziehe gleichzeitig am Haken auf der Rückseite des Stützdämpfers und entferne dann den Dämpfer von der Abdeckung.

    • Entferne den Dämpfer von der Stütze.

    • Drehe die Stütze hochkant und ziehe sie gerade aus dem Drucker heraus.

  3. TPMGxbNZbxHBRoxP
    TPMGxbNZbxHBRoxP
    LQCdkkxT1LqUIdWp
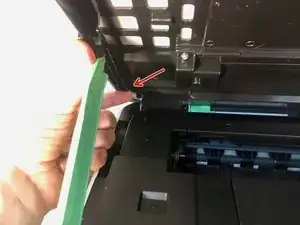
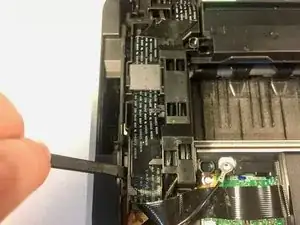
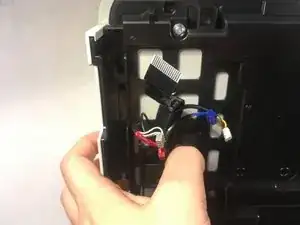
    • Verwende deinen Finger oder einen Spudger, um die beiden Laschen auf der rechten Seite der Kabelbaumabdeckung zu lösen, indem du sie nach oben hebelst.

    • Entferne die Kabelbaumabdeckung. Es gibt zwei Laschen auf der linken Seite, und eine auf der Vorderseite, die du frei rütteln musst.

  4. VEPexxLBGZPBR5Tl
    • Entferne die 6 mm Kreuzschlitzschraube #2 vom Erdungskabel des ADF-Motorkabelbaums.

    • Drehmoment: 0,40 ± 0,10 Nm

    • Das Brother-Servicehandbuch listet zwar Drehmomente für alle Schrauben auf, allerdings sollte das genaue Drehmoment nicht unbedingt erforderlich sein.

  5. 3tmQQleiDFRa6foD
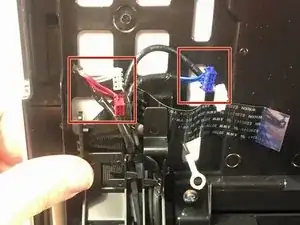
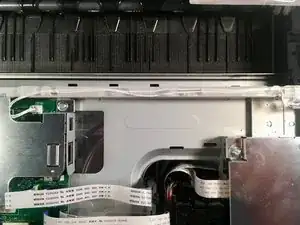
    • In den folgenden Schritten wirst du die folgenden Kabel abtrennen:

    • CIS-Flachbandkabel

    • Motorkabelbaum des Scanners

    • ADF-Motorkabelbaum

    • Kabelbaum für Dokumentenerkennungs-/Dokumentenscanpositionssensor

  6. UDhGgsGch5GO3MpI
    • Ziehe das CIS-Flachbandkabel aus seiner Buchse.

    • Ziehe alle Flachbandkabel direkt nach oben aus ihren Buchsen, indem du an den blauen Laschen an den Kabeln ziehst.

  7. m2gFNs3NvutDtKU6
    • Ziehe den Kabelbaum des Scannermotors aus seiner Buchse.

  8. PVNLe6LZsH6Vdn2F
    • Ziehe den Kabelbaum des ADF-Motors aus seinem Anschluss.

    Motherboard connector can be white

    Filipe Geraldo -

  9. aqa55HL1QLmjlfiF
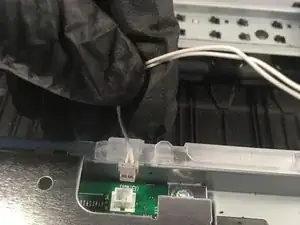
    • Ziehe den Kabelbaum des Dokumentenerkennungs-/Dokumentenscanpositionssensors aus seinem Anschluss.

  10. oNRVL1tL525KAgiU
    oNRVL1tL525KAgiU
    jEEWd4aDhSmR26sX
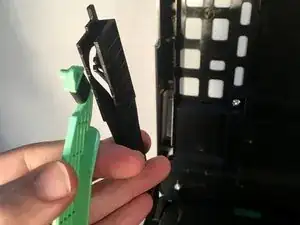
    • Setze einen Spudger zwischen die Halterung des Scannerkabelbaums und den Rahmen, um die Lasche zu lösen. Auf der gegenüberliegenden Seite befindet sich eine zweite Lasche.

    • Hebe den Kabelbaumhalter des Scanners aus seinem Rahmen.

    • Hinweis für den Zusammenbau: Bevor du den Kabelbaumhalter wieder anbringst, ist es ratsam, die Abdeckungshalterung (Schritt 2) wieder anzubringen, um die Spannung an den Kabelbäumen zu minimieren.

  11. OUEeUpcMSLVFVDBG
    OUEeUpcMSLVFVDBG
    jJiPeFHYdaZMZNMJ
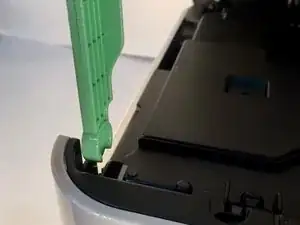
    • Drücke auf die Lasche, um den Kabelbaumhalter des Scanners an der Scannerabdeckung zu befestigen.

    • Entferne den Dokumentenerkennungs-/Dokumentenscanpositionssensorkabelbaum und den ADF-Motorkabelbaum von der Scannerkabelbaumhalterung.

    • Lege beim Wiederzusammenbau eine 20 mm dicke Unterlage (Buch, Papierstapel) auf das Scannerglas, schließe die Scannerabdeckung, und führe dann die Kabelbäume durch die Kabelbaumhalterung. Dadurch wird die richtige Gurtspannung sichergestellt, um das Scannen dicker Bücher zu ermöglichen.

  12. hL3CSXTLfOKawRYu
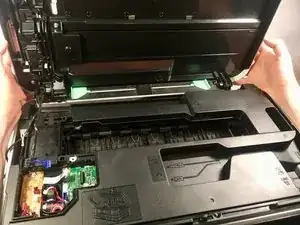
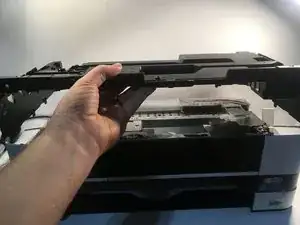
    • Ziehe die Scannerabdeckung mit beiden Händen nach hinten, während du sie senkrecht hältst, und hebe sie dann vom Drucker weg.

  13. ZmitCqKZEyXfOYpI
    ZmitCqKZEyXfOYpI
    61ZPBh1jmVZ2dFFF
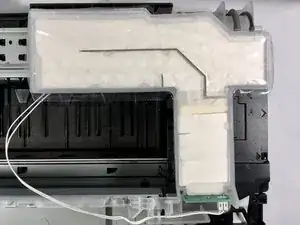
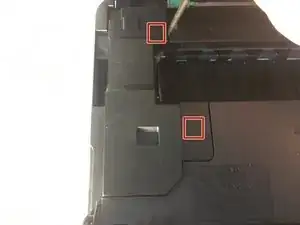
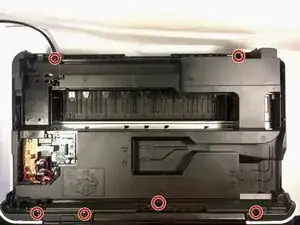
    • Entferne die sechs 12 mm Kreuzschlitzschrauben #2, mit denen die obere Abdeckung am Drucker befestigt ist.

    • Drehmoment: 0,70 ± 0,10 Nm

    • Ziehe die obere Abdeckung ab.

    • Stelle bei der Neuinstallation sicher, dass der Kabelhalter des Bedienfelds in seinen Schlitz an der oberen Abdeckung gleitet.

  14. 3xhB2pNtp6CPilZt
    3xhB2pNtp6CPilZt
    ZgAViGWMUm5Fe3xW
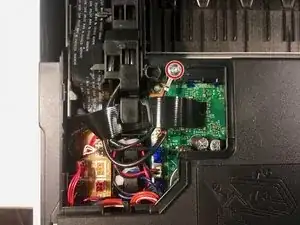
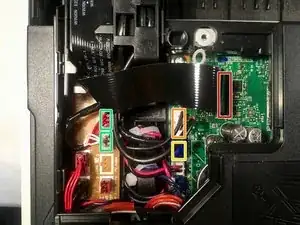
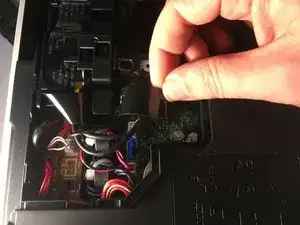
    • Entferne den Tintenabsorber-Füllstand-Sensor aus seiner Fassung.

    • Entferne die Verkabelung aus ihrer Führung.

  15. lohxJ1yoqn2wjIbK
    • Löse den Tintenabsorber aus der Führung, indem du ihn nach oben und rechts ziehst.

  16. RHU5xNxgNRhDks1D
    RHU5xNxgNRhDks1D
    jjPvEmCQ3yFZfSqv
    nCnnLQDtLxBs5yYk
    • Drehe den Drucker für diesen Schritt so, dass die Rückseite zu dir zeigt.

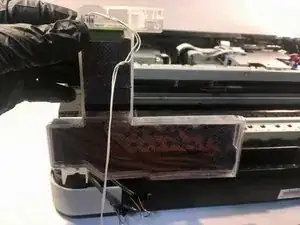
    • Entferne den Ablaufschlauch und den Entlüftungsschlauch aus der Tintenabsorberbox. Ein Spudger kann dabei hilfreich sein.

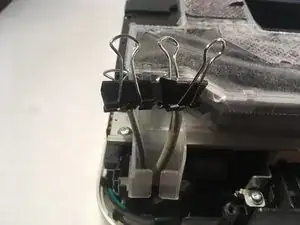
    • Klemme die Enden der Schläuche ab, damit sie nicht auslaufen können.

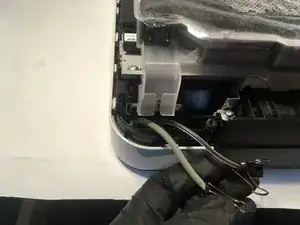
    • Ziehe die Schläuche aus der Halterung.

  17. AvPUSdFd5AnvimWY
    • Drehe die Tintenabsorberbox senkrecht um 90º und ziehe sie nach oben aus ihrer Fassung.

    The reset procedure is slightly different on the one that I have.

    1. Press the up or down chevrons to display the Home button, the house.

    2. Hold the Home button down for about 5s until 4 boxes appear. From now on ignore everything except the screen that has the boxes

    3. Press the bottom box, the blank one, for about 2s, until replaced with a keypad.

    4. Press * 2 8 6 4 to enter maintenance mode. “Machine Error46” will be displayed because purge count not yet reset.

    5. Press 8 0 to display the machine log.

    6. Press << to get more keys and then press “Mono” many, many times to reach “purge”.

    7. Press 2783 to reset. It will continue to show the error but this appears to be a bug.

    8. Press 9 9 to exit maintenance mode and reboot.

    Malcolm Boura -

    Yes this is perfect, thank you

    Thomas Baumann -

    Hallo, was wird denn nach dem 17 Schritt gemacht?

    oxana.kaljuk -

    Read “Conclusion,” below.

    Calion -

    Resseten nach Anleitung, aber das funktioniert erst wenn der Drucke sperrt.

    Siehe Abschluss. Das Menu heißt Maintenance, und die zwei Zähler heißen purge.

    Thomas Baumann -

Abschluss

Um dein Gerät wieder zusammenzubauen, folge diesen Anweisungen in umgekehrter Reihenfolge. Vielleicht möchtest zu diesem Zeitpunkt auch die Spülkammer austauschen.

Die Schraubendrehmomente aus dem Wartungshandbuch wurden beigefügt. Falls du einen Drehmomentschraubendreher hast, verwende diesen, aber mache dir keine Sorgen darüber, falls du keinen Drehmomentschlüssel haben.

Führe nach dem Zusammenbau die folgenden Schritte aus, um die Anzahl der Spülvorgänge zurückzusetzen und so den Fehler "Tintenabsorber voll" zu löschen:

  1. Schließe den Drucker an und schalte ihn ein.
  2. Drücke die Home-Taste (das Haus-Symbol) auf der Vorderseite des Druckers, bis der Wartungsmodus-Bildschirm erscheint (etwa fünf Sekunden).
  3. Halte die Leertaste am unteren Rand des Bildschirms gedrückt, bis eine Zahlentastatur auf dem Bildschirm erscheint (ca. zwei Sekunden).
  4. Drücke *, 2, 8, 6 und 4 (Du kannst dazu die Bildschirmtastatur oder die integrierte Tastatur des Druckers verwenden). Der Drucker piept und auf dem Bildschirm erscheint WARTUNG.
  5. Drücke 8 und 0.
  6. Drücke wiederholt den Abwärtspfeil, bis Reinigen: (oder Spülen:) auf dem Bildschirm erscheint.
  7. Drücke 2, 7, 8 und 3. Der Drucker gibt einen Signalton ab und WARTUNG erscheint wieder auf dem Bildschirm.
  8. Drücke zweimal 9, um den Wartungsmodus zu verlassen und den Drucker neu zu starten. Du kannst damit auch neu beginnen, wenn du einen Fehler gemacht hast.

Calion

Mitglied seit: 25/12/10

2494 Reputation

38 Kommentare

Useful for dismantling the printer although my problem wasn’t with the waste ink component

Rob Hindle -

Well, feel free to make a guide based on this one for whatever your problem was!

Calion -

Calion, you are my hero! The one place I’ve found where I can buy the replacement waste box for my Brother MFC-J4510DW does not provide directions on how to install it. And Brother itself offers neither the part nor the instructions. I thought I was going to have to buy a new printer until I came across your excellent report! Thanks so much for doing this!

haroldsogard -

You’re welcome! Very glad I could help out!

Calion -

Very informative and helpful :-)

Question could you fit a external waste ink tank ? what size are the waste ink tubes?

George Duthie -

the disassembly instructions were concise and very helpful. I had everything taken apart and removed the flushing box in less than 10 minutes. Thanks for the very helpful instructions.

William Cain -

You’re welcome and thanks!

Calion -

After I reassembled according to instructions, the left side of the scanner cover wasn’t seating correctly. I adjusted the arm, and now it seats perfectly. However, there is an error message saying “close scanner cover”, and I can’t get rid of this. Is there an error code in the maintenance mode that will get rid of this so I can use the printer/scanner again?

Lydia Clark -

The official manuals are available on the iFixIt product page at MFC-J4410DW Repair; they may have the info you’re looking for.

Also, you may wish to check that arm again; perhaps it seated wrong or there’s a blocked sensor or something.

Calion -

Thanks! This worked great on my 4510. The reprogramming section was a little confusing, but I was able to figure it out after some tinkering around.

justin -

Specifics on what was confusing or suggestions on how to improve it would be helpful. These reprogramming instructions are copied almost verbatim from the manual.

Calion -

These instructions also worked for my Brother MFC-J4610DW printer. The only supplier for the part was in the US and they were able to ship to the UK.

Shaun McDonald -

I think you can create a page for that product, then just include these instructions on that page.

Calion -

Thank you. Just completed. I asked my usual maintenance person, but he siad it was too fiddly and didn’t want to do it. It is a bit messy, But ink on the fingers is a small price to pay.

charlottepetersrock -

Thank you for the tutorial. Wow! Not a fix it kinda girl…nothing is simple anymore…wish me luck! Lol

bridget shipley -

You’re welcome! Let us know how it turns out!

Calion -

For the very first time I feel compelled to comment on tips ‘brought to you by google search’.

The most fantastic article and the very clear description at the end is perfect. This worked for my MFC-J6920DW after replacing the ink absorber (which is far easier to accomplish with this model).

Question for Calion (if you are still seeing replies to this): How to you get the printer to force a re-check of the ink levels? I have a constant issue that new inks are only seen as 1/5th full.

My thanks for the time and effort put in to this (regardless of whether you reply to my further ask above).

Sebastian Maycock -

Thanks so much!

I’m not sure about the ink levels. Perhaps try taking the cartridges out, one at a time, and putting them back in? Other than that, I’ll have to refer you to the service manual, linked on the product page.

Calion -

Thank you for this guide, worked a treat. Also found this video on Youtube - https://www.youtube.com/watch?v=6IsmfZbJ...

happyhickey -

This is an excellent set of instructions. Well done!

I actually followed a YouTube clip that provided information for the same issue. However, this set of instructions is really comprehensive.

Colm -

After cleaning the ink absorbers on my Brother MFC-J4510DW, as per the instructions, I reassembled the printer without any problems. I spent some time getting the scanner support arm fitted correctly, but it’s now fitted as it should be, after reading several clips on how to do this / how to check the arm is correctly positioned.

However I now get the message ‘Scanner cover open’ when I start the printer and this stops everything in its tracks

- I’ve tried all the usual Brother support answers without success (e.g. open and close the cover, check the support arm).

- I’ve also tried maintenance mode (See https://www.youtube.com/watch?v=ANCokAwT...) but I don’t get very far in this mode, as the error message about the scanner cover overrides this.

- I think it’s a sensor that is not working correctly, resulting in the error message, but where is this sensor and how do I fix it!

All suggestions welcome!

Colm

Colm -

Hello, I am a user of DCP-4220J.

I have destroyed the chip capacitor on the sensor board when cleaning the waste ink tank.

I have installed a ceramic capacitor of 0.01uF instead, but I can't get rid of the "near full" error.

Does anyone know the capacity of the chip capacitor on this sensor board?

nullpage -

No idea, but you can check the service manual linked on the information page for this product: MFC-J4410DW Repair

Calion -

There is no obvious reason why the ink cartridges need to be removed.

Malcolm Boura -

Perhaps not, but that was in the instructions in the service manual. Feel free to leave a comment on that step so that others can use their own judgment.

Calion -

Thank you so much for this excellent instructions. It helped me getting my printer back to operation again.

Axel Klein -

Thanks! Glad to hear it helped!

Calion -

Thank you very much for this very good guide!

My 9 year old printer will live on now!!!

Very simple and well explained.

Thank you for the effort and work.

I signed up specifically to say thank you!

Thank you so much Calion!

Wirklich vielen vielen Dank für diese sehr gute Anleitung!

Mein 9 Jahre alter Drucker wird nun weiterleben!!!

Sehr einfach und gut erklärt.

Vielen Dank für die Mühe und Arbeit. Ich habe mich extra angemeldet um mich dafür zu bedanken!

Vielen Dank Calion!

Tjay -

I followed these instructions and successfully cleaned the ink absorber. Thank you for this useful guide!

Unfortunately, now the error message "cover open" appears and I can not enter any menu and not even turn off the printer. What can be the reason for this? The cover is definitely closed. However, I have unfortunately completely disconnected the red cable at step 5. I was able to put it back on the wires that were still plugged in, but is now a little loose. Could this be the trigger? Is it possible to get replacement parts for it?

Syd -

My first suggestion would be to look at the service manual, accessible from the device page.

Calion -

Super gemachte Anleitung. Hat perfekt geklappt. Vielen Dank

Andreas Cöllen -

Super, vielen Dank für diese tolle Anleitung! Dadurch habe ich meinen 7 Jahre alten Drucker wieder reparieren können. Erst wollte ich ihn fast entsorgen, aber da ich bisher mit dem Brother zufrieden war, habe ich dann diese Anleitung gefunden und befolgt. Leider ist es etwas schwierig an das entsprechende Ersatzteil zu kommen.

Ein großes Lob an den Verfasser, vielen Dank.

m.lenssen -

Die Fehlermeldung bleibt bestehen, obwohl der Tintenbehälter erneuert worden ist. Gibt’s dafür noch eine Lösung?

Ulrich -

Believe I replaced ink absorber successfully, put back together, plugged it in. Now says scanner cover is open, but it's not. Won't work yet.

John Wehling -

I am getting a Error 46 after cleaning and reinstalling my ink absorber box. This error occurs at step #4. Can you help me try and clear this? I would hate to have to by a new printer based on this code...

fairie_princess4 -

There’s a service manual linked at the main page for this device; it may have some help for you.

Calion -

War etwas hakelig, aber Drucker hat die Meldung zurückgesetzt. Jetzt muss ich das Teil noch ausbauen und entleeren/reinigen.

Bill Hearts -

Moinsen, im Menu des Druckers steht nicht "Wartung" sondern "Maintenans" und man mus zwei Zähler Namens "PURGE" zurücksetzen. Nach Reinigen sucht man vergebens. Sonst alle Super:

Thomas Baumann -