Einleitung
Folge dieser Anleitung, um iFixit's Dual Hard Drive Kit in deinem Mac Mini Late 2012 zu installieren.
-
-
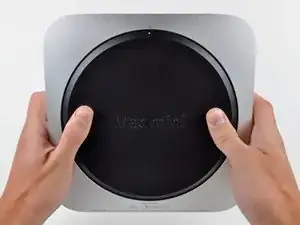
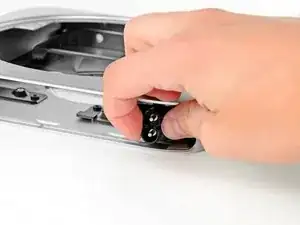
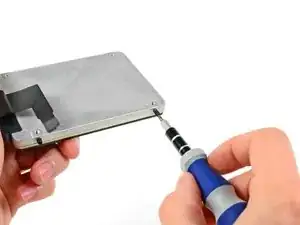
Mit den Daumen in die Vertiefungen der Bodenplatte drücken.
-
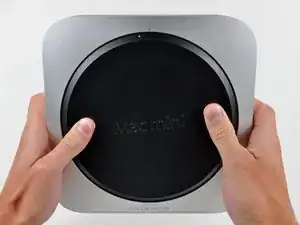
Die Bodenplatte jetzt gegen den Uhrzeigersinn drehen, bis der weiße Punkt mit der Markierung auf dem Außengehäuse übereinstimmt.
-
-
-
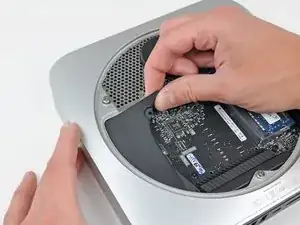
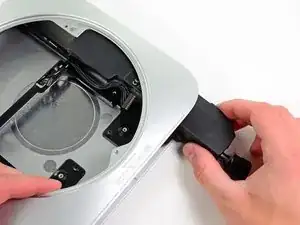
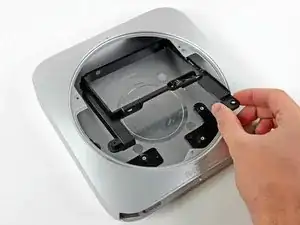
Den Mini leicht kippen, damit sich die Bodenplatte vom Gehäuse löst.
-
Bodenplatte entfernen und beiseite legen.
-
-
-
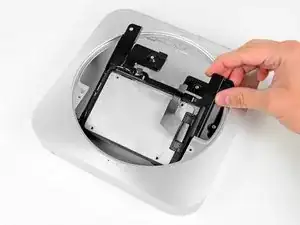
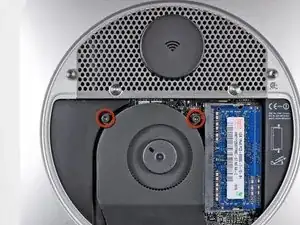
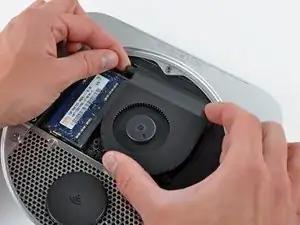
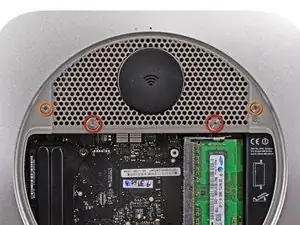
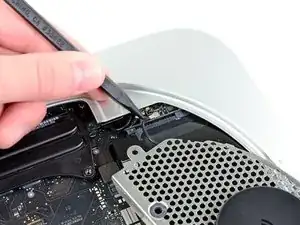
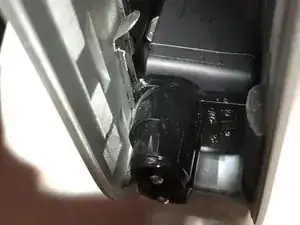
Entferne die beiden 11,3 mm T6 Torx Schrauben, die den Lüfter auf der Platine nahe der Funkantenne festhalten.
-
-
-
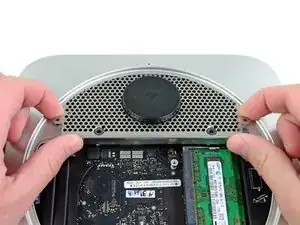
Hebe die Öse des Lüfters, die dem RAM am nächsten liegt, von dem am äußeren Gehäuse befestigten Abstandshalter ab.
-
-
-
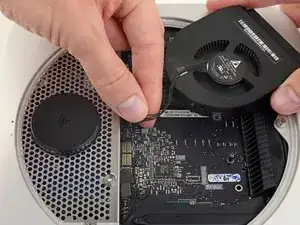
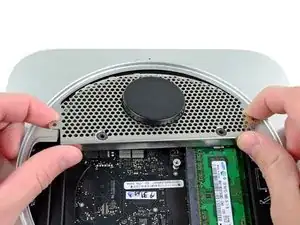
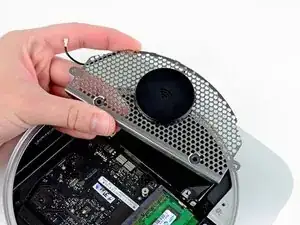
Nimm den Lüfter aus dem Mini heraus, sodass du ohne Probleme an die Anschlüsse kommst.
-
Fasse alle Lüfterkabel auf einmal und ziehe sie vorsichtig senkrecht nach oben, um den Lüfter vom Logic Board abzutrennen.
-
Entferne den Lüfter.
-
-
-
Entferne die einzige 3,5 mm T6 Torx Schraube, mit der die Haube am Kühlkörper befestigt ist.
-
-
-
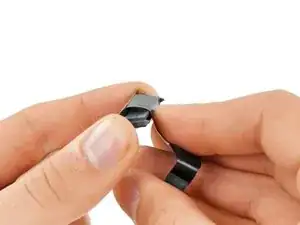
Hebe die Haube an der Seite an die dem Antennenblech am nächsten liegt.
-
Drehe sie vom Gehäuse weg und ziehe sie ab.
-
-
-
Entferne folgende Schrauben, die das Antennenblech am Mini festhalten:
-
Zwei 6,6 mm T8 Torx Schrauben
-
Zwei 5,0 mm T8 Torx Schrauben oder 2,0 mm Sechskantschrauben (beide Schraubendreher funktionieren)
-
Beachte beim Zusammenbau:
-
-
-
Hebe das Antennenblech leicht von der Seite her an, die am nächsten am RAM liegt.
-
Ziehe das Blech vorsichtig von der kreisförmigen Rille des Gehäuses weg.
-
-
-
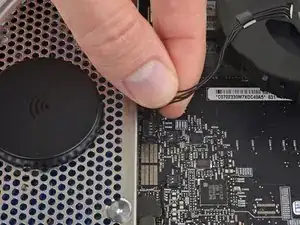
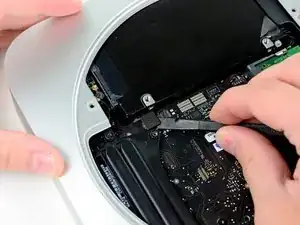
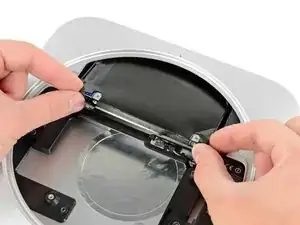
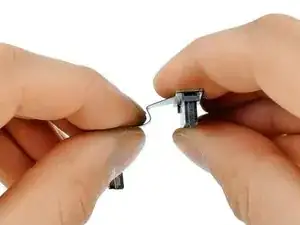
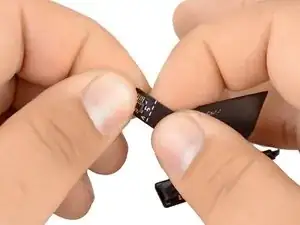
Mit der Spitze eines Spudgers löst du vorsichtig den Antennenverbinder aus seinem Sockel auf der AirPort/Bluetooth Platine.
-
-
-
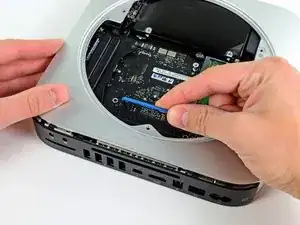
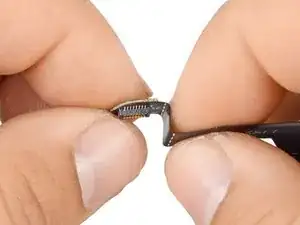
Benutze das flache Ende eines Spudgers um den Verbindungsstecker der Festplatte aus seinem Sockel auf dem Logic Board zu lösen.
-
-
-
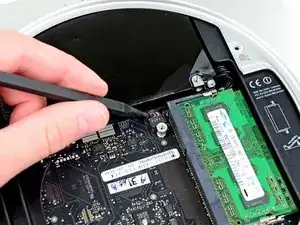
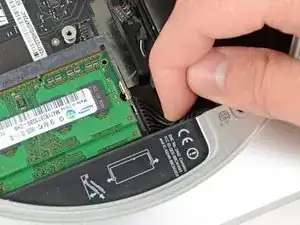
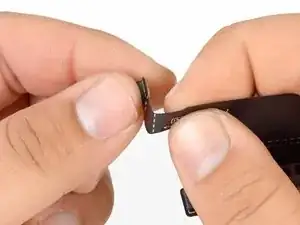
Löse den Verbindungsstecker des Infrarotsensors mit der Spitze eines Spudgers vom Logic Board.
-
-
-
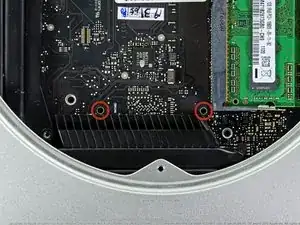
Löse die folgenden drei Schrauben:
-
Eine 5,0 mm T8 oder 2,0 mm Sechskantschraube (beide Schraubendreher funktionieren)
-
Eine 16,2 mm T6 Tox Schraube
-
Eine 26 mm T6 Torx Abstandsschraube
-
-
-
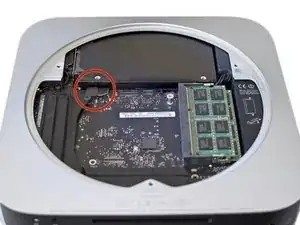
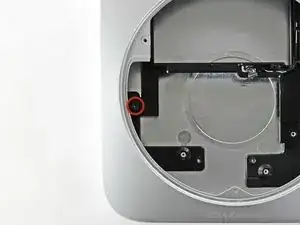
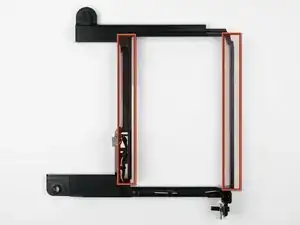
Führe also das Mac Mini Logic Board Removal Tool in die beiden rot markierten Öffnungen ein. Achte darauf, dass es Kontakt zur oberen Seite des Außengehäuses unter dem Logic Board hat, bevor du weitermachst.
-
Ziehe das Tool vorsichtig in Richtung des I/O Boards. Das Logic Board und die ganze I/O Board Einheit sollte etwas aus dem Gehäuse rutschen.
-
Entferne das Mac Mini Logic Board Removing Tool.
-
-
-
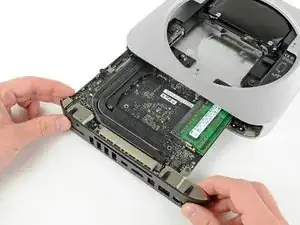
Ziehe die ganze I/O Board/ Logic Board Einheit weit genug aus dem Gehäuse, um an die Stromversorgung zu kommen.
-
Löse mit den Fingern das DC-In Kabel vom Logic Board.
-
Ziehe den Stromkabelanschluss in Richtung der Vorderseite des Mini.
-
-
-
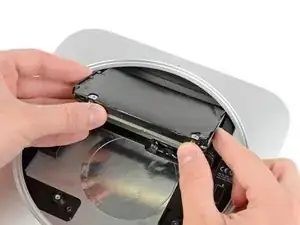
Ziehe vorsichtig die ganze Logic Board Einheit aus dem Mini, und passe dabei auf, dass kein Kabel hängen bleibt.
-
-
-
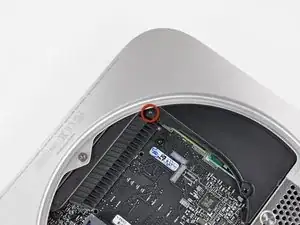
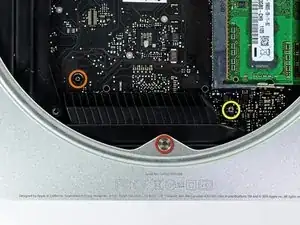
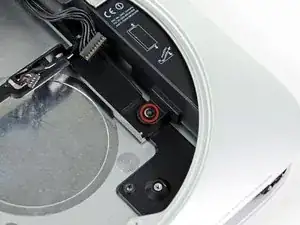
Entferne die 7,9 mm T6 Torx Schraube, die das Netzteil und den Festplattenrahmen am Gehäuse befestigt.
-
-
-
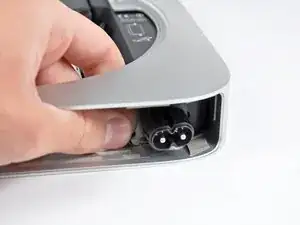
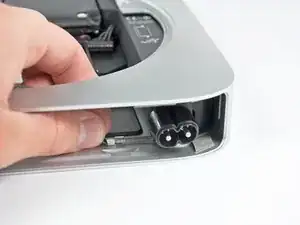
Ziehe die silbermetallische Halteklammer des Netzanschlusssockels von der Seite des Gehäuses weg und entferne sie vom Mini.
-
-
-
Lasse das Netzteil aus dem Mini gleiten, achte dabei darauf, dass keine Kabel hängen bleiben.
-
-
-
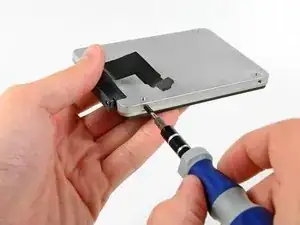
Entferne die 7,9 mm T6 Tox Schraube, die den Einsatz der Festplatte am Gehäuse befestigt.
-
-
-
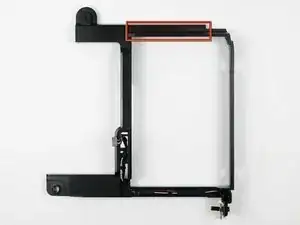
In den nächsten Schritten wirst du die Dichtungsringe in den Löchern an den rot markierten Kanten anbringen.
-
-
-
Von der Innenseite der Halterung schiebst du den Dichtungsring durch das Loch in der Seite der Halterung.
-
Achte darauf, dass die Dichtung gut sitzt, so wie im dritten Bild.
-
Wiederhole diesen Vorgang für die restlichen drei Dichtungsringe auf beiden Seiten der Halterung.
-
-
-
Wenn alle vier Dichtungsringe eingesetzt sind, sollte die Halterung so wie auf dem Bild aussehen.
-
-
-
Biege das Flachbandkabel entlang der gepunkteten Linien, so dass die Verbinder in ihren Sockeln bleiben.
-
Biege das Flachbandkabel um 90 Grad am SSD Stecker, so dass es parallel zum Stecker verläuft.
-
-
-
Benutze die Kante des SSD Steckers, um das Kabel entlang der ersten grossen gepunkteten Linie in einem 90 Grad Winkel nach unten zu biegen.
-
Biege das Kabel wieder 90 Grad zurück nach oben entlang der zweiten grossen gepunkteten Linie.
-
-
-
Halte das Kabel auf jeder Seite der ersten kleinen gepunkteten Linie und biege es um 90 Grad.
-
-
-
Biege das Flachbandkabel entlang der zweiten kleinen gepunkteten Linie um 90 Grad nach unten.
-
-
-
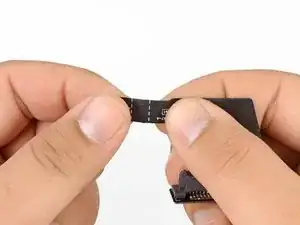
Schließe das im Kit enthaltene Kabel an der zweiten Festplatte an. Wir haben eine SSD benutzt.
-
-
-
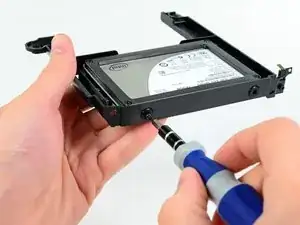
Benutze eine T6 Torx Schraubendreher, um zwei der Stellschrauben auf der Seite der Festplatte anzubringen, und zwar an der Seite, die dem Ende des Festplattenkabels dass am Logic Board befestigt ist am nächsten.
-
Ziehe die Schrauben an, bis sie am Ende der Gewinde sind. Auf dem dritten Bild siehts du, wie sie richtig sitzen.
-
-
-
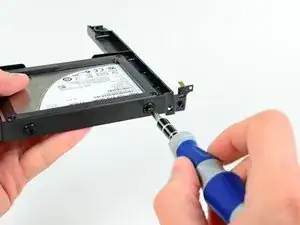
In den nächsten beiden Schritten wirst du die Festplatte in ihrer Halterung befestigen.
-
Schiebe die Stellschrauben in die Durchführungen der Halterung und befestige die Festplatte so in der Halterung, wie im zweiten Bild zu sehen ist.
-
-
-
Mit einem T6 Torx Schraubendreher kannst du die beiden übrigen Schrauben aus dem Set durch die Öffnungen und in die Seite der Festplatte einschrauben.
-
-
-
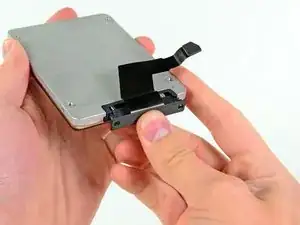
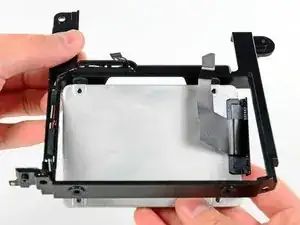
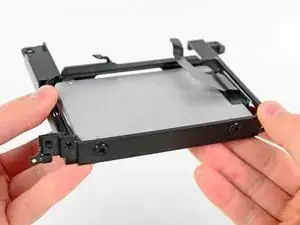
Installiere die zweite Festplatteneinheit im Gehäuse.
-
Achte daruf, dass die Schraublöcher auf die Gewinde passen, wie im zweiten Bild zu sehen ist.
-
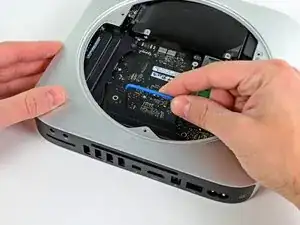
Wenn das Logic Board installiert ist verbinde einfach das Kabel der zweiten Festplatte mit dem freien Sockel auf dem Logic Board.
-
-
-
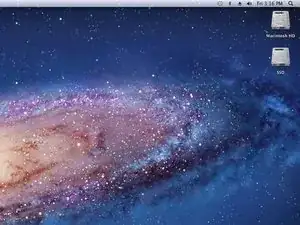
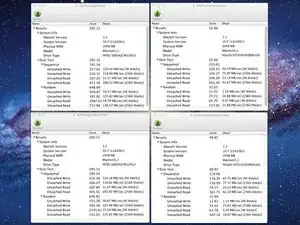
Beim Start des mini siehst du, dass er beide Festplatten erkennt.
-
Xbench Tests zeigen, dass es egal ist, ob du die Festplatte oben oder unten montierst. Sie bleiben gleich schnell.
-


Arbeite die Schritte in umgekehrter Reihenfolge ab, um dein Gerät wieder zusammenzubauen.
65 Kommentare
In my system the only way to get an SSD drive (OCZ Agility 3 120G) to work was to install it to the first SATA interface and the original HD to the second SATA interface.
I tried first as said in this guide, but the whole system got very unstable, the SSD was basicly unusable with lots of read errors, kernel panics etc...
After switch everything went smoothly. I cloned the original system to the new SSD with Carbon Copy Cloner, selected the SSD to be the startup disk and rebooted, Now the SSD is primary drive (with huge difference in speed, some 340/300 read/write) and the original 1T HD is secondary drive hosting my iTunes, iMovie and iPhoto archives.
The iFixit SATA cable does not work with the OCZ Vertex 4 drive using OS X 10.8. I tried both the "upper" and "lower" ports, neither work. Using the Apple supplied SATA cable, the drive works in both ports. Using the iFixit cable with the Apple supplied HDD drive works. Using the iFixit cable, the OCZ drive is detected using the OCZ Mac boot tools. It's just OS X 10.8 that can not see the drive when using the iFixit cable. I've contacted OCZ support.
brainsik -
Same for me as for marcojohansson. While my SSD worked in the "empty" bay, I was experiencing frequent system hangs and beach balling. Moving the SSD to the original hard drive position, and the hard drive into the extra bay seems to have solved the problem entirely!
Patrick -
This took a lot of force on my Mac mini. A lot.
nh3 -
I agree. It took a crap ton of force from my thumbs to twist the bottom off.
sleeve -
I accidentally broke the little things that hold the cover to the case. Is there a cheap replacement to the cover? Those clips are held onto it very weakly.
Jacob Halton -
Don't just use your thumbs... Use your whole palm to twist it, with maybe a thumb in one of the recesses, applying slight downward pressure.
markbart -
Wish I would have read this comment before I did it!
I found that what markbart said works best. one palm one thumb (and my knees) My thumbs would do it. It was a bit at a time.
Same difficulty getting it back on.
Would be handy if this (difficulty) was mentioned in the guide
Also would be nice to mention the safe practice of pressing the power button for a few seconds after disconnected to rid the system of any residual power, working in a clean static free environment & they say on the crucial website to touch a metal surface of the machine before touching the RAM
Nancy -
I think it depends, I have seen some that are very difficult to open and some super easy. But I see them everyday. I wish there was a tool that fit in the holes.
Justin Weathersbee -
When seating the bottom RAM chip you may have to apply a little extra side force to get it to seat properly. I put in the new RAM and just got a beeping sound upon starting. I then put the old RAM back in and got the same result.
Here is the solution I found on the Apple discussion board.
"Take a small flat head screwdriver and after you put the memory in slot 0, put the screwdriver between the top of the mac mini and the memory then turn the screwdriver a little to exert pressure on the memory into the slot. Do it on both sides of the memory."
This worked for me.
littlemas2 -
I remember this when I was changing my memory ... I realized (after opening) that more you push, more force it take to open the cover. As you push down you force the cover "to rub" the casing and possibly other things inside. If you "lightly" hold the cover it comes right off ... Remember: less is more! :-)
Have fun!
Radek -
We found it hard to use the thumbs but if you put the casing on a carpet and one person is holding the case while the other is using his palm of one hand to turn the cover it comes off quite smoothly and without much downward pressure.
Alexander -
If you're upgrading to an SSD, before you even take this first step, I'd recommend putting the SSD into an external drive case, using USB and format the SSD first before trying to swap your existing hard drive or implementing a fusion drive. The external drive case will come in handy later so you can use the old drive as extra storage anyhow.
Once that SSD is internal, the Mac errors out during the formatting process. Once it was formatted externally, then installed inside the Mac again, there was no problem.
Orange Girl -
The first time I did this it hurt! The second time my mac mini 2012 had been running so was warm. VERY EASY WHEN WARM. No fun when cool!
Nancy -
Forget about those 2 circle indents. if you consider the 2 marked dots (open and close) as position 12 o’clock, place your thumbs at 11 and 1 o’clock on the outer rim of the cover and rotate from that position.
juicer52 -
No way was I getting the back off. So I made a tool. Took a large wrench longer than the Mac mini. Superglued 2 rubber feet on the wrench at the same location as the thumb indents. Put the Mac on the ground, between my knees and used my body weight to turn the cover. Worked like a charm.
Mark -