Einleitung

Diese Anleitung zeigt, wie das Logic Board vom Mini ausgetauscht werden kann.

  1. tesVkqtkctF41qmD
    tesVkqtkctF41qmD
    YbBty6YuxcleAX6r
    TsrDTWhgReCx4LaK
    • Später in dieser Anleitung wirst du mehrere Kreuzschlitzschrauben entfernen, welche sehr tief liegen. Normale Schraubendreher sind meist zu breit um zu den vertieften Schrauben zu gelangen, achte daher darauf, einen dünnen Schraubendreher zu haben.

    • Entferne zuerst die AirPort-Antenne (die größere von den beiden), welche nah bei dem Power-Button liegt.

    • Drücke die beiden Stifte zusammen, und hebe die AirPort-Antenne von ihrem Befestigungsstift ab.

    • Sei vorsichtig und drücke die Stifte nicht zu weit zusammen, sonst brechen diese ab.

    • Beim Zusammenbau musst du die beiden Stifte leicht zusammendrücken, sodass sie in die Öffnungen auf der AirPort-Antennenkarte passen.

  2. Ne1HrDQvVHbckCOi
    Ne1HrDQvVHbckCOi
    RwZGARKpYRYjrbQO
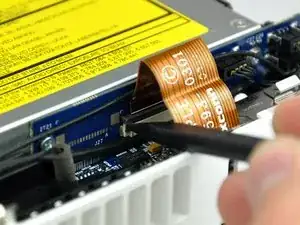
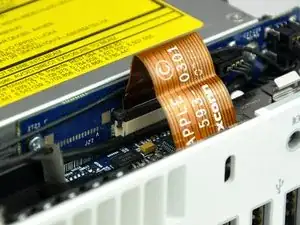
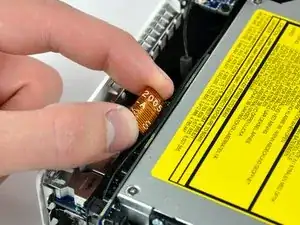
    • Hebe den Sicherungsbügel am ZIF-Anschluss auf der linken Seite mit der Spudgerspitze ein wenig hoch.

    • Der Bügel lässt sich etwa 1 mm weit anheben. Versuche nicht, den Bügel ganz zu entfernen.

    Now also lift the right side of the ZIF cable lock up from its socket.

    chriZ -

    Good catch of the incomplete unlocking instructions. ;P

    lamarhavard -

    Hmmm... what if I didn't read this before and I removed the cable and the lock sort of broke?... what would happen... would I experience problems? I can still put the cable back in place and push the lock back down with the spudger.

    Dan O -

    Same. I totally removed the lock , the edges are busted and won't stay in place, How can I get the cable to stay? what's the fix?

    Suzanne -

    Dan O & Suzanne, hold the cable in the socket and put a dab of hot glue on both sides, It's non-conductive and should hold...worked for me.

    lamarhavard -

    does any one know, where to get the connector from zhe ZIF Cable?

    someone, that preowned my mac broke the holder!

    julian gmeiner -

    Julian, did you ever find where to get a replacement lock for the Zip Cable. Mine is also broken..

    Suzanne -

    This is not my first memory replacement in a Mini and I got over-confident and stupidly fully removed the audio cable ZIF lock and assumed I had broken something. But, now that I have read this guide more carefully, I am not sure. I sure would love to hear some detailed instructions for putting a ZIF lock back on.

    Is it possible that I have removed it without having broken it? If I have broken it, do I have to buy a new cable? Just a new ZIF lock? A new audio board? This is a 2.0 GHz A1176.

    Thanks!

    GalvanicMacPro -

    Michael, Mine seems to be broken. I bought & tried the Kapton Tape that was suggested & still no sound.

    Suzanne -

    C’est la première que je doit déverrouiller un câble ZIF. Je précise qu’il faut lever à gauche et à droite, ça force un peu, prendre appui sur le boitier du Mac, comme e montre la photo.

    La partie noire reste dans la partie blanche (+1 mm), et la nappe flexible sort par le haut.

    Ludovic -

  3. EKFU6gDpNXCSQnLx
    • Hebe das Audio-Flachbandkabel nach oben aus seinem Anschluss heraus.

    • Wenn sich das Audiokabel noch nicht herausholen lässt, dann ist der Sicherungsbügel noch nicht ganz offen. Überprüfe nochmals, ob er überall 1 mm weit von seinem Anschluss auf der Verbindungsplatine angehoben ist.

    As an option to avoid potential damage when disconnecting the cable from the ZIF socket and clip, it is possible to unscrew the audio board and remove it along with the internal frame.

    Nick Baldwin -

  4. 61qvOIM5yqSBSjGd
    61qvOIM5yqSBSjGd
    MEBJfeYqFJgGhfDT
    • Drehe den mini so, dass der Einschub des SuperDrive zu dir zeigt.

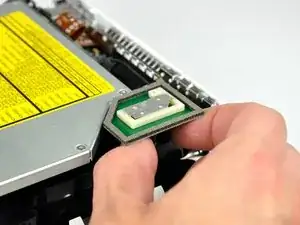
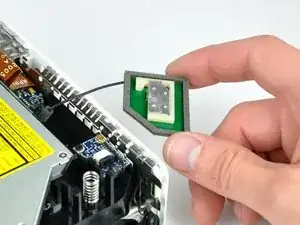
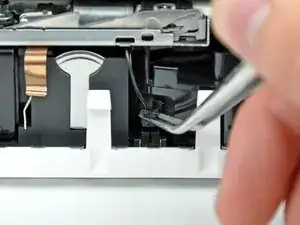
    • Hebe den Stecker am Kabel des Thermosensors der Festplatte mit einer Pinzette aus seinem Anschluss auf dem Logic Board heraus.

    • Fasse nur den Stecker mit der Pinzette an, nicht die Kabel.

    • Der Stecker befindet sich unter der Öffnung für das optische Laufwerk, nahe an der PRAM-Batterie.

    Managed to leave this connected by flopping back the drive rather than totally removing

    pglock -

    WATCH OUT!!

    separated one of the wires from the connector very easily. i would have preferred to use a spudger at this step. the tweezers in effect snipped the wire!!

    mklsvg -

    As my experience you should definitely use angeled tweezers as shown in several pictures. To avoid stripped cable deflash sharp edges of the tweezers a little bit. I never experienced problems when using that kind of tool carefully.

    Timpetou -

    I've had to remove a few of these connectors on iBooks and other small Apple devices ... I've found that, with careful and gentle pressure (working first one side and then the other) using a small flat-headed jeweller's screwdriver is best.

    Mike Haines -

    Note where the airport antennae connecting wire comes out from the interior along the top. When reassembling, it has to be routed the same way, or it won't reach its install position.

    robert -

    If your fan runs at high speed after you complete this project, you have forgotten to reconnect the thermal sensor.

    Curt -

  5. NcmfB3WBQrMtDS5h
    NcmfB3WBQrMtDS5h
    NBuQxBTA6wSbupxI
    • In den nächsten fünf Schritten werden die vier Kreuzschlitzschrauben, mit denen der innere Rahmen am Gehäuseunterteil befestigt ist, entfernt. Bei jedem Schritt wird zunächst eine Übersicht gezeigt, dann eine Nahaufnahme der betreffenden Schraube.

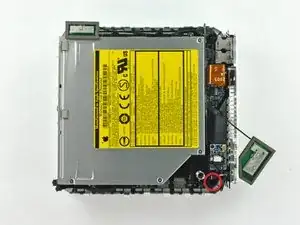
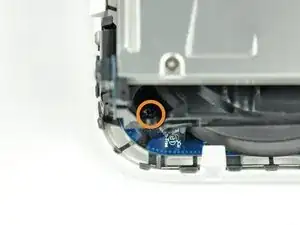
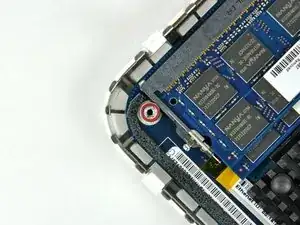
    • Eine der Kreuzschlitzschrauben liegt vertieft in der Nähe der Einschalttaste. Drehe sie heraus.

  6. mQwsrv5mEdJQTbmE
    mQwsrv5mEdJQTbmE
    tp11nlYvAvPFAPsH
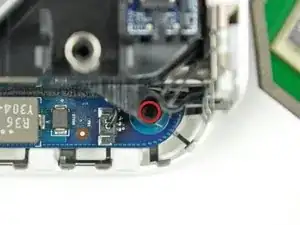
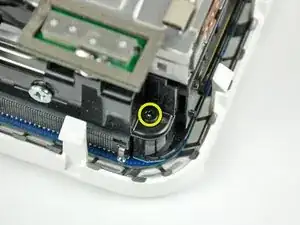
    • Eine weitere Kreuzschlitzschraube, die den Rahmen am Gehäuseunterteil befestigt, sitzt vertieft in der Nähe der Statusanzeige. Drehe sie heraus.

    • Das ist die längste der vier Befestigungsschrauben.

  7. 1qgIwm2POlMG5yqD
    1qgIwm2POlMG5yqD
    5vJl6xw6NFLCPtJV
    • Entferne die Kreuzschlitzschraube in der Nähe der Bluetooth-Antenne vom inneren Rahmen.

    Before removing any of these screws, there is another step needed which is not here:

    On the front of the optical drive, right side as you look at the slot-load, is a small blue board attached by a single black screw. This needs to be removed before the optical drive can be taken out.

    Mike Haines -

  8. mVrcohFF2qth5QAR
    mVrcohFF2qth5QAR
    4CIKANIBUuqghOGF
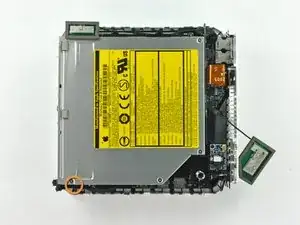
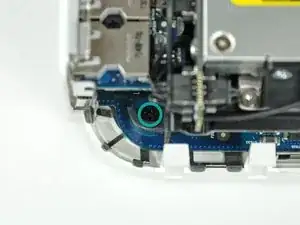
    • Entferne die Kreuzschlitzschraube, mit der der innere Rahmen in der Nähe der Audioanschlüsse am Untergehäuse befestigt ist.

    On reassembly, if you don't have a magnetic screwdriver, a tiny dab of grease at the tip of your screwdriver will help hold the screw on the driver so you can lower it into the recessed slot.

    pfbloom -

  9. CRHKcyOC23ZtADxD
    CRHKcyOC23ZtADxD
    xjktCYpDfSWnZWGd
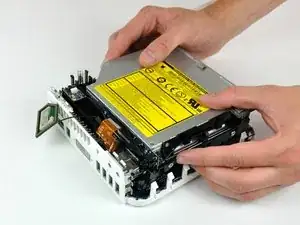
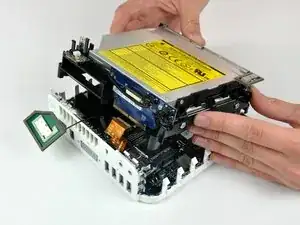
    • Hebe den inneren Rahmen behutsam vom Gehäuseunterteil ab, beachte, dass sich die AirPort-Antenne und andere Kabel verfangen könnten.

    • Eventuell musst du nahe bei der Verbindungsplatine nach oben ziehen, bis sie sich vom Logic Board löst.

    At this point be careful that you don't pull out the Airport antenna ... but if you do, just check that it is back before re-assembling.

    Mike Haines -

    During re-assembly, the internal frame has to go in at an angle ... the back of the optical drive goes in first.

    This means that you can seat the fan cover correctly, but more importantly, there is an interconnect board on the back of the optical drive that must be firmly pushed back into its housing on the logic board.

    Mike Haines -

    Reassembly: Before slipping the main frame back into its place, refer to earlier photos, ensuring proper routing of the WiFi cable.

    Steve -

    If, like me, you pull the wire on the airport antenna free, it snaps back into place easily. The connector is on the extra card screwed to the motherboard that looks like it has a phone battery embedded in it. The connector is at the top of the 'battery'. This accessory card is the wifi card, so it makes sense that the antenna plugs onto this.

    Dan -

  10. mJlMftalJCUHIMWC
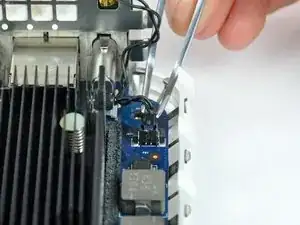
    • Fasse den Stecker am Kabel zur Einschalttaste fest mit der Pinzette an und hebe ihn senkrecht nach oben vom Logic Board weg.

  11. toglblG1NRK6KGZW
    • Fasse den Stecker am Kabel zur Statusanzeige fest mit der Pinzette an und hebe ihn senkrecht nach oben vom Logic Board weg.

  12. NEduGXJpHG1nKpYM
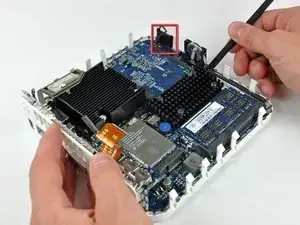
    • Entferne die einzelne Torx T10 Schraube, mit der das Logic Board am Gehäuseunterteil befestigt ist.

    I think a T15 fits better

    Marius137 -

    Agreed, T15 is a better fit

    jouniseppanen -

  13. gayHEtl6ifOlpX5l
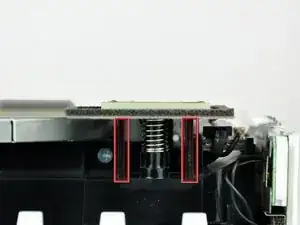
    • Hebe mit dem flachen Ende eines Spudgers das Ende des Logic Boards bei der PRAM Batterie leicht an.

    • Es ist notwendig, die Standby LED (in rot) leicht vom Mac Mini wegzuziehen, um die Ecke des Logic Boards zu befreien.

  14. yZmpChBPXYwmSsIx
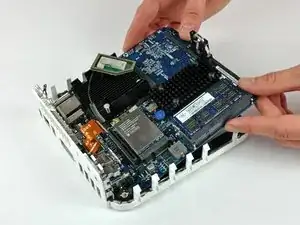
    • Hebe das lose Ende des Logic Boards vorsichtig an und wackele es ein bisschen hin und her, wenn du es von den I/O-Anschlüssen wegziehst.

    Hi, when re-assembling, if you find resistance to the board sliding right up to the rear panel make sure that the spring finger on the casing goes over the power connector not inside it. It fits much better that way!

    Adrian Berry -

Abschluss

Um dein Gerät wieder zusammenzubauen, folge den Schritten in umgekehrter Reihenfolge.

Walter Galan

685540 Reputation

0 Kommentare