Einleitung
Diese Anleitung zeigt, wie das Display im MacBook Air von 2019 getauscht werden kann.
Werkzeuge
Ersatzteile
-
-
Wenn dein MacBook unter BigSur v11.1 oder einer späteren Version läuft, lässt sich AutoBoot möglicherweise nicht deaktivieren. Arbeite zuerst normal weiter, trenne aber den Akku sofort ab, wenn du ins Innere des Gerätes hinein gekommen bist.
-
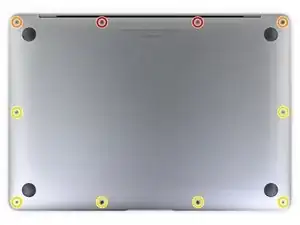
Entferne mit einem P5-Pentalobe-Schraubenzieher folgende Schrauben:
-
Zwei 7,9 mm Schrauben
-
Zwei 7,1 mm Schrauben
-
Sechs 2,6 mm Schrauben
-
-
-
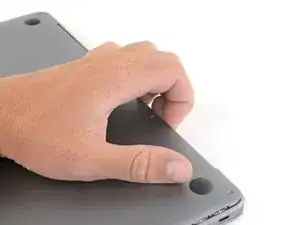
Zwänge deine Finger zwischen das Display und das Gehäuseunterteil und ziehe nach oben, so dass sich das Gehäuseunterteil vom Air ablöst.
-
Entferne das Gehäuseunterteil.
-
-
-
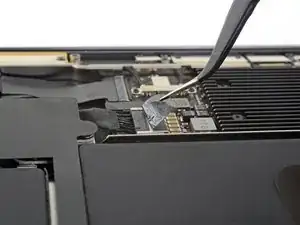
Ziehe den Aufkleber soweit vom Akkustecker zurück, dass der darunterliegende Stecker sichtbar wird.
-
-
-
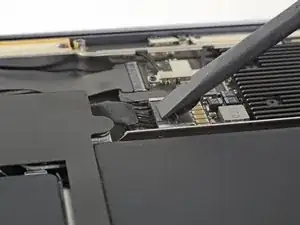
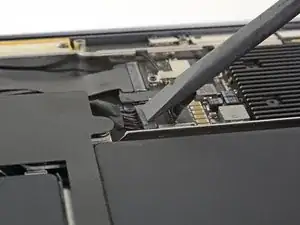
Schiebe den Akkustecker mit einem Spudger parallel zum Logic Board aus seinem Anschluss auf dem Logic Board heraus.
-
-
-
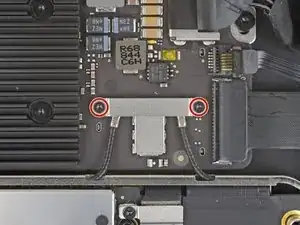
Entferne die beiden 1,4 mm Torx T3 Schrauben, mit denen die Halterung des Antennenkabels befestigt ist.
-
Entferne die Halterung des Antennenkabels.
-
-
-
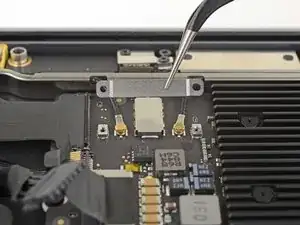
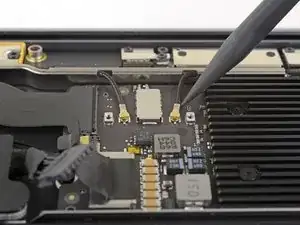
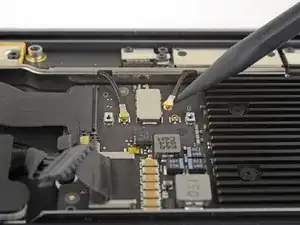
Setze die Spudgerspitze nahe am Stecker unter eines der Antennenkabel ein.
-
Heble senkrecht nach oben und löse das Kabel ab.
-
Wiederhole das Ganze für das andere Kabel.
-
-
-
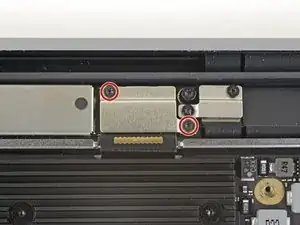
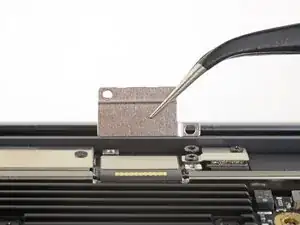
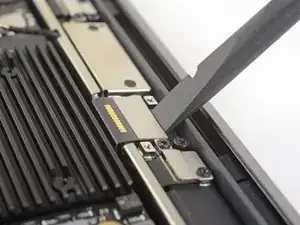
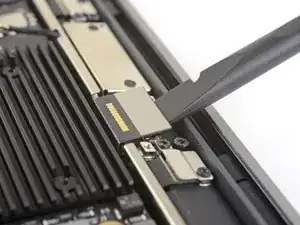
Entferne die beiden 1,5 mm Torx T3 Schrauben, mit denen die Halterung des Displaykabelsteckers befestigt ist.
-
Entferne die Halterung des Displaykabelsteckers.
-
-
-
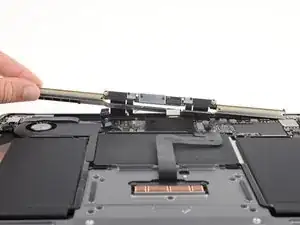
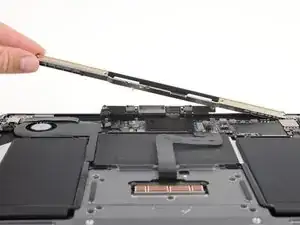
Hebe die Antennenleiste senkrecht hoch aus dem Gehäuse heraus. Achte darauf, dass die Antennenleiste nicht an irgendwelchen Kabeln oder Stecker schabt.
-
Entferne die Antennenleiste.
-
-
-
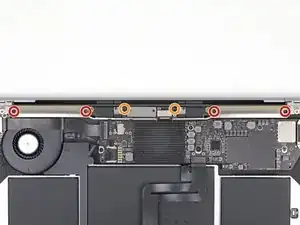
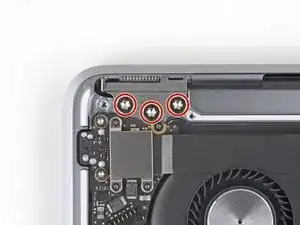
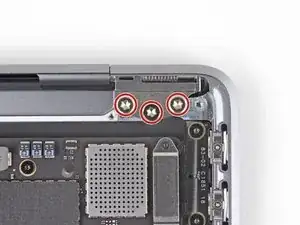
Entferne die sechs 4,9 mm Torx T9 Schrauben, mit denen die Displayscharniere am oberen Gehäuse befestigt sind.
-
-
-
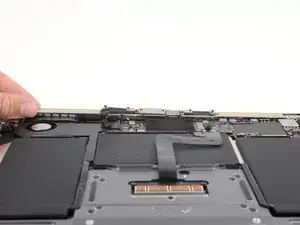
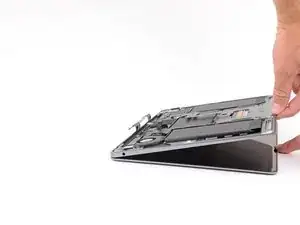
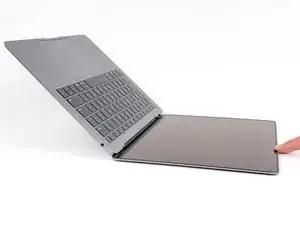
Lasse das Display immer noch nach unten liegen und hebe das obere Gehäuse an, damit sich das MacBook soweit wie möglich öffnet.
-
-
-
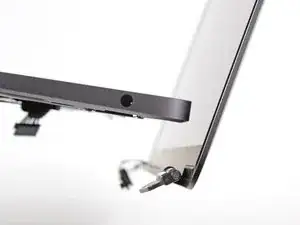
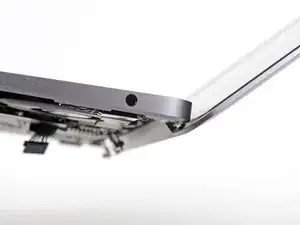
Hebe das MacBook hoch und klappe das Display behutsam so, dass es rechtwinklig zum oberen Gehäuse steht.
-
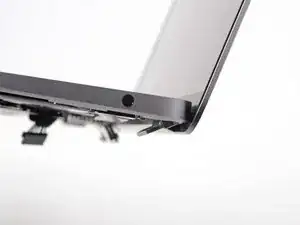
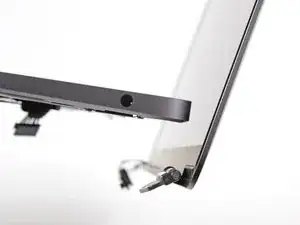
Halte das Display weiterhin rechtwinklig zum Gehäuse. Halte das Gehäuse fest und bewege das Display gerade nach unten, so dass die Scharniere aus der Unterseite des Gehäuses herausgleiten.
-
Vergleiche dein Ersatzteil mit dem Originalteil — möglicherweise musst du fehlende Bauteile übertragen oder Schutzfolien vom Neuteil abziehen, bevor du es einbauen kannst.
Um dein Gerät wieder zusammenbauen, folge den Schritten in umgekehrter Reihenfolge.
Entsorge deinen Elektromüll fachgerecht.
Hat die Reparatur doch nicht den richtigen Erfolg gebracht? Frage in unserem Antworten-Forum nach Hilfe.
11 Kommentare
Thanks a lot for the useful guide! I have found some difficulties removing the antenna bar with this description, since there is no information to remove the 4 screws holding the antenna assembly in place. Additionally the force to remove the antenna is very high and may damage the complete antenna. I have used some angled tweezers to remove it and they came right our without any force.
Another question I have for the display replacement on a 2019 MacBook Air is how to get the true tone function and keyboard backlight working again. I have found no infos for the 2019 Air but some people had the same issue with 2018 and up MacBook Pros. Any suggestions on how I could fix this up? (Already made a SMC and PRAM reset)
Thanks in advance!
Josef G -
Thanks for the comments! We’ll fix the missing steps right up!
Those are good questions. I would like to know also.
May I know where to buy a replacement screen from a reliable supplier ?
Alan Li -
Hi Alan, we sell replacement screens in our store.
This repair guide was on point!! One thing I will point out is that once you install new screen and are ready to reconnect the battery cable, make sure it is in correctly. It should not be able to slide out without some pressure. I made this mistake and it caused several problems, the laptop was extremely slow and the fan kept running. Once it seated the battery cable correctly it worked perfectly.


If the first thing you do is disconnect the battery, is it really an issue if you don’t (or can’t) disable auto-boot?
maccentric -
I agree, why disable Auto-Boot when the lid is closed and the battery is disconnected immediately? – I've never had an issue since 2016 when the feature was introduced.
stevebsiegel -
On my machine, the longest two screws were in the corners, while the other two long screws were in the middle. Perhaps previous service in the past had them replaced into the wrong place? In any case, the longest screws do seem to fit in either place. I guess 0.8mm is not very much of a difference. Seems like poor design if they could have used one size of screw.
johann beda -