Einleitung

Hier wird der Austausch eines verbrauchten Akkus gezeigt.

Hinweis: Wenn sich eine Plastikfolie auf dem Ersatzakku befindet, versuche nicht sie zu entfernen. Sie ist darauf festgeklebt und schützt den Akku, wenn er im Inneren deines MacBooks eingebaut ist.

  1. 3bTejPotVlS4MkaI
    • Bevor du weitermachst, schalte das Gerät aus, schließe den Deckel und lege den Computer mit der Unterseite nach oben auf eine weiche ebene Oberfläche.

    • Drehe folgende zehn Schrauben heraus:

    • Zwei 9 mm 5-Point Pentalobe Schrauben

    • Acht 2,6 mm 5-Point Pentalobe Schrauben

    • Den speziellen Schraubendreher, um die zehn 5-Point Pentalobe Schrauben herauszudrehen, findest du hier.

  2. WwI3rtRnhTEHj54C
    • Zwänge deine Finger zwischen Display und Gehäuseunterteil und ziehe es nach oben, so dass sich das Gehäuseunterteil vom Air löst.

    • Entferne das Gehäuseunterteil und lege es beiseite.

  3. N4ACcJX3UJrBILst
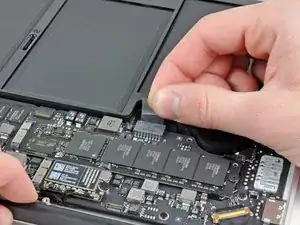
    • Fasse die durchsichtige Zuglasche aus Plastik, welche am Akkustecker angebracht ist, und ziehe sie in Richtung der Vorderkante des Air. So wird der Akku vom Logic Board getrennt.

    • Ziehe den Stecker beim Ablösen nicht nach oben.

  4. y3TUhCKKYPlT2GMN
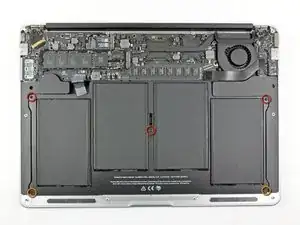
    • Der Akku ist mit fünf Torx T5 Schrauben am oberen Gehäuse befestigt. Drehe sie heraus:

    • Drei 6,3 mm Schrauben

    • Zwei 2,4 mm Schrauben

  5. Q6nMUHBqq3Ao6jyi
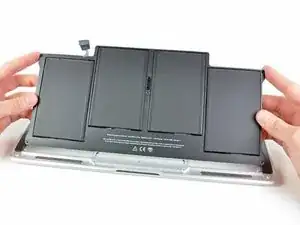
    • Vermeide es beim Hantieren am Akku, die vier freiliegenden Lithium-Polymer-Zellen zu drücken oder zu berühren.

    • Hebe den Akku an der Kante nahe am Logic Board an und entferne ihn vom oberen Gehäuse.

    • Wenn du einen neuen Akku eingebaut, solltest du ihn nach dem Einbau kalibrieren:

    • Lade ihn auf 100% auf und lade dann noch mindestens zwei weitere Stunden. Ziehe den Stecker und benutze das Gerät dann solange bis die Akkuleerstandwarnung erscheint. Speichere deine Arbeit benutze den Laptop, bis er wegen geringer Akkuladung aus geht. Warte mindestens fünf Stunden und lade den Akku dann erneut ohne Unterbrechung auf 100% auf.

    • Wenn du ein ungewöhnliches Verhalten bemerkst oder wenn du andere Probleme nach dem Einbau des Akkus hast, musst du möglicherweise den SMC deines MacBooks zurücksetzen.

    • Auf dem Ersatzakku können dünnere Schutzfilme und dickere Schutzfolien geklebt sein. Der Schutzfilm kann leicht abgezogen und entfernt werden. Die Schutzfolie ist etwas dicker und soll den Akku vor Schäden durch Anstechen bewahren. Diese Folie darfst du nicht entfernen.

    Thanks for the easy step by step guide. MacBook working like a dream again

    Peter atkins -

Abschluss

Um dein Gerät wieder zusammenzusetzen, folge den Schritten in umgekehrter Reihenfolge.

Andrew Bookholt

578335 Reputation

17 Kommentare

I received the batter for my late 2010 in good order. The instructions were easy to follow and the replacement went well. The two tools mentioned are a must - the P5 pentalobe and T5 torx.

My disappointment is that the battery from iFixit is, in fact, not new. No, it has not been used and shows 6700 mAh design capacity. However, Coconut Battery reports the manufacture date of the battery as 12-14-2011 or 1134 days. Also, I am getting 4-6 hours when I expected 5-7. What is the shelf life of an unused battery?

Perhaps iFixit may wish to change the battery description from "Brand New" to "Never Used" and put the manufacture date.

Thanks

fwunder -

Great post and thanks for this tips.

see more : http://www.geeksonsite.co.nz/

lalit -

Just arrived the battery.

Replaced in 5 minutes.

Perfect!

My Mac is up, running and charging the new battery.

Thank you

Vinicio

vgusv -

Sounds like you did not follow the conditioning procedure?
grant varga -

My battery arrived today and I was able to install it in about 30 minutes (I have not done this before). My Mac is up and running and the battery has charged up and is in use.

Thanks for all the help.

SG 03/22/2017

Saadia Greenberg -

I followed this instructions. Everything is fine except that I cannot fully insert the pull tab back into the battery connector. How hard do you have to push ? Does it have to make a click ?

Julien Salort -

Hello Julien,

It will not click, but it will need about the same amount of force to push it in as the amount needed to pull it out. This being said, you should check the battery connector for any debris, and look at all the pins to make sure nothing is broken. Let us know if you succeed!

Scott

Scott Havard -

Worked great! I used an egg carton for the screws, an ifixit 52 piece toolkit — which I love! — and the battery switch was painless and worked immediately. Many thanks! The sixteen year old girl can get back to her tweeting now. Thank God.

Best,

Ira

airira -

All went smoothly! A little bit more explanantion about re-inserting the power connector would have been nice. . . . . . .

Saved my 2011 MacAir.

thanks!!!

Paul Harris -

If you don’t already have these tiny screwdrivers, you might want to also buy the P-5 Pentalobe screwdriver and the little plastic tool (“Spudger”) from IFIXIT. My local hardware store did not have the P-5, so it was a good thing I had ordered it. And the little plastic spudger was helpful in pushing the new battery connector plug into the jack on the board. Getting the T-5 Torx, too, could be handy just to avoid a trip to the hardware store. The price on IFIXIT was not significantly more than I paid at the local Ace hardware.

Jason D -

The instructions you have given to calibrate the new battery are different from the ones that came with it. How do I proceed?

Patricia Lacerda -

I have found the answer. There are 2 different procedures, one is called CONDITIONING and the other is CALIBRATING. Conditioning of a brand new battery involves one cycle of 12 h uninterrupted charging followed by complete drainage of the battery until MacBook shuts down (repeat this 3 times). Calibrating can be done afterwards on old batteries and involves the usual instructions given by many websites (here, Lifewire, Apple, etc).

Patricia Lacerda -

Hi. I did also reset the SMC after replacing the batteries.

Fabrice -

Do i remove the plastic film on the new battery?

John -

Hi John,

If the plastic film is an easily removable layer, you can remove it. If it is glued onto the battery, do not remove the layer.

Arthur Shi -

how important is it to keep the plastic film on the battery? i didn’t see the message at the beginning and removed it :(

if it is important, i would include that message to the step where the new battery is installed.

matthewyo -

Good point! I will add a note in the last step. The battery may come installed with a liner and/or thin plastic film. The plastic film is easily removable and should be removed before installation. The liner helps with installation and acts as a layer of defense against punctures.

Arthur Shi -