Einleitung

In dieser Anleitung zeigen wir dir, wie du das Trackpad austauschen kannst. Du musst dazu auch den Akku mit Hilfe von Klebstoffentferner ausbauen. Baue den alten Akku nicht wieder ein, das ist ein Sicherheitsrisiko. Ersetze ihn durch einen neuen Akku.

Der iFixit Klebstoffentferner ist leicht entzündlich. Du solltest diese Reparatur in einem gut belüfteten Bereich durchführen und währenddessen nicht rauchen oder in die Nähe einer offenen Flamme kommen.

Um das Sicherheitsrisiko zu verkleinern, solltest du den Akku deines MacBook Pro vollständig entladen, bevor du mit der Reparatur beginnst. Ein geladener Lithium-Ionen-Akku kann ein gefährliches und unkontrollierbares Feuer verursachen, wenn er versehentlich beschädigt wird. Wenn dein Akku aufgebläht ist, dann musst du geeignete Vorsichtsmaßnahmen treffen.

  1. XxSVygoKg3BQZUeK
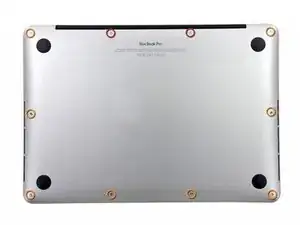
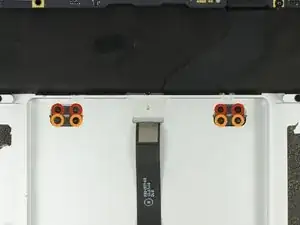
    • Entferne die folgenden zehn Schrauben, mit denen das untere Gehäuse am oberen Gehäuse befestigt ist:

    • Zwei 2,3 mm P5 Pentalobe Schrauben

    • Acht 3,0 mm P5 Pentalobe Schrauben

    • Halte während der ganzen Reparatur deine Schrauben gut geordnet und achte darauf, dass sie genau an ihren alten Platz zurück kommen, sonst könnte dein Gerät beschädigt werden.

    If don’t have one of those neat project mats, then you can use small pieces of flattened blu-tack to hold the screws. If you arrange them in the shape of your mac book cover, and put the screws down methodically, you can get a one-to-one mapping of the screws to the correct screw holes.

    Toby Thurston -

    Or you can use an ice tray where you put the screws and the parts in separate bays in the same order as they come in the instructions.

    timofej.se -

    This is great! I used a small magnetic white board, and wrote on it to identify the parts as I went. This whole process, from the fast shipment to the great instructions to the complete, high quality, tool kit has been great. I’m typing this comment on my resurrected laptop. Thank you! Sue

    Susan Greer -

  2. TZjAGsfhlId3q36t
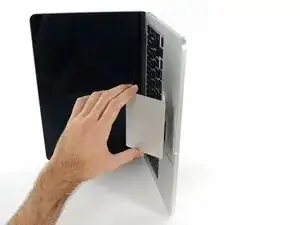
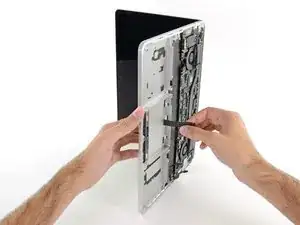
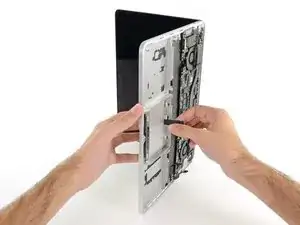
    • Versuche mit den Fingern zwischen das obere und das untere Gehäuse zu kommen.

    • Ziehe das untere Gehäuse behutsam vom Oberen weg.

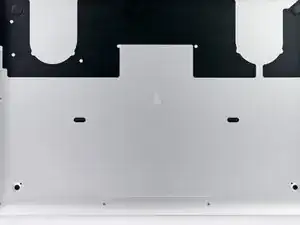
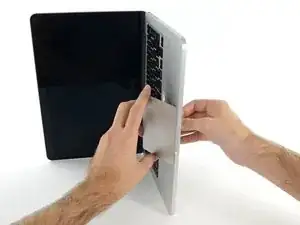
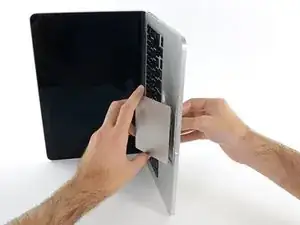
    • Entferne das untere Gehäuse und lege es zur Seite.

  3. q3ulIPMQTbiPuDUF
    q3ulIPMQTbiPuDUF
    muPIBpQokGnUUXJP
    SLwb4KCgFZKfLR2B
    • Das untere Gehäuse ist in der Mitte durch zwei Plastikklammern mit dem oberen Gehäuse verbunden.

    • Drücke beim Wiederzusammenbau das untere Gehäuse in der Mitte leicht an, damit die beiden Plastikklammern wieder einrasten.

  4. oh6QmDClHy3Es55f
    • Entferne die Plastikabdeckung über der Platine des Akkuanschlusses.

  5. AvPUsRLbmXLZWSlb
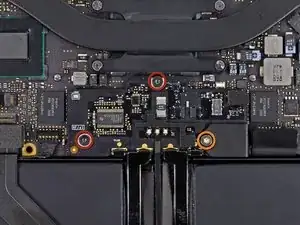
    • Entferne die folgenden Schrauben, mit denen die Platine des Akkuanschlusses am Logic Board befestigt ist:

    • Zwei 2,8 mm T6 Torx Schrauben

    • Eine 7,0 mm T6 Torx Paß-Schulterschraube

  6. eYeaxKQXRIv43WNX
    eYeaxKQXRIv43WNX
    INge1d6OYG2XdrMr
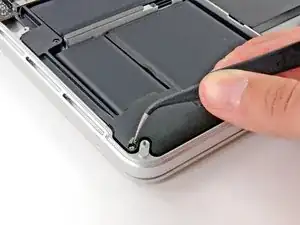
    • Mit einer Pinzette kannst du die Plastikabdeckung rechts an der Platine des Akkuanschlusses entfernen.

    Is adhered to screw beneath, so lift firmly and slowly.

    Andrew -

    when doing this with metal tweezers as instructed in the video, it was difficult to get off and apparently while i was trying to do it, the tweezers went too far under and i believe made contact with the screw underneath? there was a zzz noise, an orange flicker and a little stream of smoke that came out. i freaked out and put everything back together to see if the laptop even still worked, it turned on and everything but died right away (i drained it before doing the repair anyway, so i was surprised it turned on at all).

    i finished the battery repair and did several other things while in there. i have charged it all the way as recommended and will use it later on to see how everything is, im hoping that it’s a okay, but could someone explain to me what happened and the possible consequences?

    Kait D -

  7. 3h3p5bF5gSsxU3H1
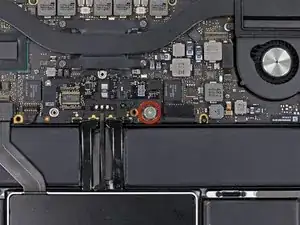
    • Entferne die 6,4 mm T6 Torx Breitkopfschraube, mit der die Platine des Akkuanschlusses am Logic Board befestigt ist.

  8. KnflDJ6YcW61sb3S
    KnflDJ6YcW61sb3S
    Y3LPyukbnPaH2Qua
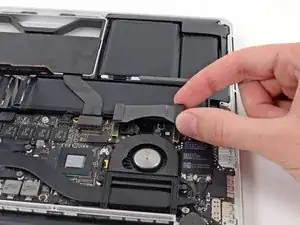
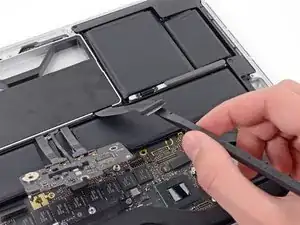
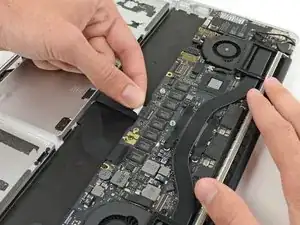
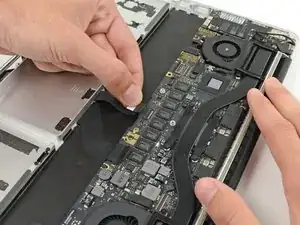
    • Ziehe die Platine des Akkuanschlusses vorsichtig vom Logic Board ab.

    • Es empfiehlt sich, die Batteriekabel nur leicht zu biegen, um die Platine über dem Logic Board und aus dem Weg zu halten.

    • Du solltest die Platine nicht vollständig umklappen oder gar die Kabel falten, denn dies könnte den Akku beschädigen.

  9. wBB3HYE4h4RPE1gv
    wBB3HYE4h4RPE1gv
    oUwSuUJp4RWM4RSK
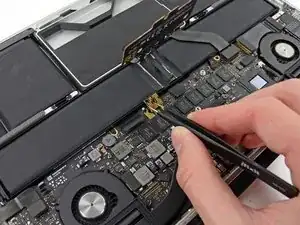
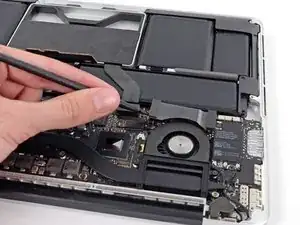
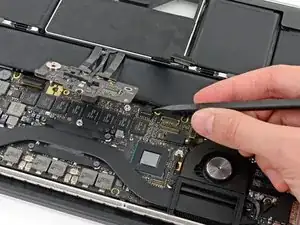
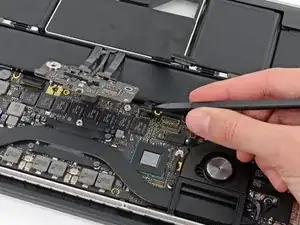
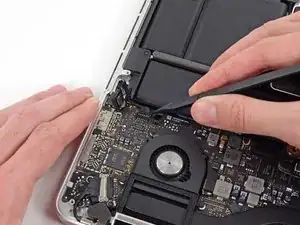
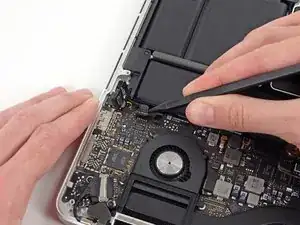
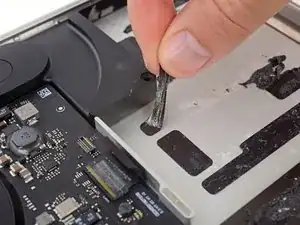
    • Schnapp dir den Interposer mit einer Pinzette.

    • Ein Interposer ist eine Schnittstelle, die eine elektrische Verbindung mit einer anderen verbindet. Bei dieser Reparatur ist es die Platine, die den Akku mit dem Logic Board verbindet.

    • Hebe den Interposer aus dem Logic Board heraus und entferne ihn.

    • Durch das Entfernen der Platine kannst du sicher gehen, dass der Akku während der Reparatur nicht mehr angeschlossen ist und so auch verhindern, dass der Computer versehentlich angeschaltet wird. Es ist auch deshalb eine gute Idee, die Platine herauszunehmen, weil sie sonst aus Versehen herausfallen könnte.

    How can I remove interposer I m not able to remove it

    Raunak -

    you must lift it absolutely vertically, or it fouls against the locator pin in the corner- you can easily get the impression that it won’t come over the end of this pin- almost like it’s rivetted in. it isn’t. get a good grip on it with the tweezers in the centre hole & one of the sides, & lift it STRAIGHT up.

    duncan rmi -

    I would recommend to use plastic tweezers in order to reduce risk of damage.

    Martin Sippel -

    wat is the model this SSD

    thierry.wilow -

  10. OZelarOBjAVaVFfX
    OZelarOBjAVaVFfX
    AqIx1EApvUJZuqXt
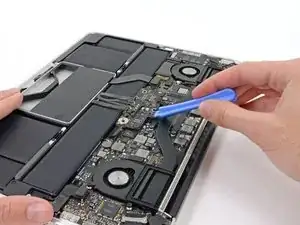
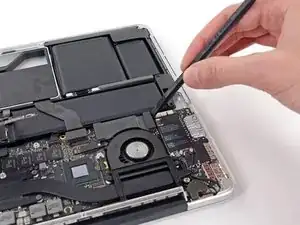
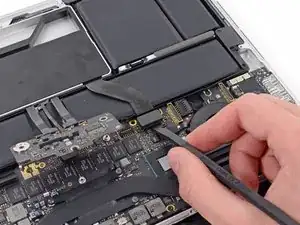
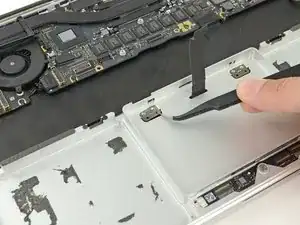
    • Mit dem flachen Ende eines Spudgers kannst du die rechte Seite des Anschlusses vom EA Board Datenkabel lösen.

    • Wenn du den Anschluss aus dem Stecker hebelst, achte bitte darauf, dass du den Hebel auch wirklich am Anschluss ansetzt und nicht am Stecker selbst. Wenn du den Stecker abhebeln würdest, könnte das zu irreversiblen Schäden am EA Board führen.

    I keep my fingernails fairly long, very handy for many computer repair jobs. This gives me 10 spudgers over which I have very fine muscular control. It is far easier to pop some of these tiny delicate MacBook parts loose with my nails.

    Ben Myers -

    Skip this step. For an easier, lower-risk repair, go straight to step 15 and just fold the speaker out of the way.

    .A. -

  11. QKxcNUeAhrixRuPH
    QKxcNUeAhrixRuPH
    fCYXnPX1iQDHNIaE
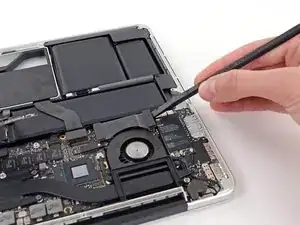
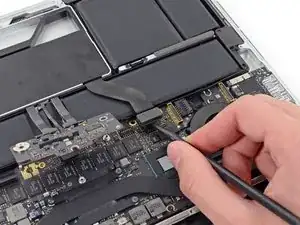
    • Führe das flache Ende des Spudgers unter die linke Seite des EA Board Datenkabelanschlusses.

    • Drehe den Spudger vorsichtig hin und her, um den Anschluss des EA Board Datenkabels aus dem Stecker auf dem Logic Board zu lösen.

    I also skipped this step as this data cable is not compromising the exchange of battery and less interaction with connectors is less risk of damage..

    Diesen Schritt habe ich ebenfalls weggelassen, da das Datenkabel den Austausch der Batterie nicht behindert und weniger Manipulationen an Steckverbindern bedeutet ein geringeres Risiko für Beschädigungen

    Martin Sippel -

  12. dWiQlHIlEeHEg2fO
    • Hebe das EA Board Datenkabel ab und entferne es vom MacBook Pro.

    This step is useless. Could be skipped

    Pierre S. -

  13. CTQFjoXtOgPwLrIS
    CTQFjoXtOgPwLrIS
    AjuDatPPf2Zjyt1F
    4KkLTuRpIoPVRcZF
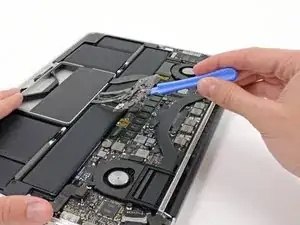
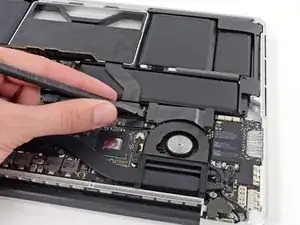
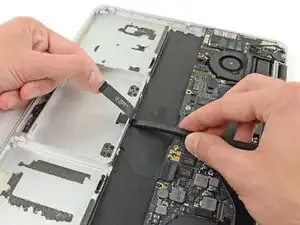
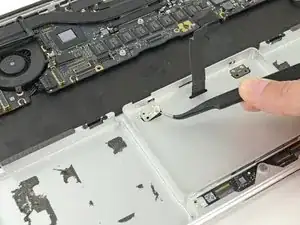
    • Heble den SSD Kabelstecker mit dem flachen Ende eines Spatels von der Buchse auf dem Logic Board.

    • Schiebe den SSD Kabelstecker aus dem Weg.

    As per my comment on step 10, this is also not required. When you remove the SSD in step 22, you can just fold it over out of the way.

    .A. -

    This step is easy enough that I’d just remove it to be out of the way. I 100% agree with your other comments though. While you’re here, might as well do step 21 and remove the drive, just takes a sec.

    maccentric -

    I also strongly recommend not to unmount the speaker plugs, just flip them out of the way, same as with the SSD drive. Makes it much less complicated and less risky. It worked perfect for me.

    Ich empfehle ebenfalls, die Platinenstecker der Lautsprecher nicht zu lösen sondern die Lautsprecher einfach, so wie das SSD-Laufwerk, einfach aus dem Weg zu legen. Das macht die Sache weniger kompliziert und weniger risikoreich. Es hat bei mir super funktioniert!

    Martin Sippel -

  14. TPfVFMgi1CPsEAui
    TPfVFMgi1CPsEAui
    TKPQmCYZiLnOlnrf
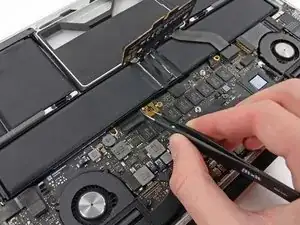
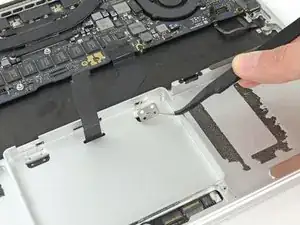
    • Fahre mit der Spudgerspitze unter den Kabelstecker des rechten Lautsprechers.

    • Ziehe den Kabelstecker des rechten Lautsprechers vorsichtig aus seiner Buchse auf dem Logic Board.

    • Achte darauf, dass du auch wirklich am Kabelstecker ziehst und nicht an der Buchse selbst.

    When reassembling be careful that the right speaker wire is flush against the battery. At first, it was slightly touching the airport/bluetooth board causing wifi and bluetooth to not work after restarting.

    Stu -

  15. IS4fFpXWeUrB2tGD
    IS4fFpXWeUrB2tGD
    XsPQG65wgAM6PYUC
    • Entferne die folgenden Torx T5 Schrauben, die den rechten Lautsprecher am oberen Gehäuse befestigen:

    • Eine schwarze 6,8 mm Schraube

    • Eine silberfarbene 6,3 mm Schraube

    • Eine schwarze 4,9 mm Schraube

    • Die silberne Eckschraube könnte mit einem Stückchen Schaumstoff abgedeckt sein, der dann mit einer Pinzette entfernt werden müsste.

    If you manage to misplace any screws, particularly one of the speaker retaining screws, look under the speakers - they are magnetic and great at hiding missing screws :)

    Peter Newman -

  16. DLfgjQrIOI4RtC16
    DLfgjQrIOI4RtC16
    pgHNnlGUEK4ohHqi
    • Hebe den rechten Lautsprecher ab und entferne ihn aus dem oberen Gehäuse.

    • Gegebenenfalls musst du das Kabel des rechten Lautsprechers aus dem Kabelkanal im oberen Gehäuse ziehen.

    For those who don’t realize it, the speakers you are removing really are the plastic corner pieces that look like they’re just there to fill the space.

    S Cockerille -

  17. ND1i5FHjBtM3ZDYb
    ND1i5FHjBtM3ZDYb
    ZY2abI6gejZRlVNY
    p1S4ofUTIZmcNIQt
    • Heble das Kopfhöreranschlusskabel mit dem flachen Ende eines Spudgers aus seiner Buchse auf dem Logic Board.

    • Biege das Kopfhöreranschlusskabel vorsichtig bis zu 90° weg vom Logic Board weg.

    • Durch dieses Wegbiegen des Kopfhöreranschlusskabels ist es dir nicht im Weg, wenn du den Kabelstecker des linken Lautsprechers trennst.

    For an easier, lower-risk repair, skip this step and step 18 - go straight to step 19 and fold the speaker out of the way.

    .A. -

    Agreed, this is the way

    maccentric -

  18. 2XnPiTJJHRf4plBI
    2XnPiTJJHRf4plBI
    PhagJEgp4wKycpCG
    • Führe die Spitze eines Spudgers unter den Kabelstecker des linken Lautsprechers.

    • Heble den Kabelstecker des linken Lautsprechers vorsichtig aus seiner Buchse auf dem Logic Board.

    • Achte darauf, dass du auch wirklich am Kabelstecker ziehst und nicht an der Buchse selbst.

    It's easier to follow Step 19 & 20 first and then come to Step 18 (this step). Doing so will make it easier to remove that speaker connector easily holding the cable of speaker without having to use a pry tool.

    Johhnie Doe -

  19. nrtdpScEP4kmlYUS
    • Entferne die folgenden Torx T5 Schrauben, die den linken Lautsprecher am oberen Gehäuse befestigen:

    • Eine schwarze 6,8 mm Schraube

    • Eine silberfarbene 6,3 mm Schraube

    • Eine schwarze 4,9 mm Schraube

    • Die silberne Eckschraube könnte mit einem Stückchen Schaumstoff abgedeckt sein, der dann mit einer Pinzette entfernt werden müsste.

    Be very careful on this step. If you aren’t you can snap the plastic on the corners where the screws go in. Remember to go slowly when spinning the screws back in, it doesn’t take gorilla torque to tighten them, just take it easy!

    Stacey Deel -

  20. T3MxHZ2JNDUGMAOP
    T3MxHZ2JNDUGMAOP
    GEiDIUvN6JjvIXoB
    • Hebe den linken Lautsprecher an und entferne ihn aus dem oberen Gehäuse.

  21. gTdRPTDqMMjsVMJm
    gTdRPTDqMMjsVMJm
    qxpBYXZfgNG5Hb5F
    UYvgWmZLd4BViAic
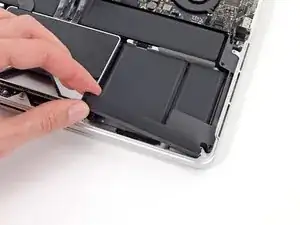
    • Drücke die Plastikfederleiste des SSD-Fachs mit dem Daumen (oder einem anderen Finger) ein, so dass die beiden Clips an der Vorderseite des Geräts frei werden.

    • Halte die Federleiste gedrückt und kippe die SSD Einheit aus ihrer Ausbuchtung.

  22. pWbTEW2yxdwMA3Fl
    • Entferne die SSD Einheit aus dem oberen Gehäuse.

  23. Nmxx2pGap6glP1oT
    Nmxx2pGap6glP1oT
    UQQdlgEj5L1FHS5V
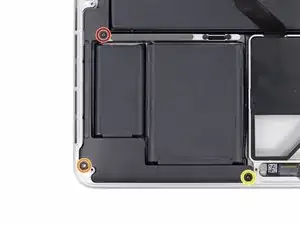
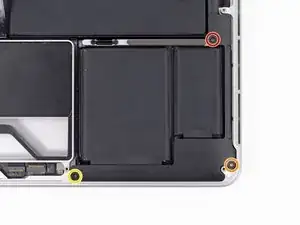
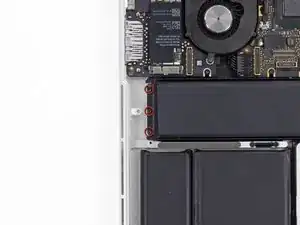
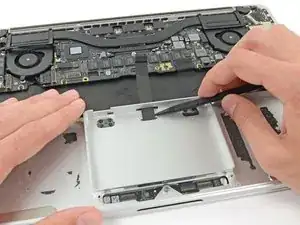
    • Entferne die drei 2,2 mm T5 Torx Schrauben auf beiden Seiten des Akkus (also insgesamt 6 Schrauben).

    If I were to do this again, I think I would leave unbolting the transverse battery until after ungluing the other four. That way one can tip the laptop on to one of its short sides and so run adhesive remover along the long edge of each battery and let gravity assist penetration without the transverse battery falling out.

    John -

    I think this is good advice.

    maccentric -

    I just did one of these that didn’t have these screws installed from the factory. Odd

    maccentric -

  24. DCbPFpVHuNDlbvlH
    • Der im Kit enthaltene flüssige Klebstoffentferner kann die Antireflexbeschichtung auf dem Display deines MacBook Pro beschädigen.

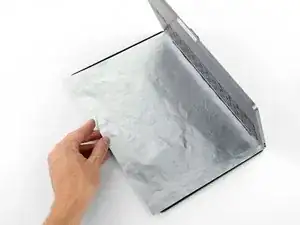
    • Lege eine Aluminiumfolie zwischen Display und Tastatur, um dein Display zu schützen. Die Folie sollte während des gesamten Arbeitsprozesses dort bleiben.

    You can use a heat gun to remove the adhesive. Remember you can always add more heat so don’t over do it. I put my heat gun on high for less than 10 seconds at a time

    BRUCEL86 -

    Using a heat gun on a lithium-ion battery is not a good idea. You can get away with it if you are careful, but a solvent is much safer. ;)

    Jeff Suovanen -

  25. kWdX6EyBKqBdoiKb
    kWdX6EyBKqBdoiKb
    DAuJB16Cd6kboU2q
    • Dein MacBook Pro ist jetzt gut vorbereitet, nun wird es Zeit, auch dich selbst vorzubereiten.

    • Der iFixit Klebstoffentferner enthält Aceton, welches Haut und Augen reizen kann.

    • Wenn du mit dem Klebstoffentferner arbeitest und ihn aufbringst, solltest du immer deine Augen schützen. (Eine Schutzbrille ist in deinem Kit enthalten).

    • Insbesondere auch wenn du Kontaktlinsen trägst, musst du zusätzlich die Schutzbrille aufsetzen.

    • In deinem Kit sind auch Schutzhandschuhe enthalten. Wenn deine Haut empfindlich ist, solltest du die Handschuhe jetzt anziehen.

  26. eHkQ32ZcFd1PxbRD
    eHkQ32ZcFd1PxbRD
    5UmWwkUFqXrcouBg
    ndaMjSVK2WJTHCSt
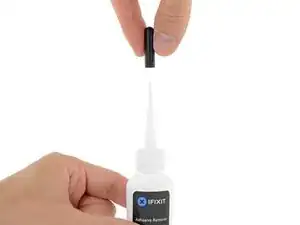
    • Ziehe den schwarzen Gummistopfen von dem Fläschchen mit Klebstoffentferner ab.

    • Drehe die Kappe der Flasche, um sie lösen oder zu entfernen, bevor du die Spitze des Applikators abschneidest.

    • Die Versiegelung der Flasche wird dadurch geöffnet und der Druck kann sich ausgleichen, bevor du die Applikatorspitze abschneidest. Wenn du diesen Schritt übergehst, dann kann die Flüssigkeit beim Abschneiden der Spitze unkontrolliert herausspritzen.

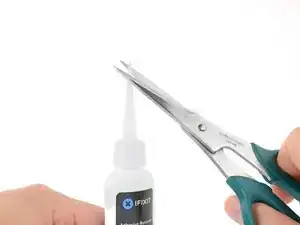
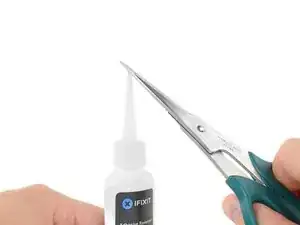
    • Schneide die verschlossene Applikatorspitze mit einer Schere ab.

    • Schneide die Spitze an der engen Stelle ab. Dadurch kannst du den Klebstoffentferner beim Ausfließen besser kontrollieren.

    • Drehe die Abdeckkappe wieder auf und verschließe sie gut, bevor du fortfährst.

    The new applicator tip doesn't need to be cut as indicated in the instructions. Instead, use a pin (one is provided in the battery replacement kit multi-tool handle) to puncture the tip, not forgetting to loosen the bottle cap to equalize pressure.

    Joe Smith -

  27. JbUZvXMEuciFWvBf
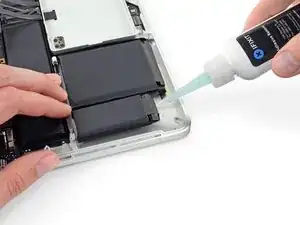
    • Gib einige Tropfen des Klebstoffentferners gleichmäßig unter den Rand der am weitesten links liegenden Akkuzelle.

    • Du musst nicht sehr viel vom Klebstoffentferner verwenden. Das Fläschchen enthält mindestens die doppelte Menge, die du brauchst, um alle Akkuzellen zu entfernen.

    • Warte 2-3 Minuten, bis der flüssige Klebstoffentferner unter die Akkuzelle eingedrungen ist, bevor du mit dem nächsten Schritt fortfährst.

    If you use a heat gun be sure to point the heat gun away from the motherboard. After heating for 10 seconds or less use the blunt end of the metal pry tool as you don’t want to puncture the battery. You don’t need much force as after you have enough heat you will hear it unsticking when you pry at it lightly with the BLUNT end of the metal pry tool. Repeat this step on the other side. You don’t need to heat the cells near the motherboard as they are secured with small screws

    BRUCEL86 -

    I replace a lot of glued in Macbook batteries and you really do not need ISO to get them out. These wide blade plastic spudgers are brilliant and cheap. https://www.aliexpress.com/item/32824615... Image here https://imgur.com/a/0Y0Yvyj

    Peter Newman -

    May not need it to remove the battery, but it sure helps for removing the leftover residue and black VHB that’s left behind. I found that dousing the VHB and using a metal flat spatula helped.

    maccentric -

    Some good advice:

    Use a iFixit plastic card/credit card (work from the short side of the computer) and stick it under the battery towards the glue strip and hold the card approx 45° (or whatever angle is appropriate) and drip the glue remover on the card so it slides/runs down the card underneath the battery. In this way the glue remover is aimed straight to the glue under the battery to ‘eat its way’ onto the glue. Let it do its job for a minute or two. Then you can dig in the card even more underneath (the angle of the card will obviously be less and less as you get further in; the idea is just to somehow slide the liquid under), add a bit more remover, dig a bit more, etc…

    Otherwise the glue remover can get a bit all over the place but this way it is more easily directed towards the glue.

    Johan Nilsson -

    Goo Gone, applied with a pipette, is a non-flammable alternative solution for releasing the adhesive that won’t harm plastics if it seeps past the battery cavities. It does take a bit longer, 30-45 mins, but is much safer. An additional benefit is that the adhesive will be completely separated from the top-case, so cleanup is super quick.

    John Grzeskowiak -

    Hi John,

    We don’t recommend using Goo Gone because it’s a petroleum distillate based remover, which leaves an oily residue. The residue can prevent replacement adhesive from fully bonding with the surface. Be sure to clean any Goo Gone surface with a detergent-based cleaner.

    Isopropyl alcohol and iFixit’s adhesive remover are formulated to evaporate quickly and leave little residue, which allows replacement adhesive to bond properly to the surface.

    Arthur Shi -

  28. epuWPc25hsXCpGXH
    epuWPc25hsXCpGXH
    ksweBYj4T1YhK5jd
    WaSGFhaWQp1NwNrP
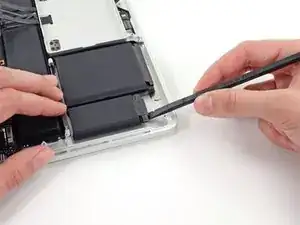
    • Setze das flache Ende eines Spudgers oder eine Plastikkarte unterhalb der am weitesten links liegenden Akkuzelle an.

    • Führe dein Werkzeug am unteren Rand der Akkuzelle entlang und hebe es an, so dass der Kleber beginnt, sich zu lösen.

    This is the most difficult step. The tip of my spudger got bended and the aluminum case damaged it.

    Ahmed Almulhim -

    I also broke a spudger trying to do this. Eventually I figured out it is easier to go in diagonally from the corner, just to one side of the screw hole, and lever until you hear the adhesive pad tear and give way.

    Matt Sephton -

    we use a hair dryer and gently blow hot air in between the battery for a good minute before trying to lift it with a spunger. It worked wonderfully! When lifting, just give it constant force upward and you'll hear the battery slowly breaking away from the macbook, and we don't even see glue residues on our macbook at all. Just be patient. :)

    Allen Lin -

    Just a note to say that the above comments were written before the liquid adhesive remover was added to the guide—you should definitely NOT be breaking any spudgers using the current procedure, which requires very little force. I recommend using plastic cards rather than spudgers—it's pretty easy to slide them under each battery cell and separate the adhesive once the solvent has done its work.

    Jeff Suovanen -

    This is much easier to do using a plastic card. Just slide the card under the side of the battery and rock it back and forth. The battery will separate pretty quickly with minimal residue.

    lukecparr -

    by a plastic card, do you mean a credit card type thing? thanks in advance.

    Jennifer McPherson -

    Exactly—one of these or an old credit card should work fine.

    Jeff Suovanen -

    I second this, I also used an old credit card and it totally worked! I did not use any heat or liquid

    yas.siqueira -

    Some good advice:

    Use a iFixit plastic card/credit card (work from the short side of the computer) and stick it under the battery towards the glue strip and hold the card approx 45° (or whatever angle is appropriate) and drip the glue remover on the card so it slides/runs down the card underneath the battery. In this way the glue remover is aimed straight to the glue under the battery to ‘eat its way’ onto the glue. Let it do its job for a minute or two. Then you can dig in the card even more underneath (the angle of the card will obviously be less and less as you get further in; the idea is just to somehow slide the liquid under), add a bit more remover, dig a bit more, etc…

    Otherwise the glue remover can get a bit all over the place but this way it is more easily directed towards the glue.

    Johan Nilsson -

    I attacked it from the longest side using the plastic card after initially sticking in the spudger. encountered some resistance so I reapplied the adhesive remover and went in with a plastic card. hardest step to me was cleaning up the adhesive remnants

    C C -

    My MBP identifies as late 2012/early 2013, and don’t know where you come up with a separate identity.

    Looking at both disassembly procedures, neither shows the aftermarket (probably NewerTech or OWC) battery I found in this MBP.

    That’s disconcerting; finds one asking myself - “Am I using the right procedure??”

    if you know this might be the case, please add note to this step if the user finds only 4 physical cased batteries.

    Tnx!

    prreitz -

  29. hQVPwVMQdoFqaMCV
    hQVPwVMQdoFqaMCV
    Ldd4AJ4sJCgDirjn
    aVtTCJbcYIQXviAQ
    • Setze den Spudger an der linken Seite der am weitesten links liegenden Akkuzelle an.

    • Führe den Spudger an der linken Seite der ganz linken Akkuzelle entlang.

    • Heble ganz leicht an der ganz linken Akkuzelle, um den Kleber zu lösen.

  30. yRaF4CWNLGRrueNb
    yRaF4CWNLGRrueNb
    qMNPTs3vpubiesWj
    wUksictQ1OH5yqkN
    • Wiederhole die obigen Schritte, um die danebenliegende Akkuzelle vom Kleber zu lösen:

    • Lasse einige Tropfen des flüssigen Klebstoffentferners unter die Akkuzelle laufen.

    • Warte 2-3 Minuten, damit der Klebstoffentferner ganz eindringen und den Kleber und aufweichen kann.

    • Zwänge vorsichtig einen Spudger oder eine Plastikkarte nach innen und achte dabei immer darauf, den Akku nicht zu beschädigen. Löse so die Akkuzelle von dem Kleber, mit dem sie am MacBook Pro befestigt ist.

  31. ClJjgNXKRHqwvHpX
    ClJjgNXKRHqwvHpX
    rrm4PwGQNGILCUUm
    5nFOeJtDeRnYjCDB
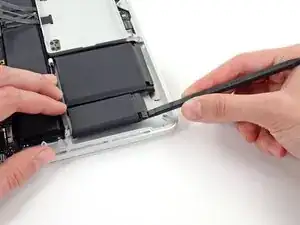
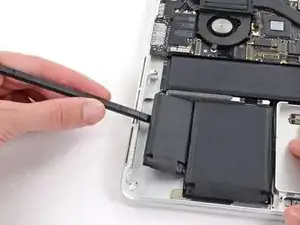
    • Setze das flache Ende eines Spudgers unter der größeren ganz links gelegenen Akkuzelle.

    • Zwänge den Spudger vorsichtig nach innen und achte darauf, die Akkuzellen dabei nicht zu beschädigen.

    • Heble die größere ganz links gelegene Akkuzelle nach oben aus dem oberen Gehäuse heraus.

  32. b3DUPHygwdTHSeui
    b3DUPHygwdTHSeui
    jHMmryPf1mROlVxU
    aMkHCKHZV6TYkJkL
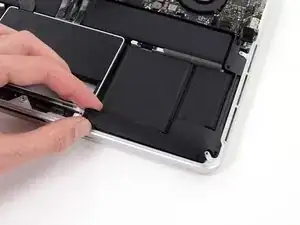
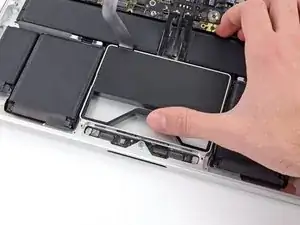
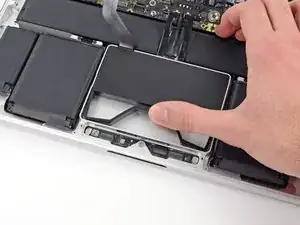
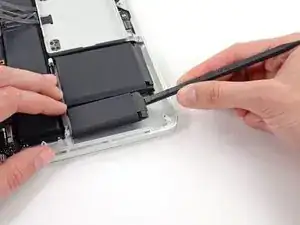
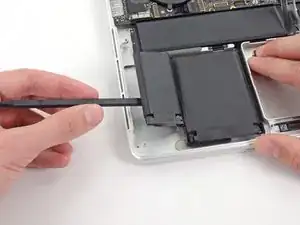
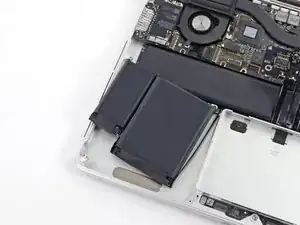
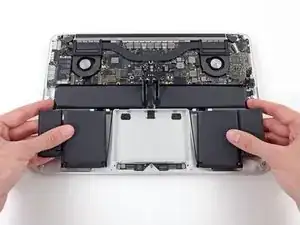
    • Fasse die Akkuzellen nun mit der Hand und bewege sie vorsichtig aus ihrer Einbuchtung im oberen Gehäuse heraus, entferne sie aber noch nicht.

    • Lasse die Akkuzellen auf dem oberen Gehäuse liegen, so wie im dritten Bild zu sehen ist.

  33. FDFlxPOB4YLTPKB2
    FDFlxPOB4YLTPKB2
    iyctAEcY12umVUbC
    KOwYtDNHAMxpuYwu
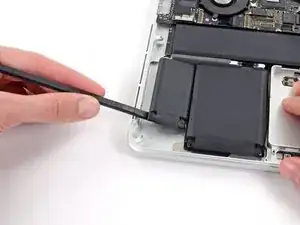
    • Wechsle die Seite und wiederhole den obigen Vorgang mit den beiden Akkuzellen auf der rechten Seite des MacBook Pros.

    • Denke daran, ein wenig von dem flüssigen Klebstoffentferner unter jede Akkuzelle zu träufeln und dann etwa 2-3 Minuten einweichen zu lassen, bevor du die Akkuzelle heraushebelst.

    • Achte darauf, die Akkuzellen nicht zu punktieren oder anderweitig zu beschädigen.

    Puncturing the battery’s protective covering can lead to release of caustic fumes or fire.

    Chris Leeds -

  34. akmVoIBhyFU22bJJ
    akmVoIBhyFU22bJJ
    D4jCJOhhnOQMvN4R
    imHRIj6xPWrUNuwH
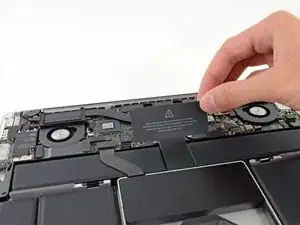
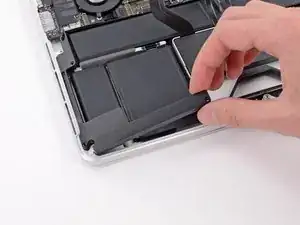
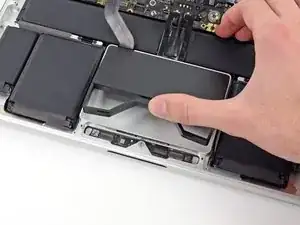
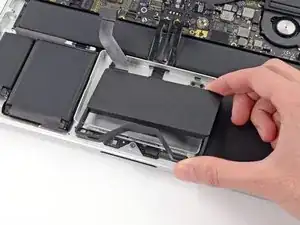
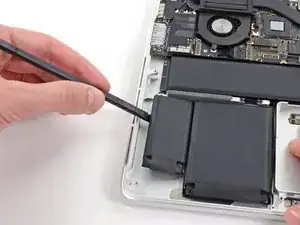
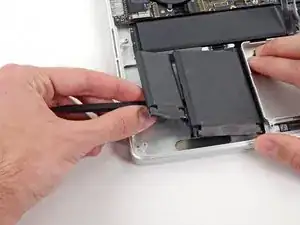
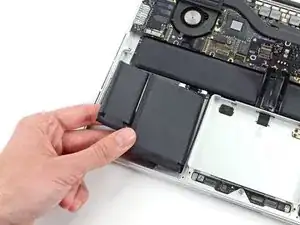
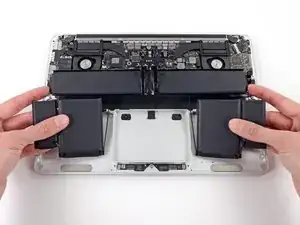
    • Hebe den Akku nun als Ganzes aus dem oberen Gehäuse heraus und entferne ihn.

    • Entferne alle alten Klebereste aus dem Gehäuse des MacBook Pro, bevor du einen neuen Akku einsetzt.

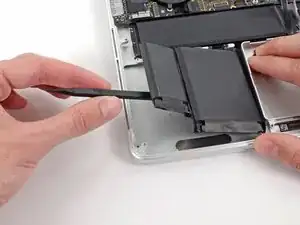
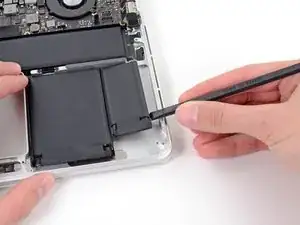
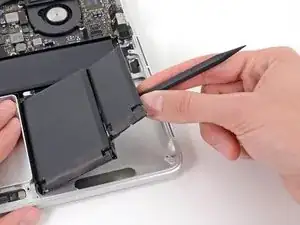
    • Mit etwas Glück kannst du jeden einzelnen Klebestreifen langsam mit den Fingern abziehen.

    • Falls das nicht klappt, träufle etwas Klebstoffentferner auf jeden Klebestreifen und lasse ihn 2-3 Minuten einwirken. Dann kannst du die Klebestreifen mit einem Plektron oder einem anderen geeigneten Werkzeug aus deinem Kit abkratzen. Das ist etwas langwierig, hier hilft dir nur Geduld!

    • Wische den restlichen Klebstoffentferner ab und lass dein MacBook Pro ein paar Minuten an der Luft trocknen.

    • Beim Ersatzakku sind die Klebestreifen bereits angebracht. Probiere zunächst aus, wie der Akku hineinpasst und achte darauf, ihn genau auszurichten, bevor du die Schutzstreifen vom Kleber abziehst. Anschliessend musst du jede Zelle gut festdrücken. Zusätzliche Folien, die sich nicht auf dem Originalakku befanden, solltest du jetzt entfernen.

    • Kalibriere deinen neu eingebauten Akku: Lade ihn auf 100% und lasse ihn mindestens zwei weitere Stunden am Ladegerät. Ziehe den Stecker und benutze dein MacBook normal, um den Akku zu entladen. Wenn die Ladeanzeige am Minimum ist, dann speichere ab und lasse den Laptop an, bis er von selbst ausgeht. Warte wenigstens 5 Stunden und lade ihn dann auf 100% auf.

    • Wenn dir nach dem Einbau deines neuen Akkus etwas Ungewöhnliches auffällt oder Probleme auftreten, kann es sein, dass du den SMC deines MacBook Pros zurücksetzen musst.

    During battery replacement take care to position the two left and right battery packs inwards and upwards towards the macbook center such, that there is sufficient space for reinstallation of the two speakers!

    Fred Ziegler -

    I second Fred’s suggestion. I had to “smoosh” the right speaker in since my battery replacement was a little bit too far over. It was fine, but the “heads up” note is warranted.

    David Ryan -

    If you're replacing the top case that includes a new battery, can't you skip removal of the battery?

    jaredcastello -

    Yes!! If uppercase Assembly(Includes Trackpad, keyboard, Palmrest & BATTERY) is being replaced, there is no need to remove battery from old uppercase assembly.

    Macrepair SF -

    When you are at this step and before you put the new battery in, take the time to clean your computer really well. You will be surprised how much dust/dirt and even pet hairs have gotten into your computer. After I removed the battery, I use a little more of the acetone to clean the bays up and after it dried, I used a tiny bit of Isopropyl Alcohol to make sure there was a good clean area for the new bonding. Make sure you clean the fans. Don’t use a toothbrush or anything like that. If your have a Lowes or Home Depot, you can buy a shop vac attachment kit for about $20, it’s well worth it. Don’t use that air in a can crap, it will put moisture on circuits. Take your time, it’s not a hard task to do everything, just use a little patience.

    Stacey Deel -

    Hi all,

    After installing the new batteries, my mac is not powering up… Do i need to charge the battery first and then check again? Have anyone faced similar issue before?

    My 1st battery from ifixit came out to be defective and it caused fire at the centre of the long battery. I have got a replacement for the defective piece which i have installed now. However, now i am worried that connecting to power could lead to any potential fire / harm to my mac???

    Already i have spent lot of time in this and it would be very upsetting if this battery spoils my mac!!!

    Any suggestion people???? thanks in advance!

    BR,

    Vijay

    Vijayaprasath Rajendran -

    Hi Vijay!

    Uh-oh, we’re sorry to hear about the battery trouble!

    Our batteries come with a 1-year warranty, so this would definitely be something we can assist with. Please feel welcome to reach out via help.ifixit.com and provide our Support team with your order number so that they can look into these battery troubles with you.

    Thanks!

    Kadan Sharpe -

    Hi All,

    Just replaced battery, and am typing this on the live MacBook. The unit fired up as soon as I plugged in the power adapter. Nice. The battery percentage indicator said the battery had approximately 85% power charge. Is this normal? If not, what steps should I take to ensure that this battery is properly calibrated?

    Cheers,

    James

    James Pineda -

    Hi James,

    Follow these steps to calibrate your new battery: https://help.ifixit.com/article/265-batt...

    Sam Omiotek -

    日本語翻訳ありがとうございます。大変分かりやすかったです。

    1点だけ、下記タイプミスだと思います。

    カリブレーション→キャリブレーション

    kazika -

    ご指摘ありがとうございました!訂正済みです。

    Midori Doi -

    Can someone tell me which model is written in the battery? I saw that is written the model a1437. Is this model compatible with the a1425? Thanks

    mizuno.doss -

    Hi Mizuno,

    The battery model is A1437, and it is compatible with the MacBook Pro model A1425.

    Arthur Shi -

    These instructions are brilliantly concise! Thank you. And thank you everyone for your comments. As a final comment from me, it is much easier to assess the final position of the batteries if you place them gently in position, reinstall the speakers, adjust the battery position if needed and then press them firmly into place.

    John -

    Ive never done anything like this before ….took less than an hour. Everything looks good…….. Thanks IFIXIT. Save the planet fixit.

    cquirolo -

    I did everything in the kit, but my computer won’t acknowledge the battery and is only running on my power adapter. Once I take off the power adapter it shuts down. I also tried resetting the snc, but unsure if it did anything. I reopened up the back to see if I missed anything. The batteries are warm, which means they were running. I’m very confused, anybody else run into similar issues?

    Alice -

  35. h32TG5Q2x46JGQxU
    h32TG5Q2x46JGQxU
    G21s6E5Wwdsut2Tc
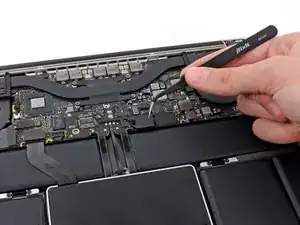
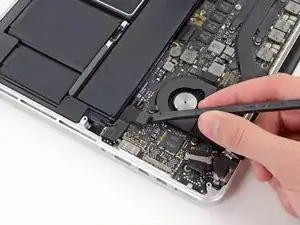
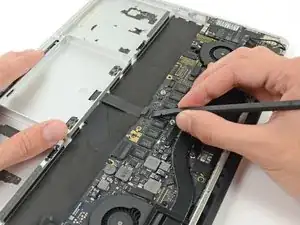
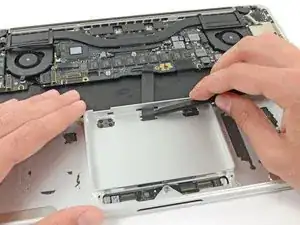
    • Klappe mit dem flachen Ende des Spudgers den Sicherungsbügel am ZIF Sockel des Flachbandkabels zum Trackpad hoch.

    • Achte daruf, dass du nur an dem scharnierartigen Sicherungsbügel selbst, nicht am Sockel hebelst.

    It looks like you could skip the entire battery removal procedure if you simply left the trackpad cable in place, disconnected it at the trackpad end, and used the old cable on the new trackpad?

    John M -

    You could try it, but there’s very little slack in that cable. I think you’ll have a hard time disconnecting the trackpad without straining or tearing the cable.

    Jeff Suovanen -

  36. GuDI2tKLwnl6cSUv
    GuDI2tKLwnl6cSUv
    1elQHCXl2OTk1ewr
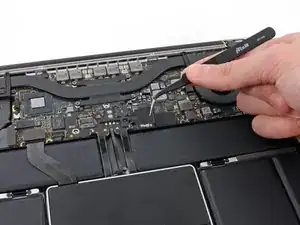
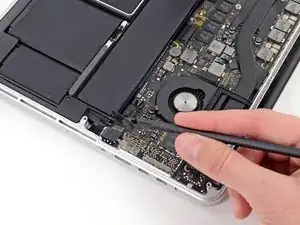
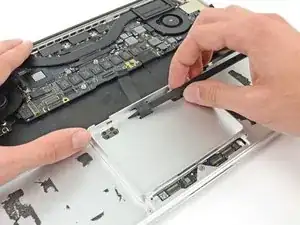
    • Fasse die Plastikzuglasche an und ziehe das Flachbandkabel zum Trackpad aus seinem Sockel heraus.

  37. aYbFPAs3xbDt1jXd
    aYbFPAs3xbDt1jXd
    Bb4jJoQvvISDPNBy
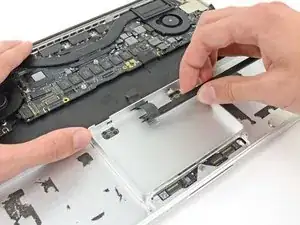
    • Zwänge den Spudger zwischen das Flachbandkabel zum Trackpad und das oberen Gehäuse.

    • Führe den Spudger entlang der Unterkante , um so das Flachbandkabel zum Trackpad aus der Klebeverbindung zum oberen Gehäuse zu lösen.

  38. 15hZFZGIboL5CCEC
    15hZFZGIboL5CCEC
    GZGao1wq3RACkiRW
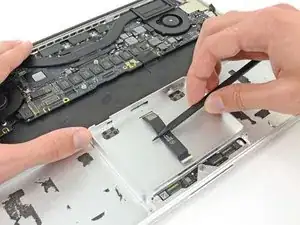
    • Setze die Spudgerspitze zwischen das Flachbandkabel zum Trackpad und dem oberen Gehäuse innerhalb der Einbuchtung für die SSD Einheit. Löse so auch die letzten Reste des Klebers.

  39. Y2xJcgO1mShgWNIN
    Y2xJcgO1mShgWNIN
    eA5dlrMdkPQ3S55I
    iECAopEHTYmY5Xtb
    • Ziehe das Flachbandkabel zum Trackpad vorsichtig mit der Spudgerspitze aus den Ausschnitt oben in der Einbuchtung der SSD.

  40. wjkGlKxUMviMtJ2G
    • Entferne folgende Kreuzschlitzschrauben #000, welche die Halterungen des Trackpads am Trackpad und am oberen Gehäuse befestigen:

    • Vier 1,9 mm Schrauben

    • Vier 1,4 mm Schrauben

    Don’t remove the Four 1.9 mm Phillips #000 screws, you will save time afterwards.

    Pierre S. -

  41. MMnsapTcXBoVICvd
    MMnsapTcXBoVICvd
    MRHNJXcNH1p1da1B
    DKffCDYTnwfbTSiL
    • Entferne die beiden Halterungen des Trackpads mit einer Pinzette vom oberen Gehäuse.

    If you don’t remove the Four 1.9 mm Phillips #000 screws, this step is skipped

    Pierre S. -

  42. JIrLXojFIybWybeW
    JIrLXojFIybWybeW
    GW15eEHlAYM51vLN
    • Um Kratzer am Display zu vermeiden, öffne den Computer etwa 90° und stelle ihn auf die Seitenkante.

    • Führe das Fachbandkabel zum Trackpad durch den Schlitz im oberen Gehäuse. Dadurch wird das Trackpad aus seiner Vertiefung oben im oberen Gehäuse herausgedrückt. Leite das Trackpad dabei mit deiner anderen Hand heraus, so dass es nicht herunterfällt.

  43. PNFpySyCxPukDSKV
    PNFpySyCxPukDSKV
    eu1uAyEhKd2tjulB
    NbiANjDbfnbTNM3M
    • Ziehe vorsichtig das Trackpad vom oberen Gehäuse weg, achte dabei darauf, dass das Flachbandkabel sich nicht verhakt.

Abschluss

Um dein Gerät wieder zusammenzusetzen, folge den Schritten in umgekehrter Reihenfolge.

Sam Goldheart

Mitglied seit: 19/10/12

457712 Reputation

8 Kommentare

No need at all to do all of this. Unless your ribbon cable is dead. Otherwise just pull up the SSD and that's it. Took 1mn30 to do..

Philippe -

Figured that out- remove the top battery! Sorry - didn't read through all the directions carefully!

Ark -

This can be done without removing the battery. The touchpad ribbon cable can be disconnected on the logic board, then snaked (gently!!) back out its channel with the battery in place.

It won't thread back through when replacing the touchpad though - it's not stiff enough. Instead, cut a strip of material from a manila folder and thread that through the channel under the battery. Then use masking tape to attach the touchpad cable to the manila strip and pull the strip out towards the logic board. The touchpad ribbon threads through the channel and the masking tape can be removed once it's in place.

Only the battery connector, SSD cable, and SSD carrier need removed.

R.G. Keen -

I agree with the last comment. But I would prefer loosening the center battery and lifting it up to guide the trackpad cable easily. This also makes it easier to reinsert it into the connector during reassembly.

Robert -

Steps 24-34 are UNNECESSARY for this repair! Removing the adhesive portion of the battery is not required to remove the trackpad. Just lift up the top part of the battery that is screwed in and unplug the trackpad cable.

bizwfshane -

I agree with sinwillet’s comments above; I repacked the battery and trackpad and did not remove the speakers entirely or the I/O board data cable

Note that the replacement trackpad may not have the ribbon cable or it may be the wrong length. Ok because you can reuse the ribbon cable on the original trackpad, as Philippe suggested above.

David -

How do you adjust the trackpad sensitivity? EG>.. the silver screw at the bottom?

John Spitta -

You just need the proper driver bit (I believe it is a Torx 5/T5 ?) first, follow steps 1-4 to remove the bottom cover, then the set screw is at the lower portion of the unibody frame smack dab in the bottom middle of the trackpad edge. To “tighten” the click (if click is not occurring or too “loose”), turn the set screw 1/8th turn in a clockwise direction. Then test the click t see if it improves, if not go 1/8th turn at a time. If you turn it too much or turn counter-clockwise too much it will release from its mount hole and they are REALLY annoying to try to re-thread.

just chris... -