Einleitung
Dies ist eine interne Prereq-Anleitung.
Werkzeuge
-
-
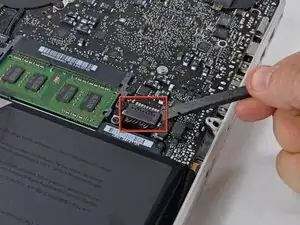
Löse mit der Kante eines Spudgers den Akkuanschluss nach oben, weg vom Sockel auf dem Logic Board.
-
Abschluss
Arbeite die Schritte in umgekehrter Reihenfolge ab, um dein Gerät wieder zusammenzubauen.


Just to disconnect any power source to avoid damages by short-circuits.
MrKane -
How do you get that battery connector back on? Do you just press it in back in place after you're done?
Horace Chung -
yes. I usually plug it in before I screw it down so I can lift the battery a bit and have enough slack to be able to go straight down on the connector, otherwise it comes in on a bit of an angle, which can't be good (though not necessarily bad).
maccentric -
This step almost finished me, and I did extensive damage to the battery plug. Fortunately, I later replaced the battery, and the replacement came with a new plug! :) Newbies need to know - 1. The battery plug is like a thin lip on a thicker lip, so you need to pry BETWEEN 2 thin lips to get it off, else you are trying to yank out the socket. 2. Mine was initially VERY tight, and trying to get it out broke the plastic on all sides of plug, even though I was as careful as possible. Luckily, this didn't hurt functionality and I later replaced the battery. AFTER disconnecting once, it was never so tight again,
Jeff Diamond -