Einleitung

Diese Anleitung zeigt dir, wie du den SuperDrive in deinem Laptop austauschen kannst. (SATA SuperDrive erforderlich).

  1. dOyroxuUBfNu1T4K
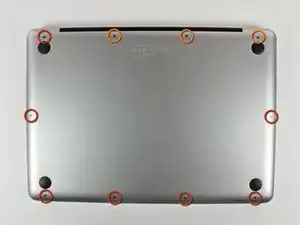
    • Entferne die folgenden 10 Kreuzschlitz-Schrauben, die die Gehäuse-Unterseite des MacBook Pro 13" Unibody befestigen:

    • Sieben 3 mm Schrauben.

    • Drei 13,5 mm Schrauben.

    Compare the short screws carefully before reinstalling them. The shouldered screws go in the holes on the front edge.

    David Kilbridge -

    Before I started removing any screws I took a piece of paper and drew the bottom of the laptop and put a piece of double-sided tape in the spot where each screw goes. That way when I took out the screws, I could put them on the tape so I knew exactly which screw went in which spot. I did the same thing for dismantling the inside on another sheet of paper, then a third sheet for the screen after getting the front glass off.

    mastover -

    I use a similar technique: I print out the iFixit manual for the job, and Scotch-tape down the screws/brackets/cables I remove at each step next to the component descriptions. That way, when I'm reassembling, the bits are taped right next to the photo of where they came from.

    adlerpe -

    That's exactly what I do for all my repairs! It's the best way to keep track of all of the parts ' original location and to make sure that you don't miss any parts during reassembly.

    joyitsjennie -

    Great idea and one I use often

    Thomas Overstreet -

    Excellent idea! Thanks for sharing it here.

    Laura Sharkey -

    I used a 00 that fit but the screws were very tight so I used a tiny paintbrush with some wd40 on it and put it around the edges of the screws. Worked like a charm

    valentinedhdh -

    I use a magnetic mat and place the screws in order on that :)

    Cary B -

  2. bLtKOLyJdyAxkZaG
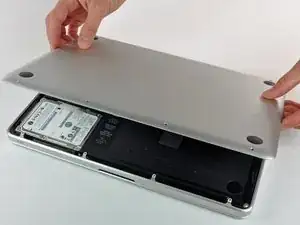
    • Hebe die Unterseite vorsichtig an und drücke sie Richtung Rückseite des Laptops, um die Halterungsclips zu lösen.

    In the introduction you should link fixers to this excellent doc: https://www.ifixit.com/Misc/HD_Software_...

    It is really critical, super easy, and free(!) to clone your existing drive onto the new one you will install. I ran into one error, but SuperDuper! support replied immediately on how to fix it...Thanks ifixit and SuperDuper! (I ponied up the $28 for the software anyway, I was so impressed!)

    Mike -

    Long story short: I drank the AppleKoolAid back in 1984 and have always left the guts of my machines up to Apple - until recently when I needed to swap the SATAs from my original MacDaddy (2009 13" MBPro that I killed in 2018 - coffee + blackout = OOOOPS) into a pristine 2009 MBPro from a Goodwill in North Carolina through eBay. I need the files from iCal and MacMail that can't be opened in my newer machines.

    Well . . . I ain't never done nuttin' like that, before!

    Enter Luke Miani on YouTube. He raves about you guys! So, I watched everything I could, read your site, bought the right tools and at the ripe old age of 72, I sat down, this morning and did the work. Now my original MacDaddy lives in MacDaddy2.0.

    Am I allowed to cry?

    Seriously, I can't thank you enough for your bitchen site and killer tools. I wish I'd'a been turned on to this shizzle 30+ years ago.

    IFIXIT - IDIGIT!

    kath myers -

    HAHAHAHAHAHAHAHAHAHA.

    That was a brilliant read.

    Yes, I came across ifixit a few years ago. Totally helped me out on several occasions.

    Glad your Mac repair journey worked out.

    :)

    Cary B -

  3. B1SUXfcr5fruMavs
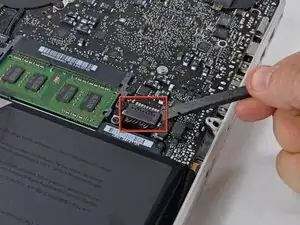
    • Wir empfehlen, vorsorglich den Akkuanschluss vom Logic Board zu lösen, um eine elektrische Entladung zu verhindern.

    • Löse mit der Kante eines Spudgers den Akkuanschluss nach oben, weg vom Sockel auf dem Logic Board.

    Zitat von gansodesoya:

    why is step 3 necessary?

    Just to disconnect any power source to avoid damages by short-circuits.

    MrKane -

    How do you get that battery connector back on? Do you just press it in back in place after you're done?

    Horace Chung -

    yes. I usually plug it in before I screw it down so I can lift the battery a bit and have enough slack to be able to go straight down on the connector, otherwise it comes in on a bit of an angle, which can't be good (though not necessarily bad).

    maccentric -

    This step almost finished me, and I did extensive damage to the battery plug. Fortunately, I later replaced the battery, and the replacement came with a new plug! :) Newbies need to know - 1. The battery plug is like a thin lip on a thicker lip, so you need to pry BETWEEN 2 thin lips to get it off, else you are trying to yank out the socket. 2. Mine was initially VERY tight, and trying to get it out broke the plastic on all sides of plug, even though I was as careful as possible. Luckily, this didn't hurt functionality and I later replaced the battery. AFTER disconnecting once, it was never so tight again,

    Jeff Diamond -

  4. 3y4Jy2Q51Si2t4gD
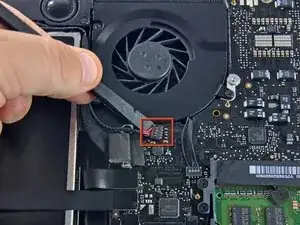
    • Heble behutsam den Stecker am Kabel des rechten Lautsprechers/Subwoofers mit dem flachen Ende des Spudgers gerade vom Logic Board hoch. Achte darauf, dass du nicht den Anschluss hochhebelst. Ziehe den Stecker zum optischen Laufwerk hin.

    • Heble unter den Kabeln.

    Step 4 is correct as stated (pull up, not slide out). You'll definitely see this when you put it back in place, pushing down in socket not sliding in. Just be careful and use spudger (gently!) underneath wires as shown.

    jgcolt -

    What is the best way to solder this back onto the board? I did it once 5 years ago, but that was my first and only time soldering. I know there is a soldering guide, and I have read it. Could someone tell me please the best way to reconnect the right speaker/subwoofer cable to the board, referencing the soldering guide?

    Leslie L. Gordon -

  5. UKx5LfwUtKQb3vdO
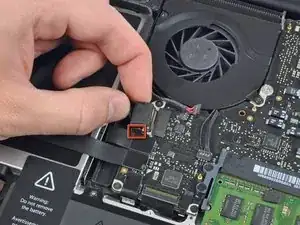
    • Du musst den kleinen durchsichtigen Kunstoffkabelhalter (rot markiert), der am Logic Board festgeklebt ist, aus dem Weg schieben, bevor du das Kamerakabel abtrennen kannst. Achte darauf, dass du keine Bauteile von der Platine brichst, während du es vom Kamerakabelstecker abschiebst.

    • Ziehe den Kamerakabelstecker zum optischen Laufwerk hin und trenne ihn vom Logic Board ab.

    • Dieser Anschluss ist aus Metall und kann leicht verbogen werden. Du musst den Stecker erst im Anschluss auf dem Logic Board ausrichten, bevor du die beiden Teile zusammenstecken kannst.

    When you put the Mac back together after this entire procedure, it's virtually impossible to get the camera cable reconnected because there is a small piece of plastic glued to the board to keep it from coming unplugged. An Apple store tech explained the piece of plastic and said it won't break anything if I pry it off the board. I did and then the cable connected easily.

    karenz -

    The retainer for the camera cable may be black as well as clear. It is much easier to remove and reinstall the retainer if the DVD drive cable is removed first.

    MikeG -

  6. 4Cmv15fiVfNrpKNa
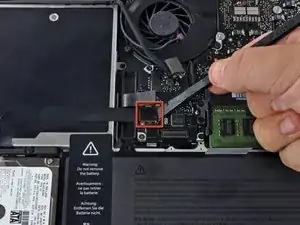
    • Heble den Stecker des optischen Laufwerks mit dem flachen Ende des Spudgers gerade vom Logic Board hoch.

  7. mqoJybZwfxQYQcTq
    • Heble den Stecker der Festplatte mit dem flachen Ende des Spudgers gerade vom Logic Board hoch.

  8. rLTqYOMGmLqOGQEI
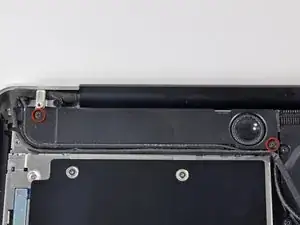
    • Entferne die beiden Kreuzschlitzschrauben, mit denen der Subwoofer am oberen Gehäuse befestigt ist. Die rechte ist 5 mm lang, die linke 3,9 mm.

    • Die längere der beiden Schrauben ist rechts.

    For step 8, I found I had to use a Phillips #0 screwdriver to remove the two screws. I'm not sure if mine were just over-tightened, but I couldn't get the two screws off with a cheapo Radioshack #00 screwdriver or a nice Wiha one for the life of me without coming close to stripping them. Tried the #0 and they popped right out. Hope this helps.

    Aaron B -

  9. XYAFSNSMNojPP4w3
    XYAFSNSMNojPP4w3
    Z5tkpABfj2LGTmL5
    • Der Subwoofer ist immer noch am rechten Lautsprecher angeschlossen, versuche noch nicht ihn ganz zu entfernen.

    • Hebe den Subwoofer vom optischen Laufwerk und lege ihn über den Computer ab.

  10. WJwTMGI3pXXpg1Dc
    WJwTMGI3pXXpg1Dc
    riMFfEXrcmtmTgTY
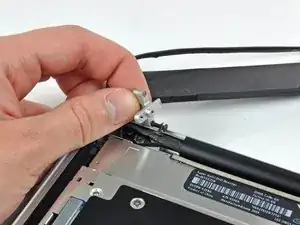
    • Entferne die beiden 8,4 mm Kreuzschlitzschrauben, mit denen die Kamerakabelhalterung am oberen Gehäuse befestigt ist.

    • Die rechte Schraube bleibt vielleicht im Kamerakabel hängen.

    • Hebe die Kamerakabelhalterung aus dem oberen Gehäuse heraus.

    There's another type of bridge, black, with an extra piece of metal to hold the cable. You don't have to remove this bridge to unmount the optical drive.

    Martin -

  11. YyXwuMPUrWkVxHTK
    YyXwuMPUrWkVxHTK
    iZpSDQD1ioEIusq4
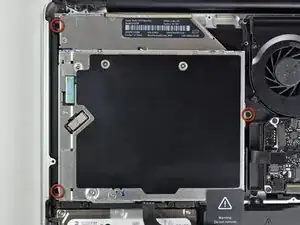
    • Entferne die drei 2,5 mm Kreuzschlitzschrauben, mit denen das optische Laufwerk am oberen Gehäuse befestigt ist.

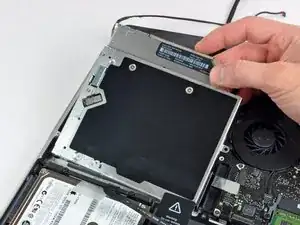
    • Hebe das optische Laufwerk an der rechten Kante hoch und ziehe es aus dem Computer heraus.

  12. t2AC6iBmY1fJY5TH
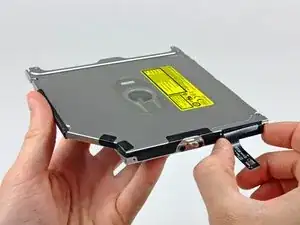
    • Ziehe das Kabel zum optischen Laufwerk gerade vom optischen Laufwerk weg und entferne es.

    • Dieser Stecker sitzt besonders tief, achte darauf, dass du ihn in seiner Mitte vom optischen Laufwerk weg ziehst.

    • Wenn sich eine CD oder etwas anderes im optischen Laufwerk verklemmt hat, dann hilft dir unsere Reparaturanleitung für das optische Laufwerk.

  13. mWZIFgpAZtqsZpSB
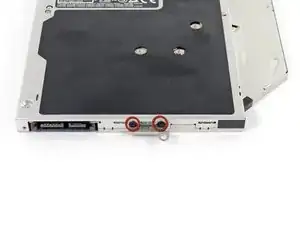
    • Entferne die beiden schwarzen Kreuzschlitzschrauben #0, mit denen die die kleine Metallhalterung befestigt ist. Übertrage diese Halterung auf dein neues optisches Laufwerk oder den Festplatteneinschub.

Abschluss

Um dein Gerät wieder zusammenbauen, folge den Schritten in umgekehrter Reihenfolge.

Walter Galan

685540 Reputation

2 Kommentare

iFixit rocks! Got a stuck CD out of my wife's superdrive this way. Many thanks!!!

Steve Folberg -

I just took mine apart and found a piece of tape in it. Smh. Works perfect now.
Dana Kimble -