Einleitung

Diese Anleitung zeigt dir, wie du einen defekten oder zu lauten Ventilator tauschen kannst.

  1. dOyroxuUBfNu1T4K
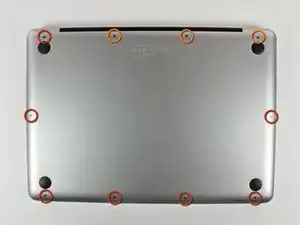
    • Entferne die folgenden 10 Kreuzschlitz-Schrauben, die die Gehäuse-Unterseite des MacBook Pro 13" Unibody befestigen:

    • Sieben 3 mm Schrauben.

    • Drei 13,5 mm Schrauben.

    Compare the short screws carefully before reinstalling them. The shouldered screws go in the holes on the front edge.

    David Kilbridge -

    Before I started removing any screws I took a piece of paper and drew the bottom of the laptop and put a piece of double-sided tape in the spot where each screw goes. That way when I took out the screws, I could put them on the tape so I knew exactly which screw went in which spot. I did the same thing for dismantling the inside on another sheet of paper, then a third sheet for the screen after getting the front glass off.

    mastover -

    I use a similar technique: I print out the iFixit manual for the job, and Scotch-tape down the screws/brackets/cables I remove at each step next to the component descriptions. That way, when I'm reassembling, the bits are taped right next to the photo of where they came from.

    adlerpe -

    That's exactly what I do for all my repairs! It's the best way to keep track of all of the parts ' original location and to make sure that you don't miss any parts during reassembly.

    joyitsjennie -

    Great idea and one I use often

    Thomas Overstreet -

    Excellent idea! Thanks for sharing it here.

    Laura Sharkey -

    I used a 00 that fit but the screws were very tight so I used a tiny paintbrush with some wd40 on it and put it around the edges of the screws. Worked like a charm

    valentinedhdh -

    I use a magnetic mat and place the screws in order on that :)

    Cary B -

  2. bLtKOLyJdyAxkZaG
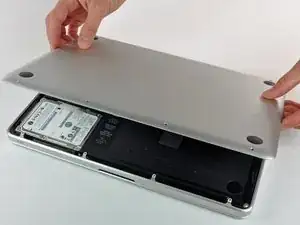
    • Hebe die Unterseite vorsichtig an und drücke sie Richtung Rückseite des Laptops, um die Halterungsclips zu lösen.

    In the introduction you should link fixers to this excellent doc: https://www.ifixit.com/Misc/HD_Software_...

    It is really critical, super easy, and free(!) to clone your existing drive onto the new one you will install. I ran into one error, but SuperDuper! support replied immediately on how to fix it...Thanks ifixit and SuperDuper! (I ponied up the $28 for the software anyway, I was so impressed!)

    Mike -

    Long story short: I drank the AppleKoolAid back in 1984 and have always left the guts of my machines up to Apple - until recently when I needed to swap the SATAs from my original MacDaddy (2009 13" MBPro that I killed in 2018 - coffee + blackout = OOOOPS) into a pristine 2009 MBPro from a Goodwill in North Carolina through eBay. I need the files from iCal and MacMail that can't be opened in my newer machines.

    Well . . . I ain't never done nuttin' like that, before!

    Enter Luke Miani on YouTube. He raves about you guys! So, I watched everything I could, read your site, bought the right tools and at the ripe old age of 72, I sat down, this morning and did the work. Now my original MacDaddy lives in MacDaddy2.0.

    Am I allowed to cry?

    Seriously, I can't thank you enough for your bitchen site and killer tools. I wish I'd'a been turned on to this shizzle 30+ years ago.

    IFIXIT - IDIGIT!

    kath myers -

    HAHAHAHAHAHAHAHAHAHA.

    That was a brilliant read.

    Yes, I came across ifixit a few years ago. Totally helped me out on several occasions.

    Glad your Mac repair journey worked out.

    :)

    Cary B -

  3. B1SUXfcr5fruMavs
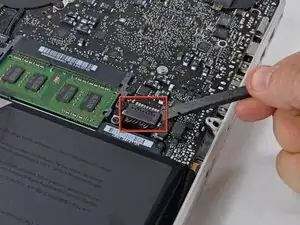
    • Wir empfehlen, vorsorglich den Akkuanschluss vom Logic Board zu lösen, um eine elektrische Entladung zu verhindern.

    • Löse mit der Kante eines Spudgers den Akkuanschluss nach oben, weg vom Sockel auf dem Logic Board.

    Zitat von gansodesoya:

    why is step 3 necessary?

    Just to disconnect any power source to avoid damages by short-circuits.

    MrKane -

    How do you get that battery connector back on? Do you just press it in back in place after you're done?

    Horace Chung -

    yes. I usually plug it in before I screw it down so I can lift the battery a bit and have enough slack to be able to go straight down on the connector, otherwise it comes in on a bit of an angle, which can't be good (though not necessarily bad).

    maccentric -

    This step almost finished me, and I did extensive damage to the battery plug. Fortunately, I later replaced the battery, and the replacement came with a new plug! :) Newbies need to know - 1. The battery plug is like a thin lip on a thicker lip, so you need to pry BETWEEN 2 thin lips to get it off, else you are trying to yank out the socket. 2. Mine was initially VERY tight, and trying to get it out broke the plastic on all sides of plug, even though I was as careful as possible. Luckily, this didn't hurt functionality and I later replaced the battery. AFTER disconnecting once, it was never so tight again,

    Jeff Diamond -

  4. kQ3R2wjKx61rvkCN
    kQ3R2wjKx61rvkCN
    cyUJCQ6xIrQCdlVw
    VXmuCnrn1lMbXlnb
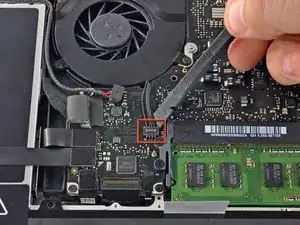
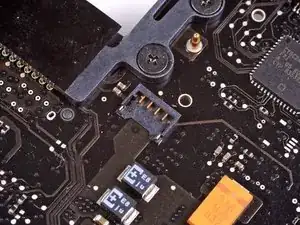
    • Benutze einen Spudger um den Verbinder des Ventilatorkabels aus seinem Anschluss auf der Hauptplatine zu lösen.

    • Am Besten geht das, indem du den Spudger in seiner Längsachse verdrehst während du ihn unter den Ventilatorkabeln ansetzt, um den Verbinder zu lösen.

    • Im zweiten und dritten Bild siehst du den Verbinder und den Anschluss des Ventilators. Passe auf, dass du den Plastikanschluss nicht aus der Hauptplatine herausbrichst, wenn du das Kabel herauslöst. Die Hauptplatine sieht in deinem Gerät vielleicht ein kleines bisschen anders aus, als auf dem zweiten Foto, aber der Ventilatoranschluss ist gleich.

    The image is very misleading. This is why many people are breaking their connectors. Please correct this and make it VERY clear that one has to put the spudger straight behind the cables, NOT behind the connector, as shown in the pic.

    Giunia -
    Thankfully there is a helpful guide in the comments on this post for fixing the socket in the likely event that you snap the sucker clean off like I did:

    I popped off the fan connection from the logic board...Fix?

    agoodcourage -

    As Giunia said I too just broke the connector only because the photo shows to slide a spudger between the connector socket and the motherboard. I am now out of my only computer. This is VERY frustrating.

    Nha1234 -

    Broke it as well the picture is very misleading.

    Christian Flores -

  5. pFGTdZImDYtjO4b4
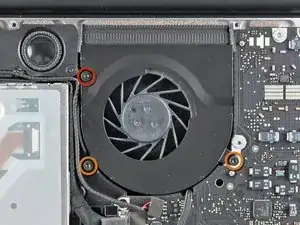
    • Löse die folgenden drei Schrauben:

    • Eine 7 mm Torx T6 Schraube

    • Zwei 5,4 mm Torx T6Schrauben

  6. bbopIIjLSdISOvLS
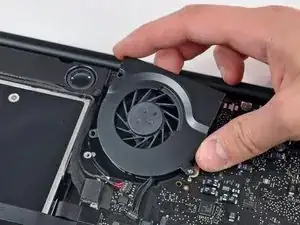
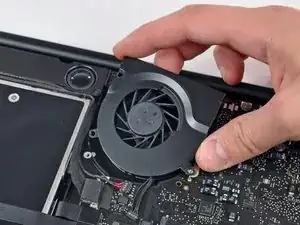
    • Hebe den Ventilator aus dem oberen Gehäuse.

Abschluss

Um dein Gerät wieder zusammenzusetzen, folge den Schritten in umgekehrter Reihenfolge.

Walter Galan

685541 Reputation

3 Kommentare

Thanks Walter Galan for this guide its my first repair using fixit.

So I noticed MacBook Pro’s Fan is not working leaving the equipment very hot.

I bought a new part in Ifixit and repair my laptop.

The trickiest part is removing the motherboard connector. I did this using spudger tool with success but spend some time with careful.

Just I noticed again before install new part that is noising when spinning. So I force a little the the metal case to put away propellers that was contacting with her.

Another suggestion is clean fan before with a hair dryer for example, same to the place where will put the new fan.

So repair made with sucess!!!

wilsonwistuba -

The repair was quick and simple with the use of an iFixit toolkit that I conveniently already had. The fan works well. Thank you to Walter Galan for this easy-to-follow guide and thank you to the guys at the iFixit store for the speedy shipment.

Luke Tomaneng -

Image #4 is very misleading. This is why many people are breaking their connectors. Please correct this and make it VERY clear that one has to put the spudger straight behind the cables, NOT behind the connector, as shown in the pic.

Giunia -