Einleitung

Ersetzen des optischen Laufwerks.

  1. AKQUReHjHNQXBJeN
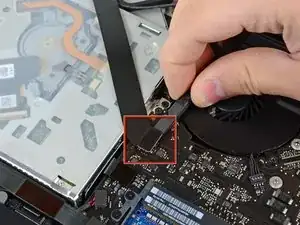
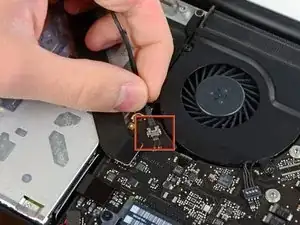
    • Trenne den Stecker des Kamerakabels von seinem Sockel auf dem Logic Board.

    • Hebe das Kabel beim Abstecken vom Logic Board nicht an. Zieh den Stecker parallel zur Oberfläche des Logic Boards.

    That's exactly what I did. I did not pay attention. Where do I find a replacement?

    Erikmendez -

    I found this website for replacement parts : https://www.powerbookmedic.com/MacBook-P...

    Guillaume Lamaison -

    My camera is not working. What should I do now.

    NARSIMHA CHARY -

    Desconecte el conector del cable de la cámara de su zócalo en la placa lógica.

    No levante el cable mientras lo desconecta de la placa lógica. Tire del cable paralelo a la cara de la placa lógica.

    Pakito Villaseñor -

  2. tFnLZiqtUWwiGyYn
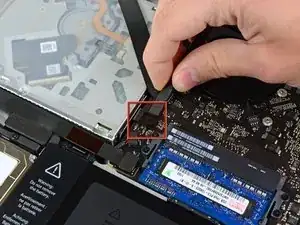
    • Benutze das flache Ende eines Spudgers, um den AirPort/Bluetooth-Stecker von seinem Anschluss auf dem Logic Board zu lösen.

    Use el extremo plano de un spudger para levantar el conector AirPort / Bluetooth de su zócalo en la placa lógica.

    Pakito Villaseñor -

  3. OX2dgDgIvZ3eEhFM
    • Benutze das flache Ende eines Spudgers, um den Stecker des optischen Laufwerks von seinem Anschluss auf dem Logic Board zu lösen.

    Use el extremo plano de un spudger para levantar el conector de la unidad óptica de su zócalo en la placa lógica.

    Pakito Villaseñor -

  4. yILuc15KUC2TLdLi
    yILuc15KUC2TLdLi
    akD3xoiDQLhJEDaN
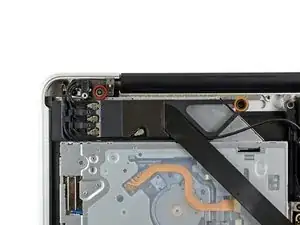
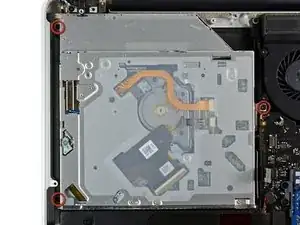
    • Entferne die folgenden zwei Schrauben:

    • Sei vorsichtig, diese Schrauben sind besonders leicht zu beschädigen. Übe festen Druck auf die Schrauben aus, während du sie herausdrehst. Lies die Kommentare durch, bevor du fortfährst.

    • Eine 8,6 mm Kreuzschlitzschraube

    • Eine 3,9 mm Kreuzschlitzschraube

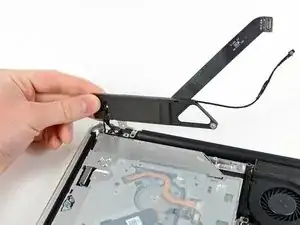
    • Drehe vorsichtig das Gehäuse der AirPort/Bluetooth Karte (mit den immer noch angeschlossenen AirPort/Antennenkabeln ) aus dem unteren Gehäuse.

    Beware of step 8. Screws strip extremely easily. For some reason, that are extremely tough to get out and the metal is extremely soft so you are likely to screw yourself over real quick even if you use the right screwdriver. Happened to me and now it's impossible for me to take the @$%# thing off so I have to return my HDD bay and deal with having a useless disc drive.

    Alex Pascal -

    I got burned here also. Unfortunately iFixit defaults to comments off, so I didn't see this until it was too late.

    eawortman -

    Yes, and I got stuck on step 8 for this simple task. Is there no way we can get the drive out while leaving the wireless/bluetooth board in place? I prefer to drill a small hole in the plastic of the board to reach the drive's screw underneath and find a way to slide it out towards the hard disk side.

    Albert Kok -

    I had the same thing happen with the 3.9 mm screw. To remove the drive afterwards I used a 1/16" drill bit to carefully remove the (stripped) screw head. I left most of the screw threads intact, and the remaining "post" is enough to hold the airport/bluetooth fixture in place with the one remaining screw. These are some seriously soft screws, folks, be careful!

    Steve -

    Just a sign, how insufficciently the whole computer is made. My impression is with every proper replacement it becomes rather valuable (not a market value by the way). I advice to replace these soft screws. It does not matter what the head is, as long as you have the screwdriver for it and it fits to the hole and to the height (which is important here).

    Hasan al-Abulafia -

    i also screwed the screw, never saw a screw this soft. Still figuring out how to "unlock" it again...

    KlawWarYoshi -

    Well. I too stripped the head on the left side screw. First I used a cheap #000 screwdriver. Stripped the head and the driver. Not realizing just how bad I had stripped the screw I got a #0000 and the right one came out. I made sure to apply firm downward pressure to minimize slip. The left side was to far gone. So...

    I broke the housing. Yep. I'm a brute.

    Anyway. I rolled it up out of the case as if I had actually removed the screw. Only to realize I don't have a T6. [facepalm]. I've spent way too much time just getting that #0000. I'll order myself a nice kit for future 'repairs'.

    Oh and yes, the bluetooth and wifi work just fine. The right screw and the tight fitting of the housing seem to keep it in place ok.

    David Couch -

    Also stripped the right screw, taking to to Apple Genius Bar, hopefully they can get it out...

    Adrian -

    I also failed here.... How can i unscrew both screws if the star of the head is destroyed??

    Alex de Graaff -

    I located the part number for the 2 easily stripped screws in this step. The 3.9mm is Apple part 922-8974 and the 8.6mm is Apple part 922-9107 pbparts.com has them available for $2 each.

    Hope this helps, it was not easy to track down.

    Roger -

    I too stripped the screw on the right, and while I tried a few basic things to remove the screw, eventually I drilled out the screw head so I could remove the airport/bluetooth housing. Only the head came off, enough to free the housing, but it sits pretty snugly on there with just the one screw and that's enough for me.

    mainframe -

    The part numbers from Roger on Feb 11 aren't right. They were too large.

    dan Lim -

    Hi, Dan. The Apple part numbers supplied were used to order exact replacements now in my MBP 15. I have also checked them against Apples official Screw Chart for the MBP 15. I am very sorry you have been supplied the wrong screws but the part numbers listed are correct.

    Roger -

    Alright, Genius bar just made it worse, ended up taking a drill to it hoping to break the head off so I could pull it out bit it just wouldn't come off. In the end I pushed a flat screw driver down as hard as I could and It shifted.

    I know many of you wont want to put a drill to your shiny (expensive) mac, but the screw is surrounded and strong so you wont break through or damage anything.

    Just have a steady hand ;)

    Adrian -

    I stripped both screws before reading these comments- disaster.

    The only reason for removing these screws is so you can get access to the Torx screw beneath the Bluetooth/wireless board (ie the top left screw circled red in step 9). I Had the idea of drilling directly into the black wireless/Bluetooth plastic board directly above this top left Torx screw shown in step 9. I could then use a long thin Torx screwdriver to reach through the hole and unscrew it, without having to remove the stripped screws holding the wireless/Bluetooth board in place at all. Be careful drilling into the board(!), but worked perfectly for me. Once the Torx screws are removed, it just takes a bit of jiggling to carefully remove the optical drive out from under the board, and put the hd drive in.

    If you're reading this before having stripped the two screws, I'd recommend not even trying to unscrew the Bluetooth board and just drill a hole in it, assuming you have steady hands. I'll try to upload a photo to show what I mean.

    Laurence -

    I’ll second this - seemed a bit daunting at first but with a stripped screw and no screw extractor my options were limited. Having weighed up the options and carefully studying the pictures I decided that Laurence’s idea was feasible (if not a little leftfield!). I carefully marked out an educated estimate of where the screw would be under the black wireless/Bluetooth plastic board (you can see it from the side so used this plus the images supplied here) and drilled, firstly with a 1.5mm to mark the spot and then with a larger 4mm. Obviously this needs to be done very carefully so you do not continue and drill into the torque 6 screw you are trying to get to, but once the hole was drilled my bit reached down to the screw and could *carefully* be lifted up and through the newly created hole. Once the screw has been removed, along with the other 2 torque 6 screws in this step, the optical drive / caddy will slide out as opposed to being lifted vertically out in the instructions, but this proved little hassle

    Andy -

    That worked for me too :) Thanks for the hint!

    Dim Petrakiev -

    Hi, this part to be drilled is metallic and not plastic. Is there any impact of the drilling on the wireless/ Bluetooth functioning? The proposed solution is attractive if it does not impact how the Macbook works… Thierry

    thierrydestainto -

    Hello there, I'm looking for some help. I am planning on doing this "procedure". I have the 54 Bit Driver set from iFixIt. If I have to unscrew the 8.6 mm Phillips screw and 3.9 mm Phillips screw. What bits should I use from the 54 Bit Kit? The PH1, PH0, PH00, PH000? I really don't want to strip the screw, which one should I use?

    Josh -

    Josh I would use the PH00 bit from the 54 Bit Kit. Apple use a different non standard screw head design to Phillips which does not have the cam-out geometry and uses a pointed tip. The PH0 and PH00 bits are a reasonable approximation. I have to say that even with the best match between the screwdriver and screw they may still strip as the original screws seem to be made of painted cheese. If that happens you could try using a tough steel small flat screwdriver bit to drill/scrape out a round hole in the screw head and then gently force in the next largest slotted bit. This has worked for me twice.

    Roger -

    As a warning i had to take a near new refurbished mid 2012 MacBook Pro into Apple to have a missing/stripped bottom case screw repaired under warranty and in the process of taking it apart they stripped five more screws and damaged the LCD screen cable, upper case and keyboard, speaker, Bluetooth module and several other assemblies. It was all repaired properly under warranty but it took over 2 weeks and the only original parts I got back were the logic board and baseplate. Some of these MacBook Pro's are a real challenge and come with stuck and sometimes pre stripped screws from the factory. Take your time and remember Apple keep all the screws at genius bars, if you ask nicely and give the the Apple part number they are often happy to fit them for you. Good Luck!

    Roger -

    I found success using the CR-V 1.5 bit without stripping either screw head.

    Firmly plant the tip and maintain pressure throughout unscrewing and re-screwing.

    Use a magnet if needed to get the 3.9mm screw out.

    chris -

    Hi,

    I've mailed with pbparts and got the clarification:

    * http://www.pbparts.com/shop.php//9229107... = 8.6mm screw

    * http://www.pbparts.com/shop.php//9228974... = 3,9mm screw

    PBParts said: Measurements from iFixit are better than the printed length by Apple manuals. I'll give these screws a try.

    Robin Kluth -

    All you need to unscrew the short screw (and don't screw up) is a soldering iron. You should apply heat to aluminum column located below the head of the screw. Loctite-like glue in thread loses its grip when heated, so you probably will unscrew that little bastard without any issues. It worked for me, even with semi-stripped head!

    Dvadzatdva -

    THANK YOU! Heating the aluminum post with a soldering iron worked perfectly for me! I was certain that I wouldn’t be able to get the short right screw loose, but a minute or two of heating the post with a soldering iron loosened the blue thread locking compound and the screw came out without any problem. Thanks again!

    Marv Ruona -

    Just use Philips #000 bit and put pressure.

    Filip -

    Siht. I screw up the screw too. And then I realize there are 24 comments in this step. Now I make 25 of it. That little fcuking 3.9mm...

    Anyway, so I drilled that striped screw head with 3mm tip, totally striped that screw so seperated rim, removed Airport supports, there still 1mm of screw steam thingy, got rid of that using small nipper, put new screw in.

    Use very, I mean very sharp even your finger bleed when touch the edge of small screw driver. Regular #0 or #00 driver will distroy your screw head.

    Anonymous -

    I stripped the screw on the right, and finally got it out with one of the screw extractors sold by iFixit: Schraubenentferner-Set

    anonymous 5548 -

    I used a Philips PH000 with applied pressure and the screws came out fine.

    jasonmartinegoudy -

    Made same mistake here (rushed through the directions and didn't even notice the warning!). I completely stripped the smaller screw but I was able to get it out easily with an extractor drill bit, the kind readily available in hardware stores (Grabit Micro was the brand name here in the U.S.). Ordered a replacement screw from pbparts re the advice above (thanks for the part number!).

    yonidass -

    Stripped this one too. I think it was fixed in with Locktite. Had to buy a Grabit Micro to remove it. Started with the #1 but when I reversed the bit it wouldn't catch. Thought I would have to drill it out completely, but tried with the #2 and the hole drilling end of the bit caught in the hole I'd already drilled with the #1. If you're about to follow through these instructions I would make sure to have some Grabit drill bits or other stripped screw removal tools on hand before you start.

    Kevin Hooke -

    I was able to do this step very easy with a Philips #0 instead. I guess sometimes its better to go bigger than smaller.

    Nils -

    I have done it using an 1,5 mm cross slot screwdriver from a screwdriver set by LIHAO (I bought it at Amazon). First, ensure that the screwdriver is well fitted into the screw head, then press down and try to turn it(without forcing it!). If the screw does not turn easily, stop, take out the screw driver and repeat the process till the screw get loose. Be patient, take your time and keep in mind that your main priority is to preserve the heads of the cheese screws

    Catalina -

    I got it out with no trouble by using a Moody Phillips #2006 .100" (the one recommended by iFixit for this repair), and by using very firm pressure and very gentle rotation, checking at about an 1/8 turn to see if the screw was turning or stripping.

    David Albertsen -

    For what it's worth, on my 2011 MBP 17", the bluetooth/wireless unit was held down with two flat-head phillips screws; the one on the left, the 8.6 was attached to the metal clip just to the right of it in the picture. It came out very easily. The one on the right definitely had some kind of loctite adhesive, but eventually I got it free with firm, quick short twists. Didn't strip. Also, the torx screws on the superdrive were all phillips heads as well. Not sure if that's a 17" thing or what. Thanks!

    Joe Mac -

    Although these screws look like PH00 Philips heads, if you’ve got one of the iFixit toolkits, the best driver to use is the J000 or JIS000 driver. Unless the screws have been terribly stripped, it’ll pop them out effortlessly every time.

    something2sea -

    These comments saved me a lot of trouble with my swap of drives.  Unfortunately the donor Mac had both screws stripped and I had to drill those out; took me about 10 minutes to accomplish.

    Thanks for pointing this out and posting it.

    Ken Short -

    I took a different method with these screws. I removed the black coating from the head of the screw with a sewing needle and a small bit of acetone while using a magnifier. This got it right down to shiny metal inside which I believe helped make better contact with the Phillips bit. I also took a small file to the bit to sharpen it like new. These screws came right out for me with just this little bit of advance prep.

    Mike Jones -

    I applied pretty firm pressure and was very careful with my rotations. They both came right out. I noticed the left longer screw was sort of tight on the first initial turn or two but after that it loosened up. I didn't have any slip on either screw so I can't speak for striping but I can say it was either because I applied firm pressure (as the instructions say to do) or because lock tight had worn off.

    Yayna -

    retire los siguientes dos tornillos:

    Tenga cuidado, ya que estos tornillos son inusualmente fáciles de pelar. Aplique una presión firme mientras desenrosca. Lea los comentarios antes de continuar.

    Un tornillo Phillips de 8.6 mm

    Un tornillo Phillips de 3.9 mm

    Con cuidado, gire la carcasa de la placa AirPort / Bluetooth (con los cables AirPort / Antenna aún conectados) fuera de la carcasa inferior.

    Pakito Villaseñor -

    the screw f***ing stripped. i just used some flush cutters do deal with that….

    domenicsto5 -

    Aug 3, 2020

    I have a mid 2012 MacBook Pro that I am trying to replace the optical drive with an SSD. And I believe I scraped a bit to much on the right side of the screw (horrible design, thanks Apple) and I’m getting angry and upset that I spent money buying this #00 Philip screw driver from this site and also purchasing the caddy and ssd from another source. Do anyone have any ideas how I can remove the right screw? Anyone? I’m trying to upgrade this thing one last time so I can have at least a efficient MacBook.

    Kareem Caldwell -

    i stripped both screws since it was on too tight. i was lucky enough to use a stripped screw extractor to extract the left screw. for the right one, sadly i had to use a pair of tin cutters and cut the V section. The frame was metal so nothing snapped. I then used pliers to pull straight up and twist eventually getting the other stripped screw out. Going to buy the replacement frame and BETTER screws that don’t strip and replace the wifi frame. ugh. didn’t want to cut the wifi frame but had to.

    Kevin Chiu -

    These were fine for me thanks to all the comments. I used a CR-V PH000 from an old Maplin screwdriver set after reading above comments. I applied a lot of downward pressure before attempting to turn. The PH000 actually got lodged in the right hand screw so I removed the screw tip from the driver with the screw still attached and left it on there until I needed to put the screw back in. The mac I’m working on was second hand and was missing the left hand screw, I checked another machine I had lying around and borrowed the left hand screw and put it back in with the same PH000. Good luck!

    louiseakempton -

    Please Help!!! Inverse problem. I can’t reassemble :(

    Today for the first time I became aware of this concern and read the comments but didn’t knock on wood. I removed them with no detectable problem.

    But now when putting back together left spins freely without catching. Right one screws in nice and level, straight and true, until a fourth of the screw is left to go then tilts and looses the vertical axis and starts to bind up. This behavior makes me think it is the aluminum deformed by the screw contrary to the standard supposition of soft screws?? So uncertain if quality replacement screws would solve.

    I would love some advice on how to tighten my blue tooth down so it isn’t left to continually rattle but don’t end up with a stripped screw stuck in place by forcing it (if I even could.)

    Also if anyone has thoughts on this janky aside, I suspect the right piece of tape could solve everything but it would need to be suitable to the inside like the pull tab on the drive (no melting or conductivity problems)

    Aaron -

    As some people have said, just leaving a post in there is enough to hold the board in without issues. I ended up doing that with my 13” 2012 (which is slightly more of a pain because you actually have to remove the wiring connectors on that board instead of just moving it out of the way with everything still connected); I think where there were three screws I’ve now just got one and the rest is held in with sheer force of hope, and maybe a random screw I had laying around from a ::shudder:: old Dell laptop.

    If you can get a shorter screw that tightens down before the point where the right one binds, that’d probably work. Even if it’s a bit loose, as long as the bottom goes on without that screw interfering, you’re probably alright.

    AJH -

  5. dYPUx5ShE6cLSREb
    • Entferne die drei 3,5mm T6 Torx Schrauben, die das optische Laufwerk im oberen Gehäuse halten.

    I actually found this section to be the most difficult, the T6 screws are soft as butter, apply plenty of pressure when removing. The one towards the front of the laptop looking from the back is the most problematic.

    Richard Howell -

    I had a hard time putting these screws back in with the HDD bracket. It looks like the bracket doesn't leave room for the bolt heads, so they go in at an angle. I tried for a while getting them lined up just right, but eventually gave up and now I'm pretty sure those T6 are cross-threaded into the aluminium. =( The original optical bay does have room for the bolt heads so they stay vertical.

    jfcaron3 -

  6. KgZXcFEoqNQAgudL
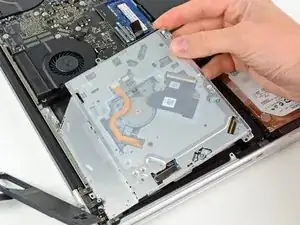
    • Hebe das optische Laufwerk in der Nähe von seinem Stecker an und ziehe es vom oberen Gehäuse weg, um es aus dem Gerät zu entfernen.

    110/5000

    Levante la unidad óptica cerca de su conector y extráigala de la caja superior para extraerla de la computadora.

    Pakito Villaseñor -

    Hola pakito, ¿Por qué no traduces directamente? En las instrucciones solo presione los tres puntos en la esquina superior derecha y elija "traducir".

    VauWeh -

Abschluss

Arbeite die Schritte in umgekehrter Reihenfolge ab, um dein Gerät wieder zusammenzubauen.
Walter Galan

685541 Reputation

0 Kommentare