
Einleitung
Hier wird der Austausch einer defekten Displayeinheit am MacBook Pro 13" Touch Bar 2017 gezeigt. Die Einheit schließt auch die Flachbandkabel ein, so dass mit dem Auswechseln das "Flexgate" Problem früherer Modelle, genauso wie der "Stage Light" Effekt sowie andere Fehler, die von den Kabeln verursacht werden, gelöst werden können.
Vor Reparaturbeginn musst du den Akku unter 25% entladen.
-
-
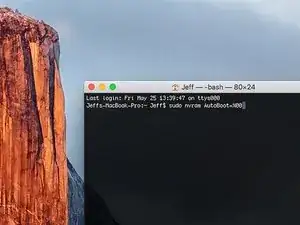
Schalte deinen Mac ein und starte Terminal.
-
Kopiere den folgenden Befehl und füge ihn im Terminal ein (oder tippe ihn exakt so ein):
-
sudo nvram AutoBoot=%00
-
Drücke die Eingabetaste [return]. Wenn du dazu aufgefordert wirst, gib dein Administratorpasswort ein und drücke erneut [return]. Hinweis: die Return-Taste kann auch mit ⏎ oder "enter" gekennzeichnet sein.
-
sudo nvram AutoBoot=%03
-
-
-
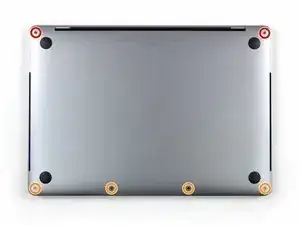
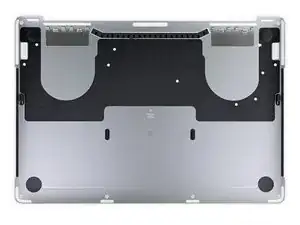
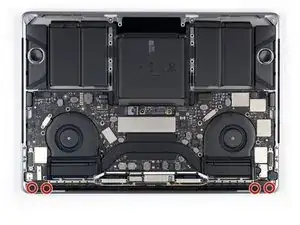
Entferne die sechs Schrauben, mit denen das Gehäuseunterteil befestigt ist, Benutze dazu einen Pentalobe P5 Schraubendreher:
-
Zwei 6,2 mm Schrauben
-
Vier 3,4 mm Schrauben
-
-
-
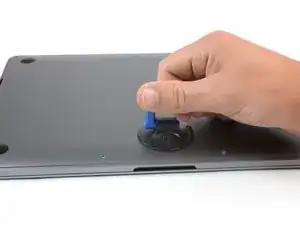
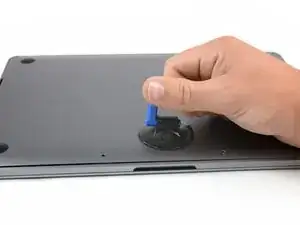
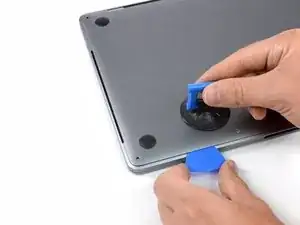
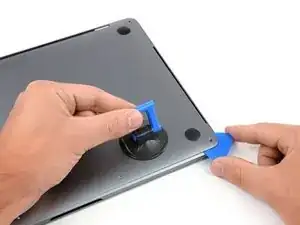
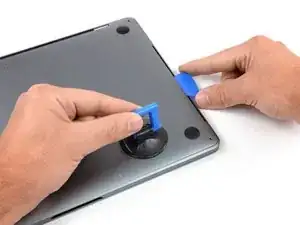
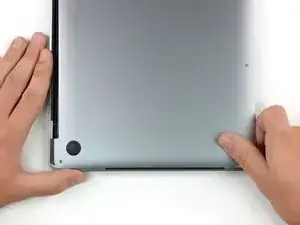
Setze einen Saugheber vorne in der Mitte auf das Gehäuseunterteil des MacBook Pro.
-
Hebe den Saugheber an, um den Rahmen und das untere Gehäuse leicht voneinander zu lösen.
-
-
-
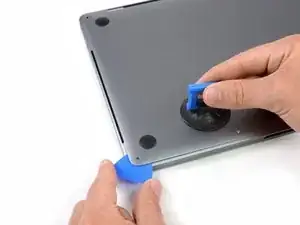
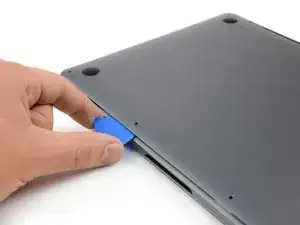
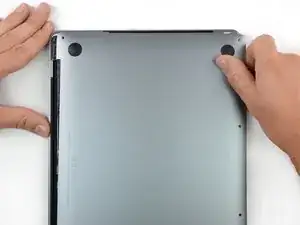
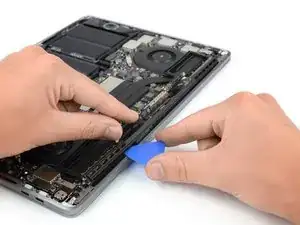
Setze die Ecke eines Plektrums in den Spalt zwischen dem unteren Gehäuse und dem Rahmen ein.
-
Schiebe das Plektrum um die nächstgelegene Ecke und die Gehäuseseite bis zur Hälfte nach oben.
-
-
-
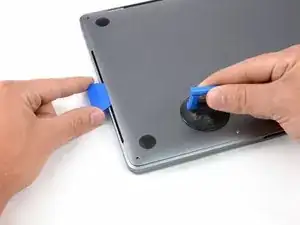
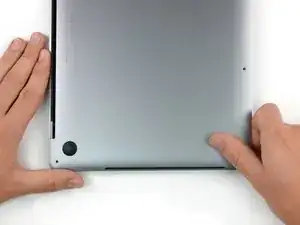
Wiederhole den vorherigen Schritt auf der anderen Seite: Schiebe dein Plektrum unter das untere Gehäuse und an der Seite nach oben, um den zweiten Clip zu lösen.
-
-
-
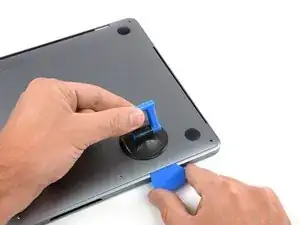
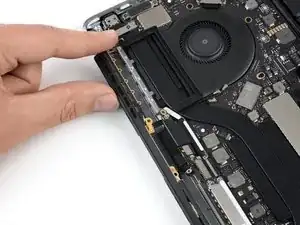
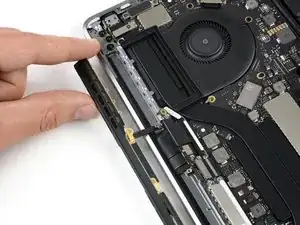
Setze dein Plektrum erneut unter die Vorderkante des unteren Gehäuses, nahe bei einem der mittleren Schraubenlöcher.
-
Verdrehe das Plektrum kräftig, um den dritten Clip zu lösen, mit den das Gehäuseunterteil am Rahmen befestigt ist.
-
Wiederhole diese Vorgehensweise bei dem anderen mittleren Schraubenloch, um den vierten Clip zu lösen.
-
-
-
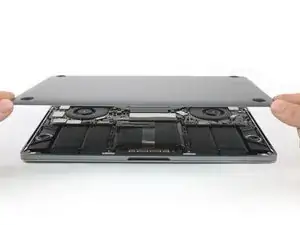
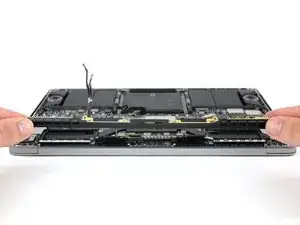
Ziehe das Gehäuseunterteil kräftig nach vorne (weg von dem Bereich mit den Scharnieren), um die letzten Clips zu lösen, mit denen das Gehäuseunterteil befestigt ist.
-
Ziehe erst an der einen Ecke, dann an der anderen.
-
-
-
Entferne das Gehäuseunterteil.
-
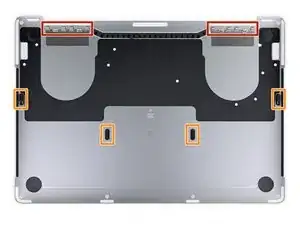
Positionere es entlang der Clips am Displayscharnier. Drücke es herunter und schiebe es Richtung Scharnier. Es sollte fest sein, wenn die Clips einrasten.
-
Wenn diese Clips eingerastet sind und das Gehäuseunterteil gerade auf dem Laptop liegt, drücke kräftig auf das Unterteil, damit die vier versteckten Clips einrasten können. Du solltest es hören und fühlen können, wenn sie einrasten.
-
-
-
Löse sorgfältig das große Stück Klebeband auf dem Akkustecker an der Kante des Logic Boards direkt beim Akku ab.
-
Entferne das Klebeband.
-
-
-
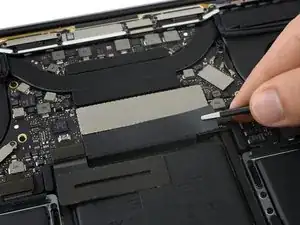
Löse sorgfältig das kleine Stück Klebeband ab, das den Stecker des Datenkabels der Akkuplatine bedeckt.
-
-
-
Benutze die Spudgerspitze, um die kleine schwarze Verriegelungslasche hochzuklappen, mit der das Kabel in seinem Stecker befestigt wird.
-
-
-
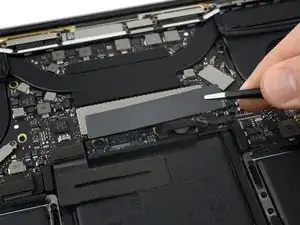
Trenne das Datenkabel der Akkuplatine ab, indem du es aus seinem Anschluss schiebst.
-
Schiebe es parallel zum Logic Board, in der Richtung des Kabels.
-
-
-
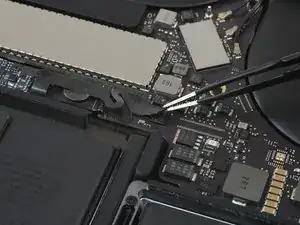
Benutze einen T5 Torx Schraubendreher, um die 3,7 mm Flachkopfschraube zu entfernen, mit der der Akkustromstecker befestigt ist.
-
-
-
Hebe den Akkustromverbinder vorsichtig mit einem Spudger an, und trenne so den Akku ab.
-
Hebe den Verbinder so hoch, dass er von seinem Anschluss getrennt bleibt. Falls er sich während der Reparatur versehentlich wieder verbindet, könnte das dein MacBook Pro beschädigen.
-
-
-
Entferne die vier 1,9 mm T3 Torx Schrauben, mit denen die Plastikabdeckungen über den Displayscharnieren befestigt sind.
-
Entferne die beiden Plastikabdeckungen über den Scharnieren.
-
-
-
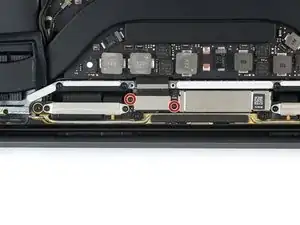
Entferne die beiden 2,9 mm T3 Torx Schrauben, mit denen die Aluminiumabdeckung über dem Hauptdisplaykabel befestigt ist.
-
Entferne die Abdeckung.
-
-
-
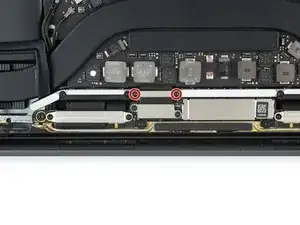
Entferne die beiden 1,7 mm T3 Torx Schrauben, mit denen die Aluminiumabdeckung über dem Displaykabel-Flexstecker befestigt ist.
-
Entferne die Abdeckung.
-
-
-
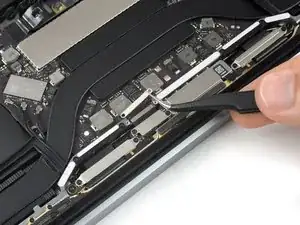
Trenne das Displaykabel vorsichtig mit dem flachen Ende eines Spudgers vom Display Board ab.
-
-
-
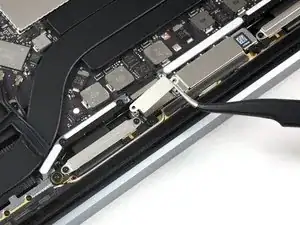
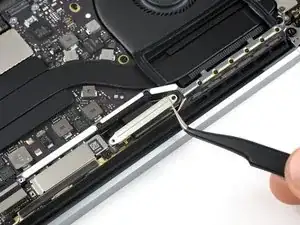
Entferne die vier 1,5 mm T3 Torx Schrauben, mit denen die beiden Aluminiumabdeckungen über den beiden Displaykabelsteckern befestigt sind.
-
Entferne die beiden Aluminiumabdeckungen mit einer Pinzette.
-
-
-
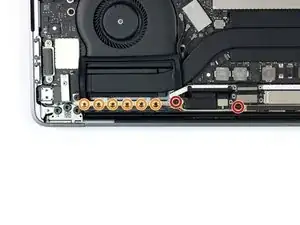
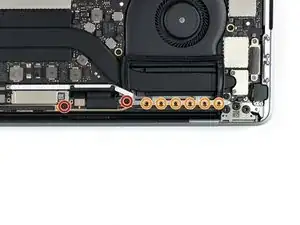
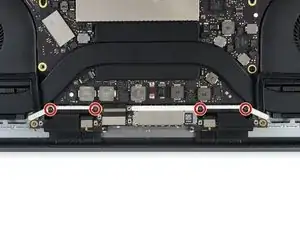
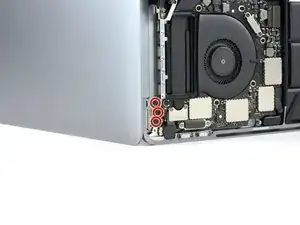
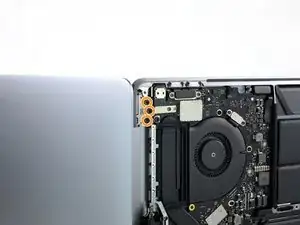
Entferne die vier 3,9 mm T5 Torx Schrauben (zwei auf jeder Seite), mit denen die Antennenkabeleinheit befestigt ist.
-
Entferne ebenfalls die zwölf 1,1 mm P2 Pentalobe Schrauben (sechs auf jeder Seite).
-
-
-
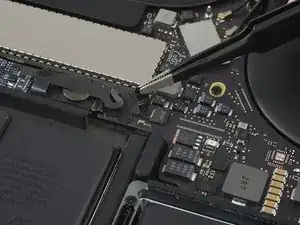
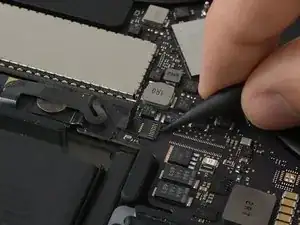
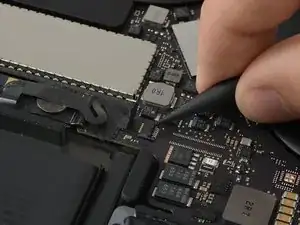
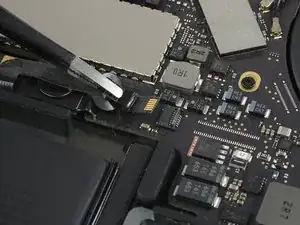
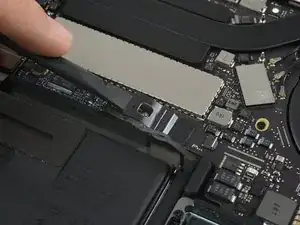
Trenne die drei Koaxialkabel vorsichtig mithilfe einer Pinzette gerade nach oben vom Logic Board ab.
-
Schiebe deine Pinzette oder das flache Ende deines Spudgers unter jedes Kabel, bis du an den Anschluss kommst und drehe oder hebele dann vorsichtig, um es zu lösen.
-
-
-
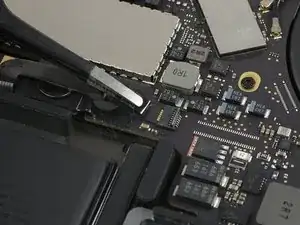
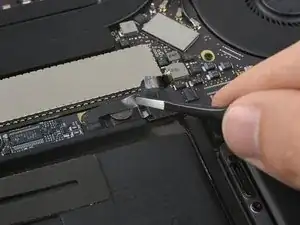
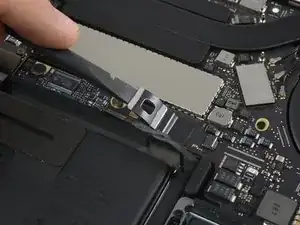
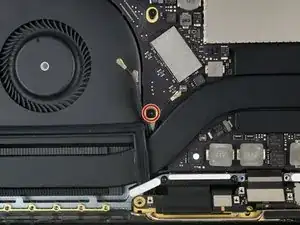
Entferne die 2,8 mm T5 Torx Schraube, mit der die drei Antennenkoaxialkabel an der Hauptplatine befestigt sind.
-
-
-
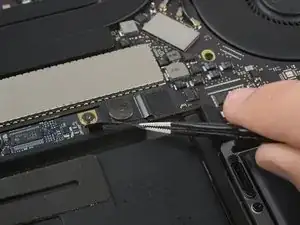
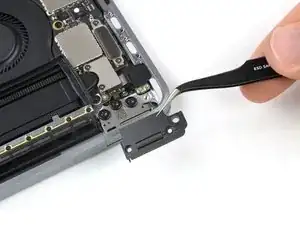
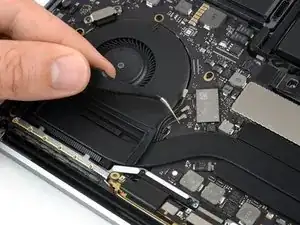
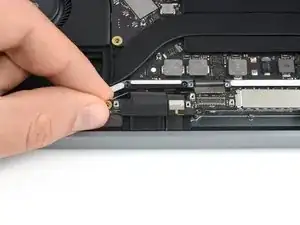
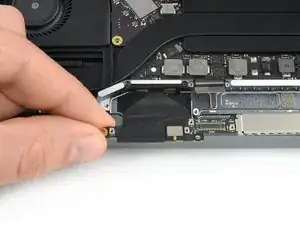
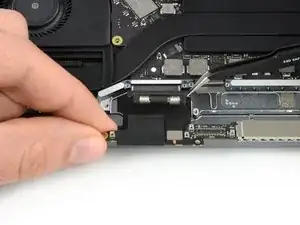
Heble die Antennenkabeleinheit mithilfe eines Plektrums an den drei gezeigten Stellen heraus.
-
-
-
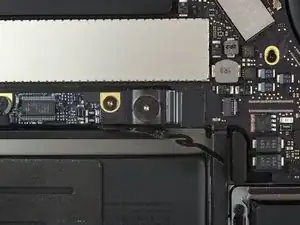
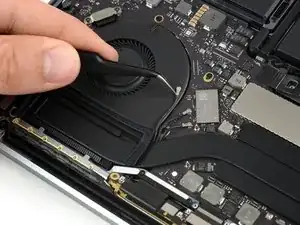
Beginne vorsichtig die Antennenkabeleinheit zu entfernen, indem du sie leicht nach oben und weg vom MacBook ziehst und das Kabel unter dem Kühlkörper hervorziehst.
-
-
-
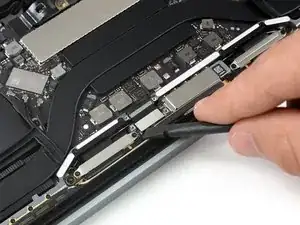
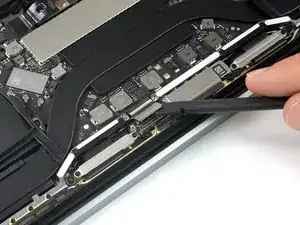
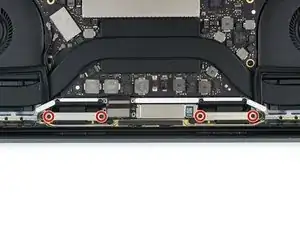
Entferne die vier 3,9 mm T3 Torx Schrauben, mit denen die Federn der beiden Displaykabelabdeckungen befestigt sind.
-
-
-
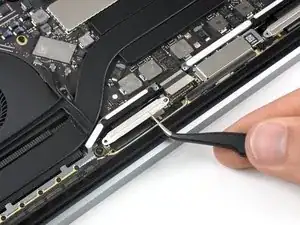
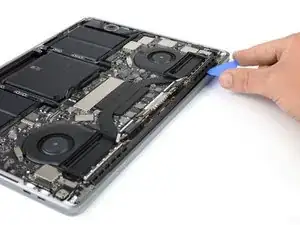
Fasse die linke Seite der Displaykabeleinheit und ziehe sie zum unteren Ende des MacBook und weg von der Feder der Abdeckung.
-
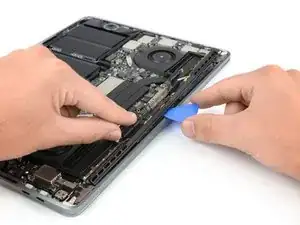
Ziehe die Feder des Displaykabels mit Hilfe einer Pinzette aus ihrer Fassung.
-
Wiederhole diesen Schritt bei der rechten Feder an der Abdeckung der Displaykabeleinheit.
-
-
-
Halte das Display mit einer Hand fest, während du die drei T8 Torx Schrauben vom unteren Displayscharnier entfernst.
-
Entferne die restlichen drei T8 Torx Schrauben von der oberen Displayhalterung.
-
-
-
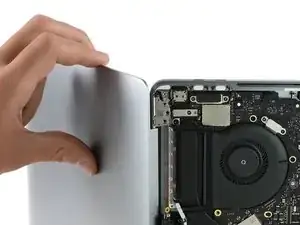
Drücke beide Hälften des MacBooks Pro zusammen, so dass du die Scharnierhalterungen aus ihren Vertiefungen im Rahmen befreien kannst.
-
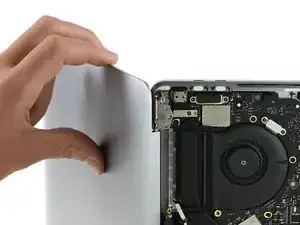
Drücke den Hauptteil des Computers von dir weg und gleichzeitig das Display zu dir, so dass sich die beiden Teile voneinander lösen.
-
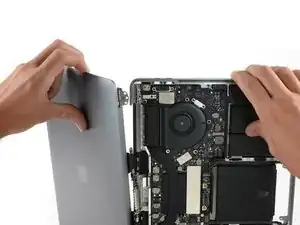
Entferne das Display und achte dabei darauf, dass sich keine Kabel verfangen.
-


Vergleiche dein Ersatzteil mit dem Originalteil. Möglicherweise musst du fehlende Teile übertragen oder Schutzfolien vom Neuteil abziehen, bevor du es einbauen kannst.
Um dein Gerät wieder zusammenbauen, folge den Schritten in umgekehrter Reihenfolge.
Bringe deinen Elektromüll zu einem zugelassenen Entsorger.
Hat die Reparatur nicht den gewünschten Erfolg gebracht? Auf unserem Antworten-Forum kannst du Hilfe bei der Fehlersuche finden.

28 Kommentare
What is the ribbon cable that you must remove before disconnecting the battery do?
Max4r -
your mom.
all joking aside, its the communication between the logic board and the battery controller (cycle count, battery health etc)
What is the exact P2 bit you need to remove the 12 screws holding the antenna bar? I ordered a P2 bit on Amazon that says it’s 0.8mm P2 bit and it’s too big. Not sure if they shipped me the wrong one or what. Been trying to find out exactly what bit to use and no luck so far.
Pentalobe P1L from Wiha tools fits perfectly.
What about the display ribbon cable ?
I have a bad cable and don’t want to spend 400 on display assy when the cable is available on this site for 25
Is this step necessary? I can’t perform this step as I am attempting to repair water damage and need to remove logic board & most likely replace the battery.
Macrepair SF -
@mac_medic You definitely don’t want the power coming on while the board is wet. In your case, I think powering on the machine to disable Auto Boot would do more damage than it prevents. I agree, skip this step and be prepared to disconnect the battery quickly if the laptop automatically powers on. Good luck!
Jeff Suovanen -
Thats right! You don't want power running while working on your logic board.
Dan -
This did not work when running High Sierra.
Kyle B -
Tried this on a 2018 MBP 13” Touchbar (there’s no iFixit guide for this model yet). Need to replace a broken screen.
Luckily I managed to connect to an external screen (Cmd-Down Brightness to switch displays) and enter above command. Seems to work, but there’s another problem with this model - it powers up as soon as any key is pressed……. ffs <gnashes teeth>
Cool_Breeze -
I unscrew the battery first and wrap electrical tape over the logic board battery connector before attempting any repairs to the board. Haven’t had any problems yet and I’ve worked on about 10 of these models already. Also when you open the bottom case use a suction cup at the bottom and pull up then run a plastic spudger along the edges to disconnect the clips. Also only use a plastic spudger on the board. Saw a youtube video from a repair shop and he did not disconnect the power and used all metal tools during the entire process of removing the board. His last step was to disconnect the battery terminal.
Brian -
Is this step necessary if my mac can turn on? Battery fully dead(
Nursat b -
BEFORE YOU START: The included torx head stripped off before I was done (and you might need an additional T4) so stop now and go buy a good one. Also they fail to warn you above to get some blue threadlocker ahead of time.
Jason Sherron -
This command did not work for me and I read that sometime in later 2020 Apple stopped this command from working…any ideas on a work around?
Patrick Machacek -
Not able to do that with damaged screen
richardjgreen -
If you have a damaged screen you can still use a converter from thunderbolt (USB 3) to HDMI and plug your Macbook Pro to your TV as monitor display. Just make sure to chose the right Source (HDMI IN) in your TV. I did it and to make it work I unplug and plug again in my Macbook and so I could disable the Auto boot
Roberto Sanchez Bustos -
Hi. This does not work on 2018 13” MacBook Pro with Touch Bar. I did exactly this to disable auto boot. But when I check by using nvram -p it says: auto-boot true. Am I doing something incorrectly? I did everything step by step. Copied and pasted the sudo command, pressed enter and then entered my password. I have Big Sur 11.1 installed. Is there any other way since I need to replace the screen. Thank you. Adrian
Adrian Vizik -
Hi everyone. This is also a little pointless if you can’t see anything on the screen, and you don’t have a display adapter to USB C to display it. I agree with Brian about removing the back and disconnecting the battery cable before you even think about opening the lid of the MacBook. Applying the insulation tape is also a handy little tip that just makes sure there is no way to discharge from either the board or battery.
Roberto Enrieu -
running `nvram -p | grep 'AutoBoot'` in terminal verifies that it was accepted
result: `AutoBoot %00`
Marek Polák -
Running Big Sur 11.6.7 on a 2019 16" MBP, it's "auto-boot". So it's:
nvram -p | grep 'auto-boot'to display the current state, the default istrue- and then to change it,sudo nvram auto-boot=falsewhich turns it off.Ed Mechem -
This step is completely unnecessary if you follow the guide to disconnect the battery properly. Just put some tape between the battery and logic board connection to prevent it from accidentally touching and therefore powering on the laptop.
Grant Ormsby -
It took me a few tries to make this command work, as I was able to copy and paste the command into Terminal, but could not type in my laptop’s password. I finally typed my password into a text document, copied it (command C), and then pasted it into Terminal and it worked.
tommy404 -
I didn’t do this. Mine never auto-booted before I replaced the battery. Now it does.
hatuxka -
BEFORE YOU DO ANYTHING - CHECK THE BATTERY!
I-fixit sent me a bad battery, which I didn’t realize until it was already install. They sent me a new one, but I wasted hours uninstalling and reinstalled.
Get a volt meter and measure the voltage on the output of the battery pack. If it reads 0 V, SEND IT BACK. It should read over 2 V.
bcardanha -
When I did this from Terminal.app within Recovery Mode, the “sudo” was not recognized but I could invoke it without the sudo part. It seems to have been accepted when looking at “nvram -p”
johann beda -
When in Recovery Mode, you already have superuser powers. So you don't need to prefix commands with the sudo command to invoke them with root privileges; you already have them. Do a
pwd(print working directory) after opening Terminal in Recovery Mode, and you'll see that you're in the root user's directory.Ed Mechem -
I received the battery kit for my 2018 MacBook Pro and as per the above comment from bcardanha - Oct 12, 2021, I checked the voltage on the pads marked + and - . It was zero volts so I panicked a bit.
I sent a message on the iFixiT Facebook page and I got no reply. I finally found the customer service email for Ifixit Europe and sent them an email voicing my concern as I was not keen to work for couple of hours just to discover that the battery is faulty. I had an almost instant reply on the email (kudos to them) and they adviced me to go ahead and install the new battery as the voltage measured when battery is not connected is not relevant.
I took a leap of faith and after two hours… the new battery showed 50% charge and everything seems to be working just fine. I am happy it worked.
Mircea Comanici -
After removing the old battery and installing the new battery I powered up the MBP before screwing the bottom on. I discovered the my keyboard would not function. It took a few hours of investigation and frustration that I discovered the track pad power ribbon had become partially dislodged from the trackpad. I was able to see that this through the little machined slot where the battery sat. I had to remove the trackpad to reinsert the power ribbon back into the connector in the trackpad. after reassembling and reinstalling the battery etc the keyboard worked. Just food for thought if your run into the keyboard issue.
Ed Mease -
This should be the default. IMO I tell you to power on - not the lid.
G Sena -
Est ce que cela fonctionne sur un macbook pro 2017 sans touchbar ?
maël muzelet -
Bonjour Maël, oui, ce tutoriel concerne "les MacBook Pro 2016 (et plus récents) et les MacBook Retina 12" 2017 (et plus récents)"
Claire Miesch -
Excellent instructions. I was able to follow and install the new screen. I recommend that you get a good set of tools before you begin. I started with an inexpensive repair kit bought online. The Penta and torx bits failed. I bought an IFIXIT kit with quality bits and I was able to do everything I needed.
Tom Markham -
If you're not running an admin account the sudo command won't work (which honestly, you should not be running admin). Rather than logging in to your admin amount via the OS, in the terminal type "login [admin username]," then the password and you'll be able to do the sudo command as described above. Once you're complete, type "logout [admin username]" and you'll be good to go. Obviously replace [admin username] with whatever the account name for your admin user is.
arichard2401 -