Einleitung
Grundständige Anleitung.
Werkzeuge
-
-
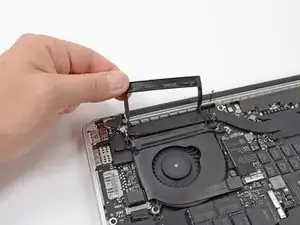
Mit einem Spudger oder einer Pinzette kannst du die drei AirPort-Antennenkabel senkrecht aus ihren Buchsen auf dem AirPort-Board herausziehen.
-
-
-
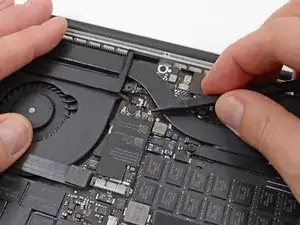
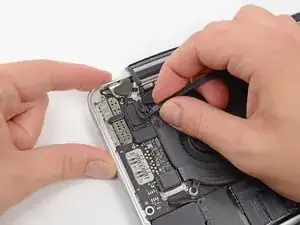
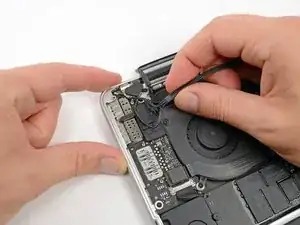
Schiebe den Stecker des Kamerakabels mit der Spudgerspitze aus seinem Anschluss auf dem Logic Board in Richtung des Lüfters.
-
-
-
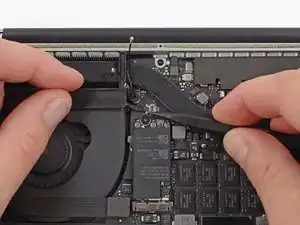
Stecke das flache Ende eines Spudgers unter die Gummiummantelung des Kühlkörpers des rechten Lüfters.
-
Fahre mit dem Spudger unter der gesamten Länge der Ummantelung entlang, um den Kleber zu lösen.
-
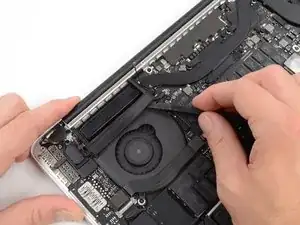
Hebe die Ummantelung an und klappe sie zurück, so dass du an die Kabel darunter herankommst.
-
-
-
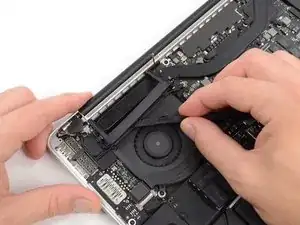
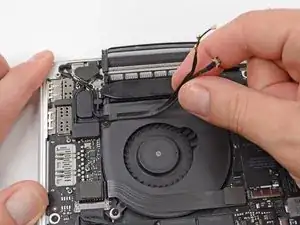
Ziehe die AirPort / Kamera Kabel mit den Fingern nach oben vom Lüfter ab.
-
Fädle die Kabel vorsichtig aus ihrer Kunststoffführung.
-
Arbeite die Schritte in umgekehrter Reihenfolge ab, um dein Gerät wieder zusammenzubauen.

will this procedure remove my warranty? I have applecare for another 2 years, Laptop was dropped on the side, there is a very small dent on the side of I/O.
Oleg Babko -
Yes, this voids your warranty.
max damage -
These are notoriously difficult to remove. I actually damaged 2/3 of the connector pins during the process. Thankfully i was still able to fit them in place. This step should not be underestimated.
Alvin Chua -
If you are not replacing the display case assembly, you can opt to leave all 3 connectors attached and remove the Airport card with them connected. You will need to carefully manage the card and attached cables so as not to damage them(masking tape) as you proceed with disassembly/reassembly. Step 6 will need to be done carefully (camera cable connector). I did it after step 8. I took a picture of routed cables as well before I removed them from channel.
Macrepair SF -
unless you have really tiny fingers, a tweezer helps, just be careful not to damage the wires or the board as your holding each cable in place. Oh and take your time - this is like the most frustrating step in the process, imo.
Arn Custodio -
The order of the cables doesn't seem to matter when re-attaching. It also might be helpful to unscrew and eject the airport card. Having it free can give you a better angle.
joey -
Definitely the hardest step (when putting it back together). The three pins were on progressively longer plugs, so I put the shortest one on the left and so on. This helps with getting the right angle. I used my fingers and the spudger to guide them back in. It took me easily 10-15 minutes to do this. The pattern that worked eventually was to first adjust the angle of the pin head so that it's x/y/z axes would line up perfectly with the connection if you are able to bring it together just so. If you're off on any of these while you try to bring it together, you won't be able to just click it down at the end. Good luck!
Thomas Kunjappu -
Agreed, for some reason, the middle one was stubborn — and I was worried the amount of force I applied to push it back on was going to break something - but it did pop back on.
Jer -
I would never remove those tiny plugs unless I absolutely have to. And we do not have to remove them, just the card itself…
Jurgen -
I looked at these plugs under a 8X lupe, since my 56-year-old eyes are not what they used to be. They are circular, so it’s more a question of just aligning the bottom with the top of the plug rather than angle. If I can do it, someone with better eyes can definitely do it.
Sam Bortnick -
After reading so many reviews on ifixit and other sites regarding the difficulty of replacing my MacBook Pro retina screen assembly, I was a bit nervous. Using this walk through made it super easy. Thank you so much for taking the time to create it!
cabcpa -
Removing these 3 tiny cables is completely unnecessary. I removed my fan last week to clean and it slips by these cables. For some dumb reason i wanted to follow this "correct" procedure and now one of the gold connections detached from the wire like it was nothing. Seriously, dont do this. I used a spunger and was very delicate putting it back on... And look what happened. SKIP!
travismlive -
Yeah, I agree, just leave the airport card attached to the pins and remove the card itself. Then you won’t have to fuss with these connectors.
Jer -
@tmm Your right on! Just finished replacing my right fan and your tip saved me from messing with these tiny cables. I totally understand your frustration as I was too just about to stick to the procedure, but if it’s any comfort your tip helped someone… so don’t be surprised being rewarded by some good karma :)
IT’S UNNECESSARY TO DETACH THE 3 TINY CABLES FROM THE CARD, JUST DETACH THE AIRPORT CARD WITH IT’S CABLES ATTACHED BY GRABING IT FROM BOTH SIDES USING TWO FINGERS AND GENTLY SHAKE IT UNTIL IT DETACHES. THEN MOVE THE WHOLE THING A BIT ASIDE.
THIS STEP IS ONLY NECESSARY TO MAKE WAY TO THE FAN CONNECTOR UNDERNEATH.
There is one thing though I find missing which concerns:
1)The rubber heat sink cover
2 The AirPort/Camera cables
3)The IO board cable
All these are “glued” to the fan and you need to peel them off gently using the spudger, now while I noticed that some glue remains on each cable so they will kinda stick again, I wonder what kind of glue is this and where one can buy it?
Itai -
These individual instructions are re-used across multiple tutorials. If you are replacing the battery, you probably won’t need to remove the three connections from the Airport card; if you are replacing the display, you definitely need to replace them, because they are connected to the display. I just replaced the battery and the display in a single activity, so I pretty much had to remove everything. Also agree with a previous commentor that it’s easier to reconnect the cables before the card is reconnected to the system board.
ChrisMBP -
travismlive is right, you do not need to remove these cables or the airport card. Just remove the I/O board cable, undo the screws, and detach the antenna cables from the fan where they are glued with a spudger. Unlock the ZIF-socket and the you can wriggle the fan out. Probably saved my airport card, thanks travismlive!
Jasper -
I only successfully reattached 1 of the 3 AirPort cables, I just taped the other two. But the AirPort seems to work fine. Do these also have anything to do with Bluetooth though? I do seem to have trouble with Bluetooth after this operation. In any case, it was worth it... I replaced the screen with a new Apple screen for less than 1/2 the Apple Store wanted! Thanks!
Douglas Johnston -
Would soldering them back in place be better than taping? I certainly don't want spare solder on my motherboard, so I figure that'd be a last resort only if I lose AirPort connectivity.
Douglas Johnston -
Assembly is a nightmare. If rightmost cable is not connected, BT will not work.
Radoslaw Przybyl -
the hardest step is reconnecting the airport antenna cables. just have patience< and use tweezers, spluger and a q-tip.
Frederick Rae -
The three cables have different lengths. The longest should to the farthest pin, medium to middle, short to nearest.
Sam Jomaa -
Also, having the right tools will make the job really easy. I used a spudger similar to the one recommended on this web site. But i had ordered a complete kit from amazon.com. I did not have any problem removing or re-attaching the pins.
Sam Jomaa -
tweezers to hold the cable and the flat part of the spudger to push down on the connectors is the easiest way to re-assemble
Jon Ocampo -
Replacing these were the most difficult step I encountered. I finally determined that it took slight back and forth twisting of the cable (from left to right as viewed from above) to cause the connector on the cable to twist into position so it could be pressed down.
chuck60 -
I read your step and you are 100% correct. This helped me tremendously. Thanks!
Achilles -
Use leverage with tip of a spudger, it’s not that difficult to pry the cables.
When you reassemble, use a tweezers to put the connector on the right position and push it down with a finger on the other hand.
Grab the neck of the cable when using a tweezers.
eskoo -
Several of the people above mentioned not disconnecting these three wires. You must remove and replace these if you are replacing the entire display which is what these instructions are about. This is the most difficult step as others have noted. Just be careful and make sure you have the cable level before you start pushing down.
Walt Goede -
If you are not replacing the display case assembly, you can opt to leave all 3 connectors attached and remove the Airport card with them connected. You will need to carefully manage the card and attached cables so as not to damage them(masking tape) as you proceed with disassembly/reassembly. Step 6 will need to be done carefully (camera cable connector). I did it after step 8. I took a picture of routed cables as well before I removed them from channel.
Macrepair SF -
Reassembling: What makes this so hard? From all appearances I’m just pressing a squat sleeve-and-pin connector down onto the female counterpart. It appears to be circular and therefore not needing to be oriented radially in any particular angle. It doesn’t look hard at all! Does anyone understand what the subtlety is that causes everyone so much grief?
Chapman Harrison -
Reassembling: as so many as commented, this is incredibly hard - and inexplicably so. From all appearances I’m just pressing a squat sleeve-and-pin connector down onto the female counterpart. It doesn’t look hard at all! But I couldn’t do it.
Here’s what seems to have worked for me: with my left fingertip on the cable holding the connector directly above the female, I used the spudger to press down the flat back of the connector, initially at the top and then sliding along toward the neck. I used normal pressure, and voila, when I lifted the spudger away the wretched wire didn’t spring up again. It was like it wanted to be rocked, or stroked, once, from top to neck, rather than pressed straight down.
Chapman Harrison -
I skipped to step 34. Just pushed up the speakers so that they don’t touch the body.
Sascha Gl Richy -
Can anyone help me? I would like to replace my speakers. Which steps can i skip?
Manzil Monabber -
I have completed replacing my speakers and this step was not needed at all.
Manzil Monabber -
I just completed the full screen assembly replacement with 90% success I guess. Like many others noted, this was the hardest step, and one them (leftmost) was extra hard, but I eventually got them all back in. However, I don’t have 5G wifi anymore. 2.4 g works fine, bluetooth works fine, and the screen, camera, and mic are all perfectly functioning. I just can’t connect to 5G wifi. Is there a fix for this?
Aaron C -
Absolutely no need to take apart the whole thing, get some strong fishing line and slowly saw the adhesive away. Once the battery is out, (if you are prone to be clumsy just cover/ shield the rest of the computer, than use GOO GONE or the like waiting a couple minutes to scrape out the old adhesive. The only reason they make your take everything out is that they assume you are lazy and will be using the adhesive remover which could damage the rest of the computer if allowed to splatter etc. Just save your self some time and stress, get strong braided fishing line ( works way better than floss or string as it is of a smaller diameter and isn’t smooth and helps the sawing action), and work your way around each cell. This is still way shorter than removing the entire computer and much less likely hood of damaging sensitive connectors.
Pia Paeh -
Agreed! Especially if you replace the batttery a second time with a less Apple-like adhesive.
To prepare for a third time I actually covered parts of the adhesive pads with plastic film on the new battery. I figured that gluing it to the base where it is actually hooked behind the frame makes little sense.
Cheers to everyone repairing good old things and keeping them alive!
Jörg -
Putting these 3 cables back was a lot of work. I bent the outer side of the middle cable, but was able to fix it with fine tweezers from the repair kit.
olegpsh -
I did a screen replacement recently using this guide and the disassembly/assembly was fine - very good instructions. But when I turned on the machine there was a very fine flickering, snow-like interference, especially noticeable on black backgrounds. I assumed it was a faulty replacement screen and continued to use it. Recently, I had to change out the battery so I dissasembled the screen again to see if reconnecting it would fix the problem. Now it is perfect. I think the problem was that the left-most (shortest) airport cable connector was touching the black screw next to it on the board and shorting out. Be careful to position this connector well away from that screw.
rumblefish -
I found placing the spunger under the part of the connectors AWAY FROM THE WIRE (top and/or side depending on which of the three you’re finessing), and then rocking them gently from side to side pops them out gently.
MFMauceri -
I read the note above and managed to fold the card out of the way. I’d put it in a paper envelope to stop it touching anything as it flaps around. The bag also stops static build up and reminds you it’s there ! The wires on mine were held down with two strips of tape, the pointed spudger? pushed along the length of the wires widened the tape loop when I pushed firmly but carefully. Once widened, tweezers can open it fully .
Simon Anthony -
I skipped the step of removing the airport antenna cables and removed the airport card with the cables since so many users said it was extremely hard to get the airport cables back on properly. By skipping the airport cable removal I save a lot of potential headaches and performing this task was not any more difficult to do.
Timothy McDaniel -
I skipped steps 5 - 40 and removed the old battery with the plastic card and a palette-knife after heating the adhesive strips cautiously with a hair dryer. After that removing the adhesive strips with the solvent was by far the most time consuming part.
Martin Zeilinger -
so what happens if you damage 1 of the 3 connectors because you didn’t read all the comments first? Does it work at all or just diminished wifi reception?
Can someone at ifixit update the main instruction page to advise removing the airport card instead of the super fragile cables?
Brandyn McKibben -
YOU DONT NEED ANY OF THIS!
it is SO stupidly risky to remove all this. Who the HECK wrote this guide?!? Thank God I checked on youtube and found guys who did NOTHING of these steps and simply removed the battery in under 1 h.
Silly Billy -
Steps 5-33 are not really needed if you are careful with the speakers, not to spill the fluid onto them. It saves a lot of time and potential dangerous operations. I did it without any problem.
Cristian Caprar -
Please be extremely careful, I just ripped out one of the sockets for the cables. I fixed it with Tesa until I can buy a new Airport-Card.
Josiah Lauer -
BE EXTREMELY CAREFUL WITH THIS STEP both when disconnecting the cable connection points and while doing the reconnection. I damaged the J2 connector (Wi-Fi and Bluetooth are working just fine, though) while trying to reconnect it to the AirPort card. I’ll suggest, as others have here as well, to not disconnect the cables and just have them connected to the card the entire time as this is, IMHO, a completely unnecessary step to take while doing this whole procedure.
Rafael Pérez -
Well, this is the step that (just through reading these comments) I decided NOT to fix my right speaker. Anytime I have to remove these delicate Airport and Camera wires and connections, I get very nervous. (I've done it before, successfully, on a MacMini [ugh; never again!] - just to replace the two slow HD with SSDs! What a hassle!
I'll just my headphones or computer speakers through the headphone jack.
Jonathan Paul Saltzman -
I'm an amateur, so what do I know - but to replace a battery I skipped this step, and all other steps until step 36, I've no idea why they include all these other steps for battery replacement. Literally all steps from 5 - 35 aren't needed.
Andy M -
I broke the J0 connector when this reconnecting step. But Wi-Fi and Bluetooth functionality are still alive I don't know the reason why.
ppop popy -
Pretty sure it is fine, but if you want stronger and further WiFi range, that 3rd connector is what gives you that.
Cary B -
Why do I have to remove the airport antennas?
Cary B -