Einleitung
Grundständige Anleitung.
Werkzeuge
-
-
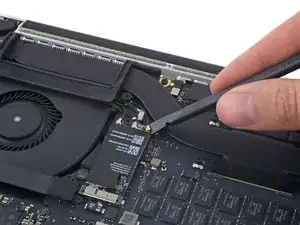
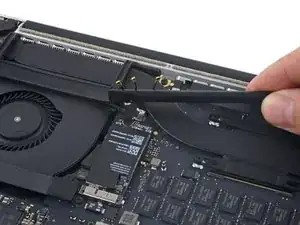
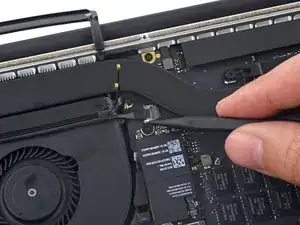
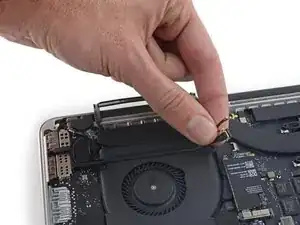
Nutze einen Spudger um die drei AirPort-Antennenkabelstecker nach oben aus ihren Buchsen auf dem AirPort Board zu hebeln und biege sie nach oben und aus dem Weg.
-
-
-
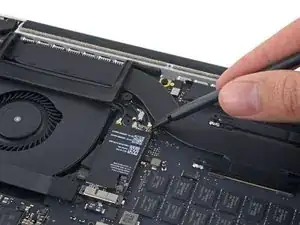
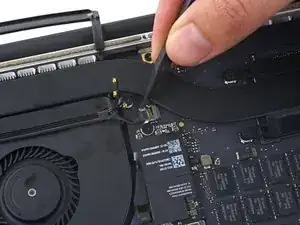
Verwende die Spitze eines Spudgers, um den Stecker des Kamerakabels aus seinem Anschluss auf dem Logic Board zu schieben.
-
-
-
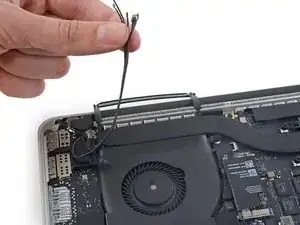
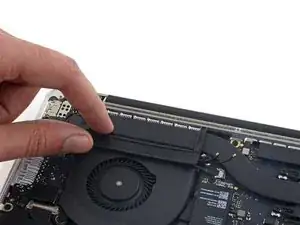
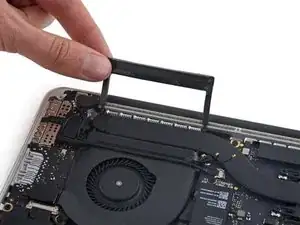
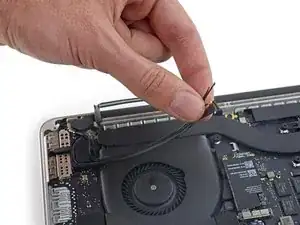
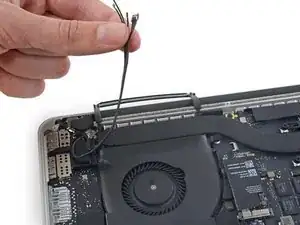
Ziehe die AirPort-/Kamera-Kabel mit den Fingern nach oben vom Lüfter ab.
-
Fädle die Kabel vorsichtig aus ihrer Kunststoffführung.
-
Abschluss
Arbeite die Schritte in umgekehrter Reihenfolge ab, um dein Gerät wieder zusammenzubauen.
I seriously hate this step - it is pretty much the only difficult part of the job. Reconnecting these microscopic stinkin connectors is a monumental PITA…
T Rowe -
Guys, be very carefull with these 3 cables.. If you are not going to replace the whole display, just be careful as much as possible.
Adi -
When reconnecting these tiny wires, use one hand to guide and align the connector by holding the wire and the other hand to press them down with a flat end of a spudger. Spent 10 minutes figuring it out and connecting the first one, then only a few seconds on both of the remaining connectors :)
If you try to do this with one hand, it’s extremely easy to move them out of the alignment while pressing them down.
Aivar Kavshevich -
I think there is a better way - where you disconnect the wifi card using the black screw in middle of wire 2 and 3 first and then untie these connectors. I pryed away the connectors but the sockets on the card were all damaged during the process. Ended up having to get a replacement card before reassembly could be completed. So again there are 2 components - connectors which are being pryed away and really fine and delicate socket. Very easy to damage them. Better to take the card off and delicately peel these connectors off. I would not recommend using these pry sticks mentioned here for that.
Abhishek Kathuria -
ATTENTION ! Cette étape est grandement sous-estimée, aucune mention de la délicatesse de l’opération contrairement à d’autres étapes bien plus facile… De plus, il semble possible de sauter cette étape en déconnectant seulement la carte comme expliquer sur la version anglophone du guide !!! J’ai endommagé le connecteur le plus proche du ventilateur, pour rien… Heureusement, tout semble fonctionner correctement…
Antochny -
AirPort/Camera Cables? not AirPort/Bluetooth Cables?
Marco Cappelli -
Je confirme qu’il est plus simple de déconnecter la carte (enlever la vis, et tirer délicatement sur la carte) que d’enlever les trois cables / I confirm that it’s a lot easier to disconnect the Airport card (just remove the screw and pull gently) than removing those 3 wires.
Maen J -
Agreed with Abhishek - removing the wifi card first makes this much easier.
Tammer Saleh -
How do you know which is which when reassembling?
Bryan Province -
I highly suggest against disconnecting these wires. It's very likely that you will damage either sockets or wires. Do as others recommend, just remove the network card. Prying tool is not good for this step. I broke 1 out of 3 sockets. I wish I read all the comments before operating. Now I gotta get another card :(
Adomas Aleknavičius -
what size driver does this require? My pentalobe doesnt seem to be the right size.
jack32878 -
As many have mentioned, don’t disconnect the wires is reallly a pain in the a… to connect them, it wont be easy and will take a lot of patience….. Better disconnect the card and carefully leave the wires connected.
ilukewitschalejandro -
Just finished replacing both speakers using this guide. VERY good. I did not remove the individual wires - just removed the card with wires attached. Seemed to be the safer, easier way to go.
Dwight Vaughn -
How? can you explain the procedure?
Cosimo Soderi -
I’m attempting taking the card out but leaving the wires attached as mentioned. A Torx T5 worked for me on that screw. I then very slightly lifted up the end of the card where the wires are attached and pulled it straight out of the slot on the opposite side.
Sean Gabel -
Just finished replacing my display LVDS Cable with this guide and another one; awesome. I as well just removed the card and left the wires attached. Much easier.
Alex DeLeon -
This is one of those skills that you get experience right after you need it.
I learned these connectors doing RF work. They require a deft touch. Put slight downward pressure while you work to align the pair. Once you get the hang of it, you will know when they are aligned, and they will go back together with a light push and make a slight snap.
If they don’t immediately pop together with a light push, they’re not aligned quite right. Don’t force them, they have a very limited number of make/break cycles.
The cables should retain their bent shape well enough to show where each goes. One it too short to go too far off, and one is too long to fit to the nearest connection.
prreitz -
I did not bother with the danger of removing cables or cards or logic board. I spent 30 mins removing my battery carefully, using string and CT1 multisolve which isn’t dangerous to plastic.
i slid my string under the battery and see-saw underneath and sprayed Ct1 Multisolve underneath. I’ve now done both my macbooks. Didn’t destroy any cables or risk it. I put a few paper sheets over my logic board to cover any spray back. Simple see-saw and a palstic card, the blue spludger and the black long spluger.
T Master. -
Yes, I did the full board disassembly on my 2012 macbook last year and once I finished I kind of wondered why I didn’t just work on removing the battery. Is there any real obstacle to doing so here? Can I just spend an hour or so carefully removing the battery? What’s the risk of doing that? again, is there any actual obstacle to removing the battery without pulling out the whole board assembly?
Brian Lamb -
You can go straight for the battery if you’re confident enough to improvise a little. Removing the board makes sense if you’re trying to protect the speakers from getting chewed up by the solvent. Otherwise, it’s faster and easier to leave the board in place.
Jeff Suovanen -
Agreed. Just replaced the battery on my 15” MacBook Pro 2015 and I skipped all instruction between step 6 and 46. I just unplugged the battery and removed the trackpad connection. Used some dental floss to cut through the adhesives and a card to help with carefully prying the batteries up. After the battery was removed I used some isopropanol to clean up from the old glue. Installed new battery, attached the trackpad connection ribbon and connected battery. All in all it took me less than one hour. I would not recommend removing the whole logic board just to replace the battery.
Mackie72 -
I’m one of those unfortunate ones that simply followed the iFixit instructions before reading the comments. On successfully reconnecting 2 of the cables and (miserably) failing with the 3rd, I realized the relevance of the comments. I decided to take a gamble and leave the 3rd connector unconnected and fired up my MacBook … strangely enough, everything works fine i.e from the comments, WiFi, Bluetooth, Camera (et al) should be affected but they are all still fully operational (maybe they’ll die with time - I hope not). I don’t like the thought of an unattached cable lying around in my Mac hence I agree with those advocating for alternatives to this step (unhinging the WiFi card as opposed to prying these cables).
Otim Samuel -
Diese drei winzigen Stecker wieder aufzusetzen war tatsächlich die größte Herausforderung der ganzen Reparatur! Wichtig ist dabei darauf zu achten, diese waagerecht und passgenau aufzusetzen. Ich habe dazu die Lupe meiner Lötvorrichtung genutzt und zum aufdrücken die flache Seite des Spudgers.
Werner Hampl -
These antenna connectors are the worst to reconnect. Depending on the model and what repair you are doing, you may not be able to avoid disconnecting them.
ccfman2004 -
We took the advice of leaving the wires attached to the card, and unhinging the wifi the card cable. Worked great for us.
Ann Brainard -
Ditto on just removing the card and leaving the antenna connected. Worked fabulously.
Matt Fisher -
If you do need to get the cables back on the the card, I have found good results using the tip of a T5 driver to gently push them down (of course while aligning carefully with other finger). It gives a firm, flat & precise surface to press with + we know you have a T5 around!
Tech Medic -
Why do these wires/sockets need to be removed at all? They seem like they are pretty faraway from the battery.
John Sikking -
As we are only replacing the battery, you can safely skip steps 6-26 and 28-48, no need to disassemble the computer to pull out the battery. Use nail polisher remover I was able to pull a super bloated battery out, without disassembling my MacBook.
John Sikking -
Can I replace it with early 2015 monitor? Couldn’t find a cheap mid 2015 one but I found a reasonably priced early 2015 one and I would like to have it ?
Mohammed -
If you’re just replacing the battery, after step 5 you can skip everything else except 26-27, 34, and 50, and then continue from step 56 onwards. Instead of needing an adhesive removal, I just used a credit card to separate the battery cells from the casing they’re glued to.
Petr Bela -
After step 5, I would skip 26-27, 34 and just to 46-50. You need to remove the cable from the battery, so even if you do 26-27 and 34, you'll need to do 46-50.
I use the solvent to remove the left over glue after the battery has been removed, but have been able to separate the battery by just sliding a card between the battery and case.
maccentric -
I'm here to tell you that it is possible to remove and reassemble these wires, despite all the above comments making it seem almost impossible. I was planning to remove the entire card instead, but accidentally popped one of the wires when trying to get the card out. So then I just figured I might as well follow the instructions. Popping them was easy, getting them back on was a bit more tricky. Use a fine tip plier to hold the wire and place the plug in place, then press down (quite firmly!) with a spudge or something flat (I would advise against using a metal tool such as the torx driver, in case you slip and hit something). As long as the plug is directly above the connector and aligned properly, you won't break it. Use a good light source and a magnifying glass if needed. I brought my adjustable desk up to eye level so I could come really close and see what I was doing.
Magnus W -
Before removing the wires, I recommend marking each with for example some tape so that you know in which socket to place them when reconnecting them later.
Lennart Philipp -
I got to this step and read a few more and was like oh shoot. I cannot be without my laptop if i mess something up and break a cable. The advice was right. I skipped all the extra removal pieces and just removed the battery. I did step 1-5. Then did step 26 and 27. Then steps 33 and 34. The finished with steps 46-51. I didn't have the blocks so i bypassed putting the laptop on a slant. so after step 51 i skipped to 56 and just started prying off the battery with a credit card and other ifix it tools. I do think the adhesive remover would be very helpful. I also wore goggles cause i caused a spark when i accident poked one of the batteries. Laptop is fine but it is very time consuming and difficult. I recommend getting the kit with the battery. Its only 10 bucks more and i think it would have saved me heaps of time!!!
kyle hansen -