Einleitung

Während so manche Leute die „Zum Klicken tippen“-Funktion schätzen, bevorzugen haptisch veranlagte Menschen den fühlbaren Klick. Manchmal verklemmt das Trackpad nach einigen Monaten im Gebrauch und verweigert auf der einen oder anderen Seite den Klick.

Diese Reparaturanleitung lässt dein Magic Trackpad in unter 5 Minuten wieder klicken.

  1. L6xADC3SjKphpvPT
    L6xADC3SjKphpvPT
    1EDhWY3wNZZQH61V
    GTi22rEnHv6oMhyn
    • Magic Trackpad zur Reparatur bereitlegen und vorbereiten.

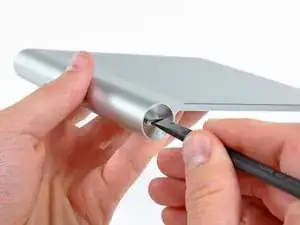
    • Batterieabdeckung entgegen dem Uhrzeigersinn mit einem Schlitz-Schraubendreher, einer Münze, etc. rausschrauben.

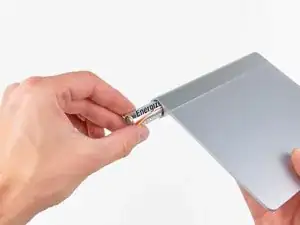
    • Batterien entfernen, um einen Kurzschluss während der Reparatur zu vermeiden.

    Before dismantling, it’s worth checking for sticky crud around the two rubber feet on the front bottom of the trackpad. Those feet are the buttons and they can get gunked up and stick.

    Shaun Crampton -

  2. 4wIW4UKxWkyilWGJ
    4wIW4UKxWkyilWGJ
    66QRttXPGgJhFmes
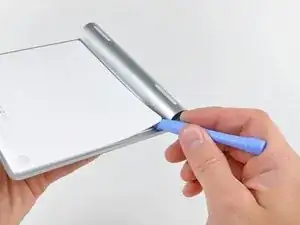
    • Verwende ein Plastiköffnungswerkzeug, um den Klebstoff unter dem linken, rechten und oberen Rand der Rückabdeckung zu lösen.

    • Setze den Hebel nicht unten (am Rand gegenüber des Akkufachs) an. Dort befinden sich Halteklammern, die sonst brechen könnten.

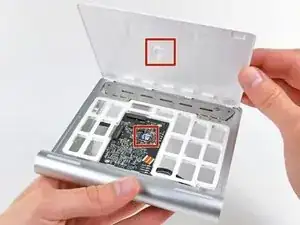
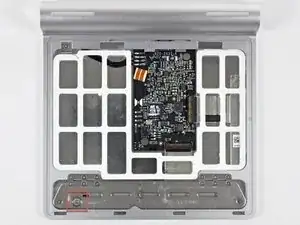
    • Sei beim Anheben des unteren Panels extrem vorsichtig. Die primäre CPU/Chip auf der Platine (im zweiten Foto rot markiert) ist mit etwas Kleber an der Rückabdeckung befestigt. Wenn der Kleber zwischen Chip und Abdeckung nicht sorgfältig durchtrennt wird, kann der Chip von der Platine abgerissen werden, was dein Trackpad UNBRAUCHBAR machen wird.

    • Nachdem alle Klebestellen getrennt wurden, lässt sich die Rückabdeckung abnehmen.

    Note that the first photo in step 2 shows the bottom (which you shouldn't try to pry) being pried. This is confusing, to say the least, and cost me one of my connecting tabs. Indeed, the glue is quite strong. After getting a pry-back started, look in to the gap, and use a narrow screwdriver to pinpoint peel off the adhesive. Worked great for me.

    Scott Hards -

    My Magic Trackpad completely broke

    Charles -

    I carefully cut and pried- using a thin flat tool to cut through the adhesive all the way across the back without having to pry it to risk damage.

    I removed the t6 screw and the 6 phillips screws holding the 'clicker' piece to the chassis. I used an alcohol pad to clean underneath it (there was an oily thumbprint from someone at the factory that built it).

    I then put everything back together, cleaned up the extra "adhesive" (this stuff is really just like the gummy gunk used on address labels affixed to magazines, or affixed to the back of a credit card when it comes in the mail).

    I figured these minor adjustments would leave me with a like-new track pad to use for many more years.

    I figured wrong. .

    Be careful! Even with care, it seems that some of these trackpads (like mine) are easily damaged during teardown. There was no evidence of any damage while I was tearing down, cleaning or putting it back together. I know my way around a soldering iron and this wasn't "my first rodeo".

    JoeYak -

    If I wasn't clear- mine is now 100% dead.

    JoeYak -

    Agree, don't pry at the bottom at all (don't do what the pic shows). The rest of the guide worked fine. In my case, the adhesive that holds the little rubber feet to the plastic cover has degraded and no longer really holds them allowing them to slip and "jam" the clicker until you slide it back. I used a very very small amount of glue to re-adhere it, so hopefully that lasts a while.

    I didn't have issues with the chip coming off because I didn't use any excessive force. The key, folks, is to go slowly. I've got the full toolkit from iFixit, so I used the metal spudger to apply gentle slow pressure until the adhesive released.

    ZackLoggins -

    This worked just fine for me. Mine was glued pretty tightly, but came up with a gentle pry.

    michaeleck -

    The first picture is very misleading. I thought "bottom" referred to the portion of the trackpad offscreen to the bottom of the picture. In fact, the picture shows prying of the very area you instruct not to pry.

    I now have broken retaining tabs.

    marionh9 -

    no problem for me, except that the plastic tabs that clip the back in place broke off. but there's enough glue on it that it sticks right back on. amazed that such an expensive bit of kit fails like this so often. one small turn of the screw and it's working again. if you're reading this, Apple, just put a small hole to allow access to the adjustment screw.

    Ben Avery -

    lol I didn't know I could remove a surface mounted part like that so fast...

    gpbyars -

    Fix the darn picture since bottom and top are competely relative to your perspective, and it sounds like the picture is just showing you how to break your trackpad!

    dunxd -

    This tore one of the circuit components off my the board :(. Notice one of the large black square in the image has a some glue on it and a corresponding imprint in the back of the white panel backing... glue trumped circuit in my lost oreo esque battle....

    Gregory Schwedock -

    Yeah seriously, wtf? The picture shows you prying open the side that you're not supposed to be prying open.

    AndrewNoNumbers -

    The center of the plastic was glued to a chip. Removing the edges of the plastic removed the chip from the board underneath. Trackpad is now dead.

    Rodeo -

    More than just a WARNING is required re the excess glue and potential damage to circuitry. On my trackpad there was a blob of glue specifically affixing the main CPU of the pad to the outer shell. It's right in the middle, and WELL glued on. Thus, removing the cover ripped the chip off. Trackpad is a complete write-off. Fellow Do-it-yourselfers BEWARE!!!

    Inspired Earth -

    I got stuck at the very first step! My blue plastic pry tool (which looks exactly like the one for sale above) wasn't able to get in the groove. Then my fingernail was, and I started prying. My tool slipped and the thing snapped right back together as if I hadn't pried at all

    Then my fingernail wouldn't lift it up again because it had been creased and weakened by the original prying. No luck with other fingernails. So I literally cannot get the back off. Methinks I'm going to stop now and just sell it as is.

    Andrei Androsoff -

    After reading these comments before following the steps to repair my Trackpad I have to assume the picture that apparently showed the back panel being pried from the wrong side has been replaced because this to me certainly shows the correct steps to remove the back panel of the Trackpad. This repair definitely requires patience and must not be rushed or likely a dead Trackpad will result. Once I pried a corner up enough to see in behind the back panel I used a very small, but long, flat screwdriver to carefully release the adhesive towards the center. I did this first from one side and left a pry tool holding that side open so the adhesive would not just re-stick, and then took the same steps on the opposite side. This resulted in the back panel lifting right off while leaving the CPU chip properly attached to the circuit board.

    papagordie -

    ATTENTION They FIXED THE PICTURE. The picture now shown is CORRECT. Pry the back up from the edge CLOSEST to the BATTERIES to avoid breaking the tabs. The tabs are along the edge furthest away from the battery. Hope this helps someone!

    asi.ifrah -

    Thanks for this warning. I was able to get the back off without ripping the chip off. Does anyone else find it odd that Apple glued the chip to the back panel? Is this a way of sabotaging any attempt at repair?

    thoughtstyle -

    I can easily believe that Apple would sabotage repairs with the needless blob of glue. This the most arrogant company. I laughed when one tech here suggested that Apple drill an access hole for the adjustment screw. Right! Like the missing service door on Imacs or gluing the imac power button instead of two small screws or a way to remove the imac screen instead of gluing it on or the glued in batteries. The most lame company.

    I remember the good old days 40 years ago, when Apple would send me replacement roms and other chips to aid me in doing circuit level repairs on the apple I’s II’s. My Oscope, a Huntron tracker, soldering iron and the latest copy of the annual IC Circuit Handbook was all you needed to completely repair the early Apples.

    Ross Elkins -

    Could you like leave everything but the technical facts rather than your view of Apple outside a guide like this one. Some us just want to repair without the fuss. Direct your frustration directly at Apple where it belongs or use forums where this is what people want to discuss. Please let the guides be about the repairs themselves.

    MiB -

    Thanks for this. My same trackpad was slowly on its way to being un-clickable and I don’t like the tap-to-click route. This was the only guide I’ve found that clearly explained how to fix it. Took it slow and appreciated the caution about potential for prying the chip out. Would only add that I ended up using a small metal flat screwdriver to start peeling the backing away - starting at the edges nearest the batteries.. The spudger was useful after that — sliding it gently between the cover and the plastic ribbing, from the left & right sides, working toward the middle, careful not to damage the chip.

    Wes -

    Took it apart (Thank you for the new correct picture) carefully using a flat screwdriver to get an opening for my nylon tool, adjusted the screw — in my case it was clicking whenever so turned it a little bit to the right — then placed the rubber feet through the holes in the bottom, held the bottom at a 90° angle and placed the tabs, then folded back the bottom carefully pressing it back into to place with distinct but light force. This old thing is as new.

    MiB -

  3. DPoCmIXB6ybwbDO3
    • Justiere die Schraube in der unteren, linken Ecke mit einem T-6 oder T-7 Torx-Schraubendreher, um das Klickverhalten zu anzupassen.

    • Wenn der Rechtsklick funktioniert, nicht aber der Linksklick, ziehe die Schraube im Uhrzeigersinn fester.

    • Linksklick und Rechtsklick beziehen sich auf die Oberseite des Trackpads, nicht auf die Unterseite auf der sich die Justierschraube befindet.

    • Falls weder Links- noch Rechtsklick funktionieren und gar keine Tastenbewegung wahrnehmbar ist, lockere die Schraube (gegen den Uhrzeigersinn drehen).

    • Wenn sich die Tasten zwar bewegen lassen, aber kein Klick wahrnehmbar ist, ziehe die Schraube im Uhrzeigersinn fester.

    The Torx screw was very tight at first. With slow, steady pressure it started to turn. In my case, my left click was soft so I turned clockwise and went too far which made both sides not click at all. Had to go back and now left click is very responsive!

    dgnguyen -

    Torx was very tight so go slow and apply pressure but not too much.

    Mike RS -

    I think I just killed my track pad.

    I can see that it would work if you DON'T START FRONT THE BOTTOM.

    The first picture in step clearly shows starting from the bottom including the retaining clip. I would suggest swopping the 2nd picture for the 1st. In fact detail the 1st picture.

    It is my own fault for rushing.

    The trackpad action on a laptop is infinitely better than this lash-up piece of hardware. Of course it is going to fail, but then I guess that if the idea for profit hungry Apple.

    Paul C -

    My problem was that my trackpad would not click at all on the right side. Left side was fine.

    I started to pry up the back cover, starting from the battery side as instructed, and had the cover almost removed when I noticed that one of the rubber feet was missing! I looked in my bag, and found the little bugger. It had the round dome, and a larger white background. It turns out all I had to do was pry up the cover (watching I didn't break the tabs at the bottom) and slide the button back into place.

    Pushed the cover back down, and now my Magic Trackpad is 100% back to normal! I didn't need to touch the screws, the problem was only the missing button.

    dazifixit -

    Worked a treat. Thank you for your help

    Lilli Clemens -

    My Trackpad lost both right and left clicks and I had almost given up on it until I found this tutorial. This guide worked seamlessly to adjust the torx screw and restore my Trackpad’s clicks. I also agree regarding the tightness of the torx screw. Again, patience and steady strong pressure might be required. Excellent and much appreciated.

    papagordie -

    My trackpad is probably wearing out — today it started sending spurious clicks, even just from the minor vibrations of typing.

    I’ve been able to make it somewhat less touchy with very careful adjustment, but it’s not perfect yet.

    Greg A. Woods -

    I’ve found out that my left button was getting stuck because of the rubber feet falling off the white plastic back cover (when disassembled). The click is actually produced by the pressure of the two rubber feet at the bottom of the trackpad to the desk. If one of them is getting stuck, the click will get stuck as well. This is where adjusting this screw does not help (although I’ve improved my click a lot). In my case, I’ve used just a touch of glue to glue the outer rim of the rubber feet with the white plastic inside. Basically when you lift off the white bottom piece, no rubber feet should fall off on its own. If one of them does, then most likely you will have the same problem as I did. Gluing the outer rim of the rubber feet to the white cover perfectly fixed the click getting stuck in my case. In opening up the device, you might want to consider heating the plastic back with a hair fan for a bit to get the glue going, it makes it a lot easier. Hope this helps someone. Thanks for sharing this tutorial!

    Dani -

    Thank you Danimir Ljepava for your trick, it actually fixed it for me. The screwing did not do much to my trackpad (the left click was getting stuck, but I did notice that the rubber feet were going away when I opened it. A bit of glue and the click is now responsive again.

    Yann Coppier -

    Thank you Danimir Ljepava, a bit of glue fixed it for me indeed!

    Yann Coppier -

  4. OdBMxOcGVTLEHXkB
    • Folge den Anleitungsschritten in umgekehrter Reihenfolge, um die Plastikabdeckung auf der Unterseite des Magic Trackpad wieder einzusetzen.

    • Dein Magic Trackpad sollte jetzt wieder wie neu und einsatzbereit sein!

    Before reassembling, drill a hole in the white cover right above the screw for permanet access.

    DRDA -

Abschluss

Folge diesen Anleitungsschritten in umgekehrter Reihenfolge, um dein Gerät wieder zusammenzubauen.

jkgarrett17

Mitglied seit: 29/09/10

2404 Reputation

77 Kommentare

DO NOT DO THIS! My trackpad had the central chip glued STRONGLY to the plastic piece. Pulling off the plastic plate ripped the chip right off. My trackpad is now completely dead. I repeat: DO NOT DO THIS FIX! Your trackpad might not be glued, but I have ruined this thing.

Chris Beyer -

Chris, I just did the same thing to mine and had the same result. I wish I'd read your warning first! Perhaps some heat at the center of the plastic backing would have helped release the adhesive from the chip/backing.

To anyone attempting this fix, if you feel anything in the center of the plastic back cover sticking, do not force it off. It might be possible to get a blade in there to slice through the adhesive, but it really didn't take much force at all for the chip to break free of the circuit board.

David -

I have updated the guide with your warning. I would recommend in the future not pulling anythng apart that could cause ripping. You'll notice the original instructions recommending cutting through the glue, not ripping it apart. Those recommendations were from a breakdown guide and have worked for multiple users. I myself have repaired trackpads 3-4 times following the above instructions.

jkgarrett17 -

I have also updated the difficulty to moderate from easy.
jkgarrett17 -

I could not turn the screw in Step 3. It seemed completely locked. However, I did lift up the whole switch plate which put some extra bend into the 2 thin metal "spring hinges". This restored the click-drag functionality that I was trying to fix.

Leo -

Great guide! It fixed my sticky left button! Thanks. I would suggest not prying from the bottom and just go around the edges.

Ben Anderson -

Worked for me. iFixit metal spudger set helped with the prying and glue slicing. Before putting the plastic plate back in its glued position I drilled a small hole for accessing the T-6 adjusting screw - for after the fix fine tuning. Cheers. /criss

Criss Hyde -

Nice tip about drilling a hole before reassembly! I took my time and it now works perfectly again.

johnhoodjr -

In my opinion Criss's tip on drilling a hole is the best, lowest risk path. Using the excellent pictures here, I scaled the image to reality and find that the adjusting screw centre is 10.9mm up from the bottom aluminium edge and 20.8mm in the left hand edge. I stuck a sliver of masking tape on the plastic and drew a +. As well as allowing a pencil to be used, the tape stops the drill head skating. I finger drilled with a 3mm bit and the T6 socket appeared in the dead centre of the hole.

In my case, both left and right clicks were sluggish so I swung the screw a full turn clockwise and the same anticlockwise. I then stepped through to find the best clicking setting.

3mm is a very neat hole but I have stuck a sliver of scotch tape over to keep bugs & Sahara sand dust out (I live in the S of France). Job done. Thanks everyone!

Robin Marshall -

Robin, you just saved me 80 to 150 dollars… THANK YOU; THANK YOU; THANK YOU!

chris.snavely -

I did the exact same thing. It’s kind of annoying to have to keep pulling the plastic off after adjusting, so I drilled a small hole to access the internal adjustment screw.

There’s a circular indentation on the back side of the plastic to allow room for the head of the adjustment screw. I drilled a 3/32” hole, centered on that indentation. The screw is slightly off center (a hair closer to battery side), but the hole is just large enough to accommodate.

Ryan Johnson -

Take care of the strong glue, and watch out the photo of step 2 that can be confusing.

Saying that, be patient, take your time -specially in the central area of the circuit- follow the instructions and voila!. I usually do not write comments but my magic trackpad was driving me crazy (I use it a lot for photograph purposes) and now IT'S BRAND NEW! Very happy! :)

Raul -

Hi guys,

I just completed this guide on a track-pad with A LOT of glue, and it worked 100%! (But I was also extremely careful!)

To all of you guys being afraid of doing this. Don't be afraid. . Consider whether you are willing to take the risk, and can afford a new trackpad if you ruin it. . If you can, and are tired of your missing physical click. Just go ahead, but please be careful when removing all that glue.

I used:

- My thumb-nail

- An old credit-card

- a small utility knife with a long blade

Gently removed the yellow glue around the circuit-board with the credit-card. . hereafter gently using the utility-knife to remove the white glue on top of the micro-chip.

Hope the best for all of you trying to do this. It is not impossible - it just needs the gentle touch :)

Kasper

N.B. otherwise i guess this fix is more or less risk-free:

https://www.youtube.com/watch?v=CXrKzzMU...

Kasper -

I followed the directions and mine is dead, not working at all.

graciehomer -

Maybe I was just lucky but I have Just used the guide, without any special measure to avoid detaching chips etc, and it worked perfectly. I substituted optician's screwdrivers (flat and Phillips) for both tools, and used a flat metal paper knife at each side to GENTLY pry the thing apart, with only a little twist along the top edge needed. Screwed the little torq screw down, clipped it all back together, using the perfect result as I speak. No glue needed to reassemble, it went back together just fine. Many thanks - it was going in the bin until I thought to check this excellent site!

Ian -

I just completed this fix and was very careful not to rip the chip off. I recommend going very slow and using a sharp knife to reach in and separate the glue, especially when you get to the chip in the very center.

As an alternative, the center of the screw in question is about 1/8" to the left of the "D" in "Developed by Apple...". If you use the sharp tip of a knife or a razor blade and very carefully twist a small 1/8" diameter hole, you'll reveal the screw, and you can gain access to adjust it without ever taking off the plastic backing, avoiding the risk of destroying the electronics. That's how I'd do it if I had to do it again.

Good luck!

Bryan Owen -

The tip to open a hole w/o removing the back is excellent.

Just did it using a 1/8" drill bit turned gently in my hand to initiate the hole (until just a bit of steel was showing as the plastic was on the verge of being fully penetrated). Finished the opening with with a razor blade.

The screw is now right there for adjustment.

hugh -

Thank you, Bryan Owen! I had a hard time trying to pry off the lower panel and stumbled upon Bryan's comment. Using a utility knife, I cut a small hole in the back as Bryan suggested. Voila! it exposed the little screw. I now have a perfectly-functioning Magic Trackpad.

pat4cars -

my trackpad is busted too, now. the glue was highly adhesive and partially ripped the board out. the power still comes on but my trackpad is no longer recognized by my computer or my wife's computer. i'm !#^&@@ that i attempted this.

Judah Parness -

I carefully pried off the back and was OK. (Mine didn't have much glue plus I saw the other warnings.) The problem was that right-click (left as viewed from the back) clicked strong, right-click was weak. I ended up tightening the adjustment screw all the way.

Then I cleaned off the rubber pads on the back of the feet, shot canned air where it seemed like crud might lurk, squirted contact cleaner where it seemed right, and carefully ran the corner of a sheet of typing paper under the metal plate that appears to get distorted and snap back to produce the "click." Then I put the back, back on.

Right now everything works great.

bill1 -

I just fixed my left click rubber nipple which had become messed up in the pad using this guide..... it took ten seconds and I am back up and running....

thanks.

guybrummel -

This is a good guide. It took me a few go's to get it working correctly, but I've had this annoying problem long enough that this fix is worth completing. (My left button would click and stick, not returning to top position). I've never had functionality of a 1-finger right click from the pad. I always hold CTRL + click from my old Mac days.

Norris Mantooth -

READ THIS BEFORE START!

Thanks for guide. I agree, first picture of step 2 is misleading. Pry along either sides of the track pad first, not the side with lettering which is referred to as the bottom(side away from the batteries). Do not pry panel more than 2-3 mm if you start from the bottom. Start at the 7 o'clock position and loosen panel in a counter clockwise direction lifting the lid no more than 1 cm. By the time you get to the 5 o'clock position the white panel should be mostly free but not fully open like the third picture in Step 2. Look underneath to make sure glue is not sticking to central chips. Then you can open lid up as shown in photo 3 of step 2.

Junkbondman -

This is a great guide and now my track works great again. Thanks.

But be warned Apple/Foxconn use some strong glue in this device.

I pried the top 1 cm of white cover up and placed a bamboo kebab stick across the whole width of the trackpad. Then slowly pulled down towards the bottom/front holding to both ends of the exposed kebab stick. After seeing how much glue is involved I would probably point a hairdryer at it for 10 min before starting next time.

Rick Anstey -

This worked for me! Thanks so much. Saved me a trip to the Genius Bar!

Jong Codamon -

I've done this - getting the plastic off was difficult, and I did break one of the retaining tabs despite reading the warnings. BE VERY CLEAR THAT THE RETAINING CLIPS ARE AT THE THIN END OF THE TRACKPAD THAT WILL BE NEAREST YOUR BODY WHEN USING IT - that is a lot clearer than "opposite the battery compartment". Anyway, I managed to get the thing apart without completely breaking it. The rubber feet have come unstuck, which is a bit annoying - everything else is glued so securely. Without the feet attached, my random click issue seemed to have gone away - however, you need the feet and the click to do certain operations such as dragging to select for a screen grab. Back to the drawing board.

dunxd -

Mine was glued as well and thank you for adding the warning. It worked like a charm and saved me from going out and buying a new one!

Mike RS -

Thank you so much! It worked like a charm!!!

ioannicut -

When your TrackPad does not restore after clicking, probably one of the rubbers has gone lose. Follow this guide to open your trackpad. When it's open use glue to reattach the rubber. Wait a few minutes for the glue to dry and make sure you remove traces of glue. Close the trackpad and it's working again.

Pim Snel -

Couple extra tips: after carefully prying the edges open, (and with batteries removed!), insert some plastic inserts on 3 sides to keep the edges open. Place the trackpad on top of a coffee mug of steaming hot water, so that the apple logo is down towards the coffee mug. Wait 10 minutes. It should now be easier to cut the glue and carefully remove the bottom panel. Carefully dab away any water residue.

mark30 -

I was fighting with my keyboard and just about gave up until I came upon your suggested fix....AAAAnnnnnnnnddd it WORKED. Thank you so much.

Armando Olivares -

Worked for me. It might help to use a blow dryer to heat the trackpad a bit next time to loosen the glue a bit.

zuzuelf -

Amazing. All done in less than 10. A cutter helps a bunch.

paulailincai -

Works, but WAY finicky to get right... I used a hair dryer to help loosen the glue. Worked best to get a wedge at the top (next to battery tube)on the right side and then another one on the left side. Kept hair dryer on, 5 or 6 inches from white plastic for a few minutes, then twisted the pry tool to open the gap a little wider, move it downward a half inch at a time. Just take your time. I think the KEY is that you do NOT need to move the adjustment screw much... at all. Like MAYBE 1/4 turn. If you watch what the adjuster DOES it becomes more obvious what you may need. When you put the white plastic back in place it is CRITICAL that you have it aligned exactly perfectly or it won't work at all. Fixed mine... and I was seriously ready to toss it. WAY happier now. Thanks for the knowledge!

pvaglienti -

MANY THANKS!! It works great and has saved me ££s on a new trackpad - they're overpriced here but invaluable for photo work. The hairdryer is a good tip but mine wasn't glued too badly. Also a pointed blade can get under the plastic grid and poke at the wiring on first starting to prise so care needs to be taken - a gradual short insert, twist the blade gently to slowly raise the plastic from the glue then in a bit further; work from both top corners towards the chip at the centre. I took extra care then, gently raising from both sides a little at a time. That said it still only takes 10mins. I drilled a 3mm hole (handholding the drill - the plastic is very thin) from the inside face of the plastic to keep the inside hole edge tidy (you can see where the centre needs to be if you hold the plastic plate up to the light). I found I needed to fine tune the adjustment after I replaced the plate so the hole is an excellent tip. Thanks to all who sorted this problem for me.

Raukopf -

First off the lift-bar screw appears to have red loctite on it but when a screw only has two threads, it's not going to do much. My advice is to put a tiny dab of glue near the threads once you have adjusted it so as to prevent the need for future adjustment. It's a design flaw, that over time, clicking on the trackpad will unscrew that pivotal screw.

Second, the right and left click are irrelevant, there is no top or bottom. The click is determined by the click-bar at the bottom, nothing else.

Lastly, turning the screw clockwise (tightening it) will raise the lift-bar, turning the screw counter-clockwise (loosening it) will lower the click-bar mechanism (backwards from what the article suggests).

Tiem -

This was a really good fix!!! I had no issues. Piggybacking off of this just be very careful when removing the bottom panel. I slightly cracked mine even after taking my time. I don't have an iFIXIT tool so a flat headed screwdriver was used. My fault... but I'll live!!!

tfordchevy -

No issues for me. I used a Tekton iPhone repair tool set that included tools for prying and slowly working through the glue, My 2012 model A1339 was glued in three places, with gum about 2cm in from each of the corners adjacent to the battery compartment, and a very strong foam tape in the dead center atop the main IC. You're really trusting the solder on the IC to hold, so it's not without risk. The Tekton pry tool has a wedge section to apply steady pressure, and that's what I used. One turn of the screw and back in business.

As a side note, it would make me feel a lot better about how much Apple charges if things weren't pasted together like macaroni art.

C Cherry -

AMAZING! An Apple Authorised place refused to acknowledge a problem when it hardly clicked... this fixed it in 60 seconds. A half turn was all that was needed. THANKS!

BAB -

Piece of cake. A T6 torx did for me. No issue with the glue on the chip—I went slowly and the back came loose on my 7 year old first gen Magic Trackpad. Took 1/8 turn and it popped back together in a second. Thanks!

michaelthalloran -

OMG thank you, i use this trackpad for work and i am really efficient with it and could go to using mouse again. These things are way to expensive to replace and this tip worked excellent for me to fix my left clicking from sticking. I would suggest putting your warm coffee on the back like a coaster to warm up the glue within the plastic so the adhesive lets loose.. just don't melt it lol.

Travis Gillard -

Excellent guide. You have to have a nice sharp spudger to get in to start prying the baseplate. Once it starts, be patient and don't rip; just gradually pull. The screw that does the adjustment isn't a screw; it's a slug so the movement is limited a couple of millimeters and then it falls out. I also found I had to bend the metal plate (to which the screw is attached) to give it a little extra springiness. It appears that between the adjustment and the bending, my trackpad has been restored! Thanks EVER so much.

ibrown000 -

I did Robin's improved method of simply drilling precisely at the specified measurements without removing the whit plastic shield, and the screw was dead center under the drill bit. (I'm in the US and only had imperial sized bits, so used 1/8".) Worked like a charm. After drilling, I used a cutting blade to clean up the plastic that was left on the screw head.

Rajiv Sarathy -

I'm quite experienced in these things and I followed the directions very carefully but now I have to report that sadly my Trackpad is DEAD!

rgrtnyjjc O -

Thanks a lot. It worked!! I was a couple of seconds away of trashing it! As other people say, don't rip and be patient. Start from the top (never from the bottom) and then do left and right sides with a plastic tool. Do not use a screwdriver.

Sergio -

Hello

thank you the community ! I decided to make a little hole with a cutter.

The center of the screw is exactly at 10 mm from the center of the foot (see photo in the tuto), on the line between the centers of the two feet. I had not this information so I was two mm too far.

My hole is not very well done but it is very easy tu cut this white plastic. And i’m not often looking at the back of my trackpad

Onfyle -

https://youtu.be/iR9U1MRo3QM?t=28 this guy applied some heat to that back before prying it open and it seems like he was able to remove the back effortlessly.

A AM -

Successfully fixed my trackpad. Applying heat to the bottom before prying it open definitely helped.

Man, it is so much easier to fix stuff when you have the right tools. It took me 5 minutes to complete this fix.

A AM -

I have the opposite problem: “ghost” or “phantom” clicks. My Magic Trackpad seems to have a mind of its own, and will start registering clicks or click-drag text selections, even though I’m not touching it. Has anyone else seen this behavior? Once you open it up, is there a way to make it less sensitive to user input?

Mark Wallace -

well,caution!central chip.but I just found a new way to fix this , don’t have to remove the back lid, just bent the whole thing, mine was the left not clicking, so I bent the trackpad tangentially the I got a response , clicking but too weak ,then I found out that my trackpad was bent on the right side, so i bent again on that side, then it works just like magic! SO, check if your trackpad was bent or not in anyway bent it back or bent some more, don’t over bent it though……

Nick Craftsmann -

Hi risk process this. I carefully levered at the top edge then used a very long bladed craft knife (the type with the snap off blades) to cut across the glue. My main chip didn’t actually seem to be stuck

Adjusted the click, put back together. Pressed power button. Nothing. Then the thing starts getting super hot so i pop the batteries out and take the back off again. Can’t see anything damaged or in the wrong place but something above the main chip got hot enough to melt the plastic of the back.

No harm in trying once more. (maybe). now it seems to work. very odd.

Simon Still -

Nice guide. I had a sticking left corner button. I spryed some Deoxit Fader F5 on the bottom button and while cleaning it up the puck cover came off. So I lifted the left corner with a small jewelers screw driver. I got enough space to think about slipping the silicone cover and puck back over the switch. I put another jewelers screw driver under the bottom edge and slowly slid it towards the opposite button. I was able to release the first tab holding the bottom on without damaging it. I then replaced the silicone cover and puck over the switch and snapped down the tab. And now it works great again. Just a minute ago I did a search and found this information. Now I know there are 4 tabs along the bottom edge. I guess those years of working on car stereos and such kind of paid off. Did not know what was under there but knew to be slow and careful. Real lesson is to search and learn before you tinker. I was also very lucky.

MrBeta -

I followed the directions. While nothing seems to have broken, the trackpad is now dead. It won’t power on. :( *sigh* Note, one thing I didn’t notice in the guide was the teeth that are on the bottom edge. a picture of that and explanation would be a good idea. The teeth that fit in the tabs can easily break off.

Michael -

DON’T DO THIS! Fortunately, I stopped after one corner and could feel that the back was not coming unglued without putting an uncomfortable amount of force that just felt like it was going to break.

Erich Wiernasz -

Why didn’t you simply use a sharp knife blade to carefully / gently slice through the adhesive, as suggested by various contributors? No pressure at all needed then.

Rod Hagen -

Wow now my trackpad works again as new one!

Thank you!

Andrey Sorokin -

Thank you - your guide worked fine for me! :)

The left-click of my heavy-used trackpad didn’t work anymore but now it’s back in business. The art is to use force in the beginning when slicing through the adhesive in the first corner. And then you have to be patient when working down and in - centimeter for centimeter… ;)

Herbert Hutterer -

Great guide! Here’s my variation of a trackpad clicking problem and my non-invasive fix. I noticed a little round silicone thing on my desk at the same time that clicking no longer worked. I realized that this was the silicone pusher thing that had got hung up on my desk surface and was pulled out from its hole in the track pad bottom. My fix consisted of working the thin edges of the silicone pusher back under the plastic bottom plate with a flat edged eyeglass screw driver gently pushing it under the bottom plate around the circumference of its hole. By pushing gently and in small increments (to avoid slicing the edge) the thin edge of the silicone pusher got worked back into position under the bottom plate. It took a combination of (gently!) pushing the edges and wiggling the silicone pusher to get it into a position wherein clicking steadily improved until it was like new. I know the pushers are positioned right because they wiggle loosely in their holes.

Robert Meppelink -

Worked fine for me, too. In my case I had had to replace the original “feet” with a couple of stick on plastic ones. The cover seemed a little loose after removal and replacement , so I added a small piece of invisible tape along the lower edge. Working beautifully now.

Rod Hagen -

Why didn’t you simply use a sharp knife blade to carefully / gently slice through the adhesive, as suggested by various contributors? No pressure at all needed then.

Hi Rod,

My repair guide was written following the dissasembly/teardown instructions, so that is why I, myself, did not include using a knife blade for the repair.

As to why iFixit did not recommend such, I assume it has to do with the risk of accidentally cutting something other than the glue, or unintentionally scratching your device. Their iOpener kits are designed to break before damaging your device, and I can attest to the many times using iOpener tools and spudgers have saved me many regrets, when the tools broke because I was applying too much force, instead of placing a nice gouge in my device (or worse!) from using tools intended for other purposes, without such safety features.

jkgarrett17 -

The hint to drill a 3mm hole 20,9mm from the left and 10,9mm from the bottom works great! The hole can be drilled by hand as the platic is quite soft. Takes only a few seconds!

dr.peter.baumann -

I was just about to spend $129 on a second-generation trackpad, but I decided to give this guide a try. It took me longer than the 3-5 minutes estimated in the guide, but I now have a working unit again! One thousand thanks to the author - and to the guy who suggested drilling a hole to get to the Torx screw. I did that after I took the bottom plate off. Two minutes with a Dremel, and I’ll never have to pop the bottom off again.

Brilliant.

ralley -

Guide worked perfect. The chip is siliconed down so be careful. I used a kitchen knife to gently slice the silicone free from the chip. The rest is just adhesive to the white plastic frame in the picture. Took me 5 mins.

Jamie -

Used the guide to open the device, turns out the rubber feet have a secondary piece inside that became loose and not centered, causing the little metal click paddle to become flush with the backing. Centered these again and it works just fine. Tip on the removal process, I used a thin zip tie from corner to corner to slowly slice through the adhesive. Thanks again!

Matthew De La Rosa -

I pried one side open slightly from the corner nearest the batteries and put in a paper clip, then worked the other side the same way and placed a paper clip in, and then worked my way across the edge alongside the battery storage. From there, the cover is also glued internally about an inch in on both sides of the circuit board, so I placed a thin screwdriver in and separated one side and then the other. After that, I placed the screwdriver between the silicone in the center and the case, NOT between the silicone and the chip, and magically the case lifted off. Lifting the lid from battery storage side first, none of the retaining tabs on the other side broke. The torx adjustment screw was tight however, must have been siliconed also to prevent movement. Got it tightened by adjusting clockwise, and cleaned the rubber covers on the bottom of the panel as well as cleaning where the covers touch the spring loaded pad with rubbing alcohol, dirtied with food and dust/dirt. And VOILA! Works perfect. Thanks.

Ron -

Really awesome ! this little screw must spin along time and i was unable to click at all; 1/10 of a turn and its a revival, thanks for it ! as said in a previous comment, there is a chip glued to the cover, be very careful, don’t force, just leverage with the tool until it separate.

Jeremy Jourdin -

Please update the guide to note that if your Trackpad is not clicking to first check and make sure it still has it’s rubber feet. I went through disassembly before finding this out (and it turned out to be all I needed to do). A small mention of that first troubleshooting step could help to avoid having to take apart the device whereupon the potential to damage it is much higher.

Dan P -

Your sharing has kept another piece of electronic trash from the landfill/ocean. I have my afternoon back not needing to spend it going to the store possibly to find they don’t have it in stock and I have $75 in my pocket to spend on better things like helping a friend with money to fix her car. Thank you!

perfectportfolio -

read entire comment before proceeding

remove batteries

warm up trackpad to soften glue - but don’t let it get hot

use small narrow razor utility knife or similar to get between white panel and body lift edge just enough to insert ifixit card or similar

you can use insert ifixit card, guitar picks, (or any thin smooth gift/membership or credit/debit card without raised/embossed characters)

insert about 1-1/8” from left side BUT NOT MORE and slide down to separate glue, keep card in place

inset about 1-1/4” from right BUT NOT MORE and slide sown to separate, keep card in place

whatever you use, keep parallel to trackpad and don’t go too deep to avoid damage

the glue is like a clear and flexible, separate it slowly to allow glue to release in its own time

as you begin to separate it you can look inside and see it separate, and you will also see the computer chip with white glue near the center

this may separate, or you may need to insert card, observe as you peel and pry

the screw has thread-lock, use force to loosen

Gyula -

This worked for me. I did not read the comments first, however I did warm up.

David Meyer -

Mine was stuck in “clicked” position. Opening and closing it as described in this guide was sufficient to fix it.

Thanks!

Michael Sulyaev -

Thanks so much for this. I did exactly as you explained this morning - and it worked. I used a Stanley knife to gently cut through the glue at the edge, and then a very, very fine screwdriver to gently prize off the top bit. It worked perfectly and now I have a working trackpad. It does take GENTLE prizing off, though, as you say. Thanks again. You just saved me having to buy a new one.

Lisa -

I LOVE this site!! ALWAYS very helpful. among many iPhones and laptops etc… this site has been THE most resourceful site on the internet. thank you ifixit!!

Ryder Bouldin -

Scheint zu funktionieren :-) Danke!!

Lars Lange -

My Adjustment screw is missing altogether, Is it possible to get a replacement???

Dean Garniss -

Worked like a charm on mine! Like others, I ended up needing a tiny flat head screwdriver to get under the seal at first. I also put the trackpad on a heating pad for ten minutes to let the glue warm up. Then eased the spudger in across the top of the back, then a couple opening picks down each side, then inserted old ID cards (plastic cards like flat credit cards) into those upper corners. Checked with flashlight to make sure the chip wasn’t stuck to the back, then eased it open the rest of the way. Adjusted the screw and cleaned around the foot cups with a swab and alcohol. Thanks for the guide! I should have done this years ago.

Danielle Long -

I used a 1.4mm screwdriver as I did not have a T-6 or T-7 Torx bit to adjust the tightness of the little screw

k_watson2613 -