
Einleitung
Wie kann ein 5 cm Ding nur so viel Ärger an einem Auto machen?
Wenn du dieses kurze Bypassrohr am Kühler meinst, tja, dann kann es schon sein.
Es ist tatsächlich die häufigste Leckstelle am Kühlsystem. Vielleicht ist es zu kurz, egal, was auch immer die Ursache ist - wenn es leckt, muss es ausgetauscht werden.. Es ist recht kritisch, da es die Kühlflüssigkeit durch den Motor leitet, wenn während des Startens und Aufwärmens des Motors der Thermostat geschlossen ist.
Wie immer wenn du mit Flüssigkeiten eines Fahrzeugs umgehst, schütze dich entsprechend, mit Handschuhen und Schutzbrille. Fange die Flüssigkeit in einem geeigneten Behälter auf und entsorge sie umweltgerecht.
Werkzeuge
Ersatzteile
-
-
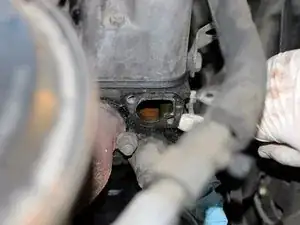
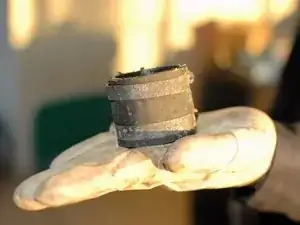
Hier ist das Schlauchstück, das ausgetauscht werden muss. Du kannst das Leck im Bild gut sehen. Das ist ein typischer Fehler.
-
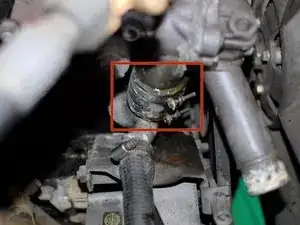
Beim Ausbau des Thermostatgehäuses musstest du bereits die obere Schlauchklemme am kurzen Schlauchstück lösen. Löse nun auch die untere Schlauchklemme.
-
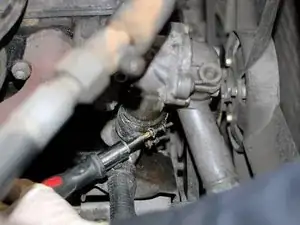
Jetzt kannst du das Schlauchstück vom Stutzen an der Wasserpumpe abziehen.
-
Normalerweise geht das mit der Hand, du kannst aber auch eine Zange benutzen.
-
-
-
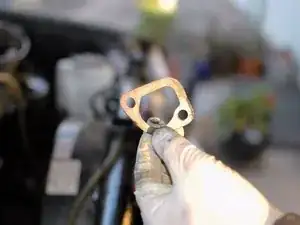
Hier ist das kurze Schlauchstück in ausgebautem Zustand.
-
Messe seine Länge ab und schneide dein gekauftes Stück entsprechend zu.
-
Benutze dazu ein starkes Messer oder ein anderes geeignetes Werkzeug.
-
Baue das neue Schlauchstück ein, anschließend das Thermostatgehäuse und die Dichtung.
-

Um dein Gerät wieder zusammenzusetzen, folge den Schritten in umgekehrter Reihenfolge.

3 Kommentare
I just wanted to say thank you to Nicolas Siemsen for this piece. I am yet to do it because I am yet to buy the piece of hose. But seeing how clearly he wrote the article with pictures I am confident that I can do it. Thanks again.
You're welcome!
Tips: Be sure to replace the clamps with new worm-drive type having combination hex-slot screw heads. These are far superior to original type. Also be sure to orient the clamps so screw heads point toward front of car and next to the cylinder head. The latter is necessary for proper clearance as air conditioning bracket sits adjacent to thermostat housing on some versions. Take time to carefully situate the hose clamps as they are almost impossible to access once compressor bracket is in place. Also take time to clean metal surfaces to which the hose connects - lightly sand or scour with metal brush to remove deposits - assuring proper seal is important before assembly.
analogcd -