Einleitung

If the screen is failing, or if you need to access a component within the Microsoft Surface 2, you may need to remove the screen. A heat gun is recommended for this process. When using the heat gun, avoid touching the metal end and keep it a few inches from the device.

  1. KoTYec23XD4Z5k1J
    KoTYec23XD4Z5k1J
    kJvTfky6UOhvkXIt
    AZei5oNPwqp13L24
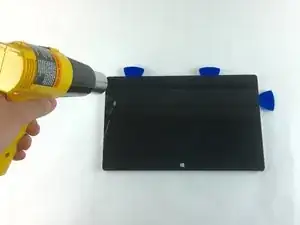
    • Begin by using a heat gun or the iOpener (This will take longer.) to melt the adhesive all around the outer edge of the screen.

    • Avoid holding the heat gun too close to the Microsoft Surface 2 so as to not cause any unwanted warping.

    • Avoid touching the metal end of the gun. It will be very hot and can burn you.

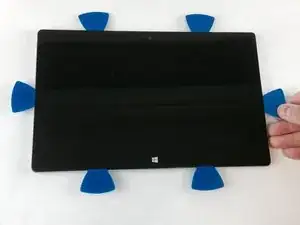
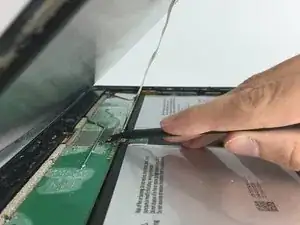
    • Insert the opening picks just under the screen and black edging. Be sure to place them evenly on each side.

    • Using the gap created by the picks, slowly pry the screen from the body of the Microsoft Surface 2 with a plastic opening tool. Pry as uniformly as possible.

    there is no mention of just how strong the adhesive actually is. i might go as far as to say this has been one of he hardest i have ever had to separate. its a combination of the strength of the adhesive and the amount of it to get through. i use a heat mat rather than a heat gun as its far better than the gun.. been able to control the temperature by 1 degrees up to 100. also the digitizer runs right to the edge of the glass, so its possible to damage it while trying to remove the screen.

    stuart -

  2. jAv6jcMOxvbhiCFU
    jAv6jcMOxvbhiCFU
    LRFUgYXh2BhW3R16
    kSBTSotUQ1bNoewh
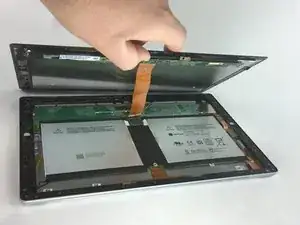
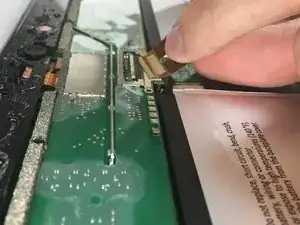
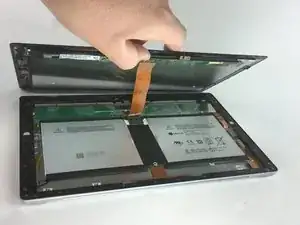
    • Once the screen is free from the body, there will be a single ribbon cable connecting the screen to the motherboard.

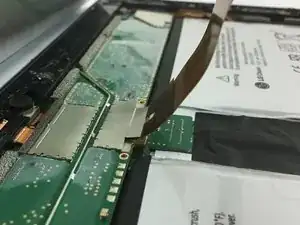
    • Use a plastic spudger to pry the retaining clip away from the display cable.

    • The ribbon cable may be glued to the motherboard.

    • Carefully pull the ribbon cable from its socket on the motherboard.

    Please tell people about unlatching the socket lock before trying to remove the ribbon cable from the socket on the motherboard! The white latch handle is still in the locked position in the photograph showing the ribbon cable being pulled. (And they’ll NEVER get the ribbon cable back in the socket without raising that latch!)

    Tom Straub -

    Be sure to get just under the glass. There is a thin black edging under the glass. I found it better to start at the bottom edge.

    There is a lot of glue, and it is about 1/2” wide.

    Do no overheat. The frame is plastic and can deform.

    If you want to preserve the screen, be careful near the bottom edge near the windows logo. There are 2 flex cables, one on either side of the logo. If you stab a tool too far in, you may tear a cable.

    If you have a new screen “without cable”, the directions are slightly different. Do not disconnect the ribbon cable from the motherboard. Instead, locate and remove 3 hexalobe screws that attach a narrow circuit board to the display. Carefully lift the narrow circuit board, disconnecting two sockets from the display board. Roll this narrow circuit board over and locate 2 flex cables. Lift the flaps on each flex cable to reveal the zif sockets underneath. Use a fingernail or plastic spudger to lift up the catches on the zif sockets and slide out the flex cables.

    michael -

    Where do you buy actual oem replacement speakers for this tablet???

    bob king -

    I'm assuming the go 1 speakers, Will not work with this tablet.

    bob king -

Abschluss

To reassemble your device, follow these instructions in reverse order.

EG1

Mitglied seit: 04/02/16

597 Reputation

9 Kommentare

hello, i try to follow your tutorial, without succes. threre is one cable ribon or three?

sophie delalieux -

This tutorial needs more photos. The part where you unclip the cable from the board is not well illustrated (quite easy to damage the socket by pulling the cable too hard instead of unclamping first)

Matthew Schwantes -

While this guide is essentially effective, it fails to mention one important aspect of the repair. The transceiver board that is mounted to the back of the LCD/Digitizer assembly needs to be transferred to the new screen. It is held in place by three T2 screws, two push clips, and two ribbon cables. This is, of course, in the event the replacement screen doesn’t include the transceiver (everyone I have received doesn’t). Otherwise, it is a great tutorial.

Christopher Janes -

did you figure out how to replace the transceiver board? I am in the same position. When I connect just what the directions say, the screen turns on but had no touch capabilities. But when I connect everything, I have nothing but a black screen. Got any tips?

Bob Burgers -

I have issues with touch capabilities too… any solutions?
Jack Perdue -

Anyone know what the connector to the screen is (ribbon cable)? I am trying to see if it is possible to remove the screen on my old Surface 2 and use it like a second monitor. But for that I need to know what kind of connection it has to get the right adapter for an HDMI/Displayport and power connection.

Pedro Salgado -

This is what I want to do, a read 60 and 30 pin lvds but want to know everything before I buy the screen and the

markpolak -

Hello, I wonder what interface does this lcd use, I read miltiple specification one is 60 pin lvds the second is 30 pin lvds which is true? Alslo how many pins the digitizer have?

markpolak -

Hello, this is a great description. But for me as a beginner it would be great to know how hot are the heatgun has to be… thank you!

Tommy -