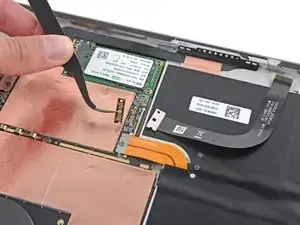
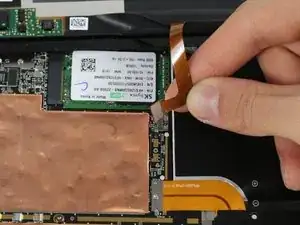
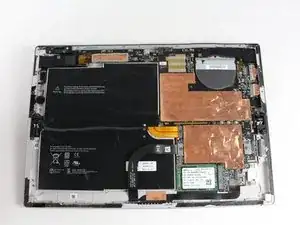
Einleitung

Bevor du anfängst:

Diese Reparatur ist eine Herausforderung. Wenn du wenig Erfahrung mit solchen Reparaturen hast ist es vielleicht besser einen professionellen Reparaturservice aufzusuchen, vielleicht sogar Microsoft selbst.

Achte sehr darauf das genau richtige Display zum Austausch zu haben. Die meisten Geräte benutzen den Digitizer/Boldschirm der Version V 1.1. Wenn du das Display durch ein falsches ersetzst kann das ein schlechtes Ergebnis haben.

Es ist sehr wichtig, dass das Gehäuse nicht verbogen wird. Wenn es auch nur leicht verbogen ist wird das neue Display nicht passen, die Toleranzen sind sehr eng. Versuche es wieder gerade zu richten - oder bringe es zu einem professionellen Service.

  1. IiLLy5RGqI2C21Fc
    IiLLy5RGqI2C21Fc
    JifXbRFswEYOyZhX
    • Entlade den Akku des Surface Pro auf unter 25%, bevor du mit der Arbeit beginnst. Ein geladener Lithium-Ionen Akku kann Feuer fangen und/oder explodieren, wenn er während der Reparatur versehentlich beschädigt wird.

    • Das Display ist stark mit dem Rahmen des Gehäuses verklebt.

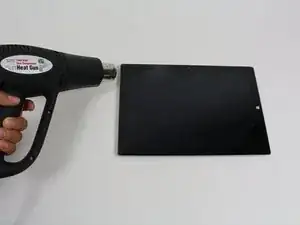
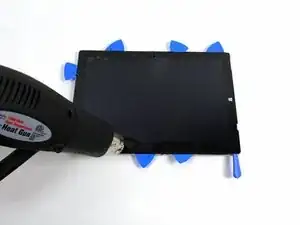
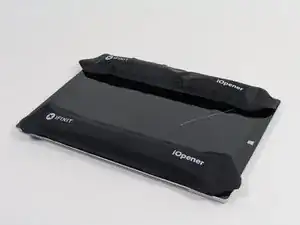
    • Um das Display zu entfernen, musst du den Kleber erst durch Wärme aufweichen. Du kannst einen Wärmeplatte, ein Heißluftgebläse odere einen iOpener verwenden. Zur Not geht es auch mit einem Haartrockner.

    • Sei mit einem Heißluftgebläse sehr vorsichtig. Zu viel Hitze kann das Display und/oder den Akku dauerhaft beschädigen.

    • Erwärme den Rand des Displays konstant und gleichmäßig, bis er zu heiß zum Anfassen ist. Versuche diese Temperatur einige Zeit lang aufrecht zu halten.

    I just replaced both my screen and battery. It took four hours and a couple of wrong turns but I was successful learning what to do next time. However, I am not sure I would do it again.


    It takes more heat than one imagines - all most too much and made me queasy fearing I was going to damage something. I would say it actually too hot and likely to damage something so be careful and do not prolong the removal. To get started I used a glass top warming/buffet heating tray set to about 200 degrees.  I turned the surface pro glass side down before turning it one so it would heat gradually with the tray. I let it heat for 15 minutes. In end, I am not sure it helped or not by starting this way.  This was not an easy removal so I shudder to think how worse it would have been if this didn’t help. I used a variable heat gun for the remaining steps. My screen was broken so breaking it further while nerve racking was not going to be catastrophic.

    michael jones -

    I attempted battery replacement, but during disassembly, i damaged the display by inserting the picks to far, and separating the display circuitry from the glass.

    I used a Milwaukee precision hot tool model 1400, which has only a fixed heat setting, but it worked perfectly to soften the adhesive.

    (I was very careful to heat the entire glass panel by playing the heat gun over the entire surface so that it would expand uniformly.

    Robert Gerlach -

    I just broke mine during the heating process as well…. The glue at the corner was so strong that I cant even slip a blade into the edge… Then when keep applying heat using a hair dryer at low tempreture the glass expanded too much and broke……

    C Y Wong -

  2. tP1SBUeGkGMfOjX5
    tP1SBUeGkGMfOjX5
    Hbta2bLf13RFqrbk
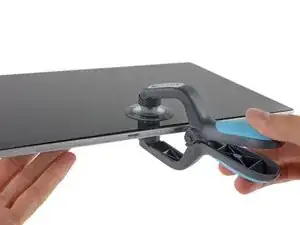
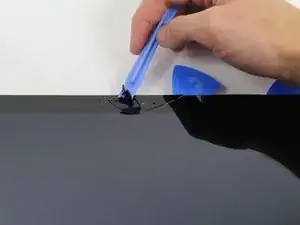
    • Ziehe die Glasscheibe mit einem Saugheber oder einem iSclack auseineander und erzeuge einen kleinen Spalt zwischen dem Glas und dem Metallrahmen.

    • Wenn das Display stark zerbrochen ist, dann hält der Saugheber nicht so gut. Es hilft vielleicht, wenn du das Display mit Klebeband zuklebst. Du kannst den Saugheber auch mit Superkleber am Display festkleben.

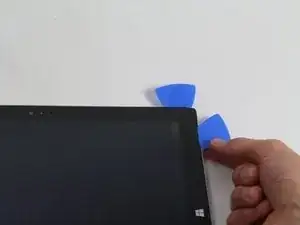
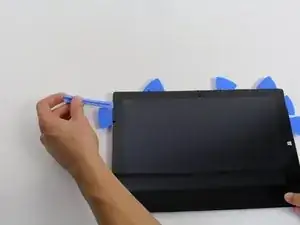
    • Setze vorsichtig ein Plektrum in den Spalt zwischen Scheibe und Gerät ein, um die Klebeverbindung aufzutrennen.

    • Schiebe das Plektrum an den Seiten und der Unterkante des Displays entlang, um die Klebeverbindung aufzutrennen. Falls nötig, musst du mehr Wärme anwenden.

    • Arbeite sorgfältig, das Glas ist dünn und bricht leicht, wenn du zu viel Kraft aufwendest.

    • Die Wi-Fi Antennen sind unter der Oberkante Am Rand der Glascheibe (an jeder Seite der Kamera) verklebt und können leicht beschädigt werden. Sei an der Oberkante besonders vorsichtig und wende mehr Wärme an, falls nötig.

    Be very very careful!! Don’t cut yourself. Wear gloves.

    Vincent van Mens -

    Wear eye protection too!

    Zach -

  3. ITFJIC242QKNpVUA
    ITFJIC242QKNpVUA
    kOlisXUZbyYIkKPE
    hBFsBRIsH4VyHVeV
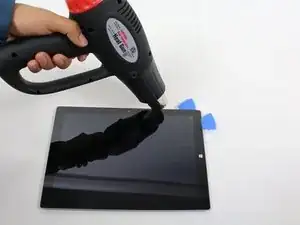
    • Fahre stückweise fort die Scheibe abzutrennen.

    • Während du die Scheibe weiter erwärmst musst du das Öffnungswerkzeug und weitere Plektren benutzen.

    • Die Scheibe ist extrem dünn und bricht leicht. Sei sehr sehr vorsichtig bei der Arbeit mit zerbrochenem Glas.

    I used an inexpensive variable heat gun with a dial. It was perfect. My fixed temperature gun would have ruined it. There are two small vents on either side of the screen near the top. Start there and work down on each side. I didn’t have opening picks to keep the glass separated from the body. So, I used blank Cards Against Humanity I found lying around.

    I watched two popular videos. Neither helped and were no better than these instructions. In one video, the guy heats and smashes his way around the display with metal tool. Mistake! Don’t do this even if the screen is broken. This causes glass shards to go everywhere and will force you to replace the adhesive before installing a new screen. You can’t reuse adhesive if it is full of glass. Another video uses a heat gun one side at a time and simply sliding a pick along the edge working around the Surface. This didn’t work. The person had already removed the screen once before and started the second removal before the video.

    michael jones -

    CAUTION: if you insert the picks too far, you risk damaging the display (separating the glass from the display circuitry).

    The display circuitry is 14 mm from the side edges, 10 mm from the top edge, and 6 mm from the bottom edge.

    Robert Gerlach -

  4. 2wnI62JYRjtwQyde
    2wnI62JYRjtwQyde
    XtSAtOnl55XIALpb
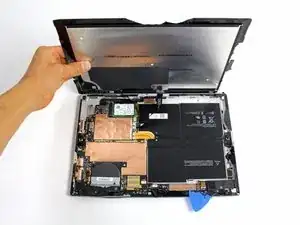
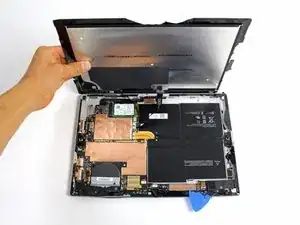
    • Hebe den Schirm vorsichtig hoch, achte dabei darauf, dass keine Kabel verdreht werden.

    This guide misses a CRUCIAL NOTE on this step.

    On this step, from Picture 1 to Picture 2 the device is rotated so the Windows logo on the glass is actually on the left hand side.

    You *must* rotate the device otherwise you will risk damaging the cables, as it folds open like a book.

    Len Demby, Jr. -

    Pain in the ass! One has to wonder why they couldn’t use magnetic connections instead of this goo, black thing that even to replace is so %#*@ annoying to say the least! After trying to remove a broken screen I didn’t even use the adhesive strips. I used the ones I had there and to be frank it’s better since:

    a) I couldn’t get the new screen properly aligned and to fit to perfection even though the touch works flawlessly (w/ some adhesive tape on the top to hide the gaps) and

    b) who knows? you may as well need to reopen it again. Hopefully not.Hopefully it will be easier. Hopefully never again!!!

    P.S.:

    Iraklis -

  5. JZKTg6AfXimEjrtV
    JZKTg6AfXimEjrtV
    ZnmLaLSWKZwXLQbk
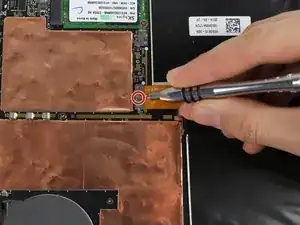
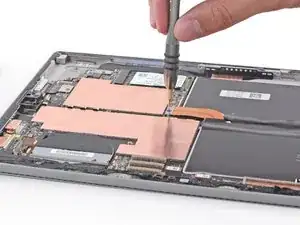
    • Der Akkuanschluss ist mit einer 3mm Torx T3 Schraube gesichert. Drehe sie heraus und löse den Akkuanschluss.

    • Dabei ist darauf zu achten, die darunter befindliche rechtwinklige Steckbrücke nicht zu verlieren!

  6. iieXwVFQKStTJgx2
    iieXwVFQKStTJgx2
    FseWAjfVVlTtIElr
    EXtrTCBmBrFVHUF2
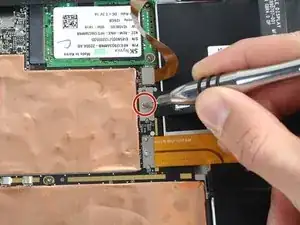
    • Löse die 4mm T3 Torx-Schraube welche das Bilschirmkabel sichert.

    • Hebe den Verbinder vom Gerät weg, um das Kabel abzulösen.

    • Dabei ist darauf zu achten, die darunter befindliche rechteckige Steckbrücke nicht zu verlieren!

    It's always best to disconnect the battery before disconnecting the display cable. Ensuring there is no power to the device will also ensure you don't damage the backlight components when disconnecting the display. You should also make sure to reattach the display cable before reattaching the battery cable when putting it back together.

    KCrepairguy -

    There is also a tiny little board between the ribbon cable and motherboard. Be sure not to lose it!!! If you do the part is 1631 LCD Contact Shield Plate.

    Joseph Neilson -

    You’ll notice a spring on the back of your old screen. The new screens don’t have that spring so it will need to be transferred over by the heat gun trick.

    Thierry Plouchart -

    The instructions do not mention the bridge connectors under the connectors - tiny little rectangle boards with gold connector dots. There is one under the battery connector and under the display connector. It is sandwiched in between the board and the connector. You may not even notice the bridge connectors. In fact the pictures here with the cable connectors off are showing the bridge connectors under the cable connectors still lying on the motherboard. Go ahead and remove the bridge connectors with tweezers. These connectors are just lying on the motherboard and WILL FALL OFF getting lost without noticing it. The cable connectors do not work without the bridge connectors installed. Good news is the connectors are keyed and fit only one way.

    BTW: Both screws on the battery and display connector were T3’s and the same size.

    michael jones -

    Hi!. What’s the name of the band connector and what’s the name of the connector in both sides?

    Nicolás Rearte -

  7. Z1WlbuZDAgkKVFiW
    Z1WlbuZDAgkKVFiW
    QNjSjbRDTeirpNKk
    YFw1T6xydkRpWpj4
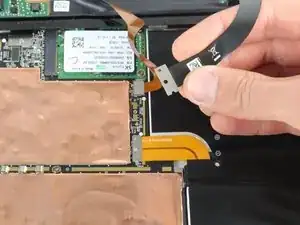
    • Fasse das orangene Kabel am silbernen Verbinder an.

    • Hebe das orangene Kabel vorsichtig hoch, bis der Verbinder herausspringt.

    • Der Bildschirm ist jetzt nicht mehr mit dem Gerät verbunden.

    • Das Ersatzdisplay enthält nicht unbedingt alle Teile, die für den Einbau benötigt werden. Hebe alle Teile des Originaldiplays auf und übertrage sie, wenn nötig, auf das neue.

Abschluss

Um dein Gerät wieder zusammen zu setzen folge den Schritten in umgekehrter Reihenfolge. Wenn du fertig bist musst du eventuell zusätzliche Schritte durchführen, wie z.B. ein Firmwareupdate, neue Treiber aufspielen oder sogar auf Werkseinstellungen zurücksetzen.

Erik Snyder

Mitglied seit: 01/10/15

5079 Reputation

52 Kommentare

Hi,

I live in the UAE and I have a broken screen. The screens work just no touch screen. Getting it replaced over here will cost a lot. Over 600 usd. The screen will cost the most.

Instead, I thought about buying the screen and digitizer myself and have someone fix it here for me. This will he relatively cheaper.

How do I know which screen and digitizer to buy? And where can I buy one from? I found the v1.1 on etrade supply but I don't know how reliable this site is.

Can you please guide me?

Thanks

JuliusCes

Julius Caesar -

what do you ended up doing? same problem here and i dont want to crack it open just to check the screen model

lautaro -

i’ve just changed my screen with mixed results. I tried to remove the cracked screen in case it turned out to be something other than v1.1. in fact I ended up chipping off hundreds of shards around the edges until it finally came out. It was a 1.1, hooray! So then I plugged in the replacement and it works great, but I’m afraid to tape it in permanently because I damaged all three antennae which I didn’t anticipate being buried in the adhesive along the top edge. As I was chipping glass and peeling pieces out I didn’t realize those were prices of the antennae I was tearing out. Wi-Fi speed test runs fine in my shop where I’m close to the access point. I‘m trying to decide whether to order the antennae to replace just in case. I’l need those tiny torx drivers to remove screws.

Contrary to the photos above I didn’t need to remove screws to remove the display. The connector is actually the one just below the one indicated -the smaller one that has no screw.

Happy fixing!

Rick Beesley -

Look up the correct replacement screen by including your Surface model # in the query. Find your model # under the kickstand.

Model # location image:

https://compass-ssl.surface.com/assets/b...

Ryan -

Many thanks for the reply. I ended up getting the screen fixed via Microsoft. It turns out that they have a service center in the UAE. Something that not even the UAE microsoft store was aware of!

Cheers,

Julius

Julius Caesar -

Could you please tell me where is the repair center in UAE? Because mine is broken for a long time now. Only the touch doesn't work. And did they format the tablet?

Omid Balak -

Hello Ryan,

how can I predict which LCD version is required to fix my Surface PRO 3, before open it?

Is there any way to obtain the info from the Serial Number?

Cheers,

Francesco

f.vergentini -

Hello,

Would it be possible to replace only the glass and use original digitzer. The digitizer seems to be responsibe. Please advise

Chris -

The digitizer is in the glass…

So no, that would not be possible.

I don’t even know how you would get the glass off of the LCD. They are glued together pretty well.
Reed Deemer -

Do I need any kind of adhesive for the screen or should it fit perfectly and automatically adhear to the tablet with application of the heat gun afterward?

gratgreg -

Hi Julias, Could you please advise how much did the Microsoft service centre in UAE billed for the change in display.

Syed zainalabuddin -

I hooked up a new screen and the device is not coming on at all. I tried the old screen with the same result. Does anyone know what could be causing this problem?

Cory -

There is a little contact board between the lcd connector and the MB. Mine was doing the same thing and I found that the connector contact board is missing. Still wondering where to find that exact part if anyone has any info.

Brian Carthans -

Did you find a solution to this problem?

Tim Myhre-Larsen -

How do i check which version of screen i have before the repair, is there any online tool for that? Many thanks

Vlad -

did you find any tool? i have the same problem

lautaro -

Great guide! We've done the RT several times and this was a little different with the glue around the bezel. Thank you for the guide!

AUBURN DATA SOLUTIONS -

Sooo.... What glue do i use to put it back, and how do i do that?

"repeat steps backwards" I'm pretty sure blowing a heat gun on it isn't going to seal it back on.

Foxx Riddle -

Yes I'd like to know the answer to this too if anyone can advise

Michael Gladstein -

You need to reheat it once you put the adhesive and then put it under the press to let the adhesive cool down and work..

Junar -

Is it preferable to use adhesive tape, or LOCA glue? This is a good guide except for that detail.

JohnEric Clements -

adhesive tape

SeanKwon -

I have successfully taken of the cracked screen - When I connect the new screen and tur on the Surface Pro 3 - There is light in the attached keyboard but nothing i shown on the screen - I have tried to put the old screen back on but still no succes. Now it looks like the machine turns on, but no connection or light in the screen - Any one who knows what to do?

Tim Myhre-Larsen -

Digitizer question:

My screen is cracked and does not sense finger touch but I did have to disable the touch screen driver because it sensed touches in the top left corner. Can I assume that my digitizer is still ok and that I only need to replace the screen? Or do I need to replace the whole setup?

bari_saxy_man -

You need to replace the whole assembly(digitizer+lcd).

SeanKwon -

The little contact board between the ribbon cable and mother board is called 1631 LCD Contact Shield Plate. They can be had on eBay.

I had the same issue of losing mine and the LCD screen not working after I replaced it. Touch worked fine.

There are 4 different Contact shield plates so be sure to order the right one.

Joseph Neilson -

Is there an adhesive tape that you recommend? Name brand? Does IFixit sell it?

Marvin Lopez -

Ok, so some details from a professional. Check your screen res, it should be 2160 x 1440 this is v1.1 and is 99.9% of all Surface Pro 3 machines. The Surface 3 was 1920 x 1280 and 10.8" not 12". Surface Pro 4 is the same size as the 3 Pro, but screen res is 2736 x 1824 , they are NOT interchangeable. Use only medium hard carbon fiber or hard plastic tools, no metal screwdrivers to remove the old screen. 3M 5mm double sided tape can be cut in half if the 3mm can't be found. Use E6000 or B7000 glue only at the four corners, just a touch. Heat is VERY important, but not too much; take your time, small even actions are what is needed here. Be sure to replace ALL the parts or it may not work at all. All replacements are now aftermarket imports from Asia. Quality runs from very poor to very good, and price does not mean better, read the reviews, all of them. Last note: if you have done cell phones or iPads in the past, you'll be fine; if you have never done this type of work before, watch YouTube videos-GoodLuck

WJohnson Enterprises -

Hi, there are various 3M adhesive out there. I have tried 3M300LSE but does not seem to hold well. Which specific adhesive do you use. What about Tesa tapes? An Amazon or eBay link would be appreciated.

engineer_cj -

So using the old glue is ok?

dan -

I successfully replaced the screen on mine but after powering on I found the touch screen wasn’t working.

Using an external keyboard/mouse it showed it could not detec the driver for the screen (it was using the default factory build of Windows 8) and the Windows update couldn’t find better drivers.

In the end I installed Windows10 and it all worked, so there must be some versions of the screen that don’t have older drivers available.

To reseat the screen I ordered some 5mm wide double sided tape from Amazon (about $2 for a roll) and cutting this to size worked a treat - no need to heat seal the screen again.

The device cost me nothing to buy (it was being thrown out as an uneconomic repair) and for $180 (the screen) I now have a great little Surface Pro 3.

Iain -

Thanks for the info Iain. Can you send on a link to the replacement screen you used?

Tom McManamon -

how were you able to reload windows - without a display ? Sorry if it is a stupid - don’t know what i am doing question?

Perry White -

Having broken the second corner after like 30 minutes, I just took two little forks, placed a foil over the whole screen to prevent pieces of glas from flying around and just leveraged the thing out. Took like 2 minutes and 15 minutes to remove pieces of glass and the glue from the edges. I should have done this right from the start. Just hammer a screwdriver through the glas on the lower left corner where no motherboard or battery is underneath and break it out. The adhesive is of the most disgusting type I’ve ever seen. Shame on you, Microsoft! This is clearly on purpose to make people buy new stuff! I’ve completely removed the adhesive on 3 sides. The display isn’t falling out even without any glue! I will probably just glue some little spots with very weak glue.

Smon -

i just did the screen on my surface pro 3 and removed the hinges. the screen broke from one of the hinges breaking and pushing on the inside of the glass, i use a uae cover with it’s own kickstand now, so i just put a strip of 3m adhesive leftover from the screen at the top edge and let the magnet hold the bottom, it opens up just enough to slip a microsd in and out. strangely, the tablet feels more solid in the hand now.

Kowalskithegreat -

Where can i get the adhesive for the screen? the replacement screen being sold on this site doesn’t have adhesive.

Patrick Gerlach -

Have a look on Amazon for titles like “5mm wide, 50m length, Black Adhesive Glue Double Sided Tape Sticker Repair Cell Phone Glass Screen” - most of these are Scotch double sided tape cut to the advertised thickness and do the job well. They also cost like $2. Mine has held for the last year of daily use in a 4 hour commute so they do the trick.

Iain -

Hi, how I could know the specific model of Lcd that I need to my surface pro 3?, because I discover theres 2 models the 16131v1.1 and the 1631 tom12h20 v1.1

Joshep -

Once you open the tablet, the black ribbon on the bottom left hand corner connected to the windows button has the correct m odel

Bobby Panarisi -

How to find which version Do need I to buy? Where can I get this LCD version number?

Dinesh Kumar -

Hi

I bought a Surface Pro 3 years ago.

Three months ago i bought a screen replacement from Aliexpress. I should have known better. Contrary to product description, no screen replacement tools were included. Secondly, when i finally got a “pro” to change it in a shop, I was told the touch and digitizer never worked. I tried myself. Customer support has been so so kind but totally worthless. I can’t send it back because I dont have the seller adress. Seller doesn’t reply.

And this is an I7 256 GB.

If I were to buy a screen replacement, what should it be? Living in Denmark if it matters.

Omol -

I got mine off e-bay from a Canadian seller for $157 US with free shipping. It included the adhesive but nothing else. Went in no problem and works perfectly. My advice is take your time and only use plastic picks on the top so you don’t damage the antennas. Tape the screen with packing tape as well to keep the risk of flying glass to a minimum! Good luck it’s a tough repair but doable.

hexdump -

I have just replaced screen on my pro3 now its not turning on. The shows battery sign for few seconds and goes off. I charged the computer long enough, still no luck. Any suggestions?

saini_anjana -

Hi, it seems that several folks on here have asked the same question without a response that is working for any of us. 1. What surface pro screen replacement would you recommend, there are so many one star ratings on amazon and ebay that it is making my head spin. I’m looking for a quality replacement screen, not some cheap junk and 2. without removing the existing functioning cracked screen, how do you specifically (step by step for novices please) identify the current version that your surface pro has for ordering. I read the resolution post and it wasn’t clear as it addressed the surface pro 3 twice in the first two sentences without differentiating HOW to determine which one you have. Thanks for your help in advance. Just want to fix my screen and don’t want to buy 1) The wrong screen and 2) a junk screen. Thanks!

jasonoutside313 -

This was super friggin easy.. I don’t know why it’s listed as VERY DIFFICULT.. It’s definitely easier than a phone.. Took like 45 minutes..

non-stopdjs -

Hey guys if you can’t find the parts on here go to https://www.mengtor.com/brand/MICROSOFT/...

Parts have  60 day warranty most parts they have including a tempered glass for only $6 remember something is better than nothing

Tito Trevino -

This guide misses a note regarding which way you open the Surface, I noted this on STEP 4’s comments.

Happy repairing, the hardest part of this repair is easily getting the screen off!

Len Demby, Jr. -

I haven’t been able to find a professional to replace my broken cracked touch screen. It works without the touch screen, yet looks ghetto as the left facing cube magnet has popped out permanently.

not sure if I should attempt this on my own.

the pro shops say its a bad idea & to leave it.

Angela Tenchi -

For anyone thinking of attempting this - two things: 1) Take your time heating. It takes more heat than you think. The adhesive is massively strong. 2) As mentioned by another commenter, iFixit doesn’t mention the two antennas flanking the camera. You must EXTRA careful up top. I attempted this screen repair, but damaged both antennas and my repair was unsuccessful. The antennas have some of the adhesive from the screen on them so if you don’t heat enough, when you pull off the screen or use your spuger, you can tear them. The adhesive has to be virtually melted for the screen to come off. Take your time.

Jonathan Rodriguez -

Why is tesa tape recommended here and where do I use it in this particular repair? Cant seem to find it as part of the instructions.

Fahad Al Riyami -

Honestly not too difficult. If you're okay breaking the existing screen, just use a metal scraper/credit card/guitar pick to glide through the two sides and the bottom. I watched a youtube guide to determine where the antennaes on top were so that I could be extra cautious around them. (They're gold, I think there were three of them?)

Heads up, make sure the chassis of the surface is smooth and level otherwise the screen flex may Crack the glass

As an aside, the top half of my screen stopped detecting about a day after installation. Not sure if it's related to something I did or if I got a lemon

Cole Nebeker -

The model is written on the back of the tablet on the kick stand it's 4 digits long but as long as you know if it's a surface pro or just a surface will point you in the correct direction for confirming what screen is compatible

ryan perceval -