Einleitung

  1. KxWZNmqSHCNSWYbs
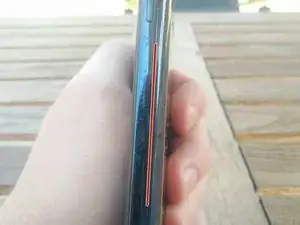
    • Use the IFixit prying and opening tool to not damage the phone like I did.

    • The red line indicates the opening, follow it all the way around the phone.

    • Use a hair dryer or heat gun to soften the glue if necessary.

    Mine was super glued down! It took a lot of patience to get the case open. Didn't break anything. Hope there is still enough 'stick' to hold it back together again. Would be nice if it had clips too.

    Jim Thorne -

  2. 5EFFj5JtvExWp5vo
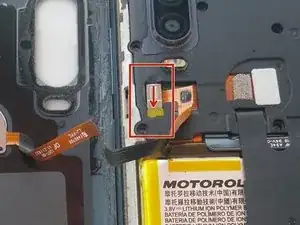
    • Peel the small yellow tab away with a small flathead screwdriver.

    • Slide the metal shield down to unlock and remove it.

    I was a bit confused by the description "peel away the yellow tab". It was more of little plastic brick thingy that has to be completely yanked out, then you can slide the metal shield.

    gottfried -

  3. ej3aHtG3UUYGJOXR
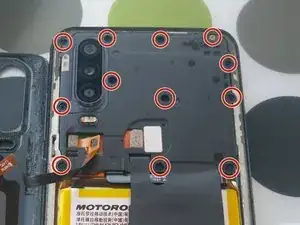
    • Undo all the screws on the top cover.

    I had one 'hidden' screw. The screw beside the cameras on the inside was under tape. If not for this picture I would never have found it. I sliced a slot in the tape to access the screw and just put it back over when I was done. Thank you for the pictures!!!

    Jim Thorne -

  4. LgWa5OgFgJZbLL5w
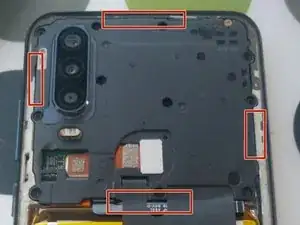
    • Use a small flathead to loosen the cover.

    • Around the red markers are little clips that keep it in place.

  5. brPjsJ6wHnKqcGDE
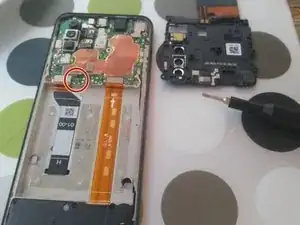
    • Inside the red marker, disconnect the battery cable and carefully pull the battery out.

    • Use a non-metal prying tool to pull the corners up and apply heat to soften the glue in the process.

    • Be careful and make sure that the battery doesn't bend too far or breaks.

    For me it wasn't quite as simple as "pull the battery out". The battery was glued down rather well and I ended up piercing the battery trying to pry it off. THIS IS VERY DANGEROUS! THE BATTERY CAN EXPLODE!

    My advice: Get a non-metal prying tool to pull up one of the battery corners then start applying heat (e.g. heat gun or blow dryer). Don't stick the tool farther in, just pry up the edge a bit more every 5 mins or so. You don't want to pierce the battery or scratch up the cable underneath. This part requires patience.

    Martin K -

    Mine wasn't really glued down that hard, but thanks for the heads-up, I will update the guide

    Ferre Vekemans -

    In case it helps:

    My phone Motorola One Action stopped charging. On connecting the charger nothing happened. On pressing the power button a 0% charge sign appeared.

    I just opened the case, disconnected the battery, and connected it back. It works again, without replacing the part.

    Thanks for the tutorial, very useful to open the case and do the thing :)

    Cheers.

    Salva -

    It was more like 30 to 45 minutes for me, but I'm no pro. Just be very, very careful. Better to take a half hour longer and not break anything. Thank you so much for the tutorial!

    Jim Thorne -

    Thanks very much for the tutorial. Like Jim said took about 30 minutes. Have to be very very careful with the battery and take your time.

    Bill Garms -

    I also was getting 0% and not able to charge.

    Opened it up and the battery connector was loose. Reconnected and now working fine.

    Thanks for the disassembly steps

    Richard Lacasse -

    No worries guys, glad I could help ;)

    Ferre Vekemans -

Abschluss

To reassemble your device, follow these instructions in reverse order.
Ferre Vekemans

Mitglied seit: 14/08/20

248 Reputation

0 Kommentare