Einleitung

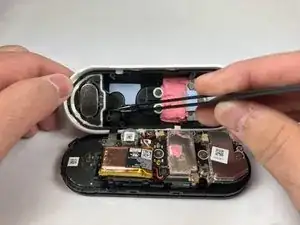
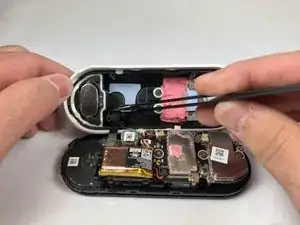
Wenn dein Nest Hello schneller als üblich seine Akkuladung verliert oder sich, trotz Fehlersuche, nicht mehr einschalten lässt, wird dir diese Anleitung helfen, Zugang zum defekten Akku zu erhalten.

Die folgenden Schritte erfordern das iFixit Werkzeugset zum Hebeln und Öffnen, einen Kreuzschlitzschraubendreher PH000 und eine Pinzette. Während des Öffnen des Gehäuse kann es leicht passieren den O-Ring der Wasserdichtung zu beschädigen, also bereite dich darauf vor auch diesen zu tauschen.

  1. 4OhVXWLRmT2mwNrZ
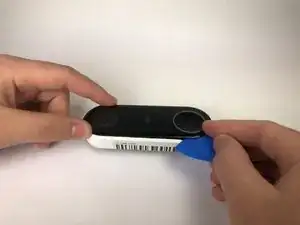
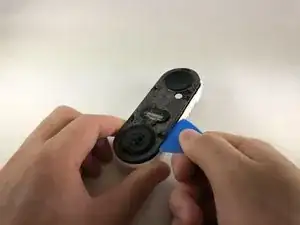
    • Schiebe ein Plektrum zwischen die schwarze Vorderseite und das weiße Gehäuse des Nest Hello.

    • Heble die Vorderseite mit dem Plektrum vom Gehäuse weg.

    • Wenn du dein Nest Hello zum ersten Mal öffnest, wird sich im Inneren ein Schaumstoffschutz befinden, der am Gehäuse klebt. Versuche diesen so tief wie möglich mit dem Plektrum zu zerschneiden.

    • Entferne nun die Vorderseite komplett vom Gerät, zögere nicht, hier fest zu ziehen.

  2. iOunefeVg4DKHhOu
    iOunefeVg4DKHhOu
    bitW2l5mCQoWhyiQ
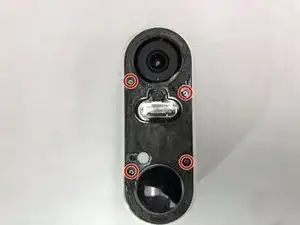
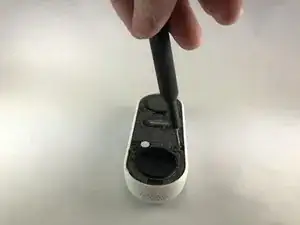
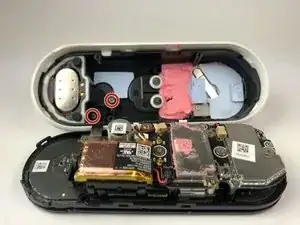
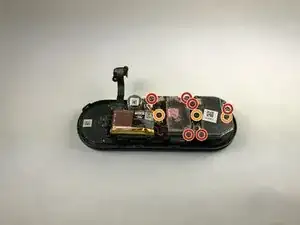
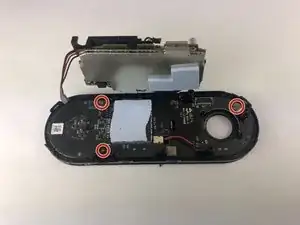
    • Entferne die Aufkleber und benutze einen Kreuzschlitzschraubendreher #000, um die vier Schrauben zu entfernen.

    There is a small circle sticker over each screw, about the size of the red circles in the image above. It wasn't clear from the directions what the "cover stickers" were. A small exacto knife was helpful to pry up the edge of each sticker.

    Tim Scott -

  3. HtCWfAHNKEYHltQb
    HtCWfAHNKEYHltQb
    Ik6niEiyH3bvD1nX
    JnHFQwOrSANXfEaJ
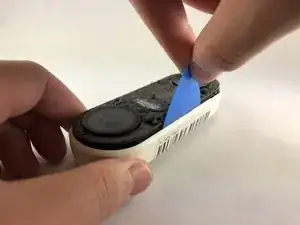
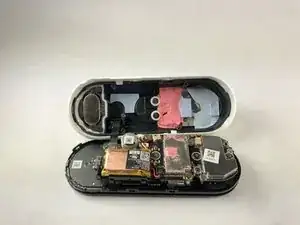
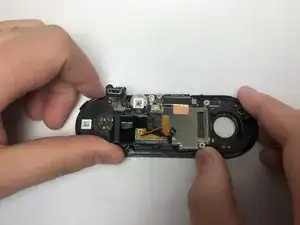
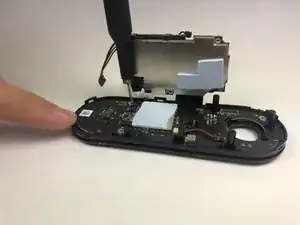
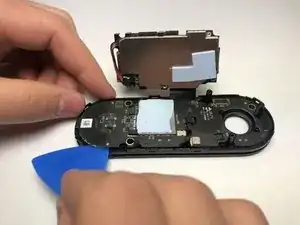
    • Schiebe ein Plektrum zwischen das weiße Gehäuse und die schwarze interne Platine, um diese heraus zu hebeln.

    • Ein kleines Flachbandkabel verbindet das weiße Gehäuse mit der Platine. Achte darauf, dieses nicht herauszureißen, wenn du die Platine vom Gehäuse trennst.

  4. RCIMD4YNUVO36PkH
    • Benutze einen Kreuzschlitzschraubendreher #000, um die zwei Schrauben zu entfernen, die das Flachbandkabel am weißen Gehäuse befestigen.

  5. CKSIkQPaTIQaih5c
    CKSIkQPaTIQaih5c
    DCVQbfaAoGol4FYM
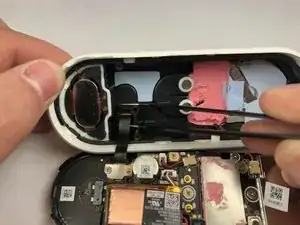
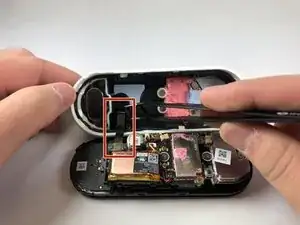
    • Greife den Stecker wie im Bild mit der Pinzette und zieh ihn vom Gehäuse weg.

  6. B2xLEZCmEUrXh1CV
    • Entferne die sechs kleineren Schrauben (rot) mit einem Kreuzschlitzschraubendreher #000.

    • Entferne die drei größeren Schrauben (orange) mit einem Kreuzschlitzschraubendreher #000.

    I didn't see a reason to proceed with step 7 - 10 as the battery was replaceable at this point. I just used my tweezers to pull the battery connector out and insert the new one. I probably could've stopped earlier and skipped removing the USB connector.

    Jay Chin -

  7. 5kNEtLidHy4JiOqi
    5kNEtLidHy4JiOqi
    iaOqdqWZGQiQgpZn
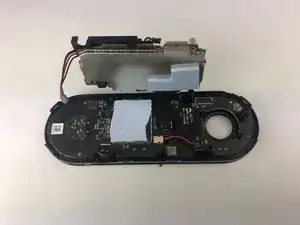
    • Halte das Gerät wie im Bild fest und drücke die Platine von dir weg und hoch, um sie aus den Klammern zu entfernen.

  8. T6gO4wq1MqKw5YWW
    T6gO4wq1MqKw5YWW
    KlFSOfjinh4WrjvI
    • Benutze einen Kreuzschlitzschraubendreher #000, um die drei Schrauben zu entfernen, welche die letzte Platine am schwarzen Kunststoffgehäuse befestigen.

  9. CQONrwDmsZATMkus
    • Schiebe ein Plektrum unter die schwarzen Stecker und heble sie nach oben, um sie von der Platine zu entfernen.

    • Arbeite die Stecker rings herum ab und heble so die Platine aus dem Gehäuse.

    • Achte auf die Kabel, wenn du die Platine entfernst.

  10. pBLxCmQWuu3ZmUxq
    pBLxCmQWuu3ZmUxq
    MLPMtnNSWuLcDhgI
    hafMjtURWA4JBbE5
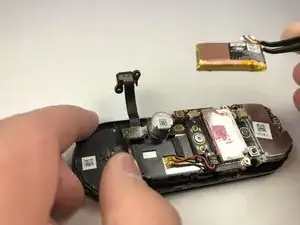
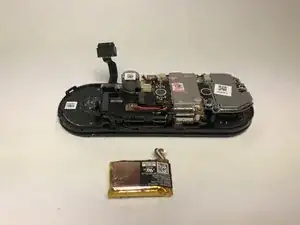
    • Sobald das schwarze Gehäuse entfernt ist, trenne das Kabel des Akkus und entferne den Akku aus dem Gerät.

    What is the battery model?

    Benjamin Dudley -

    My Nest Hello would immediately lose power after the doorbell button was pressed. Changing the battery fixed the issue. My Nest Hello is 3-4 years old. The battery has what seems like a resistant thin film heater that wraps around the battery that must keep it warm when the temperature outside is cold. The film heater and copper films that wrap the battery can be carefully removed and transferred to your new battery. I was able to find a new battery module on Amazon by searching for “Nest Hello Battery”.

    benjaminrclark -

    For &&^& sake, what is the battery model?!

    Sergei B -

    See my post in the comments section below for part information.

    BigThunder -

    Steps 4-10 are not needed. After step 3, the battery is sitting on top. Just remove it and put the new one in and put everything back together.

    Dallas Shaw -

    Can you replace the ribbon cable?

    Sheila Morgan -

    Ok, so I did the swap and no more blank video. But now I don't have sound.. I can barely hear anyone talking, and they cant hear me at all. Anyone else have this issue?

    Ben Pritchard -

    Cool. Now I have a battery in my hands. How do I REPLACE it and with WHAT???

    harrisdjh -

    You're going to need something to stick the faceplate back on. It may snap slightly back into place, but it didn't hold for me. I used some transparent tape around the edges, but it doesn't look great. Perhaps some double-sided silicone tape or something. You don't want something too permanent in case you have to swap the battery again in the future.

    Tim Scott -

    I followed these instructions and successfully replaced my battery. Mine also has the heater elements around the battery, and I was able to wrap that around the new one.

    I do have one problem though: now my button does not trigger a doorbell ring. Tested the indoor chime and it’s working correctly. The app doesn’t register a doorbell notification when the button is depressed, so I think I’ve damaged it somehow.

    Any suggestions?

    RetroNinja611 -

Abschluss

Um dein Gerät wieder zusammenzubauen, folge der Anleitung in umgekehrter Reihenfolge.

Daniel Moore

Mitglied seit: 14/01/20

637 Reputation

28 Kommentare

Any recommendations as to where we can find a replacement battery? Model #, specs?

Patrick Ouellet -

Battery and o-ring part source?

Ryan -

What is the replacement battery?

Leon Sparrow -

Search Amazon for the following and you should find several choices:

Nest Hello NC5100US C1241290 Video Doorbell Wired
JOHN ZUCKERMAN -

Bonjour, j’ai besoin de changer la batterie.

Merci pour le tuto,

avez vous un liens pour la batterie svp ?

urgent

dessolle.emmanuel -

Confirming that this battery being removed is from a WIRED Nest Hello doorbell? Thanks!

Vee Li -

Yes, this matches my experience from a few days ago on my original Nest Hello(Pre-google buy out). Initially there was only one version. I do not know if the current "Wired" V2 after google bought them is identical or not.

Michael Park -

I just installed this replacement battery and it seems to have fixed the disconnect problem when the external chime is enabled:

280mAh/3.7V Replacement Battery for Nest C1241290 Vido Doorbell Wired NC5100US Hello 1ICP7/17/26

https://www.amazon.com/dp/B09P57QLRZ

BigThunder -

What about the seal?

Ryan Gauder -

I was able to reuse the original seal

BigThunder -

At Step 4, the battery and the connector are staring at you. Why must you continue to disassemble the device if you are able to simply unplug the battery and replace at Step 4?

Clark Moore -

I totally agree

Anibal Morales -

This seems to have fixed my original Nest Hello(Pre-google buy out) that had after years of very reliable use started disconnecting and shutting down until it ultimately would only record a few seconds and then shutdown for hours again. As Clark Moore(above comment) said, you only need to get to step 4. No need to keep disassembling. The o-ring did not seem to require replacement, though I did apply some pure silicone grease to help it seal and hopefully make the inevitable next replacement easier. In the instruction it was not clear to me, but if you look closely at the pictures for step 4 there are 2 snap fitting on each end and on each side. This information may help in step 3. Mine was much harder to pry out than I had expected. Good luck, and thanks to those who provided info!

Michael Park -

I can confirm. Replacing the battery fixed the issue with the Nest disconnecting when someone would ring the doorbell. The O-Ring was still good and when I put everything back together, I put a few dots of gorilla glue under the faceplate. Also, there is no need to remove the motherboard to replace the battery, you can remove it in Step 4. I also connected the nest to a USB charger overnight, in case the battery needed some power. Lastly, I also ordered a silicone cover for the Nest that really helps the aesthetics, since the faceplate was peeling and looking old. Good luck, it's a rather easy repair.

Battery - https://www.amazon.com/dp/B09P57QLRZ?tag...

Silicone Cover - https://www.amazon.com/elago-Nest-Hello-...

Eric Martinez -

Steps 6, 7, 8 and 9 were totally unnecessary to remove the battery. You can see the battery in the picture in step 5, no need to keep disassembling. Also, you will need some adhesive to reassemble, otherwise the faceplate will just fall off. I used 3M General Purpose 45.

Charles -

Great instructions, thank you! If you only want to exchange the battery, steps 4-9 are not necessary - the battery can be removed directly and exchanged after step 3. I used a NC5100US (280 mAh, 3.7 V) replacement from the world's biggest online retailer.

Tobias Wabnitz -

Can confirm that you only need to do Steps 1-4 to replace the battery.

Can confirm is Step 1 is a royal pain to do to. You have to slip the pick all the way under the face plate all the way around to separate the glue from the face plate. Don't try to pry the face plate off, or you might crack it. And once you do this, you'll have to re-glue it back on because there will be nothing holding the face plate to the doorbell.

Scott B -

I followed this guide and big thanks to those who shared the link to purchase a battery. Oddly it did not seem to work right away. I plugged the doorbell once assembled to charge for 15 minutes or so and then installed.

About 24 hours later it just started working again so it was definitely the battery. You will need to get some glue for the cover and do not try and scrape off the foam adhesive. I just used my fingers to pull away any clumps and applied about a q-tip amount of flex seal in certain spots and held together for five minutes .

Battery: 280mAh/3.7V Replacement Battery for Nest C1241290 Vido Doorbell Wired NC5100US Hello 1ICP7/17/26 https://a.co/d/9zXgbXO

Glue: Flex Glue Mini Clear 3 Pack https://a.co/d/7ALQLGh

Doorbell cover: elago Silicone Case Designed for Google Nest Hello Doorbell Cover (Black) - Full Protection, Night Vision Compatible [US Patent Registered] https://a.co/d/fzTB3Lz

Dex R -

Yeah because the comments are hidden under load more comments, I started doing steps 5-8 which was annoying, not just because of the extra needless steps, but because the 6 screws in step 6 are actual 3 and 3 of slightly different screws, so reassemble got confusing.

Also I did slice my cable to the case that it warns about, I thought I was done for, and was just continued the steps to complete incase I could get my hands on an old one for parts, but then when I reassemble I realized it was just the usb cable, which is not necessary the battery was charged already and now my Nest Hello works and no longer cuts out on button presses.

There were also two rubber bumpers inside the white case that fell out, I only noticed one falling out, so it took me a while to find where they went (button side of white case) I couldn't find the second bumper, but seems to work okay with out it.

Jay Tuley -

well that didn't work. the faceplate snapped in half. I suspect that the old plastic having been in the sun for so many years didn't help. Oh well.

alex -

I was very careful but the ribbon snapped off, it was so short I cant see how it would have been avoidable. In addition there is another cable attached to a wrap around the battery. So once I disconnect the battery, I cant remove it due to the wrap and extra cable. Is there a way to replace the ribbon and additional instructions for the other cable/wrap around the battery?

Tiffany -

There must be two generations of Nest Hello (aside from Google version) - one with a 'plain' battery. The other generation (mine/yours) have a battery wrapped with a ribbon heater (I found a Reddit black hole - I guess this is called a Kapton heater). FYI, the battery is the white 3-wire and the heater is the black 2-wire. I guess Lithium batteries do not charge well in cold weather, hence the heater.

So, I painstakingly tried to unwrap the heater (it's got tape and layers of adhesive around the battery), but it eventually broke. I pulled out the heater's two wires (black/red) from the connector and tossed it. I replaced the battery as per usual and it's working fine without the heater. I'm in Chicago and it gets %#*@ cold, so I'm hoping there won't be performance issues this winter.

I searched for a replacment battery with the heater, but no luck. And I couldn't find a kapton heater replacement either. These must be very specific Nest/OEM parts that are not readily available to the public.

Good luck!

Nick Lyons -

Ok, so I did the swap and no more blank video. But now I don't have sound.. I can barely hear anyone talking, and they cant hear me at all. Anyone else have this issue?

Ben Pritchard -

Procedure worked as advertised. I used multiple wedges on the front plate until it separated without bending. It took all 6 to do this using 3 on each side.

My replacement battery had one wire and worked fine. The one that was removed had a black and white connector. The replacement only had a white connector. I need to figure out what will be best to use to reattach faceplate so I can remove it again if necessary.

Thank you!

Chip Lagdon -

According to Dex R’s response above, he used Flex Glue Mini Clear. If you look closely at the pictures accompanying this procedure, they show a battery connector with three wires (black, white, & red). This is identical to the battery wiring connector shown for all of the replacement batteries available from Amazon.

JOHN ZUCKERMAN -

Absolutely the worst instructions ever. Doesn't matter, this thing isn't supposed to be serviced.

1. It's nearly impossible to remove the faceplate without breaking it.

2. Doesn't show which side the ribbon cable is on, important for opening!

3. Doesn't mention the copper item around the battery (strain gage for detecting puffing?) or its wiring. This is stuck onto the battery, and the replacement battery doesn't come with it. It will be destroyed if you try to peel it off the old battery. I have no idea if the unit will function with this bit disconnected/destroyed.

Patrick Matthews -

I just completed this, and my old battery was puffy, so it was ready to let out it's magic smoke. The doorbell gave no warning about the puffy battery, so I assume it wasn't a strain gauge. The new battery did come with copper around it, but the connector was coming out of the opposite end of the battery on the replacement, and the connector had to be rotated 180 to keep the color orientation as the original when I put the label in the opposite way from the original. I will say to be careful around the thin part around the doorbell and camera openings, as I broke the cover one time at each end while spudging when I should have been picking. Luckily, it was only one break per end. I ended up using a thin paring knife to cut through the foam, the picks didn't seem like the most efficient way of cutting the foam, but vital for making enough room to get the paring knife in.

John Haller -

Thanks so much for these instructions. Here is the battery I used, and it fixed the problem I was having with the door bell rebooting.

Nest Hello Doorbell (Wired, Gen 1) Replacement Battery: Battery Replacement for Nest Hello Vido Doorbell Wired NC5100US C1241290 1ICP7/17/26 (280mAh/3.7V)

https://a.co/d/0uQbtTA

Jimbo -