Einleitung

Wenn dein Gerät sich nicht mehr einschalten lässt, oder selbst nach dem Laden schnell abschaltet, musst du vielleicht den Akku tauschen. In dieser Anleitung wird gezeigt, wie der Akku ausgebaut wird, um einen neuen Akku einzubauen.

Falls dein Akku aufgebläht ist, musst du entsprechende Vorsichtsmaßnahmen treffen.

  1. Lo4WNid1IIoiskat
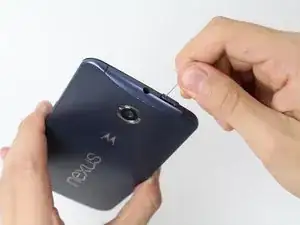
    • Verwende ein SIM-Karten-Auswurfwerkzeug (eine Büroklammer funktioniert auch), um in das Loch am oberen Ende des Gerätes zu drücken und die SIM-Kartenhalterung zu entriegeln. Dies sollte nicht sehr viel Kraft erfordern.

    • Entferne die SIM-Karte und die SIM-Kartenhalterung.

  2. PrHyDptGtZjnSp6k
    PrHyDptGtZjnSp6k
    PPlMTgZXAsQBrqec
    • Lege ein weiches Tuch auf deine Arbeitsfläche, um Kratzer auf dem Bildschirm zu vermeiden.

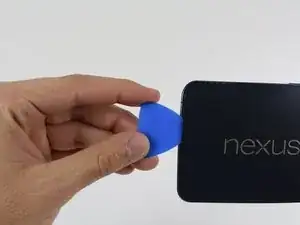
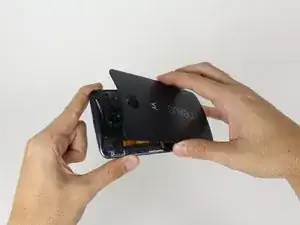
    • Verwende ein Plastic Opening Pick, um das Rückgehäuse aufzuhebeln.

    • Achte auf das Power- und Lautstärkekabel, auf der linken Seite direkt neben den Lautstärkereglern. Das Kabel liegt offen und könnte mit dem Werkzeug beschädigt werden.

    • Nimm das Rückgehäuse mit deinen Händen vorsichtig vom Rest des Geräts ab. Da das Rückgehäuse leicht verklebt ist geht dies schwerer als gedacht – wunder dich nicht, wenn sich das Rückgehäuse dabei leicht biegt.

    • Vielleicht benötigst du sogar einen iOpener, um den Kleber zu lösen. Schau dir für mehr Infos diese Anleitung an.

    • Du kannst einen kleinen Saugnapf verwenden, um das Rückgehäuse leicht anzuheben und das Plastic Opening Pick darunter zu schieben.

    Dave Lee on YouTube has a much more helpful note on removing the back cover. That video is available at: https://youtu.be/Yk1CGk0TZAw?t=1m20s

    Taylor Says So -

    the adhesive is actually quite strong (mild is the wrong term here), even after lots of heat I still struggled to remove the back cover easily. BE CAREFUL of the volume/power flex cable at the side and top left, it is completely exposed when you attempt to pry the back plate off. I got lucky.

    Andrew -

    I would recommend using a utility kniofe (make sure you have a new blade) to pry open the back case just a bit, and then slide in a playing card, fingers, pick tool or whatever else you have.

    The YouTube video note about sticking a needle through a hole in the SIM slot would have worked fine if I had a needle...

    Ada m Lacey -

    I was able to use a spudger to get around the tape. If it is really bad you can use a hair dryer if you don't have a heat gun to help loosen the adhesive.

    Ryan -

    After removing the sim card, note the hole near the edge angled toward the back cover. Stick the sim removal tool (or a strudy earring post if not long enough) to start off the back cover removal process.

    Lindsay -

    I second the method of getting the back off by inserting an appropriate shaft through the hole just inside the sim slot. I had zero success using suction cups or trying to get something into the edge at the bottom, but very easily pushed on the back from the sim slot hole enough to get a plastic spreader in. The YouTube video by David Lee shows this.

    Jan Bottorff -

    I used the iOpener and some plastic prying tools. Took me a solid 2 hours to get the back case off and the battery free from the midframe. No problems, and everything worked fine, but people should be aware that “15-20 mins” is wildly optimistic for your first attempt at this.

    Pete -

  3. 24dIF6ZlMcKMNSd3
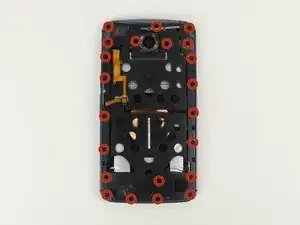
    • Entferne die 22 2,3 mm Torx T3 Schrauben.

    The screws are T4. Not T3. I just performed a battery replacement on my Nexus 6 5/15/2017. All 22 screws are T4. Even the one holding the volume and power buttons in place.

    Ryan -

    Right. while possible with a T3, it grinds out the center of the screws, making a hassle for the next guy who has to get in there. T4 feels secure.

    Thor -

    Thanks for the heads up. about to start the surgery on the old baby. Turns out that on my phone its T3. Makes me wonder if they varied the screws from batch to batch at the factory, certainly looks like it

    mrdamnslow -

    If you're using iFixit's tools then T3 should be the correct size, but T4 may work as well. There's probably a bit of variance in the sizes and manufacturing tolerances depending on who made your tools. Bottom line, try a T3 and if that doesn't feel right, move up a size (which is a good rule of thumb for any screw you encounter).

    Jeff Suovanen -

    my T4 drivers are too large. T3 has always worked for me on the back panel.

    Steve B -

    I got this kit: https://www.lowes.com/pd/Kobalt-73-Piece... as I thought I had bits small enough already, so didn’t order them with the battery. Rather than wait for shipping after finding out I was mistaken, I just ran out and grabbed this since it had T3 and T4 (nothing else I found in store or online for Lowes or Walmart did).

    The T3 bit fit all my screws snuggly; the T4 bit was too big. So clearly, this is a “YMMV” based on the screws either being different depending on manuf. batch, or based on different tolerances between bits. Hence why I linked the exact one I used (Item #856840 @ Lowes).

    Tim Fisher -

    After you take out the screw by the buttons, the retainer bar and buttons can fall out. I recommend you just explicitly remove the button retained and buttons, so they don’t fall out unexpectedly.

    Jan Bottorff -

    I tried T3, and then T4. Both of them stripped most of the screws. The screw quality is garbage. Just a heads up for anyone looking to try this. If your phone has over-tightened screws like mine, you’re SOL. I managed to get 5 screws out from the 22 total.

    PORTER LYMAN -

    Really wish these comments were made more apparent when going through this guide, had 18 screws come free with T3 just fine, ended up with 5 that stripped the instant I turned my driver once with T3, T4 wasn’t enough to fill the gap, now they’re stuck and I’m out $75 from buying a new display for a device I can’t fix without last resort trying to Dremel a slot into the heads of these teeny tiny screws

    Zach Grooves -

  4. abdFFF6iMFgpmvnR
    abdFFF6iMFgpmvnR
    WEqOweE16wimtOBO
    YqBAIlIXRg1Qr4P3
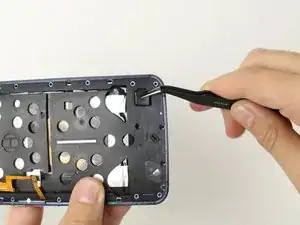
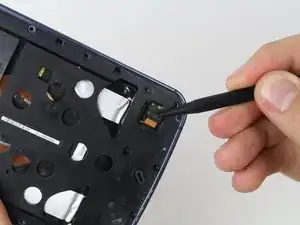
    • Entferne mit einer Pinzette den Gummischutz unten rechts am Gerät.

    • Löse mit einem Spudger den freigelegten ZIF-Anschluss. Schaue hier für Infos, wie man ZIF-Anschlüsse löst.

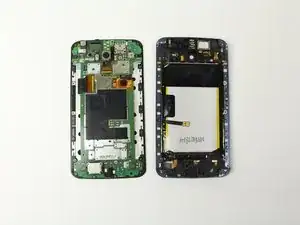
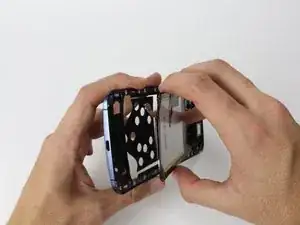
    • Trenne die Akku-Seite komplett von der Seite mit dem Logic Board, indem du sie vorsichtig händisch auseinanderziehst.

    This step MUST also include a note to disconnect the power and volume ribbon cable and cover at the top left of the device.

    Taylor Says So -

    Hi Taylor. I just completed this guide and it was not required to disconnect the power and volume ribbon at this step. Both connected ribbon are part of the mid frame.

    Gaetan -

    Hi Gaetan, Taylor is right, you need to document that the power switch & volume connector (left top under the rubber) is to be disconnected from the motherboard when you disassemble. - Worse if you do not comment on it, this becomes an serious issue when you assembly the phone again! Most people will ignore the fact, they have to connect the cable again. Otherwise the power switch will not work. People will get mad, because they don't identify the root cause, why the phone does not start again), as the rubber does not show, the disconnected cable. It took my a least an hour before I worked through all connectors, after I already tried to run through all the 'Nexus 6 does not start' comments on the Internet, which aren't the root cause here.

    Michael Pirker -

    Yes, I realised this after I’d put the phone back together and the power and volume ribbon cable had been disconnected in the process without me realising it. My Nexus 6 is nearly 4 years old now but the phone is back to new! Thanks for the advice guys.

    Alistair B. -

    The bottom right cable is not a ZIF (Zero Insertion Force) connector, it does not have a latch, the connectors are little copper clips and the connector needs to be pulled with some force upwards to disconnect.

    Isak -

    This is definitely not a ZIF connector. Not only does it require a fair amount of force (relative to the connector size) to push on, it can be extremely stubborn to remove--especially with nearly two years of age on the fragile plastic available for pulling. There is a pull tab (of sorts) on the connector, but mine snapped right off. Luckily, the parts that are likely to break are all part of the battery assembly. The new battery comes with a new cable.

    Lampshade -

    To separate the battery section and motherboard sides you don't pull up the black swiss cheese plastic cover, just run your fingernail along the side in between the blue metal and the black edge of the screen.

    Kevin Edwards -

    thanks a lot kevin you saved me. This guide should be a bit more precise...

    guyom -

    As Taylor said, by the camera lens there is another rubber peice, take that out and disconnect that cable, and make sure to reconnect it afterwards. That cable connects your buttons to the mobo.

    Nick Myers -

    I did exactly everything described in this guide and my Nexus 6 front camera still does not correspond with the camera app. Is there something I am missing and is there anyone else with a similar problem to mine. I am thinking of cleaning the connector with rubbing alcohol or something similar.

    ajqwerty93 -

  5. VNAfPhkEyBEcYJlR
    VNAfPhkEyBEcYJlR
    F3W324fAQdrNJK2s
    xMqxpWoVEglY1gdU
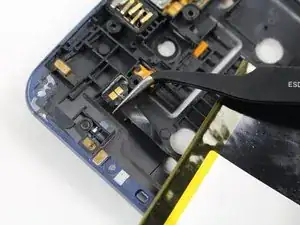
    • Ziehe den Akku vorsichtig mit deinen Händen vom Rest des Gehäuses weg.

    • Verwende eine Pinzette, um den Anschluss des Akkus zu lösen. Heble gegen die harte Rückplatte, achte darauf, dass du nicht das Kabel von der Druckplatte ablöst.

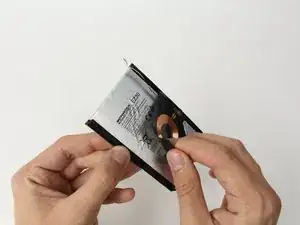
    • Messe genau aus, wo sich die Ladespule auf dem alten Akku befindet und übertrage dieses Maße auf den neuen Akku. Ziehe vorsichtig die Ladespule ab.

    • Übertrage die Ladespule auf den neuen Akku. Vermesse die Lage der Kontakte/Kontaktstifte für den Stecker mit den vier Anschlüssen an der anderen Seite am Smartphone selbst und übertrage es auf die Rückseite des Akkus.

    after a while the glue used to connect the coil becomes harder than the foam/rubber the coil is mounted on. a heat gun might help.

    Tomasz Kielak -

    The bottom edge of the charging coil connector is 2.280” from the USB connector side, and 1.790” in from the button side. I used a caliper to measure, and reposition it on reassembler. This flat cable wrapped around the side of the battery along with a larger flap. The wireless charging loop also had another flat cable and 2 contact pins that goes up the midframe to near the lens. There was a small rectangular end on the flat cable, with an alignment pin. I had to peel this off to work on separating the battery from the charging coil. I reassembled the charging coil back into the midframe, using the slight indent in the midframe as a positioning guide. I then reattached the flat cable and rectangular end, pressing down to make the alignment pin go through the hole, and the adhesive to stick again. The new battery came with a slight curve, after pressing into the adhesive, wrapped the flap and flat cable on the coil around the side, and stuck down the 4 pin coil contacts based on the above measurement.

    Jan Bottorff -

    I just used that long flat cable that Jan mentioned, the one by the camera lens area, as the guide for where to place the coil, lined the battery up and set it down.

    All this adhesive though…

    Strings Cat -

    +1 for Jan’s measurements above. I didn’t have a caliper to measure, but I did have a ruler with millimeters. So I converted the measurements above to millimeters (yay Google) and used my ruler, voila, wireless charging works.

    Wes -

    Glad to know about the importance of lining up the coil before removing it. Before prying the old battery and coil off the frame, I scratched a few registration lines into the midframe so I could tell when things were lined up properly during reassembly.

    Pete -

    Lining up the coil itself is not the critical item. Getting the connector to pad lined up to contact the pins is crucial item. Place the back on the long edge with the screw holes lined up to align the pad in that direction, and then do the same with the short edge.

    It took three times before I got mine aligned properly. A flashlight help see the alignment.

    Chris -

    It might be helpful to note that the charging coil should be unwrapped from the old battery by using the black tab that wraps about the battery body. Start with this tab on the other side from the coil itself. If you don’t you risk separating the plastic membrane which is glued to the battery from the coil assembly itself. I know because that’s what happened to me. It should also be noted that getting the old coil assembly in the proper position on the new battery is critical, particularly the contact strip which wraps about the new battery. It must be accurately placed or it will be misaligned with the contacts when mated with the main body of the phone - and the wireless charging will be broken. I used veneer calipers and Jan’s measurements to carefully place the contacts and it worked first time! Thank you Jan!

    Richard Freeberg -

    • Stecke das Ladekabel ein. Wenn du das Ladesymbol siehst, das Smartphone aber nicht einschalten kannst, dann prüfe, ob die Seitentasten angeschlossen sind. Löse die Gummiabdeckung vom Stecker und stecke ihn in die Buchse ein.

    • Wenn das drahtlose Laden nicht funktioniert, dann prüfe, ob das Smartphone hochgefahren und funktional ist.

    • Wenn das drahtlose Laden immer noch nicht funktioniert, dann nimm noch einmal alles auseinander und übertrage die Position der vier Kontaktstifte an der Telefonseite genau auf den Verbinder der Ladespule auf der anderen Seite.

    • Wenn sich die beiden Teile schwer verbinden und zusammenschrauben lassen, dann biege den Akku, bis er leicht gewölbt ist und die gleiche Form wie der alte hat. Das Zusammenfügen der beiden Hälften sollte ohne Kraftaufwand gehen.

    • Wenn der Kleber an der Rückseite nicht mehr haftet, dann kannst du ihn vor dem Zusammenbau mit einem Haartrockner erwärmen. Du kannst auch ein Ersatzrückteil mit neuem Kleber kaufen, er ist aber recht teuer.

    My old/factory presumed (bought the device from the original owner on Swappa) had a riser block that was somehow super-glued to the battery, that the ribbon cable for the coil sat on. The new battery (not used, purchased from iFixIt) did *not* have this riser block, nor did the coils seem to (I didn’t buy one of those, as there was nothing wrong with mine).

    Figuring that it was just a matter of those contacts not being pushed into the pins, I opened it back up and found that the pins were indeed extremely springy.

    Rather than attempt to get the riser off the old batter (as trying to scrape, like with a blade, something off a lithium cell didn’t seem wise), I just pushed the cable against the pins snugly, and used hot glue to cover/hold it, but not be taller than the surrounding heatsinks.

    That was a few weeks ago, and my Qi Charging still seems to be working just fine. Hooray for laziness!

    Tim Fisher -

Abschluss

Arbeite die Schritte in umgekehrter Reihenfolge ab, um dein Gerät wieder zusammenzubauen.

Nach Abschluss dieser Anleitung solltest du deinen neu eingebauten Akku kalibrieren.

Marina Moore

Mitglied seit: 13/01/15

4284 Reputation

43 Kommentare

There's a *lot* of glued down parts. Don't force them apart. Use a hot-water bottle or similar to loosen the glue. Good luck!

Terence Eden -

Intriguing. I bought my nexus 6 thinking I would never be able to replace the battery, but this looks doable, albeit not without some risk of damaging the device.

David Betz -

Hi David, Im in the same process and what I found is a lot of glue on the back, rather than that is fairly easy. :)

Mauricio Gloria -

My battery side board has been broken! It did not hurt to work properly, but you guys MUST be careful of taking it apart!
Jang Younghwan -

Also T3 screws are so weak, Unscrew carefully and use a good T3 screw drivers otherwise they will be stripped!

Jang Younghwan -

half of mine stripped, possibly from using cheap drivers that came with the replacement battery. now i have a new battery that I cannot use because I cant get the remaining screws out. It didnt help that the youtube video I watched didnt have me using the correct size driver. He had me use a T4…Plus I believe someone already tried to get the screws out before. It was a used phone when I got it. The video I watched also had me disconnect the flex cable and now I cannot get it to connect good again so the power button and volume buttons are messing up and sometimes the phone wont charge. Which, again I think the cable was messed with prior. I am thinking a new battery was never my issue to begin with. I am wondering if it was a bad cable all along. This simple project turned into a huge headache for me. I wish I would have seen the 2nd video I found first because he did it without disconnecting the flex cable.

Sarah Smart -

And +1 for Terence Eden's comment.

Jang Younghwan -

ONLY T4 Screwdriver

ELYEZER TOFACH -

I have trouble getting through the day with my 2 year old battery. Will a fresh one help or is it the phone?

Art Schwadron -

It sounds like it might a combination of both. Make sure you're updated to the latest Android software and then from there it may also be useful to look into a new battery. 2 years is quite a high amount of cycles for a phone battery and in a phone that large, it requires a lot of power. So I would suggest a software update and a battery replacement and I'm almost certain you will see a usage time increase!

Robert Myers -

Hello,

Do we need to replace the rear cover by a new one once the old one has been unglued?

Thank you!

Olivier Lapointe -

Hi Oliver.

I've just followed this guide and the rear cover fits back fine. It'll help if you warm the cover so the glue rebonds. I have mine in a tight fitting case, so this'll help as well.

Matt North -

Thank you for your answer Matt :)

Olivier Lapointe -

What a crock, the case is glued together!

I'd like to see a full video of the process by the 'Marina Moore (and 7 other contributors)'.

This not an easy job as depicted by the process described above.

As explained to me the glue softening process takes 20-30 minutes and is required twice because the mother board is also glued to the case.

If you are in Orange County, CA, Call Android-Genius in Newport Beach. Not cheap but better it's done by a pro.

Steve -

Only the back plate was glued quite so much, and it didn't take too much time to remove.

The only other place where glue was an issue for me, was when the double stick tape stayed on the battery, rather than it staying on the induction coil. But I was able to carefully peel it off to reuse.

I watched a couple youtube videos, but other than getting a visual of the process, I would never suggest any of them as they all skipped steps or left things unsaid. This tutorial covered most things and was all I needed to finish the job.

I'm just a housewife by the way, although I admit not typical. I'm self-taught and have built two computers (one is a media center pc). But I'd never worked on a phone before. I think if someone is confident, and very careful, this is very doable.

Rayna Thompson -

Hardest part was getting the back cover off. Other than that it was pretty easy. Though the adhesive came off the contact for what I assume is wireless charging and now that doesn't work. I can probably go back in and align it properly but for now it's not that big of deal. Word of advice, unplug the battery connector before removing the battery. I kind of ripped it out accidentally and thought I'd torn it but it went back in no problem. Hoping the new battery will help my random reboots. My old one was a little warped. Thanks for the guide!

Emri -

Screw are fine, it's just a mistake in the guide - you need T4 screwdriver!

Serhii Kaistrenko -

Thanks so much to everyone who contributed to this guide. I've never even rooted my phone, let alone disassembled it.

Everything went very smoothly and my new battery has been working just great for over a month.

I love my Nexus 6, especially since Nougat was made available. Now that the OS will last another two years, I have a battery to match (and a spare, too) thanks to this helpful guide. Thank you all.

A couple tips for readers:

* I used a microwavable heating pad to loose the glue on my phone's case back. It took 10 minutes.

* When you remove the connector in Step 4 (the one under the rubber flap), it might not be apparent that it slid out; it did not lift straight up. To reattach, lay the two halves flat beside each other, then slide together. I broke a tiny corner of the clip trying to push it down (still holds just fine).

* Due to the case's curve, the screws may not realign if you work in a circle (clockwise etc). Try reattaching them by alternating in the corners and mid-sides to start.

Rayna Thompson -

Thanks a lots, I was confused about my lovely nexus 6. I,m going to follow yr advise.

Thanks again.

Daphrose Mukabaranga -

I have followed the exact steps. Everything went smoothly until I try to turn on the phone. The phone won’t charge or boot anymore even with the old battery. I checked every connector. Any advice?

Χρήστος Δημητρούλης -

Hello,

Like you, I followed the step and now my phone won’t Start…

When I charge it, I see the phone which is saying to me that he’s in charge, but that’s all. Even after a night of charge the phone don’t start.

Any ideas everyone ?

irwin dewachter -

You must reconnect the power button to the motherboard. See my comment further down the thread.

Robert Gerber -

I Use T4 driver~ thx battery change

엄웅앙 -

+1 on the T4 screwdriver. I did fine with T3, but only because I have a really good screwdriver set. I tried T4 after reading this guide and indeed it fits way better.

One little note - when starting to pry, start with bottom right (as the screen is facing you) corner. Be careful not to thrust your plunger into the middle, where the tiny mic hole is - the plastic body has a tiny bit of oval padding, probably to soften the mic sounds and prevent the case from covering the hole, if you go too hard you may strip that piece of padding.

Ivan Tarapov -

I’m about to attempt this. What have others used for replacement adhesive? Some sort of 2 sided tape under the battery? What about replacement adhesive to hold the back case on again?

FriendOfEntropy -

Maybe it’s because I got my phone when it first came out, but mine definitely had T3 screws. Make sure your screwdriver bits are good quality, I stripped a cheap bit aster 5 screws. Also, I did rip the thing for the wireless charging that wraps around the batters when pulling the back cover off. Make sure whatever you are sticking in there to peel the back cover off is between the cover and the plastic back, and not between the plastic back and the battery.

Bryan -

[|I was having trouble removing 3 screws and I ended up drill it to open. I broke the plastic cover and other connection came lose. I put everything together as best I could. My phone did not turn on after I put everything together. I put it on charge and I am hoping for the best. I used new battery and T 3 screw driver from ifixit.]

Shirhad Meah -

Update: After charging the phone for few hours it did not turn on. I opened the phone and re-check everything and no luck.

Shirhad Meah -

Tips from doing this once.

1. Make sure you have the right tools. T3 worked for me. But T3 was not the right torx size included in the free tools that came with the EZ30 battery kit I bought (Ebay vendor)

2. If you keep your Nexus 6 in a case and/or if it gets hot a lot in the past, then you will have very sticky cover removal, and possibly battery coil sticks as well. Be patient, and use plastic tools with sharp edges to get the initial ribbon edges, and slowly peel the rest.

Wilson -

For those who have completed this process, but cannot get their phone to turn on: The guide omits a crucial step in reassembling the phone - disconnecting and reconnecting your power button.

Short version: In the upper left corner of the phone (to left of rear facing camera), there is a black rubber boot. Pry this boot up, and press the connector there into place on the motherboard. Test phone now - power and volume buttons should work. Replace boot and reassemble phone.

Longer Version: Please look at the photo in Step 3 for reference. See the ribbon cable in the upper left part of the phone? This cable goes to the power and volume buttons. In the upper left, you can see the cable go under a black boot like the battery cable. Also like the battery cable, this ribbon cable for the power and volume buttons must be pressed back onto its connection on the motherboard.

For more on taking apart and reassembling this phone (including more disassembly than is necessary to replace the battery), see this video.

Robert Gerber -

Made an account just to say this.

Thank you so much Robert. I couldn’t for the life of me figure out why my phone won’t boot despite seeing the charging indicator on the screen. You’ve saved this guy hours of troubleshooting. :)

dan t -

Any comments on how to position the charging coil contacts on the new battery? I did my best, fully extending the ribbon cable and making sure it was straight. Not sure if it works or not - it didn’t work, but then again, it didn’t work before I replaced the battery so it may be something else, or the charger.

Otherwise it was easy enough. Hardest part was getting the back cover off, especially where it was stuck to the flexible parts of the chassis and at risk of tearing a ribbon cable. The back certainly flexed quite a lot in the process, but once off it returned to its original shape, and was easily re-installed. Didn’t seem to stick on as well as the original adhesion; perhaps some thin 2-sided sticky tape would help if you keep your phone “naked” but mine is in a case so I’m less concerned about how well the back sticks.

Thanks for a great guide, and for it NOT being a video without written instructions and still photos (as many are). A video as a supplement is great, but as the only reference, it sucks.

barefootedmike -

You can buy replacement charging coils for cheap. I posted a comment after yours describing how to line up the charging coil’s connector on the backside of the battery.

wagnerism -

Several items were missing in the instructions and that cost me a lot of time.

Step 4: There are TWO (2) plugs and connectors to be removed. NEITHER are ZIF connectors. They don’t have that flip-up gate and ribbon. They are both plug and receptacle. The one not shown is for the buttons on the side. To remove both connectors, pry up underneath them.

Step 5: The connector removed with tweezers is glued to a backing plate. Use the tweezers to pry under the backing plate. If you pull up on the wire you might peel the connector off of the backing plate.

wagnerism -

Step 5: Removing and replacing the charging coil is not described sufficiently. The four-wire connector that faces inside the phone must be correctly positioned and the batteries do not have guides or markings. I used a post-it note as a tape measure. On the phone side of things, paste the note’s sticky strip at the edge of the bottom and run the strip up to and besides the pins for the connector. Mark both rows of pins with a pencil. Repeat the same measurement from the side edge. Transfer those measurements to the battery holder assembly, making a hash sign (#) marking the future position of the four pins. Then stick the connector to the battery, placing the connector pads at the four intersections of the hash sign.

wagnerism -

Step 2: There is a plastic “cage” for the battery underneath the glued cover. Ensure that you’re prying between the cage and the back cover. The cover is very thin and it should be removed with nothing stuck to it except adhesive. The ribbon cable for the side buttons can get stuck there too. Work on the side away from the buttons first so that you can see that ribbon cable and not damage it.

wagnerism -

Step 6: Use a hair dryer to heat up the back cover adhesive before sticking it back on. If it is weak you can either use a phone case or buy a replacement peel-and-stick back cover.

I bought a replacement battery from Amazon and it came with a great set of small torx screwdrivers. My screws were definitely all T4

wagnerism -

Step 3: All the screws are black and there are exactly 22. Do not remove the silver screw near the buttons.

wagnerism -

re the Torx screws and 3 or 4 I bought a set that only went down to 4 and it was fine. I am UK.

The middle picture in step 4 was awkward. The plastic bit came off on mine and I ended up separating the front and back just enough to get something in there and push the clip up. This was the only way I could do that step.

For the charging coil placement - visible marks were left where the arm that looped around to the back was stuck. And I stacked the old battery on top of the new battery and lined up the charging coil with the old battery, a family member then slid it out of the way and this worked easier than measuring etc.

The battery connector in step 5 was very solidly in place. I had to focus on the right hand side of the connector as it is shown in the picture and this is very well seated by the adjacent screw hole. Keep your nerve, its quite firmly on there and took some minutes to get off.

No major issues through this one

Paul Manzi -

I have this phone and my daughter has this phone. I just replaced her battery. Stripped 3 of the T3 screws (my bad). Ended up being able to yank the battery out the chargeport end between black plastic and screen. I’m really surprised it worked and I didn’t destroy the phone.

I didn’t care for the part where you had to pull off the capacitor and reattach it to the new battery.

Alice Dobry -

Fantastic guide. Enormous thanks to Marina Moore, iFixit, and commenters. Everything went fine here. Notes: Plastic camera lens cover came off with the back, thanks to strong adhesive nearby (only noticed when camera didn’t work, wouldn’t even open app, and back cover slightly seemed off, bulged; managed to get unstuck and place correctly, before back cover, camera now works magically). Used a T4 driver (not T3), fit perfect, no screw problems (using cheap kit, Inlife 81-part, 10-20 USD). Qi wireless parts are a total PITA, I just REMOVED ENTIRELY; couldn’t find much info on this, but seemingly no problems here. Battery seems to be fantastic, very noticeably longer runtime (purchased from iFixit, mfr LG Chem, almost identical to original). Awesome! My 2015-11 Nexus 6 is ready for another… decade?

Vanon -

Needs instructions about reconnecting power / volume cables at the middle connectors and at motherboard connector.

This Android Forums provided clue middle connector has is hinged and opens by lifting far side to allow reinserting power / volume tab.

https://androidforums.com/threads/ribbon...

Conrad Pino -

There a cheaper batteries out there but replacement purchased here matched original battery. I am very pleased with iFixit replacement.

Conrad Pino -