Einleitung

By following these ten steps one can effectively replace the Nikon COOLPIX P7700 camera's internal reflective mirror.

  1. 5NmOBO2TfKuHSdOj
    5NmOBO2TfKuHSdOj
    wegiWGVBtexlNCK2
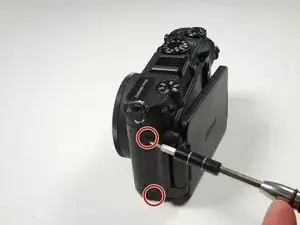
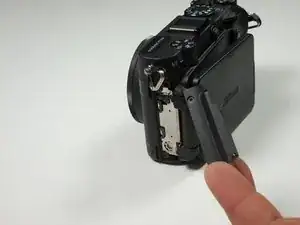
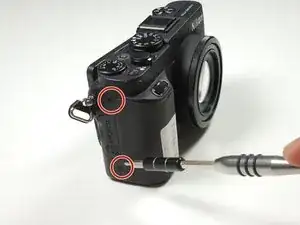
    • Turn camera to the left side and remove the two 4.3 mm black side screws using the Phillips #00 screwdriver.

    • Remove the side panel.

  2. SMb1OEVioVwojOuR
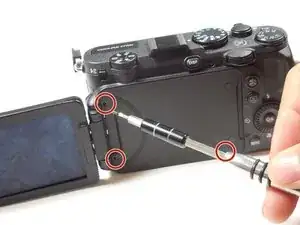
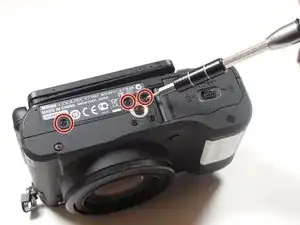
    • Open the touch screen, and remove the three 4.3 mm black screws inside using the Phillips #00 screwdriver.

    These 3 screws are longer than the others! Store them separately.

    Tomaz -

    If you fix the p7800, the right down screw is different, its not a countersink, its flush.

    Robert Böhm -

  3. qPAADVkMTZtFQfHj
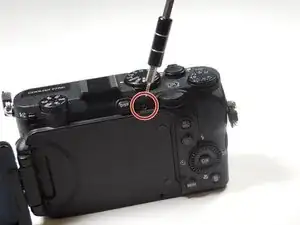
    • Remove the 4.3 mm black screw on top of the camera, right above where the screen folds out. Use the Phillips #00 screwdriver.

  4. gMTGKdn1WcAyLgci
    • Remove the two 4.3 mm black screws on the right side of the camera using the Phillips #00 screwdriver.

  5. VQVTScFnb36pPPIF
    • Remove the 4.3 mm black screws on the bottom of the camera using the Phillips #00 screwdriver.

  6. paWQbkMTwxpuFD2K
    paWQbkMTwxpuFD2K
    INNlB2Y4BOUci2I1
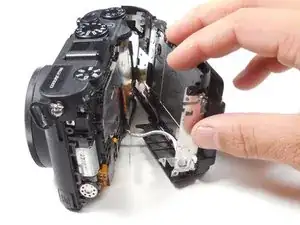
    • Begin separating the camera into two parts.

    • It is okay to remove the orange ribbon. This will be easily put back into place when re-assembling.

    a. Remove plastic plate between main body & LCD screen (where the thumb is in the pic).

    b. Remove one screw (the only one) found behind the plastic plate.

    Kramm K -

    This is the most scary moment as I did not know how to remove the orange flat cable. I would not come off and I broke off a little plastic. Somehow it came off accidentally as I moved the backcover. The cable was later re- inserted with care, from the right towards the left via a very thin slit.

    JY -

    "It is okay to remove the orange ribbon. This will be easily put back into place when re-assembling." Easily put back? Yeah, right (not!). It is actually anything but easy. I managed doing it after several attempts, but it was more by luck than skill. The ribbon is tiny, the contacts even more so and the slot into which the ribbon must be reinserted - I cannot even see it properly. A pair of small tweezers is a must for this step.

    Tomaz -

  7. K1ptRuUO4sp2dSVh
    • Remove the back casing.

    It would be better to lift the little white adhesive tape so that the backcover could be worked on.

    JY -

    Step 4: I had to remove the blank screw as well..

    Konrad Erhard -

    Hi,

    Thank you for your most professional advice.

    How can I clean the sensor??

    Moshe Pulik -

  8. vNmiRTBGAMixkM3L
    vNmiRTBGAMixkM3L
    rLIOeCeGsCSqcDOx
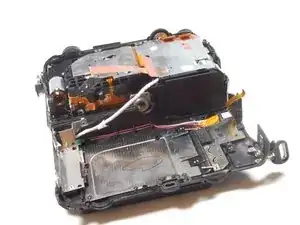
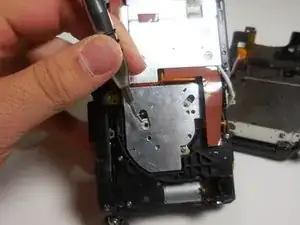
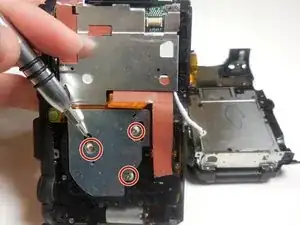
    • Remove the three 4.3 mm screws on the right metal sheet using the Phillips #00 screwdriver.

    • It is okay to remove the orange ribbon.

  9. 1TFsVudX6DZaWPBU
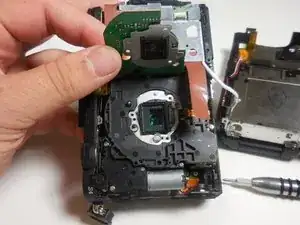
    • Lift the metal sheet up to locate the reflective mirror.

  10. WWYosl4MolSSTAIX
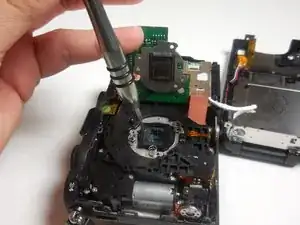
    • Remove and replace the reflective mirror.

Abschluss

To reassemble your device, follow these instructions in reverse order.

Dustin Wahl

Mitglied seit: 11/03/15

775 Reputation

2 Kommentare

There is a further screw hidden under the black cover on the left hand side of the camera (visible in step 1).

Without removing this silver screw, it is not possible to take the camera apart.

There should be an explanation about how to properly remove the ribbon cable. One has to flick up a dark part attached to the ribbon cable socket (opposite to where the ribbon cable enters). Putting the cable back is not “easy”, it is rather fiddly. One needs to put down the dark part again, after inserting the cable.

The three screws for the silver backplate that presses the sensor against the spacers and lens need to be tighten just the right amount. One cannot just fully tighten them. These three screws determine the distance of the sensor to the lens and also its alignment to the lens. One essentially needs to perform a sensor calibration when putting the camera together again.

Finally, the part replaced in this guide is not a “reflective mirror”. It is probably a low pass filter, potentially an IR filter or both.

Tom C -

And how can you calibrate, adjust?
lothar4460 -