Einleitung

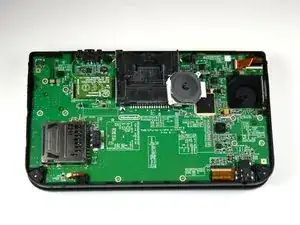
Diese Anleitung zeigt dir wie du das Schiebepad austauschen kannst.

  1. uiGfsMWIvvMi1Gxg
    uiGfsMWIvvMi1Gxg
    BrgDdSH43ysqpUC2
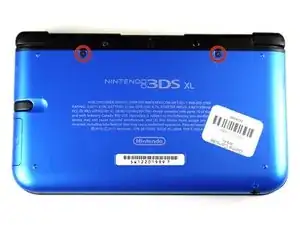
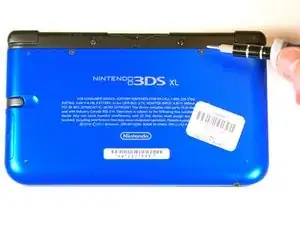
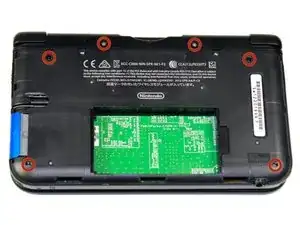
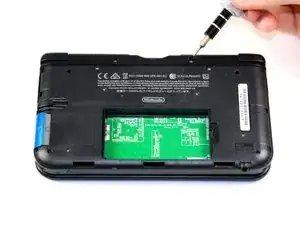
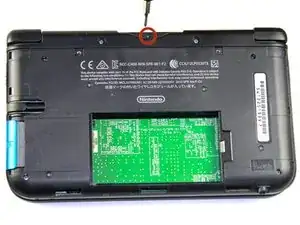
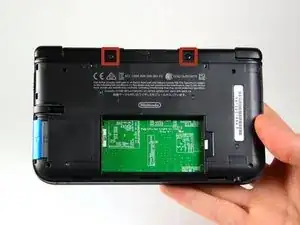
    • Lockere die beiden 4,2 mm langen Schrauben, die sich oben auf der hinteren Abdeckung befinden.

    • Die Schrauben haben feste Unterlegscheiben, durch die sie an der Rückabdeckung hängen bleiben. Lasse diese Unterlegscheiben an den Schrauben, es ist nicht nötig, sie für diese Reparatur zu entfernen.

    Note: If your top or bottom screen was working before disassembly and doesn't work after reassembly, then it's likely that the connector is loose or dirty or damaged or not clipped or PLACED UPSIDE-DOWN. I had this issue with my Super3DS XL(2015) and it turns out that the reason why my top screen wasn't working after put together, was because I had the top LCD connector upside-down. After I correctly put the connector in, It worked again!

    justjustintuber -

    what type screwdriver do i use?!? its so small!!!!

    Matthew -

    I had success using a #00 Phillips head

    Jake S -

    Can't clip the front of the back cover back in

    Macro Man -

  2. GUqhWChaLM3ZkYDT
    GUqhWChaLM3ZkYDT
    w2fpAWwgAJcqSHZQ
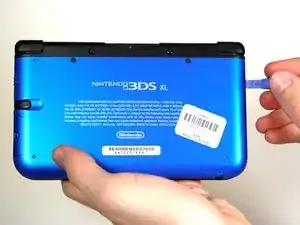
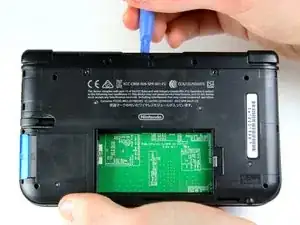
    • Halte das Gerät mit der Rückabdeckung nach oben.

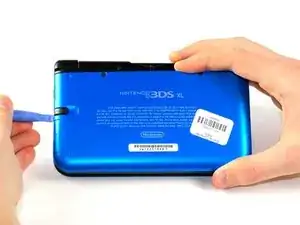
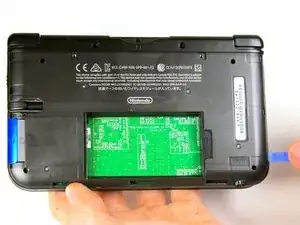
    • Fange in der Ecke rechts oben an die Rückabdeckung mit einem Plastiköffnungswerkzeug abzuhebeln.

    • Halte die Ecke offen, so dass sie nicht wieder einschnappt.

    • Schaue dir die Stelle unter dem Fach für den Stylus genau an. Heble die Abdeckung ab, falls nötig.

    • Hebe die Abdeckung ab und lege sie beiseite.

    Note that on the lower side (opposite to the hinges), there are small hooking tabs. These require you to lift the top (screw side) off towards you, then the lower area.

    Jordan Kelly -

  3. C6DIOSrlv4hCvQlN
    C6DIOSrlv4hCvQlN
    gKdhLpsCKBQbRC2P
    pL42eowreW5MQMTY
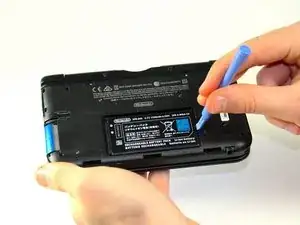
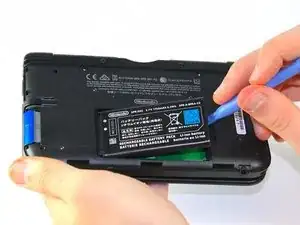
    • Setze das Plastiköffnungswekzeug in die Öffnung rechts vom Akku ein.

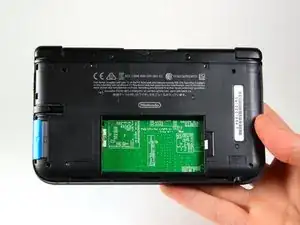
    • Hebe den Akku aus dem unteren Gehäuseteil heraus.

    • Entferne ihn und lege ihn beiseite.

    My 👴 grandpa was helping me 🔧 repair my 3ds xl and ⚡️electrocuted himself with the 🔋battery while we was taking it out with a 🔪 knife. 💀 Rip grandpa 😔

    Corban Bennett -

  4. NDaL1FwfgpipXktP
    NDaL1FwfgpipXktP
    ED2niUPcvZGc6RIq
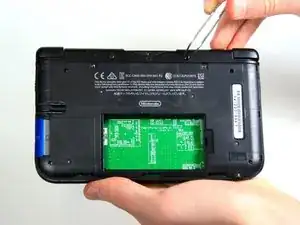
    • Links und rechts vom Einschub für die Cartridges befinden sich oben zwei Gummifüße. Entferne sie mit einer Pinzette.

    I found that the rubber bumps don't move easily, you'll likely have to use a lot of upward force to move them.

    jconnell85 -

    I torn one of the bumpers because I used a needle instead.

    luxusmirajane -

    You do have a pry a bit. I tore one a little but not that big of a deal.

    Christopher -

    I think the ease of this step would be subject to the age and condition of the 3DS. Mine came out with minimal leverage using my nails.

    infmz -

    try twisting upward

    Kmi Nguyen -

    I used a super tiny metal screwdriver to push the bumper against one side and then used the screwdriver to push it up and out

    S Maduras -

    I tried tweezers but they were scraping against the plastic and I didn't want to leave any marks. Ended up using a tiny flat screwdriver to get them out like S Maduras said. Once I got them out I noticed there was a tiny bit of glue on the bottom holding them in place.

    Anth Rodi -

  5. TCb3gX1x3AIQipCO
    TCb3gX1x3AIQipCO
    ZUBt6MsBLfRC1bRg
    • Entferne sechs 6,2 mm Kreuzschlitzschrauben # 00.

    #000 ifixit philips screwdriver does not fit the 6.2mm screws. Whats the deal?

    sevenethshinobi -

    I have a 000 Phillips from tekton and it worked just fine.

    Megan -

    I stripped a good #000 screwdriver, and found that EVERY screw actually fit perfect and snug with a #00 screwdriver. Zero damage to the screws or the screwdriver with the #00.

    Vannicke Trabeitt -

    Don't buy the #000 screwdriver from this site! It's poorly made and strips the screws. I had to drill the screws out and replace them, it was very tricky and nearly broke my DS. Get a screwdriver from an electronics store.

    sharga -

    I bought and used the #00 screwdriver, and it worked perfectly for this.

    I had also bought the #000, but I never needed it during the entire operation.

    jconnell85 -

    All 6 screws are exactly the same so you don't have to worry about mixing them up.

    Christopher -

    One of the screws in my 3ds XL seems to have its '+' engraving worn off, i can't seem to unscrew it, though the other 5 unscrewed properly. What should I do?

    Potato Man -

    J000 works better here.

    Dom -

    I stripped a screw in my 3ds xl and don’t know how to get it out. Do I have to use a drill or is there another way?

    Troy Czaban -

  6. lwAJqibixLXNUTvp
    • Entferne die 2,3 mm Kreuzschlitzschraube #00 über dem Einschub für die Cartridges.

    between these two steps, the bottom two screws are not mentioned. make sure to take those out too ;)

    anthony pullano -

  7. MZdsuNoC12SfAQg2
    MZdsuNoC12SfAQg2
    j4KlaO4YjMZXQMr1
    egELWOpQy2ZM2GaK
    • Sei sicher, dass die SD Karte entfernt ist. Fange an der Unterkante an das untere Gehäuseteil mit einem Plastiköffnungswerkzeug abzulösen und gehe rings um das Gehäuse.

    • Zwei Flachbandkabel verbinden das Gehäuse mit der Hauptplatine. Ziehe nicht zu fest am Gehäuse damit die Kabel nicht beschädigt werden.

    Make sure that you have removed your SD card, otherwise that'll keep you from completing this step.

    jconnell85 -

  8. ML2lLyhIAkqvwZ6M
    ML2lLyhIAkqvwZ6M
    vUOOFyrWcTD5U3Uc
    QHCGlYtRbFsLEEwm
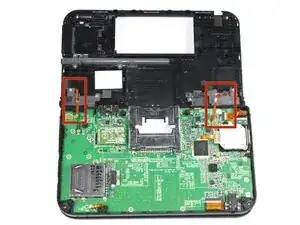
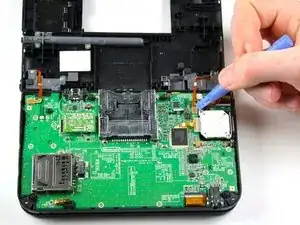
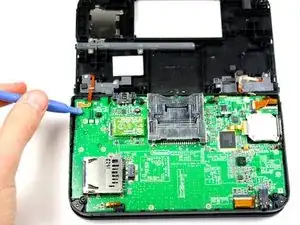
    • Unter den rechten und linken Tasten befinden sich zwei Flachbandkabel. Löse die Verbinder mit einem Plastiköffnungswerkzeug.

    • Entferne das untere Gehäuseteil vom Gerät und lege es beiseite.

    The IR board is facing the wrong way.

    Jordan -

    Thank you so much for pointing that out, it was keeping my system from starting up and I thought I blew it!

    Ryan Hescock -

    Yup, that is definitely an upside-down IR board, and will result in a silent post error. It was driving me crazy trying to figure out why the system wouldn't start up.

    alexmouravskiy -

    That's it!! Thanks so much!! I've tinkered around about one month and couldn't get this thing to work...all because I've followed the guide here and looked the picture up twice so I don't put the IR-Board in the wrong way...

    chfreydank -

    Hehe. That would explain why it was not working ;-)

    boma40 -

    Thank you guys so much! I followed everything faithfully and it was DOA on startup. (Black screens, blue light). The IR board was backwards. These pictures need to be fixed. As-is, it shows a broken 3DS.

    jtmuehlbauer -

  9. nLUoPQfoGUNaBU3D
    nLUoPQfoGUNaBU3D
    gALvDvwpnAVUwYfJ
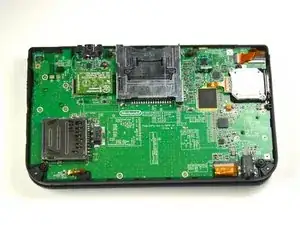
    • Lege das Gerät mit dem Einschub für die Cartridges nach oben.

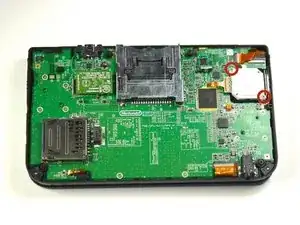
    • Finde das Schiebepad auf der rechten Seite.

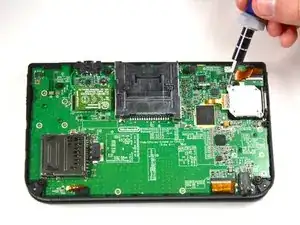
    • Entferne die beiden 7,5 mm Schrauben oben links und unten rechts.

    This IR is bad side, diode IR must be UP

    patholog -

    Careful you don’t lose the little washer on the circle pad stem. It’s not held down by anything.

    edwardsgreg -

  10. CI62DGXtCSkNx26o
    CI62DGXtCSkNx26o
    W66IMNEFjpu6mMYa
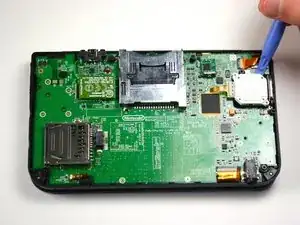
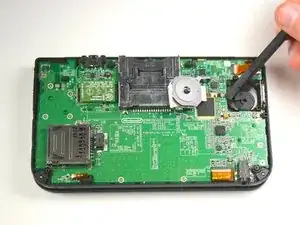
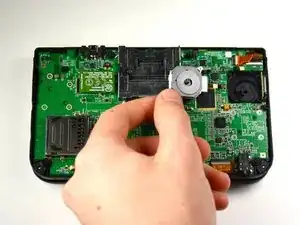
    • Hebe das Schiebepad mit einem Plastiköffnungswerkzeug heraus.

    • Wende dabei nicht zu viel Kraft an. Ein Flachbandkabel verbindet noch das Schiebepad mit der Hauptplatine.

    • Zwischen dem Joystick am Schiebepad und dem Schiebepad befindet sich eine Unterlegscheibe. Achte darauf und verliere sie nicht.

    I found it easy to put my finger ontop of the board and apply a little pressure. When i popped off the board, my finger stopped it flying off.

    Chris Ramsay -

    I made a small mistake by popping the circle pad joystick and it went flying off and now im stuck trying to put it back in

    magnus munoz -

  11. CdVVBuCTeyDO5mZT
    CdVVBuCTeyDO5mZT
    QynH2EYVTOOVVjMR
    • Klappe den Sicherungsbügel am Verbinder des Flachbandkabels zum Schiebepad auf der Hauptplatine mit dem flachen Ende des Spudgers hoch.

    • Löse das Flachbandkabel und das Schiebepad.

    The 'flat head' holds it in place when down, and you can reattach your ribbon cable when it's up, it only needs to be partway in so when you close the flat head, if your joystick board can't move easily in place then you've done it right, it it's too loose, try again to work the ribbon cable under.

    jconnell85 -

    The ribbon goes into the left side of the "flat head" right? Not the end that clamps down on the right? I'm having a !&&* of a time sliding the end of the ribbon into the little space between the flat head when it's up and the side of the terminal.

    Sedroc Djeddi -

    For those of you like me, who got stuck after the last step.

    To understand how to actually remove the circle pad, continue with these steps at 21.

    Nintendo 3DS Schiebepad austauschen

    Hope it helps those after me. I almost ripped some cabling inside thinking I had to take out the motherboard.. luckily I didn't.

    monk333y -

    Just as what monk333y said, follow the Original 3DS steps. They are identical and you don't have to remove anymore big parts. The only annoying part is taking out the circle pad.

    luxusmirajane -

    I broke the retaining clip. It is not very strong and I used a bit too much force i think in opening the clip or pushing it back down. Thinking of using hot glue or something else to keep the circle pad ribbon in place.

    Lawrence -

    Did the hot glue work? I did the exact same thing now im not sure what to do…

    Matthew Johnson -

    How do you re attach the ribbons? do the just snap right into the motherboard?

    petraogan -

    thank you monk333y, the author of this guide needs to correct a couple of things and how hard would it be for her to add steps 21 onward from the other guide?

    S Maduras -

    step 11, if you're just replacing the button, you don't need to disconnect the circle pad ribbon from the motherboard.

    S Maduras -

    During re-assemblhy, note that the peg between the joystick mechanism and the circle pad is rectangular, and must fit into the matching rectangular socket on the circle pad.

    Dan -

    When testing the touchscreen, make sure you install the analog. Otherwise, the screen will act erratic. Thought I broke a brand new part. Just a heads up!

    Hassan Sinanan -

    The entire top part of my circle pad had broken off, so I had no problem getting the old one out. I actually had more trouble getting the ribbon cable back into the clip, and the new circle pad attached to the stick, than any other part.

    That said, this was way, way easier than I expected it to be.

    Emtu -

Abschluss

Um dein Gerät wieder zusammen zu setzen folge den Schritten in umgekehrter Reihenfolge.

Charlene Donlon

Mitglied seit: 08/04/14

9809 Reputation

26 Kommentare

Thank you very much.Perfect repair the circle pad.

The circle pad link:http://www.ebay.com/itm/Genuine-New-Anal...?

mouyi chen -

Great guide, just upgraded my joystick. Bought my replacement from shapeways. The replacement is metal so it won't break like the last one. Also it's a lot more comfortable.

Anyway highly recommend this replacement:

https://www.shapeways.com/product/76RHQ7...

Omniwheel -

I'm having trouble removing the plastic case in step 7, it seems it refuses to come apart at the SD card part. What should I do? What is holding it down?

brittanylikespie1 -

Remove the SD card

Daniel Sze -

My son broke the circle pad on his 3DS XL while playing Super Smash Bros.. I purchased 2 circle pads just in-case from http://www.ebay.com/itm/Genuine-New-Anal...

Excellent replacement, just like the original circle pad. The write-up and pics were very helpful. Highly recommend for anyone needing to buy and replace the circle button on a 3DS XL.

RickyB -
When removing the circle pad joystick in Step 10, my ribbon came off of the piece that is attached to the motherboard. I tried attaching it back and turned my 3DSXL back on and the connection was making the select tool jump sporadically on my screen without me moving the circle pad at all. Is this fixable or do I need to send my 3DSXL to Nintendo?

Karen McLucas -

http://m.ebay.com/itm?itemId=19159304393...

I received my circle pad from this seller.

luxusmirajane -

You need to remove the SD card before step 7. I was struggling to flip the back cover until I realized the SD card was in the way. Instructions otherwise were excellent.

It takes very little prying to take off the back plate and back cover once the screws are off. If you have to force it you are probably doing it wrong.

zlandar -

This Screwdriver is too big for the screws in mine. Maybe it's a later model or something, but keep that in mind.

Allison Hunt -

I'm having trouble with the first two screws and I'm using the right screwdriver. The right turned easily but I'm having trouble with the left. No matter how I turn it it won't budge I think I've ruined the screw. What can I do to turn it or fix this?

Semeki Izuio -

Well a small but large enough problem is that there are 2 variation for 3ds XL circle pad and the screws will not aligned unless it is screwed into it self.

James Betker -

Couldn't get the ribbon for the joystick back on and the plastic retaining flap broke as I applied pressure. Should have sent it to the pros. Also the guide doesn't say what to do to actually install the joystick. Otherwise useful until that point, bit bummed that I destroyed my 3ds despite being very careful.

Jeff H -

How do you replace the circle pad itself? not the joystick.

Thanks.

hlhr -

Just registered to add my thanks for this - absolutely brilliantly easy guide to follow which has (together with replacement circle pad for $2 on ebay) made our son extremely happy to have his 3DS back again! Thanks!

Alastair Campbell -

Thanks. A well-organised guide, very good pictures, and every step explained.

BUT

For a guide headed "Circle Pad Replacement" it completely fails to show how to actually replace the circle pad! (Which is why *we are all here*!)

Luckily I flicked across to another guide that gave me the clues I actually needed. (quiet "yay!")

Two more points:

1) There is no instruction advising us to remove the SD card. Would have helped (a lot).

2) With all the covers off, and while turning it over to insert the circle-pad, it is possible for some parts to simply drop out. The little corner thingies for attaching a carry/safety strap. Not essential to its function, sure. But still. That info could have helped me. (I found it on the carpet five minutes after I thought I had finished.)

Cheers

G

Ged Maybury -

My battery won't charge after doing this... Please help

brentgarciar -

i was following the guide and a small square shaped object with rounded edges came off and im not sure where it came from any clues?

Jose Soto -

My ribbon cable tab came undone, I have used 5 others and cant seem to get it on, I have used sticky tape to connect it but doesn't connect properly what do I do, I am very frustrated at this point.

Kaleb Overmars -

Hi there,

I just used this walkthrough to replace just the outer pad tip/top (brushed steel from Shapeways.com), not the whole module. While your instructions were very helpful for the steps involved in opening the case, you might want to adjust them to say that a 1.5 mm cross head works best to avoid stripping the tiny screws, instead of a pointy #000 Phillips head. Also, if you're just replacing the outer pad, you don't really have to do step 11 (and disconnect the module thingy entirely from the board) - all you have to do is pull the broken "joystick pad" part out of the hole once you unscrew the module, open the DS carefully from below (so as not to lose parts from the underside), twist the replacement pad into place, making sure to include the washer you mentioned around its base (between it and the casing), then close the DS again, pop the module connected to the board back onto the underside of the "joystick pad", then screw it back down, insert the battery and SD card, and close up the casing.

Feather Elfstrom -

do i need to replace the circle pad ribbon?

Haruhiko Akimoto -

Why didn’t you include the most important last step of this: DO NOT REMOVE THE RETAINING CLIP THAT HOLDS THE CIRCLE PAD RIBBON IN PLACE. SLIDE THE OLD RIBBON OUT AND SPLIP THE NEW ONE IN, THEN CLOSE THE CLIP. Thanks to leaving out this very important detail, we have to buy a new circuit board. That clip is impossible to put back and there’s no way to get that ribbon to stay in place without it.

Sarah -

excellent guide, I broke my circle pad playing terraria and after months of delivery of wether to do it myself of pay to fix it I find the guts to do it. your guide turn the scales on my favor, really easy to follow and even better ilustrated.

Rodolfo Paz Martínez (Dr Paz) -

My joystick was sticking and refusing to move in the “down” direction. Wiggling it to try and fix it the joystick broke at the top as well. The washer was cracked underneath (original problem) and beyond repair. I need to order the replacement joystick but I’ll also need a new washer; as it was fairly flimsy and the pieces fell apart after the joystick top broke off I don’t have even a cracked one to take in to any shop… can someone point me to where I’d find a comparable (or better) replacement washer?

Christopher Minshall -

Hi, would you ever please make a tutorial for a New 3ds XL? Thank you

Anrei -

Not that it was too hard to figure out, but there seems to be a final step missing - the actual plastic thumb stick has a C shaped thin film washer which needs removing with tweezers, after which the stick can be carefully removed by twisting the underside so that one edge works its way to the surface side of the case, and then turning around it works the rest of it loose.

Laurie Chilvers -

I followed the guide, which was extremely helpful, and replaced the joystick. But now it does not recognize up and down, only side to side. I took it back apart to ensure the ribbon cable was fully secured, and it was, so I’m at a loss for what could be wrong. Does anyone have any ideas?

simodan10 -