Einleitung

Hier wird der Austausch der Hauptplatine gezeigt.

  1. aWptGiRVTeq1GLPj
    aWptGiRVTeq1GLPj
    X2DlKA2PHkWZSJno
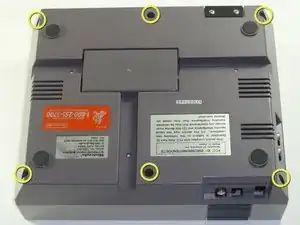
    • Entferne die sechs 13,25 mm Kreuzschlitzschrauben an der Bodenplatte der Konsole.

    • Die Schrauben sitzen 40 mm vertieft.

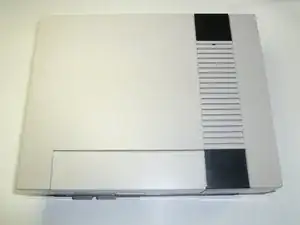
    • Drehe die Konsole herum und ziehe das obere Gehäuseteil vom Rest des Gerätes weg.

    the outside screws are a little deep, plan ahead :)

    Joseph McCord -

    Why use a slotted driver? The screws are phillips. Both #1 and #2 work for me.

    kmcrawford111 -

  2. WlRGREqDfRX5XcTU
    WlRGREqDfRX5XcTU
    IwactFKPXGkwbdmR
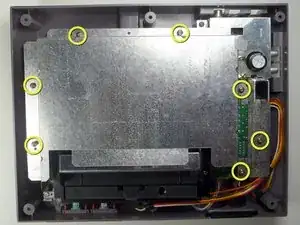
    • Entferne sieben 13,25 mm Kreuzschlitzschrauben #2 von der Metallabdeckung.

    • Ziehe die Metallabdeckung mit den Händen hoch und vom Rest des Gerätes weg.

  3. U3hHS514sOOJGH4O
    U3hHS514sOOJGH4O
    LMEuSKjdCqqnWLcu
    1EOlwLWfUKBQLetP
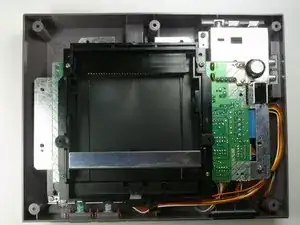
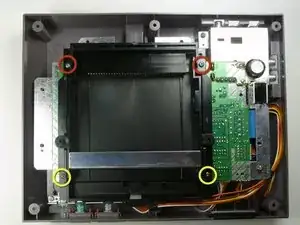
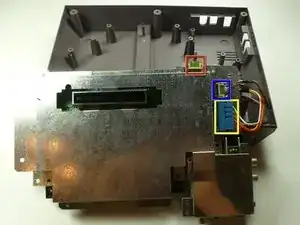
    • Entferne die beiden silberfarbenen 17,25 mm Kreuzschlitzschrauben #2 vom Einschub .

    • Entferne die beiden bronzefarbenen 13,25 mm Kreuzschlitzschrauben #2 vom Cartridge Einschub .

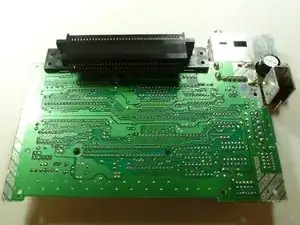
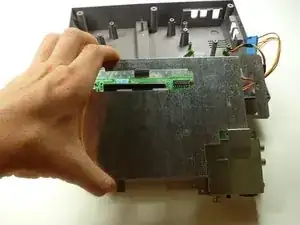
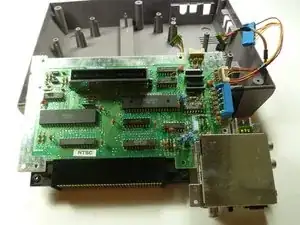
    • Schiebe den Cartridge Einschub zu dir , weg vom 72 Pin Verbinder und weg von der Einheit der Hauptplatine.

    There may also be two short/yellow screws at the upper (back) right and left of the cartridge tray.

    Jay -

  4. bR5tFq2ubQKbsQdy
    • Unter dem Einschub ist eine Lasche/Lippe, im Bild markiert.

    • Achte darauf, dass diese Lasche unter der Hauptplatine passend zur Richtung mit dem Oberteil des Einschubs verläuft. Wenn das nicht stimmt wird sich der Einschub verbiegen und zu stark beanspruchen.

    This is so unclear! I have no idea what tab this step is referring to.

    trevorsklar -

    So, it’s a year later, and I have a lot more experience with this system now. The front of the cartridge tray needs to hook under the edge of the board.

    It’s much easier to get the tray on and off if you just make sure the board is unscrewed from the case. Then pick the board up a little and the tray should be much easier to slide on and off.

    trevorsklar -

    Me too... No idea whatsoever

    zac -

    its when your replacing the cartridge tray, if u do it wrong the tray will feel like it's bowing up in the middle, like when u put in the screws u have to press the tray down to get the screw holes to line up / be flush, if u get the lip underneath to catch correctly there will be no issue/bow u wan't have to press down on it, or make the screws pull the tray to the motherboard, instead the tray will be flush with no pressure applied, i had no idea what he meant either until i was reversing the steps.

    Joseph McCord -

    also not all NES are the same underneath, my tab was much less noticeable and i had one less screw to get the shield off then he showed. and 2 less screws to remove the cartridge tray.

    Joseph McCord -

    This seemed very unclear to me at first, until I tried to replace the cart tray. I apparently didn’t get the little lip under the mobo on my first attempt, and I noticed there was a pretty decent chunk of space between the front brass screw holes and their corresponding holes on the mobo. I reseated it, and the second time I heard a little click (apparently the lip going under the mobo). This time the bottom/brass screw holes were virtually FLUSH with the mobo holes. If you see a chunk of space between the cart tray and the mobo near the brass screw holes you didn’t get the lip under the mobo.

    Gary -

    I’ve added a new, better picture with additional clarification. Hope this helps.

    Steve -

  5. rohAFokIaTayMsCU
    rohAFokIaTayMsCU
    RkNYgOSWMtCgeWoj
    KZRgKExjUxhTZ6qQ
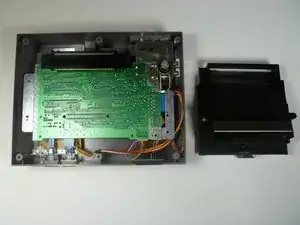
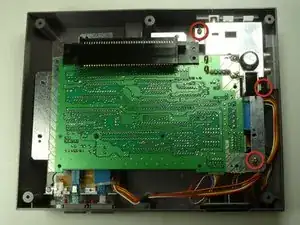
    • Entferne die drei 13,25 mm Kreuzschlitzschrauben #2 welche die Hauptplatine am Gehäuse festhalten.

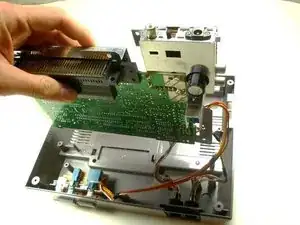
    • Hebe die ganze Einheit der Hauptplatine gerade mit den Händen hoch und weg vom Gehäuse.

    • Drehe die Einheit herum, so dass die Metallabdeckung zu dir zeigt.

    I did not have the bottom right screw on my NES

    if you look at step 2, that shield overlaps the place where the bottom right screw would be, so there's a big gap if you put one there!

    Devin Zuczek -

  6. 2duJSColf1CMSFsi
    • Löse das Kabelwerk von der Einheit der Hauptplatine:

    • Spieler 1

    • Spieler 2

    • Stromversorgung

    • Merke dir gut, welcher Anschluss Spieler 1 zu nehmen welcher Spieler 2 ist. Du kannst die Kabel markieren.

  7. Ae3sOlNCyfBEvBCA
    Ae3sOlNCyfBEvBCA
    mNetqQsCMM1VETiq
    XBEqCAQjfKieqs4F
    • Löse das Abschirmblech von der Einheit der Hauptplatine.

    • Drehe die Einheit der Hauptplatine um, so dass der 72 Pin Anschluss oben liegt.

    would have been really nice to show a Step 8 in pulling off the 72-PIN connector has i had to just guess that it would just pull off. it took a little force and at first i thought it was attached via something i was missing, Also anyone who wants to know when removing player 1/2 and the power and reset "big blue tab" don't pull on the wires but try and get your fingernail/jimmy on either side and nudge it going back and forth until you get some release a little, then go to other side and so same until you can get a better grip and just pull it out

    Joseph McCord -

Abschluss

Um dein Gerät wieder zusammenzusetzen folge den Schritten in umgekehrter Reihenfolge.

nicholasweiser

Mitglied seit: 23/09/10

2625 Reputation

8 Kommentare

What do I do if my console doesn't work at all I put a game in and the power light flashes on and off and or the screen stays on purple

Albert lopez -

Clean the 72-pin connector and cartridge pins

Fritz Geib -

What do I do if my console doesn't work at all the power light flashes on and off or it'll stay on but the screen shows purple what could be the

Albert lopez -

you need to change the cartridge connector (the one to the mainboard)

Brede Basualdo -

Hello can you tell me why my nes turns on but I don’t get any sound or picture of the tv.

Jay -

I got a question on the nes top case when will it be restocked

ShotJaw 555 -

I have an nes when i put the games in they stick and are very hard to pull out and only play in the upright position. if you push the game down it will not play. also when i put my rf switch in the back i get a picture but no sound. i tried the rf switch on my Snes and i got picture and sound so i think the rf connector on the back of the nes may be bad. i would like to know what i should do to fix it ? or would you recommend just buying a new NES i am building a game room and would like to get this to work again any help would be appreciated.

Tom -

what do I do if the power light flashes after I have cleaned the connector and cartridge pins I’ve had it all apart cleaned everything

Rosemary Sexton -