Einleitung

Benutze diese Anleitung, um das äußere Gehäuse aus weißem Kunststoff an der Wii zu entfernen. Du benötigst dazu einen TrWing Schraubendreher.

  1. nAy3OhXSoOfu4ijL
    nAy3OhXSoOfu4ijL
    c15NIW3ZpSXgdFZe
    • Entferne mit einem Metallspatel die weißen Schraubenabdeckungen, die im Gehäuse unten an der Vorderseite des Wii stecken.

    Die Abdeckungen sind geklebt, stecken also nicht.

    Ludger -

    Don’t mistakenly remove the rubber case feet

    Bob Trout -

    I just did. That picture could be better.

    B G -

    Thanks I almost removed the rubber feet

    Lushane -

    If you’re wondering what to use for this, the main blade of a pocket knife from the corner of the plastic works well.

    Cameron Holman -

    As you remove the hardware in each step, place them together on a sheet of paper and circle them with the step number.

    Tom J -

  2. QLLTmVQpby6q1oKX
    • Entferne die beiden 8,3 mm TriWing Schrauben unter den eben abgelösten Abdeckungen.

    Before you start, get a small plastic tray with at least 15 small bins in it, and put the screws you take out in each step in the bins in order. It makes reassembly a LOT easier.

    larry -

    NOTE: You need a Y1 screwdriver. Be careful when buying the little red screwdrivers on Amazon that claim to fit the Wii - they don’t!! From personal experience.

    Robotai -

    Just to add to Robotai’s comment, if you do get the little red/orange screwdrivers on Amazon, file off the tip. It if’s mostly blunt, it fits the tri-wing screws much better.

    jeff -

    1/16 x 1 craftsman Phillips mini screwdriver works for this if you don’t have the tri-wing driver

    grace nicosin -

    How do you make one ? If you don’t have the screwdriver

    Ethan -

    I am using a 18ct empty egg carton to hold the screws/parts removed in the steps.

    karenmparamore -

    Larry’s idea about the bins was great and helpful.

    Robots is right- you NEED a Y1. Just buy the thing with the drive. I didn’t, tried many other options, none worked. Had to order the thing separately with shipping. Mistake….

    David Ryan -

  3. wjvAQVg1yyeAi1pU
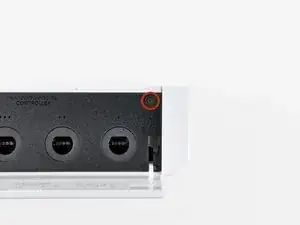
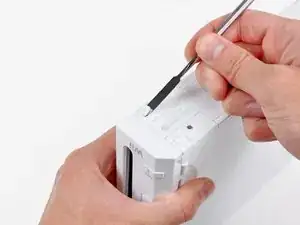
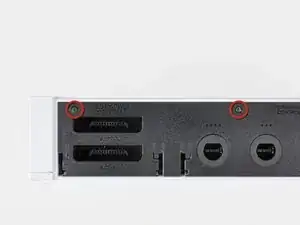
    • Entferne die einzelne 5,9 mm Kreuzschlitzschraube unter der Klappe für den Eingang des Controllers gleich bei der Frontplatte.

  4. ghUThgil3vmDoPcV
    • Entferne mit einem Metallspatel den Gummifuß auf der Seite der Wii in der Nähe der Öffnung des DVD Laufwerks.

    All of the rubber feet on my very old Wii had literally melted into a gooey mess and just needed to be scraper off and cleaned with alcohol.

    Bob Robins -

  5. mhVTpcmCaFExhNaO
    • Entferne die einzelne 5,9 mm Kreuzschlitzschraube unter dem eben entfernten Fuß.

    please help! my lil sis got a disc stuck in my wii while it was off!!! please help fast!!!

    Leah Vegan -

    does it turn on?

    Giovanni Munoz -

  6. i1WPurAjixkuIcDK
    i1WPurAjixkuIcDK
    xygEtkVuunWqi4dd
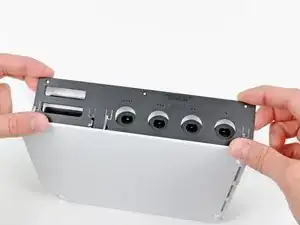
    • Ziehe die Frontplatte vorsichtig von der Vorderseite der Wii weg.

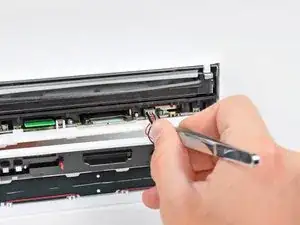
    • Löse den Plastikverbinder am LED-Kabel mit der Pinzette von der Hauptplatine.

    • Entferne die Frontplatte.

    surprisingly, this was the trickiest step for me. I almost completely mangled the wires when my tweezers slipped as I was attempting to remove the connector.

    rbelknap -

    I removed it with a spudger, gently lift from each side until it pops out.

    For those reassembling

    line up the pins push it in with your spudger gently until it's in. Then line up the front plate, push gently, confirm everything is where it should be and push firmly, I found it needed a strong push to sit flush with the other body panels.

    James middleton -

    I ended up using needle nose pliars on this step.

    Awesome detailed guide made this very easy, thank you author!

    Glenn Woodard -

    Can someone direct me to what I need to do? My tweezers slipped and I cut one of the wires on the connector. Where can I find a new Y plug for the wii?

    jaredslaweski -

    I also broke my wire trying to use tweezers. I should have known better. I use (normally do) a spudger on one side and my fingernail on the other to gently pry these types of connectors out. I ended up buying a replacement faceplate on ebay.

    Tyler -

    This was the hardest part for me. I tried using my fingernails, two different tweezers, and needle nose pliers, but I ended up cutting both the wires. Anyway, I put some electric tape over the exposed wires and just reassembled the system. Funny thing is that the LED still works and I have not noticed any difference. I'm not sure what those wires did, but they seem to not be important.

    Nick -

    For people still wondering after all these years, :), The connector is for the blue leds around the dvd when loading and unloading a disk.

    Niels -

    I also broke off the flimsy wires at the connector. To NOT break the wires, alternate pressing on the right and left sides of the connector with a small flathead screwdriver. Be patient, it will eventually work itself free. There isn't enough to grab onto with the tweezers and you'll only succeed in having them slip off, grab the wires, and yank the wires out.

    Good news is that if you do rip out the wires, no worries... I didn't reconnect them and the unit works just fine. I have no idea what those wires are even for. Power LED continues to work no problem.

    jasendorf -

    I used two small flat head screw drivers, one on each side to pry out the connector. This created less pressure from me and reduced my chance of cutting the wires.

    mulkey -

    This guide is really marvellous - works a treat. But I would definitely recommend needle nose pliers for this step rather than tweezers. It's really easy if you use pliers and potentially damaging if not, and you get it wrong. I had one sniff at it with tweezers then immediate nipped out to the garage for my pliers!

    thepitcanary -

    Definitely a tricky step with that connector. I also cut broke the wire accidentally and was going to just give up trying to fix the Wii. However, as others stated the Wii works just fine, including the lights. I do wonder what those wire are for.

    darcaesar -

    I also had a lot of trouble trying to get the connector off with tweezers. Ended up leaving it attached. It does not really get in the way of remaining steps.

    Ron Even -

    Needlenose pliers did the trick for us!

    Ron Cormier -

    Needlenose pliers did it for us!

    Ron Cormier -

    You can save yourself some trouble at this point and skip the rest of the disassembly: See that green tab to the left of the sd card slot? THAT’S the wifi board (and that green tab, in hindsight, seems designed to make it accessible without taking apart the whole device, don’t you think?) A little careful spudging, and you’ve got it out, ready to replace! (There’s a guy who shows the process on youtube, if you want to review first)

    Will -

    I got the connector out ok thanks to the suggestions here, but I couldn’t figure out how to reattach it. In the end, I just kind of threw it in and it worked fine.

    Christine Wittmer -

    Very clear instructions - thanks! Faceplate needed replacing after one of my son’s friends accidentally kicked it across the room. $10 bucks to fix, thanks to ebay and these instructions. I’d never heard of a “tri-wing” screw before.

    LInda Rawlins -

    I just left the connector alone and kept it connected while working on it. There is enough wire to allow you to do what you need if you are just careful not to snag it on anything.

    Michael Payne -

    This was the trickiest part, I almost broke the wires using tweezers and pliers, so instead use a flat end screwdriver to pry it out, when putting it back in use needlenose pliers to start it then use your fingernail to go the rest of the way.

    grace nicosin -

    After I got the connector out I noticed the little locking flap on the top side of the connector. I think prying this first is the key to easier removal.

    Will B -

    Anyone know of a method to replace the connector if you end up breaking the wires? Bits of wire are stuck in the white plastic connector, so I'm wondering if I can buy a connector online somewhere without replacing the whole face plate. Thanks :)

    Bronze Owl -

    I severed both wires. If you want to avoid removing the connector, you can lengthen the two wires by unserpentining them from the wire holder that's in the cover.

    Griff Derryberry -

    Make sure there is no SD card in your unit before pulling this off, otherwise it'll get stuck and you could snap your sd card in half!

    carlosahiciano -

  7. GZYIO2iirMcnTBQL
    GZYIO2iirMcnTBQL
    PbD4A5VBcsLJ1tYW
    GAwGa1hgtnKuiPFs
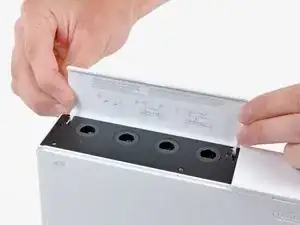
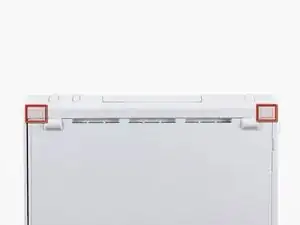
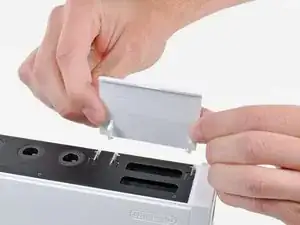
    • Öffne die Abdeckung über den Controller-Ports bis sie rechtwinklig zur schwarzen Blende ist.

    • Ziehe die Abdeckung gerade heraus und löse sie vom äusseren Gehäuse.

    • Wiederhole diesen Schritt für die Abdeckung über dem Anschluss für die Speicherkarte.

  8. 5gH2SPFFYhQLXoZ2
    5gH2SPFFYhQLXoZ2
    UGivIc4L2ejQD3mv
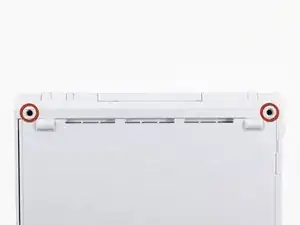
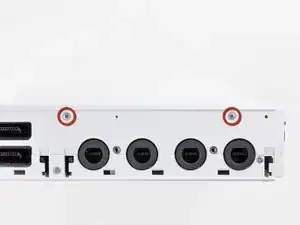
    • Entferne die beiden 4,1 mm Kreuzschlitzschrauben am oberen Rand der schwarzen Kunststoffblende der Controller-Ports.

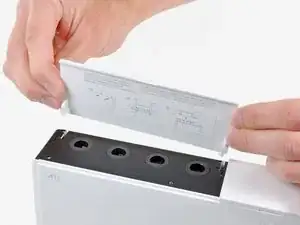
    • Hebe die Blende der langen Kante gegenüber den Controller-Ports hoch und entferne sie von der Wii.

    The 3rd hole is in step 3.

    James middleton -

  9. gVM15IknBqyYY5sO
    • Entferne die beiden 5 mm Kreuzschlitzschrauben über den Controller-Ports.

  10. BCYHR1CYxUkGSIAM
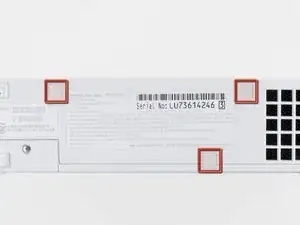
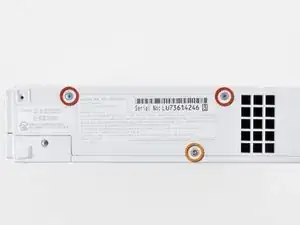
    • Entferne mit einem Metallspatel die drei markierten Schraubenabdeckungen auf der Seite der Wii.

  11. vrshxvpywjLhpKLT
    • Entferne folgende Schrauben:

    • Zwei 5 mm Kreuzschlitzschrauben

    • Eine 8,2 mm Tri-Wing Schraube

  12. jSyMwWqvjWCBPTxE
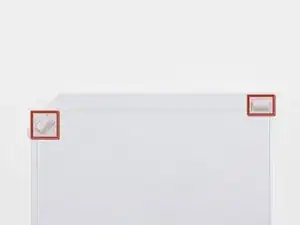
    • Entferne mit dem Metallspatel die beiden Gummifüße in der Bodenplatte in der Nähe der hinteren Anschlüsse.

  13. UVFQ6pJvVMHKKHje
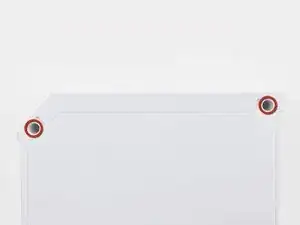
    • Darunter befinden sich zwei 8,2 mm TriWing Schrauben. Drehe sie heraus.

    • Eventuell benötigst du eine Verlängerung für das 4 mm Sechskantbit, um die Schrauben in den tiefen Löchern zu erreichen.

    had a little trouble with theses screws. they were just barely too deep for my 54pies bit driver kit to reach. I ended up inserting a small wad of paper into the shaft of my driver so the tri-wing bit stuck out far enough to engage the screw. (I used the tweezers to remove the paper when I was done) :)

    rbelknap -

    I can confirm, this works fantasticly!

    Thank you

    James middleton -

    When putting the screws back in hold the tip still with the screw and carefully drop it in.

    James middleton -

    Thank you rbelknap, this is excellent advice for those using the ifixit branded driver.

    George Squires -

    You could also use the 4mm nut driver in the iFixit kit to turn the tri-wing driver. This will give you a little more reach.

    Edward Tucker -

    How is no one talking about the included 4mm nut driver trick at Edward Tucker mentioned?! That is genius! Thanks mate!

    Zabuza -

    That's the idea that I needed. Agree with Zabuza.

    cwdick -

    Bingo. All of the other comments were unnecessary.

    Tony Shannon -

    This paper wad trick totally worked for me too!

    anonymous 779 -

    Standard Tri-Wing bits will NOT fit into the holes. Make sure that you get one of the tool kits from iFixit (I just ordered the Mako Driver/Bit kit with 64 bits ) - the Tri-Wing bits in this kit have a narrow shaft that allows it to reach deep into narrow holes like these on the Wii . (Disclaimer - I have no association with iFixit).

    dave whale -

    I just sawed off a bit of the shank holder from the iFixit tool, in order for the bit to go deep enough into the case.

    The tool still works fine.

    Alan Walker -

    Thanks for the paper wad trick advice! Worked perfectly with my Wii

    Finder352 -

    The 4mm driver was the exact fix for this problem, no mods necessary

    Tony Shannon -

  14. mymDLxDWlRsB4vHW
    • Hebe das äußere Gehäuse vom Rest der Wii weg.

    This step could use at least another picture from the backside so it's clearer what comes up and what stays down.

    Jose Vazquez -

    I used a spudger around the edges of the outer case to gently ease it upward since I could not lift it out with my fingers. Then it came right out.

    Marko -

    hey marko that really helped me thanks\. als if you need help figuring which side is up, its the one with the nintendo engraving on it

    Aryan Garg -

    A fan filter fell out at this step how do you put it back?

    Edit: I figured it out it was from the side intake vent. Just line up the two notches with the pegs in the case to hold it in place

    Darren Jones -

Abschluss

Um dein Gerät wieder zusammenzusetzen, folge den Schritten in umgekehrter Reihenfolge.

Andrew Bookholt

578335 Reputation

3 Kommentare

Great guide. I had no problems.

wewomack -

Ugh, I went and purchased an iFixit Essential Electronics Toolkit and the Tri-wing screwdriver is too small! Y000 is what it says on the box, time to return this purchase.

iamstilllaughing -

Unfortunately this guide stops half way through and doesn’t include the other side of the case, which involves quite a few screws as the motherboard is screwed down in quite a few places, and the cpu heatsink has to come up, it’s much more complicated than this.

Lily Larceny -